透视变换
 日萌社
日萌社
人工智能AI:Keras PyTorch MXNet TensorFlow PaddlePaddle 深度学习实战(不定时更新)
CNN:RCNN、SPPNet、Fast RCNN、Faster RCNN、YOLO V1 V2 V3、SSD、FCN、SegNet、U-Net、DeepLab V1 V2 V3、Mask RCNN
车道线检测
相机校正、张氏标定法、极大似然估计/极大似然参数估计、牛顿法、高斯牛顿法、LM算法、sin/cos/tan/cot
相机校正和图像校正:图像去畸变
车道线提取:Sobel边缘提取算法
透视变换
车道线定位及拟合:直方图确定车道线位置
车道曲率和中心点偏离距离计算
在视频中检测车道线
5.3. 透视变换
学习目标
- 知道透视变换在车道线检测中的应用
为了方便后续的直方图滑窗对车道线进行准确的定位,我们在这里利用透视变换将图像转换成俯视图,也可将俯视图恢复成原有的图像,代码如下:
计算透视变换所需的参数矩阵:
def cal_perspective_params(img, points):
    offset_x = 330
    offset_y = 0
    img_size = (img.shape[1], img.shape[0])
    src = np.float32(points)
    # 俯视图中四点的位置
    dst = np.float32([[offset_x, offset_y], [img_size[0] - offset_x, offset_y],
                      [offset_x, img_size[1] - offset_y],
                      [img_size[0] - offset_x, img_size[1] - offset_y]
                      ])
    # 从原始图像转换为俯视图的透视变换的参数矩阵
    M = cv2.getPerspectiveTransform(src, dst)
    # 从俯视图转换为原始图像的透视变换参数矩阵
    M_inverse = cv2.getPerspectiveTransform(dst, src)
    return M, M_inverse
透视变换:
def img_perspect_transform(img, M):
    img_size = (img.shape[1], img.shape[0])
    return cv2.warpPerspective(img, M, img_size)
下面我们调用上述两个方法看下透视变换的结果:
在原始图像中我们绘制道路检测的结果,然后通过透视变换转换为俯视图。
img = cv2.imread("./test/straight_lines2.jpg")
img = cv2.line(img, (601, 448), (683, 448), (0, 0, 255), 3)
img = cv2.line(img, (683, 448), (1097, 717), (0, 0, 255), 3)
img = cv2.line(img, (1097, 717), (230, 717), (0, 0, 255), 3)
img = cv2.line(img, (230, 717), (601, 448), (0, 0, 255), 3)
points = [[601, 448], [683, 448], [230, 717], [1097, 717]]
M, M_inverse = cal_perspective_params(img, points)
transform_img = img_perspect_transform(img, M)
plt.figure(figsize=(20,8))
plt.subplot(1,2,1)
plt.title('原始图像')
plt.imshow(img[:,:,::-1])
plt.subplot(1,2,2)
plt.title('俯视图')
plt.imshow(transform_img[:,:,::-1])
plt.show()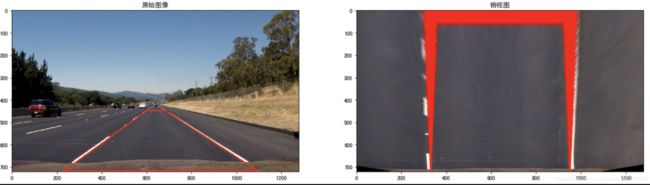
总结:
透视变换将检测结果转换为俯视图。