SpringBoot集成阿里云短信服务实现登录注册(超详细)
本篇博客采用得技术为:springboot + redis + aliyun短信验证
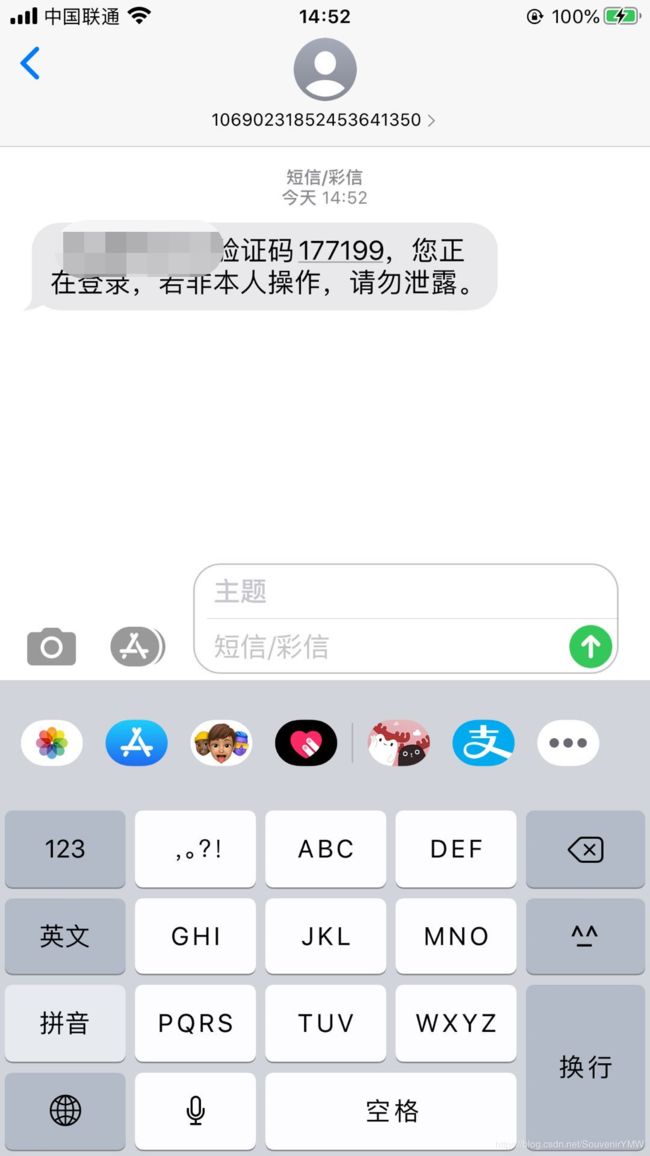
redis我用来做短信校验,首先我们先刨除redis部分做一个发送功能
登录你得阿里云账号
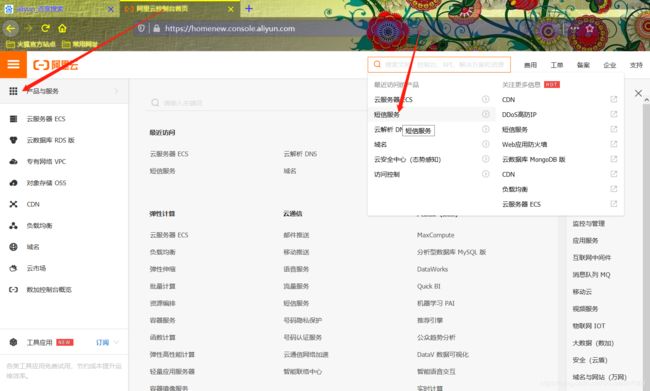
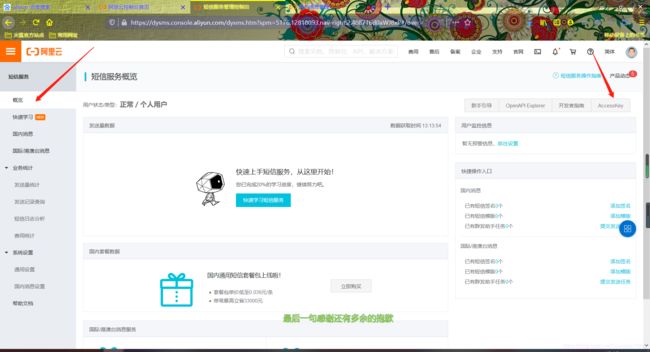
1 -> 控制台 2->产品与服务 3->短信服务
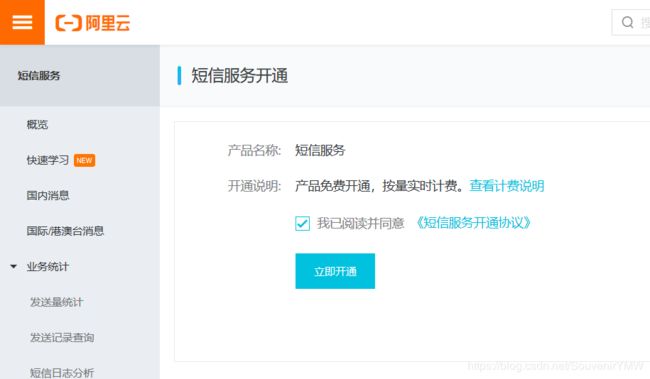
 4 -> 开通短信服务
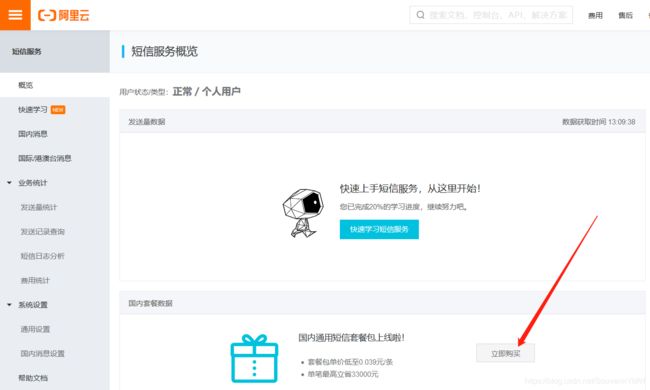
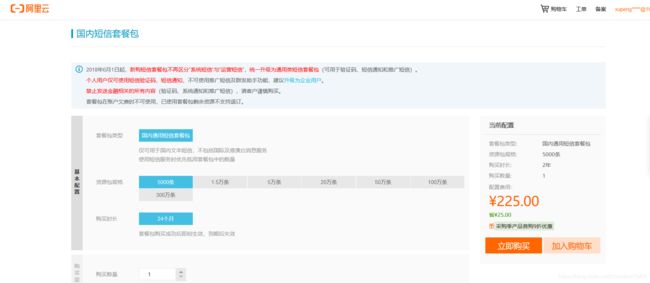
 5 -> 购买短信条数
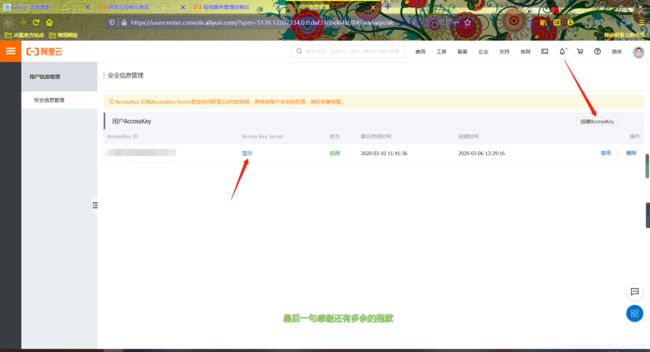
 6 ->创建你得AccessKey和Access Secret (这两个自己保存好,不要上传到开源项目)
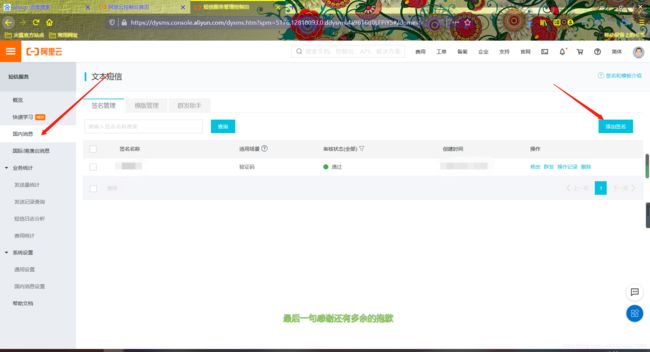
 7 ->创建你得签名 签名一般是指企业名称,也就是短信内得企业称呼
 8->创建你得模板,模板是你得短信内容,一般都为验证码 模板CODE是你的模板序列号
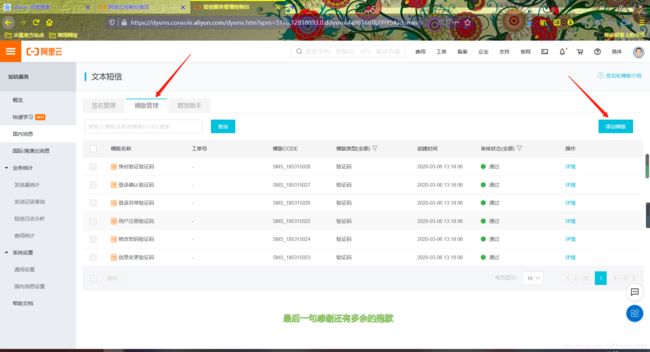 到此,短信购买得基本功能已经完善了
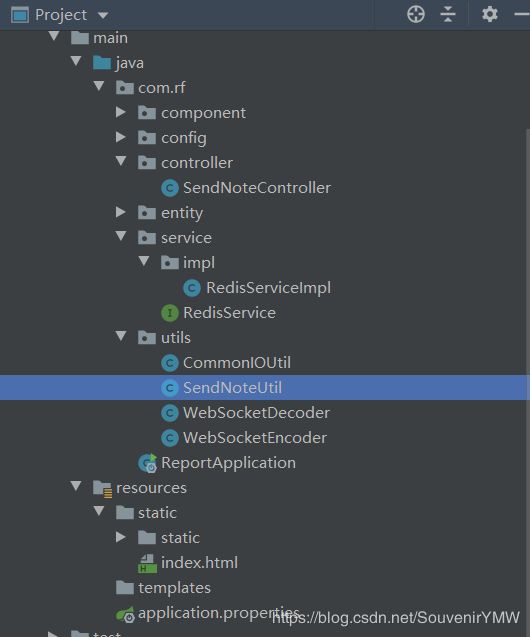
下面开始创建发送短信得工具类
第一步:Maven坐标
			com.aliyun
			aliyun-java-sdk-core
			4.4.0


			com.aliyun
			aliyun-java-sdk-dysmsapi
			1.0.0
第二步:发送短信得工具类
package com.rf.utils;

import com.alibaba.fastjson.JSONObject;
import com.aliyuncs.CommonRequest;
import com.aliyuncs.CommonResponse;
import com.aliyuncs.DefaultAcsClient;
import com.aliyuncs.IAcsClient;
import com.aliyuncs.exceptions.ClientException;
import com.aliyuncs.exceptions.ServerException;
import com.aliyuncs.http.MethodType;
import com.aliyuncs.profile.DefaultProfile;
import org.springframework.stereotype.Component;

import java.util.Random;

@Component
public class SendNoteUtil {

    //验证平台信息 开发者无需任何更改
    private static final String dysmsapi = "dysmsapi.aliyuncs.com";

    DefaultProfile profile = DefaultProfile.getProfile("default", "你的accessKeyId 参考第六步", "你得accessKeySecret 参考第六步");
    IAcsClient client = new DefaultAcsClient(profile);
	//这一步的两个参数,一个是要发送验证码的手机号 一个是模板Code用来区分登录注册
    public String sendNoteMessgae(String PhoneNumbers,String template){
     	StringBuilder sb = new StringBuilder();
        Random random = new Random();
        for(int i=0;i<6;i++){
            sb.append(random.nextInt(10));
        }
        CommonRequest request = new CommonRequest();
        //request.setSysProtocol(ProtocolType.HTTPS);
        request.setSysMethod(MethodType.POST);
        request.setSysDomain(dysmsapi);
        request.setSysVersion("2017-05-25");
        request.setSysAction("SendSms");
        request.putQueryParameter("PhoneNumbers", PhoneNumbers);//接受验证码的手机号
        request.putQueryParameter("SignName", "公司名称");//签名
        //模板代码,我暂时用的参数,你可以直接写成模板码,模板码参考第八步
        request.putQueryParameter("TemplateCode", template);
        //用户定义的验证码内容
        request.putQueryParameter("TemplateParam","{code:"+sb.toString()+"}");
        try {
            CommonResponse response = client.getCommonResponse(request);
            String returnStr = response.getData();
            System.out.println(returnStr);
            JSONObject jsonObject = JSONObject.parseObject(returnStr);
            //返回的信息
            return jsonObject.getString("Message");
        } catch (ServerException e) {
            return e.getErrMsg();
        } catch (ClientException e) {
            return e.getErrMsg();
        }
    };

}
第三步:书写一个Controller验证
package com.rf.controller;

import com.rf.utils.SendNoteUtil;
import org.springframework.beans.factory.annotation.Autowired;
import org.springframework.web.bind.annotation.RequestMapping;
import org.springframework.web.bind.annotation.RequestMethod;
import org.springframework.web.bind.annotation.RestController;
import javax.servlet.http.HttpServletResponse;
import java.io.IOException;

@RestController
@RequestMapping(value = "/api/note")
public class SendNoteController {

    @Autowired
    private SendNoteUtil sendNoteUtil;

    @RequestMapping(value = "/sendNote",method = RequestMethod.GET)
    public void sendNote(String phone, HttpServletResponse response){
        String template = "SMS_185315027";
        try {
            response.getWriter().write(sendNoteUtil.sendNoteMessgae(phone,template));
        } catch (IOException e) {
            e.printStackTrace();
        }
    }
}

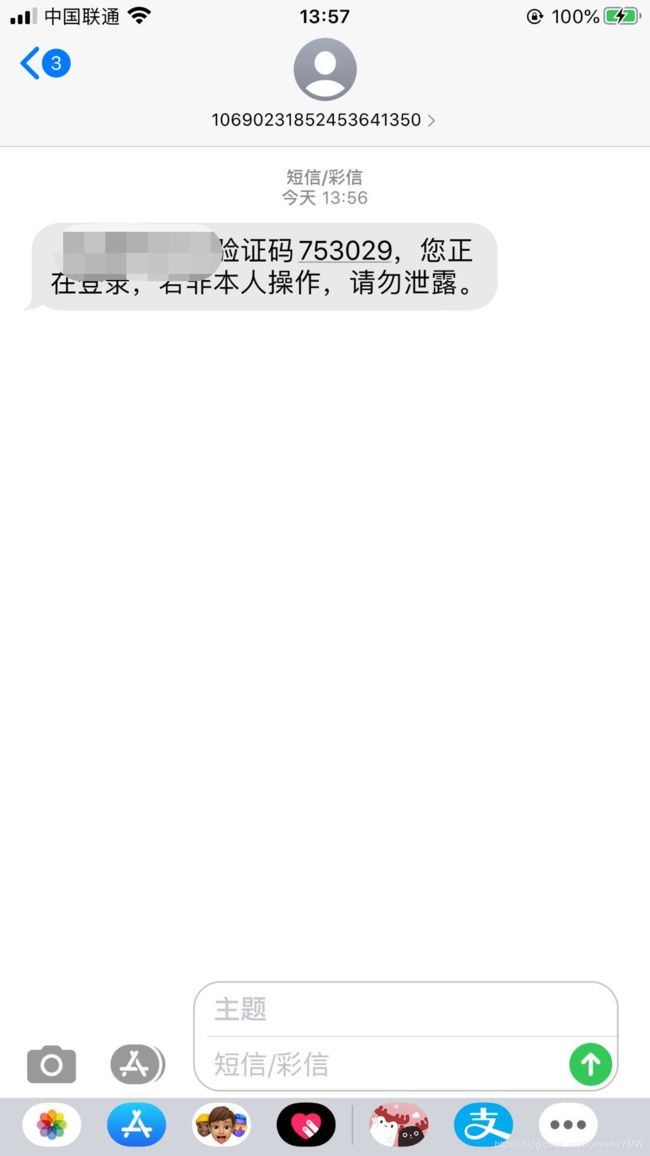 以上,发送短信的基本功能已经实现
下面整合 Redis 来做登陆注册功能
第一步:引入Redis 的 Maven坐标
            org.springframework.boot
            spring-boot-starter-data-redis
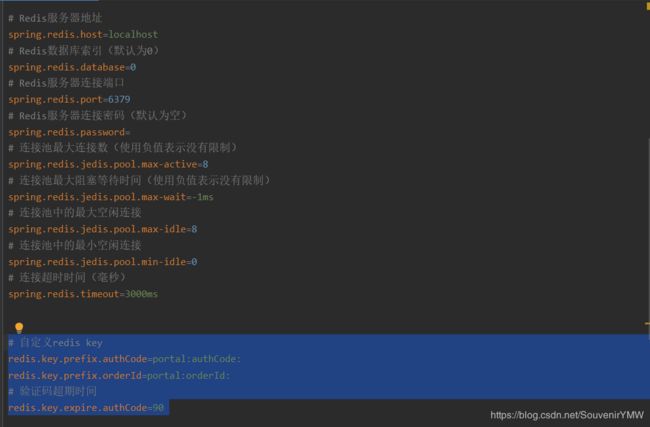
第二步:application.properties 或 yml内添加redis驱动
# Redis服务器地址
spring.redis.host=localhost
# Redis数据库索引(默认为0)
spring.redis.database=0
# Redis服务器连接端口
spring.redis.port=6379
# Redis服务器连接密码(默认为空)
spring.redis.password=
# 连接池最大连接数(使用负值表示没有限制)
spring.redis.jedis.pool.max-active=8
# 连接池最大阻塞等待时间(使用负值表示没有限制)
spring.redis.jedis.pool.max-wait=-1ms
# 连接池中的最大空闲连接
spring.redis.jedis.pool.max-idle=8
# 连接池中的最小空闲连接
spring.redis.jedis.pool.min-idle=0
# 连接超时时间(毫秒)
spring.redis.timeout=3000ms
注意:以下是我自定义的redis key 和spring没有关系
# 自定义redis key
redis.key.prefix.authCode=portal:authCode:
# 验证码超期时间
redis.key.expire.authCode=90
package com.rf.service;

public interface RedisService {
    /**
     * 存储数据
     */
    void set(String key, String value);

    /**
     * 获取数据
     */
    String get(String key);

    /**
     * 设置超期时间
     */
    boolean expire(String key, long expire);

    /**
     * 删除数据
     */
    void remove(String key);

    /**
     * 自增操作
     * @param delta 自增步长
     */
    Long increment(String key, long delta);

}
第四步:书写一个redis实现类,实现该接口内的方法,书写自己的业务需求
package com.rf.service.impl;

import com.rf.service.RedisService;
import org.springframework.beans.factory.annotation.Autowired;
import org.springframework.data.redis.core.StringRedisTemplate;
import org.springframework.stereotype.Service;

import java.util.concurrent.TimeUnit;


@Service
public class RedisServiceImpl implements RedisService {
    @Autowired
    private StringRedisTemplate stringRedisTemplate;

    @Override
    public void set(String key, String value) {
        stringRedisTemplate.opsForValue().set(key, value);
    }

    @Override
    public String get(String key) {
        return stringRedisTemplate.opsForValue().get(key);
    }

    @Override
    public boolean expire(String key, long expire) {
        return stringRedisTemplate.expire(key, expire, TimeUnit.SECONDS);
    }

    @Override
    public void remove(String key) {
        stringRedisTemplate.delete(key);
    }

    @Override
    public Long increment(String key, long delta) {
        return stringRedisTemplate.opsForValue().increment(key,delta);
    }
}
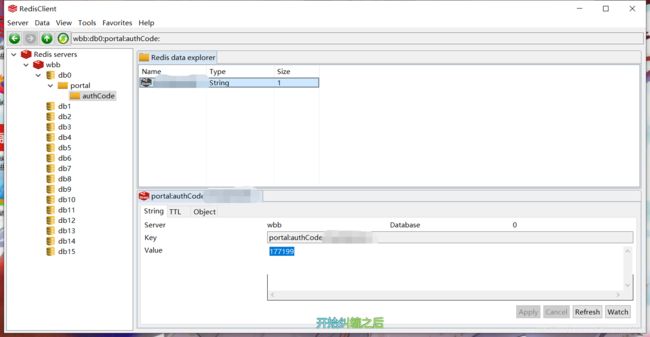
第五步:将验证码实时存入redis 做登录校验
在发送短信的工具类内添加redis的存储
package com.rf.utils;

import com.alibaba.fastjson.JSONObject;
import com.aliyuncs.CommonRequest;
import com.aliyuncs.CommonResponse;
import com.aliyuncs.DefaultAcsClient;
import com.aliyuncs.IAcsClient;
import com.aliyuncs.exceptions.ClientException;
import com.aliyuncs.exceptions.ServerException;
import com.aliyuncs.http.MethodType;
import com.aliyuncs.profile.DefaultProfile;
import org.springframework.stereotype.Component;

import java.util.Random;

@Component
public class SendNoteUtil {
	@Autowired
    private RedisService redisService;
    @Value("${redis.key.prefix.authCode}")
    private String REDIS_KEY_PREFIX_AUTH_CODE;
    @Value("${redis.key.expire.authCode}")
    private Long AUTH_CODE_EXPIRE_SECONDS;
    //验证平台信息 开发者无需任何更改
    private static final String dysmsapi = "dysmsapi.aliyuncs.com";

    DefaultProfile profile = DefaultProfile.getProfile("default", "你的accessKeyId 参考第六步", "你得accessKeySecret 参考第六步");
    IAcsClient client = new DefaultAcsClient(profile);
	//这一步的两个参数,一个是要发送验证码的手机号 一个是模板Code用来区分登录注册
    public String sendNoteMessgae(String PhoneNumbers,String template){
     	StringBuilder sb = new StringBuilder();
        Random random = new Random();
        for(int i=0;i<6;i++){
            sb.append(random.nextInt(10));
        }
        CommonRequest request = new CommonRequest();
        //request.setSysProtocol(ProtocolType.HTTPS);
        request.setSysMethod(MethodType.POST);
        request.setSysDomain(dysmsapi);
        request.setSysVersion("2017-05-25");
        request.setSysAction("SendSms");
        request.putQueryParameter("PhoneNumbers", PhoneNumbers);//接受验证码的手机号
        request.putQueryParameter("SignName", "公司名称");//签名
        //模板代码,我暂时用的参数,你可以直接写成模板码,模板码参考第八步
        request.putQueryParameter("TemplateCode", template);
        //用户定义的验证码内容
        request.putQueryParameter("TemplateParam","{code:"+sb.toString()+"}");
        //验证码绑定手机号并存储到redis
        redisService.set(REDIS_KEY_PREFIX_AUTH_CODE+PhoneNumbers,sb.toString());
        redisService.expire(REDIS_KEY_PREFIX_AUTH_CODE+PhoneNumbers,AUTH_CODE_EXPIRE_SECONDS);
        try {
            CommonResponse response = client.getCommonResponse(request);
            String returnStr = response.getData();
            System.out.println(returnStr);
            JSONObject jsonObject = JSONObject.parseObject(returnStr);
            //返回的信息
            return jsonObject.getString("Message");
        } catch (ServerException e) {
            return e.getErrMsg();
        } catch (ClientException e) {
            return e.getErrMsg();
        }
    };

}
至此 我们验证一下登录(注册的话和登录基本相同)
package com.rf.controller;

import com.rf.service.RedisService;
import com.rf.utils.SendNoteUtil;
import org.springframework.beans.factory.annotation.Autowired;
import org.springframework.beans.factory.annotation.Value;
import org.springframework.util.StringUtils;
import org.springframework.web.bind.annotation.RequestMapping;
import org.springframework.web.bind.annotation.RequestMethod;
import org.springframework.web.bind.annotation.RestController;
import javax.servlet.http.HttpServletResponse;
import java.io.IOException;

@RestController
@RequestMapping(value = "/api/note")
public class SendNoteController {

    @Autowired
    private SendNoteUtil sendNoteUtil;

    @Autowired
    private RedisService redisService;

    @Value("${redis.key.prefix.authCode}")
    private String REDIS_KEY_PREFIX_AUTH_CODE;

    @RequestMapping(value = "/sendNote",method = RequestMethod.GET)
    public void sendNote(String phone, HttpServletResponse response){
        String template = "SMS_185315027";
        try {
            response.getWriter().write(sendNoteUtil.sendNoteMessgae(phone,template));
        } catch (IOException e) {
            e.printStackTrace();
        }
    }

    @RequestMapping(value = "/login",method = RequestMethod.POST)
    public String login(String phone,String authCode){
        //验证验证码
        if(!verifyAuthCode(authCode,phone)){
            return"验证码错误";
        }
        return "登陆成功";
    }

    //对输入的验证码进行校验
    private boolean verifyAuthCode(String authCode, String telephone){
        if(StringUtils.isEmpty(authCode)){
            return false;
        }
        String realAuthCode = redisService.get(REDIS_KEY_PREFIX_AUTH_CODE + telephone);
        return authCode.equals(realAuthCode);
    }
}
