小白也能看懂的seaborn入门示例
作者:奔雷手,目前是名在校学生,当前主要在学习机器学习,也在做机器学习方面的助教,相对还是比较了解初学者学习过程的需求和问题,希望通过这个专栏能够广结好友,共同成长。
编辑:王老湿
4.
seaborn一共有5个大类21种图,分别是:
Relational plots 关系类图表
relplot() 关系类图表的接口,其实是下面两种图的集成,通过指定kind参数可以画出下面的两种图
scatterplot() 散点图
lineplot() 折线图
Categorical plots 分类图表
stripplot() 分类散点图
swarmplot() 能够显示分布密度的分类散点图
boxplot() 箱图
violinplot() 小提琴图
boxenplot() 增强箱图
pointplot() 点图
barplot() 条形图
countplot() 计数图
Distribution plot 分布图
jointplot() 双变量关系图
pairplot() 变量关系组图
distplot() 直方图,质量估计图
kdeplot() 核函数密度估计图
rugplot() 将数组中的数据点绘制为轴上的数据
Regression plots 回归图
lmplot() 回归模型图
regplot() 线性回归图
residplot() 线性回归残差图
Matrix plots 矩阵图
heatmap() 热力图
clustermap() 聚集图
下面展现一下以上涉及的大部分绘图示例,所涉及参数均有注释,(可左右滑动代码段)在数据集符合要求的情况下,我们大多可以用一行代码实现绘图功能,相信看完示例后你就能初步掌握seaborn画图,如果对绘图要求更高的话,可以查询seaborn手册更改所画图类型的其他默认参数
%matplotlib inline
# 如果不添加这句,是无法直接在jupyter里看到图的
import seaborn as sns
import numpy as np
import pandas as pd
import matplotlib.pyplot as plt
set()重置默认的主题参数:darkgrid, whitegrid, dark, white, ticks。默认的主题darkgrid。
sns.set()
# 加载数据集Anscombe 看下数据
df = sns.load_dataset("anscombe")
df.head()
seaborn内置了不少样例数据,为dataframe类型,如果要查看数据,可以使用类似df.head()命令查看
lmplot(回归图)
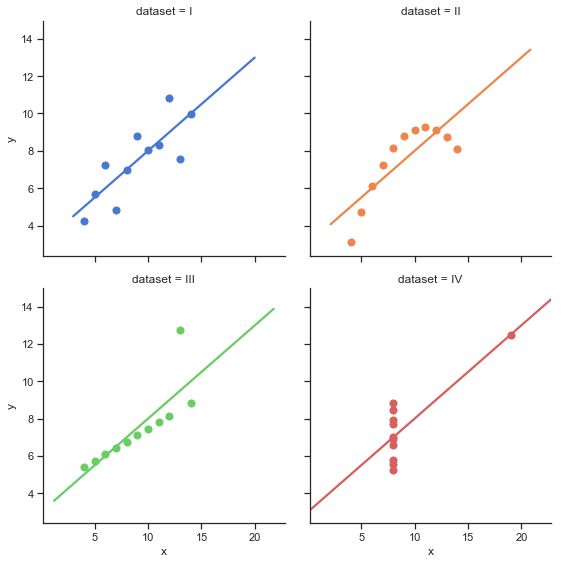
lmplot是用来绘制回归图的,通过lmplot我们可以直观地总览数据的内在关系。
#显示每个数据集的线性回归结果,xy变量,col,hue定义数据子集变量,可以把它看作分类绘图依据
#data数据,col_wap列变量,ci置信区间,palette调色板,height高度,scatter_kws由散点连线
sns.lmplot(x="x", y="y", col="dataset", hue="dataset", data=df,
           col_wrap=2, ci=None, palette="muted", height=4,
           scatter_kws={"s": 50, "alpha": 1})
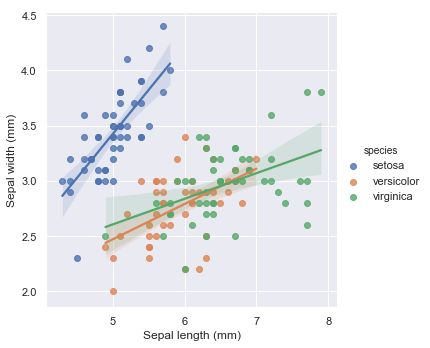
#多元线性回归 重置主题
sns.set()
# 加载iris dataset
iris = sns.load_dataset("iris")
#hue定义数据子集变量,可以把它看作分类绘图依据,truncate回归线
g = sns.lmplot(x="sepal_length", y="sepal_width", hue="species",
               truncate=True, height=5, data=iris)
# 使用自定义轴标签
g.set_axis_labels("Sepal length (mm)", "Sepal width (mm)")
# 设置主题风格
sns.set()
# 加载titanic dataset
df = sns.load_dataset("titanic")
# 制作具有性别色彩的自定义调色板
pal = dict(male="#6495ED", female="#F08080")
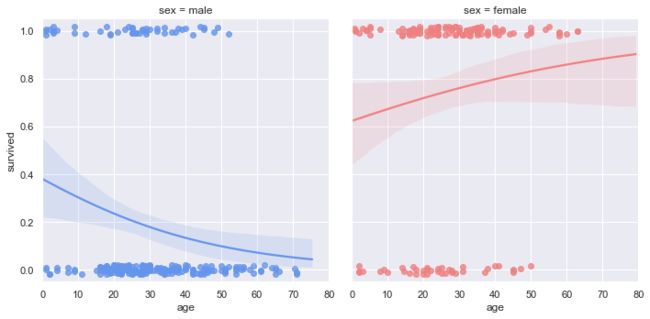
# 生存概率如何随年龄和性别变化
# y_jitter回归噪声,logistic逻辑回归模型
g = sns.lmplot(x="age", y="survived", col="sex", hue="sex", data=df,
               palette=pal, y_jitter=.02, logistic=True)
#自定义坐标轴刻度
g.set(xlim=(0, 80), ylim=(-.05, 1.05))
kdeplot(核密度估计图)
核密度估计(kernel density estimation)是在概率论中用来估计未知的密度函数,属于非参数检验方法之一。通过核密度估计图可以比较直观的看出数据样本本身的分布特征。具体用法如下:
sns.set()
#生成随机种子
rs = np.random.RandomState(50)
# 设置matplotlib图 共享坐标轴
f, axes = plt.subplots(3, 3, figsize=(9, 9), sharex=True, sharey=True)
for ax, s in zip(axes.flat, np.linspace(0, 3, 10)):
    # 创键调色板图
    cmap = sns.cubehelix_palette(start=s, light=1, as_cmap=True)
    # 生成并绘制随机双变量数据集,shade设置阴影,cut限制曲线
    x, y = rs.randn(2, 50)
    sns.kdeplot(x, y, cmap=cmap, shade=True, cut=5, ax=ax)
    ax.set(xlim=(-3, 3), ylim=(-3, 3))
f.tight_layout()
FacetGrid
是一个绘制多个图表(以网格形式显示)的接口。
#按数据子集构造直方图
sns.set()
tips = sns.load_dataset("tips")
# row行设置,margin_titles边缘标题,bins直方图参数分段
g = sns.FacetGrid(tips, row="sex", col="time", margin_titles=True)
bins = np.linspace(0, 60, 13)
g.map(plt.hist, "total_bill", color="steelblue", bins=bins)
distplot(单变量分布直方图)
在seaborn中想要对单变量分布进行快速了解最方便的就是使用distplot()函数,默认情况下它将绘制一个直方图,并且可以同时画出核密度估计(KDE)。
sns.set(, palette="muted", color_codes=True)
rs = np.random.RandomState(10)
#设置matplotlib图
f, axes = plt.subplots(2, 2, figsize=(7, 7), sharex=True)
sns.despine(left=True)
# 生成随机单变量数据集
d = rs.normal(size=100)
#kde=False不绘制核密度图,ax第一个图,坐标左上
sns.distplot(d, kde=False, color="b", ax=axes[0, 0])
# 不绘制直方图即绘制核密度图,rug在轴上画凹槽
sns.distplot(d, hist=False, rug=True, color="r", ax=axes[0, 1])
# 绘制核密度图,设置阴影
sns.distplot(d, hist=False, color="g", kde_kws={"shade": True}, ax=axes[1, 0])
# 绘制核密度图直方图
sns.distplot(d, color="m", ax=axes[1, 1])
plt.setp(axes, yticks=[])
plt.tight_layout()
lineplot
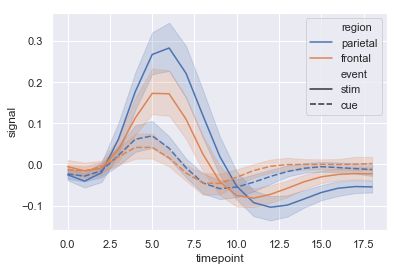
seaborn里的lineplot函数所传数据必须为一个pandas数组.
sns.set()
# 加载样例数据
fmri = sns.load_dataset("fmri")
sns.lineplot(x="timepoint", y="signal",
             hue="region", ,
             data=fmri)
relplot
这是一个图形级别的函数,它用散点图和线图两种常用的手段来表现统计关系。
sns.set()
dots = sns.load_dataset("dots")
palette = dict(zip(dots.coherence.unique(),
                   sns.color_palette("rocket_r", 6)))
# hue, col分类依据,size将产生不同大小的元素的变量分组,aspect长宽比,legend_full每组均有条目
sns.relplot(x="time", y="firing_rate",
            hue="coherence", size="choice", col="align",
            size_order=["T1", "T2"], palette=palette,
            height=5, aspect=.75, facet_kws=dict(sharex=False),
            kind="line", legend="full", data=dots)
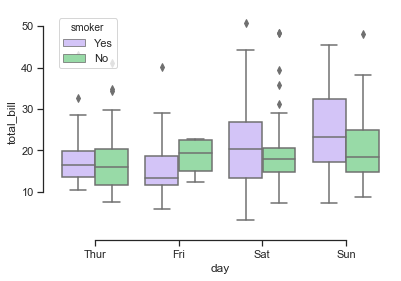
boxplot
箱形图(Box-plot)又称为盒须图、盒式图或箱线图,是一种用作显示一组数据分散情况资料的统计图。它能显示出一组数据的最大值、最小值、中位数及上下四分位数。
sns.set(, palette="pastel")
# 加载数据
tips = sns.load_dataset("tips")
# hue分类依据
sns.boxplot(x="day", y="total_bill",
            hue="smoker", palette=["m", "g"],
            data=tips)
#offset设置纵横两轴近原点端点距离原地的距离
sns.despine(offset=10, trim=True)
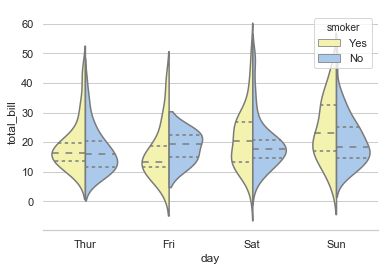
violinplot
violinplot与boxplot扮演类似的角色,它显示了定量数据在一个(或多个)分类变量的多个层次上的分布,这些分布可以进行比较。不像箱形图中所有绘图组件都对应于实际数据点,小提琴绘图以基础分布的核密度估计为特征。
sns.set()
rs = np.random.RandomState(0)
n, p = 40, 8
d = rs.normal(0, 2, (n, p))
d += np.log(np.arange(1, p + 1)) * -5 + 10
pal = sns.cubehelix_palette(p, rot=-.5, dark=.3)
# inner小提琴内部数据点的表示
sns.violinplot(data=d, palette=pal, inner="points")
sns.set(, palette="pastel", color_codes=True)
tips = sns.load_dataset("tips")
sns.violinplot(x="day", y="total_bill", hue="smoker",
               split=True, inner="quart",
               palette={"Yes": "y", "No": "b"},
               data=tips)
#在隐藏右和上边框线的同时,隐藏左边线。
sns.despine(left=True)
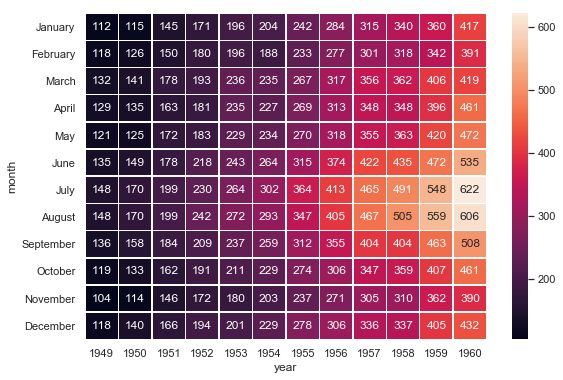
heatmap热力图
利用热力图可以看数据表里多个特征两两的相似度。
sns.set()
flights_long = sns.load_dataset("flights")
flights = flights_long.pivot("month", "year", "passengers")
# annot在每个单元格中写入数据值,线宽5
f, ax = plt.subplots(figsize=(9, 6))
sns.heatmap(flights, annot=True, fmt="d", linewidths=.5, ax=ax)
jointplot
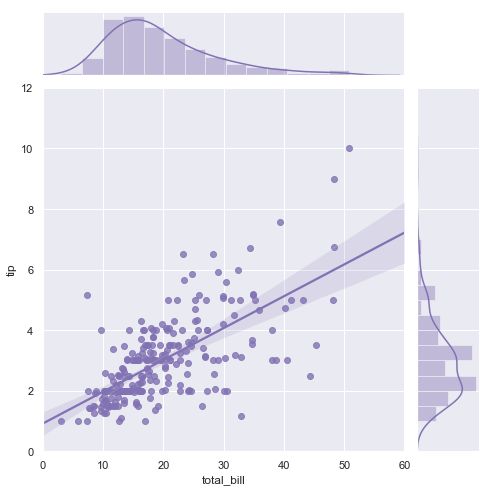
用于2个变量的画图,将两个变量的联合分布形态可视化出来往往会很有用。在seaborn中,最简单的实现方式是使用jointplot()函数,它会生成多个面板,不仅展示了两个变量之间的关系,也在两个坐标轴上分别展示了每个变量的分布。
sns.set()
rs = np.random.RandomState(5)
mean = [0, 0]
cov = [(1, .5), (.5, 1)]
x1, x2 = rs.multivariate_normal(mean, cov, 500).T
x1 = pd.Series(x1, name="$X_1$")
x2 = pd.Series(x2, name="$X_2$")
# kind:scatter,reg,resid,kde,hex变量可视化种类,space轴与边缘轴之间的空间
g = sns.jointplot(x1, x2, kind="kde", height=7, space=0)
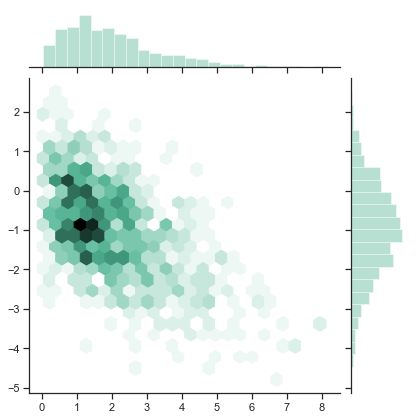
HexBin图
sns.set()
rs = np.random.RandomState(11)
x = rs.gamma(2, size=1000)
y = -.5 * x + rs.normal(size=1000)
sns.jointplot(x, y, kind="hex", color="#4CB391")
sns.set()
tips = sns.load_dataset("tips")
g = sns.jointplot("total_bill", "tip", data=tips, kind="reg",
                  xlim=(0, 60), ylim=(0, 12), color="m", height=7)
catplot
分类图表的接口,通过指定kind参数可以画出下面的八种图
stripplot() 分类散点图
sns.set()
titanic = sns.load_dataset("titanic")
g = sns.catplot(x="class", y="survived", hue="sex", data=titanic,
                height=6, kind="bar", palette="muted")
#隐藏左边线
g.despine(left=True)
g.set_ylabels("survival probability")
sns.set()
df = sns.load_dataset("exercise")
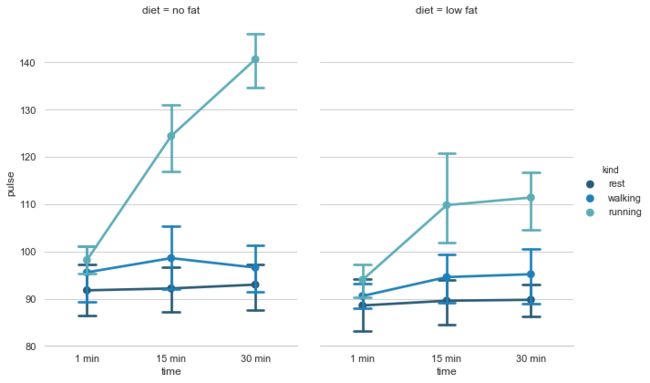
g = sns.catplot(x="time", y="pulse", hue="kind", col="diet",
                capsize=.2, palette="YlGnBu_d", height=6, aspect=.75,
                kind="point", data=df)
g.despine(left=True)
pointplot
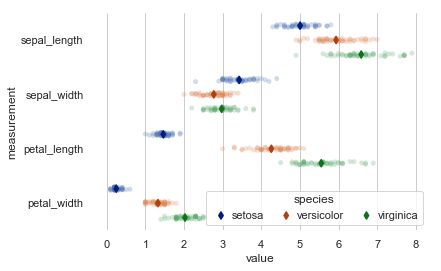
点图代表散点图位置的数值变量的中心趋势估计,并使用误差线提供关于该估计的不确定性的一些指示。点图可能比条形图更有用于聚焦一个或多个分类变量的不同级别之间的比较。他们尤其善于表现交互作用:一个分类变量的层次之间的关系如何在第二个分类变量的层次之间变化。连接来自相同色调等级的每个点的线允许交互作用通过斜率的差异进行判断,这比对几组点或条的高度比较容易。
sns.set()
iris = sns.load_dataset("iris")
iris = pd.melt(iris, "species", var_name="measurement")
f, ax = plt.subplots()
sns.despine(bottom=True, left=True)
# 用散点图显示每个观察结果 jitter抖动量为了更容易地看到分布
sns.stripplot(x="value", y="measurement", hue="species",
              data=iris, dodge=True, jitter=True,
              alpha=.25, zorder=1)
# dodge每个级别的点数,join同一点的估计值之间不绘制线
sns.pointplot(x="value", y="measurement", hue="species",
              data=iris, dodge=.532, join=False, palette="dark",
              markers="d", scale=.75, ci=None)
# 完善图例
handles, labels = ax.get_legend_handles_labels()
ax.legend(handles[3:], labels[3:], title="species",
          handletextpad=0, columnspacing=1,
          loc="lower right", ncol=3, frameon=True)
boxenplot(增强箱图)
sns.set()
diamonds = sns.load_dataset("diamonds")
clarity_ranking = ["I1", "SI2", "SI1", "VS2", "VS1", "VVS2", "VVS1", "IF"]
#order分类
sns.boxenplot(x="clarity", y="carat",
              color="b", order=clarity_ranking,
              scale="linear", data=diamonds)
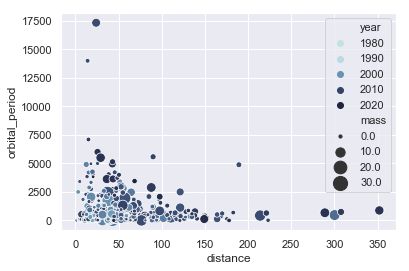
Scatterplot(散点图)
sns.set()
planets = sns.load_dataset("planets")
cmap = sns.cubehelix_palette(rot=-.2, as_cmap=True)
ax = sns.scatterplot(x="distance", y="orbital_period",
                     hue="year", size="mass",
                     palette=cmap, sizes=(10, 200),
                     data=planets)
PairGrid
用于绘制数据集中成对关系的子图网格。
sns.set()
df = sns.load_dataset("iris")
g = sns.PairGrid(df, diag_sharey=False)
g.map_lower(sns.kdeplot)
g.map_upper(sns.scatterplot)
g.map_diag(sns.kdeplot, lw=3)
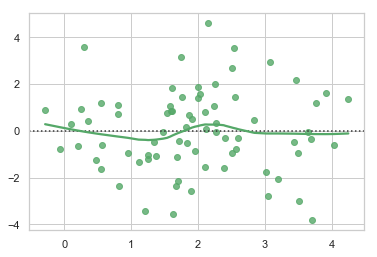
residplot
线性回归残差图
#绘制模型残差
sns.set()
# 使用以下示例数据集y ~ x
rs = np.random.RandomState(7)
x = rs.normal(2, 1, 75)
y = 2 + 1.5 * x + rs.normal(0, 2, 75)
# 拟合线性模型后绘制残差,lowess平滑
sns.residplot(x, y, lowess=True, color="g")
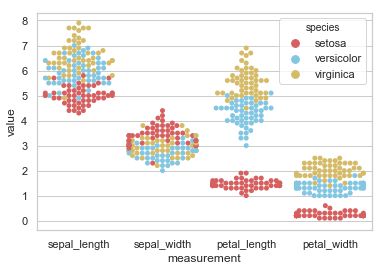
swarmplot
能够显示分布密度的分类散点图
sns.set(, palette="muted")
# 加载iris dataset
iris = sns.load_dataset("iris")
iris = pd.melt(iris, "species", var_name="measurement")
sns.swarmplot(x="measurement", y="value", hue="species",
              palette=["r", "c", "y"], data=iris)
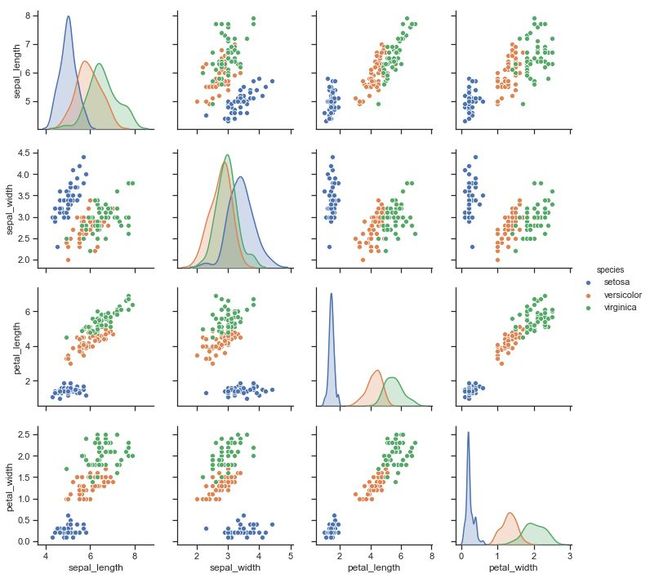
pairplot
变量关系组图
sns.set()
df = sns.load_dataset("iris")
sns.pairplot(df, hue="species")
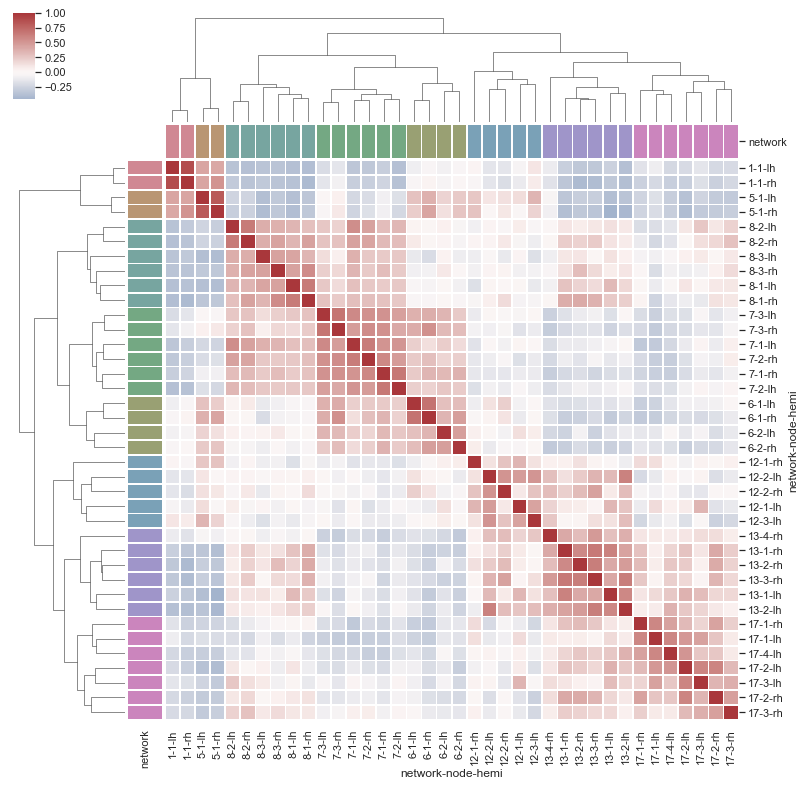
clustermap
聚集图
sns.set()
# 加载brain networks dataset
df = sns.load_dataset("brain_networks", header=[0, 1, 2], index_col=0)
# 选择网络的一个子集
used_networks = [1, 5, 6, 7, 8, 12, 13, 17]
used_columns = (df.columns.get_level_values("network")
                          .astype(int)
                          .isin(used_networks))
df = df.loc[:, used_columns]
#创建分类调色板以识别网络
network_pal = sns.husl_palette(8, s=.45)
network_lut = dict(zip(map(str, used_networks), network_pal))
# 将调色板转换为将在矩阵侧面绘制的矢量
networks = df.columns.get_level_values("network")
network_colors = pd.Series(networks, index=df.columns).map(network_lut)
# 绘图
sns.clustermap(df.corr(), center=0, cmap="vlag",
               row_colors=network_colors, col_colors=network_colors,
               linewidths=.75, figsize=(13, 13))
![]()
(完)
![]()
?关注“Python与人工智能社区”
王老湿目前建立了Python、爬虫、数据分析、机器学习、AI实战、自然语言处理、计算机视觉、推荐系统等方向的读者交流群,大家可以添加王老湿的微信进行加群
近期专栏推荐 (点击下方标题即可跳转)
1.
2.
3.
4.
点下「在看」,给文章盖个戳吧!?

