日积月累--android基础知识日记
这篇文章主要用于记录日常的android基础知识。
android播放通知声音
try {
    Uri notification = RingtoneManager.getDefaultUri(RingtoneManager.TYPE_NOTIFICATION);
    Ringtone r = RingtoneManager.getRingtone(getApplicationContext(), notification);
    r.play();
} catch (Exception e) {
    e.printStackTrace();
}
volley添加请求头
// could be any class that implements Map
Map mHeaders = new ArrayMap();
mHeaders.put("user", USER);
mHeaders.put("pass", PASSWORD);
Request req = new Request(url, postBody, listener, errorListener) {
  public Map getHeaders() {
    return mHeaders;
  }
}
单边背景
layer-list xmlns:android="http://schemas.android.com/apk/res/android">

    <item
        android:bottom="-2dp"
        android:top="-2dp"
        android:right="0dp"
        android:left="-2dp"
        >
        <shape>
            <solid android:color="@android:color/transparent"/>
            <stroke
                android:width="1dp"
                android:color="@android:color/darker_gray"/>
        shape>
    item>

layer-list>
width如果与padding之和小于0则该边不显示
Android studio编译jar
task makeJar(type: Copy) {
    delete 'build/libs/volley.jar'
    from('build/intermediates/bundles/release/')
    into('build/libs/')
    include('classes.jar')
    rename ('classes.jar', 'volley.jar')
}

makeJar.dependsOn(build)
actionbar去除阴影
Remove shadow below actionbar
通过浏览器中的网页链接跳转至app
方法很简单:http://itindex.net/blog/2014/11/07/1415353560000.html
这里要说明的是在配置清单文件时scheme尽量不要使用http,因为使用http的太多了,而且权限都很高,因此很难达到你的要求。例如可以使用“myapp”等等。
Fragment重叠问题的原因及解决方案
fragment在add和show的过程中由于activity的重建会导致fragment的重叠。贴出解决方案:
http://my.oschina.net/wangxnn/blog/417581
TextView实现长按复制文本功能的方法
在布局文件的TextView控件属性中增加:android:textIsSelectable="true"
listview去除点击效果
android:listSelector="@android:color/transparent" android用shape画虚线,怎么也不显示
http://blog.csdn.net/qiuqingpo/article/details/40394677
<shape xmlns:android="http://schemas.android.com/apk/res/android"
     android:shape="line">

   <stroke android:width="1dp" android:color="#D5D5D5"
             android:dashWidth="2dp" android:dashGap="3dp" />

     <size android:height="2dp" />
shape> 从android3.0开始,安卓关闭了硬件加速功能,所以就不能显示了,所以就是在 AndroidManifest.xml,或者是在activity中把硬件加速的功能关掉就可以了android:hardwareAccelerated="false"或者是view.setLayerType(View.LAYER_TYPE_SOFTWARE, null);数据库查询有时是耗时操作

数据库查询有时是耗时操作。但是可以写在UI线程中,如果数据量不大。不过网络请求是不能放在UI线程中的。
对应用程序创建的文件进行管理
上下文提供了,获取删除文件的方法deleteFile()传入一个文件名即可。另外可以通过上下文的fileList()方法,获取文件名的字符串数组。
关于setContentView的实质
这个很好解决。直接上源码:
AppComptActivity:
@Override
    public void setContentView(@LayoutRes int layoutResID) {
        getDelegate().setContentView(layoutResID);
    }
而getDelegate()的实质就是AppCompatDelegate的某个实例,例如AppCompatDelegateImplV7等等:
@Override
    public void setContentView(int resId) {
        ensureSubDecor();
        ViewGroup contentParent = (ViewGroup) mSubDecor.findViewById(android.R.id.content);
        contentParent.removeAllViews();
        LayoutInflater.from(mContext).inflate(resId, contentParent);
        mOriginalWindowCallback.onContentChanged();
    }
看到这里应该明白了吧?
关于Preference
Overview
Instead of using View objects to build the user interface, settings are built using various subclasses of the Preference class that you declare in an XML file.
除了使用view对象来构建用户界面以外,settings使用Preference的各种各样的子类,你可以在xml文件中声明来进行构建。
不错的教程:
Android学习笔记(四十):Preference的使用 ;
解决include标签的一个缺陷
在同一个布局中通过include多次引用另一个布局时,会出现布局id混淆的问题。解决办法:
<include
    android:id="@+id/bookmarks"
    layout="@layout/bookmarks_element" />

<include android:id="@+id/bookmarks_favourite"
    layout="@layout/bookmarks_element" />
假设布局bookmarks_element都包含一个id为bookmarks_list的控件。
在实例化控件时:
View bookmarks_container_2 = findViewById(R.id.bookmarks_favourite);
bookmarks_container_2.findViewById(R.id.bookmarks_list);
Android桌面添加快捷方式
最重要的是添加权限:
<uses-permission android:name="com.android.launcher.permission.INSTALL_SHORTCUT" />private void addShortcut() {
//Adding shortcut for MainActivity
//on Home screen
Intent shortcutIntent = new Intent(getApplicationContext(),
MainActivity.class);
shortcutIntent.setAction(Intent.ACTION_MAIN);
Intent addIntent = new Intent();
addIntent
.putExtra(Intent.EXTRA_SHORTCUT_INTENT, shortcutIntent);
addIntent.putExtra(Intent.EXTRA_SHORTCUT_NAME, "HelloWorldShortcut");//注意这里必须是字符串形式的,不可以是R.string.app_name;
addIntent.putExtra(Intent.EXTRA_SHORTCUT_ICON_RESOURCE,
Intent.ShortcutIconResource.fromContext(getApplicationContext(),
R.drawable.ic_launcher));
addIntent
.setAction("com.android.launcher.action.INSTALL_SHORTCUT");
getApplicationContext().sendBroadcast(addIntent);
}防作弊思路——获取网络代理(Android反抓包)
使用网络代理的用户大多是为了抓包。因此可以通过有没有使用了代理,来判断用户是否对应用进行了抓包。
public boolean isCapture() {
        if (!TextUtils.isEmpty(getProxyHost())) {
            return true;
        }else
            return false;
    }

    public String getProxyHost() {
        return Proxy.getDefaultHost();
    }
TextView添加删除线的思路
思路一:通过html为TextView的值设置下划线
思路二:设置TextView的画笔,如下:
(TextView)findViewById(R.id.tvId).getPaint().setFlags(Paint.STRIKE_THRU_TEXT_FLAG);记录一个Dialog的主题
<resources xmlns:android="http://schemas.android.com/apk/res/android">
<style name="add_dialog" parent="@android:style/Theme.Dialog">
<item name="android:windowFrame">@null
- "android:windowIsFloating"
>true
- "android:windowIsTranslucent"
>false
- "android:windowNoTitle"
>true
- "android:windowBackground">@drawable/bg_search_end
- "android:backgroundDimEnabled">false
style> 2016年8月8日16:03:56
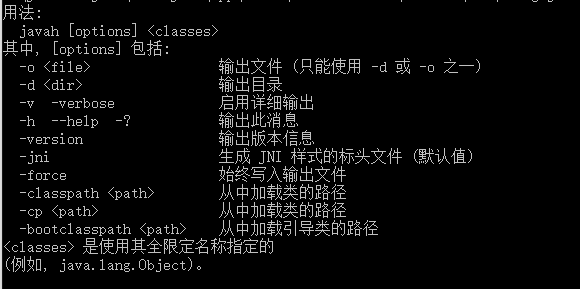
javah的用法
2016年8月3日16:11:58

cp等同于classpath
用法实例:
javah -d jni -cp xxx\xxx\xxx com.xxx.xxx.Test
其中在指定cp是如果有多个请用分号(;)隔开。
Activity转场动画的一种
        Slide slideTransition = new Slide();
        slideTransition.setSlideEdge(Gravity.LEFT);
        slideTransition.setDuration(getResources().getInteger(R.integer.anim_duration_long));
        getWindow().setReenterTransition(slideTransition);
        getWindow().setExitTransition(slideTransition);
兼容新老版本的通知
NotificationManager manager = (NotificationManager) getSystemService(NOTIFICATION_SERVICE);
NotificationCompat.Builder builder = new NotificationCompat.Builder(context);
Notification notification = builder
.setContentTitle("这是通知标题")
.setContentText("这是通知内容")
.setWhen(System.currentTimeMillis())
.setSmallIcon(R.mipmap.ic_launcher)
.setLargeIcon(BitmapFactory.decodeResource(
  getResources(), R.mipmap.ic_launcher))
.build();
manager.notify(1, notification);
注意SmallIcon大小为50*50,且为透明,不然Android6.0的显示会出现问题。另外可通过setColor为透明的小图标设置背景色。