ViewController的自定义转场动画
http://www.xiaoyaoli.com/?p=1271
UIView的动画自由度一直很大,可以说想怎么动画怎么动画,但是UIViewController之间的动画一直都不好高度定制。
一般我会用的有:
- 系统提供的(UINavigationController,UITabbarController)
- ParentViewController上面加子ViewController,用transitionFromViewController来转场
- 再要不然就用2说的方法,然后控制Controller的View来动画了
然后我发现这样真的是太土了,iOS7以后UIViewControllerAnimatedTransitioning或者UIViewControllerContextTransitioning这些协议已经可以比较方便的自定义ViewController之间的动画了,比如修改UINavigationController的动画,下面举个例子来看一看如何做一个自定义的NavigationController的Push和Pop非交互动画
自定义NavigationController动画
首先,实现一个非常简单的UINavigationController转场,一般会这么干
实现FirstViewController,加到Window上(没用storyboard和xib)
实现FirstViewController上面有个按钮,点击后push到SecondViewController
贴一下FirstViewController的关键代码,这很简单
|
1
2
3
4
5
6
7
8
9
10
11
12
13
14
15
16
17
18
19
20
21
22
23
24
25
26
27
28
29
30
31
32
33
34
35
|
-
(
void
)
viewDidLoad
{
[
super
viewDidLoad
]
;
//init First
self
.
navigationItem
.
title
=
@
"First"
;
self
.
view
.
backgroundColor
=
[
UIColor
orangeColor
]
;
//init Second
secondViewController
=
[
[
SecondViewController
alloc
]
init
]
;
// Push
UIButton *
pushButton
=
[
UIButton
buttonWithType
:
UIButtonTypeSystem
]
;
pushButton
.
frame
=
CGRectMake
(
140
,
200
,
40
,
40
)
;
[
pushButton
setTitle
:
@
"Push"
forState
:
UIControlStateNormal
]
;
[
pushButton
addTarget
:
self
action
:
@
selector
(
push
)
forControlEvents
:
UIControlEventTouchUpInside
]
;
[
self
.
view
addSubview
:
pushButton
]
;
}
-
(
void
)
push
{
[
self
.
navigationController
pushViewController
:
secondViewController
animated
:
YES
]
;
}
|
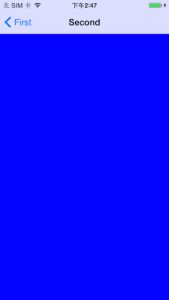
那么就像下图这样,push进去动画有了,pop回来动画有了,手势pop回来也有
下面我们要自定义这个push动画
我们先实现一个push自定义动画类姑且叫做CustomPushAnimation,它实现UIViewControllerAnimatedTransitioning协议,用来定义一个非交互动画(就是动画过程中没交互)
里面也用到了UIViewControllerContextTransitioning这个协议,可以理解为转场动画的上下文,一个容器。下面是代码.h和.m,记住这是一个自定义的push的动画
|
1
2
3
4
5
6
7
|
#import
#import
@
interface
CustomPushAnimation
:
NSObject
<
UIViewControllerAnimatedTransitioning
>
@
end
|
|
1
2
3
4
5
6
7
8
9
10
11
12
13
14
15
16
17
18
19
20
21
22
23
24
25
26
27
28
29
30
31
32
33
34
35
36
37
38
39
40
41
42
43
44
45
46
47
48
49
50
51
52
53
54
55
|
#import "CustomPushAnimation.h"
@
implementation
CustomPushAnimation
-
(
NSTimeInterval
)
transitionDuration
:
(
id
<
UIViewControllerContextTransitioning
>
)
transitionContext
{
return
3.0
;
}
-
(
void
)
animateTransition
:
(
id
<
UIViewControllerContextTransitioning
>
)
transitionContext
{
//目的ViewController
UIViewController *
toViewController
=
[
transitionContext
viewControllerForKey
:
UITransitionContextToViewControllerKey
]
;
//起始ViewController
UIViewController *
fromViewController
=
[
transitionContext
viewControllerForKey
:
UITransitionContextFromViewControllerKey
]
;
//添加toView到上下文
[
[
transitionContext
containerView
]
insertSubview
:
toViewController
.
view
belowSubview
:
fromViewController
.
view
]
;
//自定义动画
toViewController
.
view
.
transform
=
CGAffineTransformMakeTranslation
(
320
,
568
)
;
[
UIView
animateWithDuration
:
[
self
transitionDuration
:
transitionContext
]
animations
:
^
{
fromViewController
.
view
.
transform
=
CGAffineTransformMakeTranslation
(
-
320
,
-
568
)
;
toViewController
.
view
.
transform
=
CGAffineTransformIdentity
;
}
completion
:
^
(
BOOL
finished
)
{
fromViewController
.
view
.
transform
=
CGAffineTransformIdentity
;
// 声明过渡结束时调用 completeTransition: 这个方法
[
transitionContext
completeTransition
:
!
[
transitionContext
transitionWasCancelled
]
]
;
}
]
;
}
@
end
|
下面在FirstViewController里面初始化CustomPush动画,并给FirstViewController添加UINavigationController代理
|
1
2
3
4
5
|
//FirstViewController viewDidLoad
self
.
navigationController
.
delegate
=
self
;
//init CustomPush
customPush
=
[
[
CustomPushAnimation
alloc
]
init
]
;
|
为什么要添加代理呢?怎么用这个CustomPush动画呢?
答案就是我们要用UINavigationControllerDelegate的
– (id<UIViewControllerAnimatedTransitioning>) navigationController:(UINavigationController *)navigationController animationControllerForOperation:(UINavigationControllerOperation)operation fromViewController:(UIViewController *)fromVC toViewController:(UIViewController *)toVC
这个方法来选中Push转场的时候用我们自己定义的CustomPush动画。
|
1
2
3
4
5
6
7
8
9
10
11
12
13
14
15
16
17
18
19
20
21
22
23
24
25
26
27
28
29
30
31
32
|
#pragma mark - UINavigationControllerDelegate iOS7非交互自定义Navigation转场
// 动画特效
-
(
id
<
UIViewControllerAnimatedTransitioning
>
)
navigationController
:
(
UINavigationController *
)
navigationController
animationControllerForOperation
:
(
UINavigationControllerOperation
)
operation
fromViewController
:
(
UIViewController *
)
fromVC
toViewController
:
(
UIViewController *
)
toVC
{
/**
* typedef NS_ENUM(NSInteger, UINavigationControllerOperation) {
* UINavigationControllerOperationNone,
* UINavigationControllerOperationPush,
* UINavigationControllerOperationPop,
* };
*/
//push的时候用我们自己定义的customPush
if
(
operation
==
UINavigationControllerOperationPush
)
{
return
customPush
;
}
else
{
return
nil
;
}
}
|
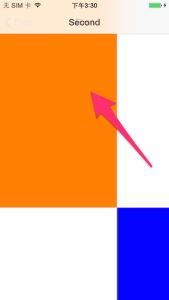
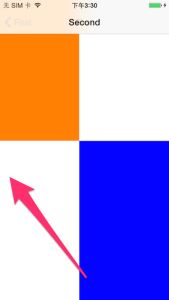
大功告成,现在就运行一下试试吧,可以发现动画像我想的一样,FirstViewController往左上角飘,SecondViewController紧随其后,这样完成了转场,这样我们就自定义了一个push的转场动画!
很有趣吧,下面照葫芦画瓢,做一个Pop动画吧!
考虑一下非对称的才是美,做一个从上往下的Pop转场,写一个CustomPopAnimation,代码如下:
|
1
2
3
4
5
6
7
|
#import
#import
@
interface
CustomPopAnimation
:
NSObject
<
UIViewControllerAnimatedTransitioning
>
@
end
|
|
1
2
3
4
5
6
7
8
9
10
11
12
13
14
15
16
17
18
19
20
21
22
23
24
25
26
27
28
29
30
31
32
33
34
35
36
37
38
39
40
41
42
43
44
45
46
47
48
49
50
51
52
53
54
55
56
57
|
#import "CustomPopAnimation.h"
@
implementation
CustomPopAnimation
-
(
NSTimeInterval
)
transitionDuration
:
(
id
<
UIViewControllerContextTransitioning
>
)
transitionContext
{
return
2.0
;
}
-
(
void
)
animateTransition
:
(
id
<
UIViewControllerContextTransitioning
>
)
transitionContext
{
//目的ViewController
UIViewController *
toViewController
=
[
transitionContext
viewControllerForKey
:
UITransitionContextToViewControllerKey
]
;
//起始ViewController
UIViewController *
fromViewController
=
[
transitionContext
viewControllerForKey
:
UITransitionContextFromViewControllerKey
]
;
//添加toView到上下文
[
[
transitionContext
containerView
]
insertSubview
:
toViewController
.
view
belowSubview
:
fromViewController
.
view
]
;
//自定义动画
toViewController
.
view
.
transform
=
CGAffineTransformMakeTranslation
(
0
,
-
568
)
;
[
UIView
animateWithDuration
:
[
self
transitionDuration
:
transitionContext
]
animations
:
^
{
fromViewController
.
view
.
transform
=
CGAffineTransformMakeTranslation
(
0
,
568
)
;
toViewController
.
view
.
transform
=
CGAffineTransformIdentity
;
}
completion
:
^
(
BOOL
finished
)
{
fromViewController
.
view
.
transform
=
CGAffineTransformIdentity
;
// 声明过渡结束时调用 completeTransition: 这个方法
[
transitionContext
completeTransition
:
!
[
transitionContext
transitionWasCancelled
]
]
;
}
]
;
}
@
end
|
聪明的你一定知道除了初始化这个pop外,只需要在自定义转场的代理里面加一个if语句判断pop就好
|
1
2
3
4
5
6
7
8
9
10
11
12
13
14
15
16
17
18
19
20
21
22
23
24
25
26
27
28
29
30
31
32
33
34
35
|
// 动画特效
-
(
id
<
UIViewControllerAnimatedTransitioning
>
)
navigationController
:
(
UINavigationController *
)
navigationController
animationControllerForOperation
:
(
UINavigationControllerOperation
)
operation
fromViewController
:
(
UIViewController *
)
fromVC
toViewController
:
(
UIViewController *
)
toVC
{
/**
* typedef NS_ENUM(NSInteger, UINavigationControllerOperation) {
* UINavigationControllerOperationNone,
* UINavigationControllerOperationPush,
* UINavigationControllerOperationPop,
* };
*/
if
(
operation
==
UINavigationControllerOperationPush
)
{
return
customPush
;
}
else
if
(
operation
==
UINavigationControllerOperationPop
)
{
return
customPop
;
}
else
{
return
nil
;
}
}
|
好了,运行!
自此,UINavigationController自定义转场就OK了
自定义PresentViewController动画
NavigationController搞定,Present也依葫芦画瓢
工程里添加第三个ViewController 叫做ThirdViewController,然后在FirstViewController里面添加下面代码
|
1
2
3
4
5
6
7
8
9
10
11
12
13
14
15
16
17
|
//init Third
thirdViewController
=
[
[
ThirdViewController
alloc
]
init
]
;
// Present
UIButton *
presentButton
=
[
UIButton
buttonWithType
:
UIButtonTypeSystem
]
;
presentButton
.
frame
=
CGRectMake
(
110
,
400
,
100
,
40
)
;
[
presentButton
setTitle
:
@
"Present"
forState
:
UIControlStateNormal
]
;
[
presentButton
addTarget
:
self
action
:
@
selector
(
present
)
forControlEvents
:
UIControlEventTouchUpInside
]
;
[
self
.
view
addSubview
:
presentButton
]
;
|
然后ThirdViewController添加一个按钮用来Dismiss自己,这个就不写了,然后运行起来实现的功能就很正常,点击Present按钮就会自下而上的一个动画推入新的ViewController,这很正常,然后现在来实现高级动画
首先,和Navigation类似,在FirstViewController我们要做一些准备工作
修改FirstViewController的协议
|
1
|
@
interface
FirstViewController
(
)
<
UINavigationControllerDelegate
,
UIViewControllerTransitioningDelegate
>
|
然后和NavigationController有区别的是给自己的“下家儿”,也就是要转去的ViewController设置代理
|
1
|
thirdViewController
.
transitioningDelegate
=
self
;
|
接下来就要在present时候和dismiss两个协议方法设置自定义动画,下面两个方法来于UIViewControllerTransitioningDelegate
|
1
2
3
4
5
6
7
8
9
10
11
12
13
14
15
16
17
18
19
20
21
|
#pragma mark - UIViewControllerTransitioningDelegate
-
(
id
<
UIViewControllerAnimatedTransitioning
>
)
animationControllerForPresentedController
:
(
UIViewController *
)
presented
presentingController
:
(
UIViewController *
)
presenting
sourceController
:
(
UIViewController *
)
source
{
customPresent
.
animationType
=
AnimationTypePresent
;
return
customPresent
;
}
-
(
id
<
UIViewControllerAnimatedTransitioning
>
)
animationControllerForDismissedController
:
(
UIViewController *
)
dismissed
{
customPresent
.
animationType
=
AnimationTypeDismiss
;
return
customPresent
;
}
|
那么,customPresent.animationType = AnimationTypePresent;这是什么东西呢?不要着急,这个就是自定义的Present动画效果,下面就讲他的实现,但是目前已经可以看到代码写起来和NavigationController的自定义动画非常像,对仗工整,都是协议,设置代理,调用代理时候使用自定义的动画。
下面定义真正的自定义动画CustomPresentAnimation.h
|
1
2
3
4
5
6
7
8
9
10
11
12
13
14
15
16
17
|
typedef
enum
{
AnimationTypePresent
,
AnimationTypeDismiss
}
AnimationType
;
#import
#import
@
interface
CustomPresentAnimation
:
NSObject
<
UIViewControllerAnimatedTransitioning
>
@
property
(
nonatomic
,
assign
)
AnimationType
animationType
;
@
end
|
CustomPresentAnimation.m
|
1
2
3
4
5
6
7
8
9
10
11
12
13
14
15
16
17
18
19
20
21
22
23
24
25
26
27
28
29
30
31
32
33
34
35
36
37
38
39
40
41
42
43
44
45
46
47
48
49
50
51
52
53
54
55
56
57
58
59
60
61
62
63
64
65
66
67
68
69
70
71
72
73
74
75
76
77
78
79
80
81
82
83
84
85
86
87
88
89
90
91
92
93
94
95
96
97
98
99
100
101
102
103
104
105
106
107
108
109
110
111
112
113
114
115
116
117
118
119
120
121
122
123
124
125
126
127
128
129
130
131
|
#import "CustomPresentAnimation.h"
@
implementation
CustomPresentAnimation
-
(
NSTimeInterval
)
transitionDuration
:
(
id
<
UIViewControllerContextTransitioning
>
)
transitionContext
{
return
1.3
;
}
-
(
void
)
animateTransition
:
(
id
<
UIViewControllerContextTransitioning
>
)
transitionContext
{
UIViewController*
toViewController
=
[
transitionContext
viewControllerForKey
:
UITransitionContextToViewControllerKey
]
;
UIViewController*
fromViewController
=
[
transitionContext
viewControllerForKey
:
UITransitionContextFromViewControllerKey
]
;
UIView *
toView
=
toViewController
.
view
;
UIView *
fromView
=
fromViewController
.
view
;
if
(
self
.
animationType
==
AnimationTypePresent
)
{
//snapshot方法是很高效的截屏
//First放下面
UIView *
snap
=
[
fromView
snapshotViewAfterScreenUpdates
:
YES
]
;
[
transitionContext
.
containerView
addSubview
:
snap
]
;
//Third放上面
UIView *
snap2
=
[
toView
snapshotViewAfterScreenUpdates
:
YES
]
;
[
transitionContext
.
containerView
addSubview
:
snap2
]
;
snap2
.
transform
=
CGAffineTransformMakeTranslation
(
-
320
,
0
)
;
//进行动画
[
UIView
animateWithDuration
:
[
self
transitionDuration
:
transitionContext
]
delay
:
0
usingSpringWithDamping
:
0.5
initialSpringVelocity
:
0
options
:
UIViewAnimationOptionCurveLinear
animations
:
^
{
snap2
.
transform
=
CGAffineTransformIdentity
;
}
completion
:
^
(
BOOL
finished
)
{
//删掉截图
[
snap
removeFromSuperview
]
;
[
snap2
removeFromSuperview
]
;
//添加视图
[
[
transitionContext
containerView
]
addSubview
:
toView
]
;
//结束Transition
[
transitionContext
completeTransition
:
!
[
transitionContext
transitionWasCancelled
]
]
;
}
]
;
}
else
{
//First 放下面
UIView *
snap
=
[
toView
snapshotViewAfterScreenUpdates
:
YES
]
;
[
transitionContext
.
containerView
addSubview
:
snap
]
;
//Third 放上面
UIView *
snap2
=
[
fromView
snapshotViewAfterScreenUpdates
:
YES
]
;
[
transitionContext
.
containerView
addSubview
:
snap2
]
;
//进行动画
[
UIView
animateWithDuration
:
[
self
transitionDuration
:
transitionContext
]
delay
:
0
usingSpringWithDamping
:
0.5
initialSpringVelocity
:
0
options
:
UIViewAnimationOptionCurveLinear
animations
:
^
{
snap2
.
transform
=
CGAffineTransformMakeTranslation
(
-
320
,
0
)
;
}
completion
:
^
(
BOOL
finished
)
{
//删掉截图
[
snap
removeFromSuperview
]
;
[
snap2
removeFromSuperview
|


