Delta Lake - 数据写入的旅程
在《Delta Lake 事务日志实现的源码剖析》文章中,我们已经从源码层面大致熟悉了 Delta Lake 事务日志的实现过程。
最近不少读者反馈,希望笔者从 Delta Lake 增删改等方面展开深入研究。其实这也是笔者正在研究的方向,总体上都已经过了一遍。那么,在本篇文章中,笔者将从数据写入开始,因为这也是真正踏入 Delta Lake 世界的第一步。
回顾 Quickstart
以 Scala 编程语言举例,实现批量写和实时流写入:
批量写:
      val data = spark.range(0, 5)


      data.write.format("delta").save("/tmp/delta-table")
实时流式数据写入:
      val streamingDf = spark.readStream.format("rate").load()


      val stream = streamingDf.select($"value"as"id").writeStream.format("delta").option("checkpointLocation", "/tmp/checkpoint").start("/tmp/delta-table")
这里只是带着大家回顾一下,详细的内容请回顾之前的文章《Delta Lake - 数据湖的开放标准》,里面有关于上面两种数据写入方式的实战案例,同时也是为了更好地理解本篇文章的内容。
数据写入旅程
因为 Delte Lake 是完全兼容 Apache Spark API,所以可以非常容易地以 The Spark Way 进行数据写入。
笔者一般会把一个问题自始至终讲清楚,也是方便大家读有所学,学而思之。笔者不会贴一堆无头无脑的源码,那么大家看了半天都不知道到底是什么鬼东西。
1. 初始化
当我们开始使用 Delta Lake 时,如果使用命令行方式,是不是会执行如下代码:
      spark-shell --packages io.delta:delta-core_2.11:0.4.0


      ...


      scala> val data = spark.range(0, 5)


      data: org.apache.spark.sql.Dataset[Long] = [id: bigint]


      scala> data.write.format("delta").save("/user/deltalake/dcoe/delta-table")
只是启动 spark-shell 客户端,为啥这里可以使用 delta 存储格式呢?
因为指定了--package了,指定了就可以使用 delta 吗?
我们知道 Delta Lake 是开源的存储引擎层,与 Spark 支持的其他存储引擎一样,比如 parqet,sequence等, Delta Lake 实现了 delta 存储格式。
其实如果对 Spark 比较熟悉的读者应该知道,Spark 定义一个 trait,如下:org.apache.spark.sql.sources.DataSourceRegister
      trait DataSourceRegister{


      /**


       * The string that represents the format that this data source provider uses. This is


       * overridden by children to provide a nice alias for the data source. For example:


       *


       * {{{


       * override def shortName(): String = "parquet"


       * }}}


       *


       * @since 1.5.0


       */


      def shortName(): String


      }
数据源需要实现此 trait,以便可以向其数据源注册一个别名(比如 delta ),允许用户将数据源别名作为完全类名的格式类型。这个类的一个新实例将在每次 DDL 调用时被实例化,这样才可以在上面的命令行中使用。另外 Delta Lake 还实现 Spark 的批量以及流式数据写入等接口,这部分内容我们不细说,因为涉及到 Spark 很多内容,三言两语很难说清楚,以后如果有必要会单独介绍 Spark 实现的各种存储格式。
Scala trait:
简单说明:Scala 的 trait 和 Java 的 interface 类似,在 Scala 中类继承 trait,必须实现其中的抽象方法,不支持多继承类,支持多继承 trait,使用 with 关键字。
2. 数据写入的入口
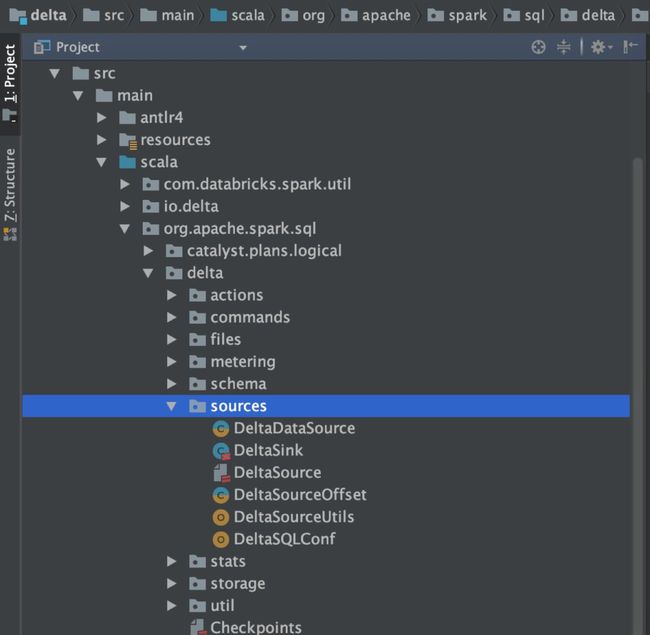
看一下 Delta Lake 的代码结构,因为数据写入涉及数据源,所以不妨来看一下 org.apache.spark.sql.delta.sources 包下面的代码。
读者还是将代码都打开,点点看,看看注释,看看代码层次。
data.write.format("delta").save("/user/deltalake/dcoe/delta-table")
当我们执行上面的代码时,底层到底调用什么呢?
可能细心的读者打开 DeltaDataSource 类时发现一丝线索:
      class DeltaDataSource


       extends RelationProvider


       with StreamSourceProvider


       with StreamSinkProvider


       with CreatableRelationProvider


       with DataSourceRegister


       with DeltaLogging {


      ...


      }
其实执行 data.write.format("delta").save("/user/deltalake/dcoe/delta-table") 时,调用了 DeltaDataSource 类,而 Delta Lake 使用 Spark DataSource V1 版本的 API 实现的一种新的数据源,用于将 Delta 集成到 Spark SQL 批处理和流式 API,是不是可以和文章刚开始的问题联系上。
从 DeltaDataSource 的实现上来看,实现了 Delta Lake 批量数据写入和流式数据写入。这里可以简单看几个 Spark 定义的 trait,接口定义的非常清晰明了。比如 StreamSourceProvider:
      /**


       * ::Experimental::


       * Implemented by objects that can produce a streaming `Source` for a specific format or system.


       *


       * @since 2.0.0


       */


      @Experimental


      @InterfaceStability.Unstable


      trait StreamSourceProvider {


      /**


       * Returns the name and schema of the source that can be used to continually read data.


       * @since 2.0.0


       */


      def sourceSchema(


       sqlContext: SQLContext,


       schema: Option[StructType],


       providerName: String,


       parameters: Map[String, String]): (String, StructType)


      /**


       * @since 2.0.0


       */


      def createSource(


       sqlContext: SQLContext,


       metadataPath: String,


       schema: Option[StructType],


       providerName: String,


       parameters: Map[String, String]): Source


      }
该功能在 Spark 2.4.2 版本中还是一个实验性质。
再来看一个 trait 为 CreatableRelationProvider:
      trait CreatableRelationProvider {


      def createRelation(


       sqlContext: SQLContext,


       mode: SaveMode,


       parameters: Map[String, String],


       data: DataFrame): BaseRelation


      }
这个 trait 定义的方法 createRelation,功能是保存 DataFrame 到指定的路径,路径具体是在 parameters 参数中定义,其实就是批量数据写操作。
由此,DeltaDataSource 实现了批量数据写和流式数据写操作。由于流式数据写目前版本还是实验功能,笔者暂时不进行深入讲解。
不知道到这里,大家有没有发现什么?
对,DeltaDataSource 也实现了 DataSourceRegister。
3. Delta Lake 批量数据写入
通过上面的分析,我们知道 Delta Lake 的入口类 DeltaDataSource 实现了 CreatableRelationProvider 批量数据写入的操作。那我们来看一下具体实现哪些内容。
CreatableRelationProvider 接口其实只定义了一个方法 createRelation,看一下实现代码,笔者就直接在代码上面简单注释,具体细节在代码下方单独说明:org.apache.spark.sql.delta.sources.DeltaDataSource
      override def createRelation(


       sqlContext: SQLContext,


       mode: SaveMode,


       parameters: Map[String, String],


       data: DataFrame): BaseRelation= {


       // 获取数据写入的路径,路径不存在抛出 "'path' is not specified"


       val path = parameters.getOrElse("path", {


       throw DeltaErrors.pathNotSpecifiedException


       })


       // 获取分区字段


       val partitionColumns = parameters.get(DeltaSourceUtils.PARTITIONING_COLUMNS_KEY)


       .map(DeltaDataSource.decodePartitioningColumns)


       .getOrElse(Nil)


       // 用于数据存储在根目录时创建事务日志


       val deltaLog = DeltaLog.forTable(sqlContext.sparkSession, path)


       // 开始写数据到 Delta,WriteIntoDelta 这个方法非常重要


       WriteIntoDelta(


       deltaLog = deltaLog,


       mode = mode,


       new DeltaOptions(parameters, sqlContext.sparkSession.sessionState.conf),


       partitionColumns = partitionColumns,


       configuration = Map.empty,


       data = data).run(sqlContext.sparkSession)


       // 该 Relation 包含表中存在的所有数据,随着在表中添加或删除文件,此 Relation 将不断更新


       deltaLog.createRelation()


      }
createRelation 方法中传入如下几个参数:
1. sqlContext
Spark SQLContext 实例,不多说。
2. mode 指定保存数据的模式
Delta Lake 支持如下几种方式:
      public enum SaveMode {


       Append,


       Overwrite,


       ErrorIfExists,


       Ignore


      }
3. parameters
一个 Map,可以传入多个参数,一般有数据存储的路径、分区字段以及一些 Schema 变更方式。具体参数类型可以查看 DeltaOptions 中的定义。
4. data
实际存储的数据。
createRelation 方法的操作步骤如下:
1. 获取数据存储路径
2. 获取分区字段
3. deltaLog 初始化操作,这部分涉及内容比较多,接下来详细说明
forTable 方法如下:
      def forTable(spark: SparkSession, dataPath: String): DeltaLog= {


       apply(spark, new Path(dataPath, "_delta_log"), new SystemClock)


      }
具体看一下 apply 方法:
      def apply(spark: SparkSession, rawPath: Path, clock: Clock= new SystemClock): DeltaLog = {


       val hadoopConf = spark.sessionState.newHadoopConf()


       val fs = rawPath.getFileSystem(hadoopConf)


       val path = fs.makeQualified(rawPath)


       val cached = try {


       deltaLogCache.get(path, new Callable[DeltaLog] {


       override def call(): DeltaLog= recordDeltaOperation(


       null, "delta.log.create", Map(TAG_TAHOE_PATH -> path.getParent.toString)) {


       AnalysisHelper.allowInvokingTransformsInAnalyzer {


       new DeltaLog(path, path.getParent, clock)


       }


       }


       })


       } catch {


       case e: com.google.common.util.concurrent.UncheckedExecutionException=>


       throw e.getCause


       }


       if(cached.snapshot.version == -1|| cached.isValid()) {


       cached


       } else {


       deltaLogCache.invalidate(path)


       apply(spark, path)


       }


      }
deltaLog 实例化过程中,读取所有的事务日志(存储在deltalog目录下),构建最新事务日志的最新快照,获取到最新数据的版本。笔者在以前的文章中介绍 deltaLog 初始化过程时,成本较高。所以 deltaLog 实例化后就会被缓存到 deltaLogCache 中,如下实现:
      /**


       * We create only a single [[DeltaLog]] for any given path to avoid wasted work


       * in reconstructing the log.


       */


      private val deltaLogCache = {


       val builder = CacheBuilder.newBuilder()


       .expireAfterAccess(60, TimeUnit.MINUTES)


       .removalListener(new RemovalListener[Path, DeltaLog] {


       override def onRemoval(removalNotification: RemovalNotification[Path, DeltaLog]) = {


       val log = removalNotification.getValue


       try log.snapshot.uncache() catch {


       case _: java.lang.NullPointerException=>


       // Various layers will throw null pointer if the RDD is already gone.


       }


       }


       })


       sys.props.get("delta.log.cacheSize")


       .flatMap(v => Try(v.toLong).toOption)


       .foreach(builder.maximumSize)


       builder.build[Path, DeltaLog]()


      }
看源码就会发现,缓存是使用 Guava 的 CacheBuilder 类实现。代码设置了 expireAfterAccess(60,TimeUnit.MINUTES),即缓存有效期为60分钟,缓存大小可以通过 delta.log.cacheSize 参数进行设置。 deltaLogCache.get 根据数据的路径判断,如果数据路径一致,就可以直接从之前缓存的 deltaLog 中获取。如果之前缓存的 deltaLog 由于过期或无效被清理,就需要再次初始化。
4. WriteIntoDelta 初始化操作
      case class WriteIntoDelta(


       deltaLog: DeltaLog,


       mode: SaveMode,


       options: DeltaOptions,


       partitionColumns: Seq[String],


       configuration: Map[String, String],


       data: DataFrame)


       extends RunnableCommand


       with ImplicitMetadataOperation


       with DeltaCommand{


       ...


      }
WriteIntoDelta 扩展 RunnableCommand trait。WriteIntoDelta 用于将 DataFrame 写入 Delta 表。针对表的类型,定义不同语义操作:
      1. 新表语义


        - 使用 DataFrame 的 schema 初始化表。


        - 分区列将用于对表进行分区。


      2. 现有表语义


       - SaveMode 将控制如何处理现有数据(overwrite、append等)。


       - 检查 DataFrame 的 schema,如果存在新列,则将它们添加到表的 schema 中;


       如果存在冲突的列(比如 INT 和 STRING 类型)将会导致抛出异常。


       - 分区列(如果存在)将根据现有元数据进行验证。如果不存在,那么将考虑表的分区。
可以看出,Delta Lake 中表的更新、删除等都会涉及这个类。
然后调用 run 方法,执行数据写入操作。WriteIntoDelta 的 run 方法实现如下:
      override def run(sparkSession: SparkSession): Seq[Row] = {


       deltaLog.withNewTransaction { txn =>


       val actions = write(txn, sparkSession)


       val operation = DeltaOperations.Write(mode, Option(partitionColumns), options.replaceWhere)


       txn.commit(actions, operation)


       }


       Seq.empty


      }
deltaLog.withNewTransaction 开启一个事务,Delta Lake 数据写入需要在事务中操作。既然这里涉及到事务,我们就先阅读一下代码,以后再深度分析,withNewTransaction 实现如下:
      /**


       * Execute a piece of code within a new [[OptimisticTransaction]]. Reads/write sets will


       * be recorded for this table, and all other tables will be read


       * at a snapshot that is pinned on the first access.


       *


       * @note This uses thread-local variable to make the active transaction visible. So do not use


       * multi-threaded code in the provided thunk.


       */


      def withNewTransaction[T](thunk: OptimisticTransaction=> T): T = {


       try {


       update()


       val txn = new OptimisticTransaction(this)


       OptimisticTransaction.setActive(txn)


       thunk(txn)


       } finally {


       OptimisticTransaction.clearActive()


       }


      }
大致分几个步骤:
1. update()
通过应用新的 delta 文件(如果有)来更新 ActionLog。在开启事务前,需要更新当前表事务的快照,因为在执行写数据之前,该包可能已经被修改。因此执行 update 操作之后,就可以拿到当前表的最新版本。
2. new OptimisticTransaction(this)
获取表的最新版本后,就可以初始化乐观事务锁对象。
3. OptimisticTransaction.setActive(txn)
紧接着,激活并开启事务。
4. thunk(txn)
thunk: OptimisticTransaction
事务下操作,具体实现在
deltaLog.withNewTransaction{txn=>...}
我们继续看 WriteIntoDelta 的 run 方法的代码:
      deltaLog.withNewTransaction { txn =>


       val actions = write(txn, sparkSession)


       val operation = DeltaOperations.Write(mode, Option(partitionColumns), options.replaceWhere)


       txn.commit(actions, operation)


      }
这里就是执行数据写入的操作,write 方法就是核心方法,代码有点多,仔细看看,还是有所收获的,至少比 Java 代码实现简洁很多。由于代码比较多,注解就直接写在源码中了,方便查看:
      def write(txn: OptimisticTransaction, sparkSession: SparkSession): Seq[Action] = {


       import sparkSession.implicits._


       // 如果表未被初始化或 commit 时间戳未知等情况,那么 version = -1


       // 如果表存在,判断 insert 的模式是否符合条件


       if (txn.readVersion > -1) {


       // This table already exists, check if the insert is valid.


       // 数据存在时,抛出异常


       if (mode == SaveMode.ErrorIfExists) {


       throw DeltaErrors.pathAlreadyExistsException(deltaLog.dataPath)


       } else if (mode == SaveMode.Ignore) {


       // 数据存在时,忽略,不变更


       return Nil


       } else if (mode == SaveMode.Overwrite) {


       // 数据存在时,覆盖


       deltaLog.assertRemovable()


       }


       }


       // 更新表的元数据,包括是否覆盖操作或 Schema 的变更操作等


       updateMetadata(txn, data, partitionColumns, configuration, isOverwriteOperation)


       // Validate partition predicates


       // 写数据的时候可能会指定某个分区进行覆盖


       val replaceWhere = options.replaceWhere


       // 判断是否定义分区过滤条件


       val partitionFilters = if (replaceWhere.isDefined) {


       val predicates = parsePartitionPredicates(sparkSession, replaceWhere.get)


       if (mode == SaveMode.Overwrite) {


       verifyPartitionPredicates(


       sparkSession, txn.metadata.partitionColumns, predicates)


       }


       Some(predicates)


       } else {


       None


       }


       // 首次数据写入时,需要创建事务日志的目录


       if (txn.readVersion < 0) {


       // Initialize the log path


       deltaLog.fs.mkdirs(deltaLog.logPath)


       }


       // 初次写入数据,将数据写入到存储目录中


       // 数据写入操作成功后,获取新增的文件列表 AddFile


       val newFiles = txn.writeFiles(data, Some(options))


       // 数据写入成功后,获取需要删除的文件 RemoveFile


       val deletedFiles = (mode, partitionFilters) match {


       case (SaveMode.Overwrite, None) =>


       // 逻辑标记删除


       txn.filterFiles().map(_.remove)


       case (SaveMode.Overwrite, Some(predicates)) =>


       // 检查以确保我们写出的文件确实有效


       val matchingFiles = DeltaLog.filterFileList(


       txn.metadata.partitionColumns, newFiles.toDF(), predicates).as[AddFile].collect()


       val invalidFiles = newFiles.toSet -- matchingFiles


       if (invalidFiles.nonEmpty) {


       val badPartitions = invalidFiles


       .map(_.partitionValues)


       .map { _.map { case(k, v) => s"$k=$v"}.mkString("/") }


       .mkString(", ")


       throw DeltaErrors.replaceWhereMismatchException(replaceWhere.get, badPartitions)


       }


       txn.filterFiles(predicates).map(_.remove)


       case _ => Nil


       }


       newFiles ++ deletedFiles


      }
上面代码多次对 txn.readVersion 进行判断,这是从 snapshot 中获取的版本号,用于判断表是否第一次写入数据,实现源代码:
      /**


       * An initial snapshot with only metadata specified. Useful for creating a DataFrame from an


       * existing parquet table during its conversion to delta.


       * @param logPath the path to transaction log


       * @param deltaLog the delta log object


       * @param metadata the metadata of the table


       */


      class InitialSnapshot(


       val logPath: Path,


       override val deltaLog: DeltaLog,


       override val metadata: Metadata)


       extends Snapshot(logPath, -1, None, Nil, -1, deltaLog, -1)
如果 version = -1,表明第一次写数据到 Delta 表。
另外, val newFiles=txn.writeFiles(data,Some(options))是最终通过 Spark 把数据写入 Delta 表中,都是事务操作,具体操作如下:org.apache.spark.sql.delta.files.TransactionalWrite
      /**


       * Writes out the dataframe after performing schema validation. Returns a list of


       * actions to append these files to the reservoir.


       */


      def writeFiles(


       data: Dataset[_],


       writeOptions: Option[DeltaOptions],


       isOptimize: Boolean): Seq[AddFile] = {


       hasWritten = true


       // SparkSession


       val spark = data.sparkSession


       // 分区 schema


       val partitionSchema = metadata.partitionSchema


       // 写入数据的路径


       val outputPath = deltaLog.dataPath


       // 规范化 Schema,并返回需要被执行的 QueryExecution


       val (queryExecution, output) = normalizeData(data, metadata.partitionColumns)


       val partitioningColumns =


       getPartitioningColumns(partitionSchema, output, output.length < data.schema.size)


       // new DelayedCommitProtocol("delta", outputPath.toString, None)


       // 将文件写到`path`并在`addedStatuses`中返回它们的列表。


       val committer = getCommitter(outputPath)


       // 可以在 Delta 表上定义的不变量列表,这样在对表进行更改时可以执行验证检查,以确保 data hygiene(数据卫生),笔者简单理解为数据质量,应用一些规则,比如字段不为 null


       // 如果遇到不识别的,可能和 Spark 版本不匹配,升级 Spark 版本


       val invariants = Invariants.getFromSchema(metadata.schema, spark)


       // New ExecutionId,用于执行计划


       SQLExecution.withNewExecutionId(spark, queryExecution) {


       val outputSpec = FileFormatWriter.OutputSpec(


       outputPath.toString,


       Map.empty,


       output)


       // 生成物理计划


       val physicalPlan = DeltaInvariantCheckerExec(queryExecution.executedPlan, invariants)


       // 调用 write,将数据写入 Delta 表


       FileFormatWriter.write(


       sparkSession = spark,


       plan = physicalPlan,


       fileFormat = snapshot.fileFormat, // TODO doesn't support changing formats.


       committer = committer,


       outputSpec = outputSpec,


       hadoopConf = spark.sessionState.newHadoopConfWithOptions(metadata.configuration),


       partitionColumns = partitioningColumns,


       bucketSpec = None,


       statsTrackers = Nil,


       options = Map.empty)


       }


       // addedStatuses = new ArrayBuffer[AddFile]


       // 添加新增文件到 AddFile case class 中并返回


       committer.addedStatuses


      }
不知道大家还记不记得,我们之前在实战中,查看过 AddFile 记录相关的信息,它们都存储在事务日志里面,笔者带领大家再来看一下:
      $ hdfs dfs -cat /delta/mydelta.db/user_info/_delta_log/00000000000000000000.json


      {"commitInfo":{"timestamp":1571824795230,"operation":"WRITE","operationParameters":{"mode":"ErrorIfExists","partitionBy":"[]"},"isBlindAppend":true}}


      {"protocol":{"minReaderVersion":1,"minWriterVersion":2}}


      {"metaData":{"id":"44f7e591-cc4c-4121-b0f2-53fb41bf92ec","format":{"provider":"parquet","options":{}},"schemaString":"{\"type\":\"struct\",\"fields\":[{\"name\":\"uid\",\"type\":\"string\",\"nullable\":true,\"metadata\":{}},{\"name\":\"name\",\"type\":\"string\",\"nullable\":true,\"metadata\":{}},{\"name\":\"age\",\"type\":\"string\",\"nullable\":true,\"metadata\":{}}]}","partitionColumns":[],"configuration":{},"createdTime":1571824794341}}


      {"add":{"path":"part-00000-f504c7cc-7599-4253-8265-5767b86fe133-c000.snappy.parquet","partitionValues":{},"size":797,"modificationTime":1571824795183,"dataChange":true}}
其中 add 部分的 json 格式的内容就是 AddFile 记录的内容,包括新增文件的路径,分区值,文件大小等。
那么如果针对 remove 操作呢,其实也是有对应的事务记录日志,以后文章再说。
再回到 WriteIntoDelta.write方法:
      val newFiles = txn.writeFiles(data, Some(options))


      val deletedFiles = (mode, partitionFilters) match {


       case (SaveMode.Overwrite, None) =>


       txn.filterFiles().map(_.remove)


       case (SaveMode.Overwrite, Some(predicates)) =>


       // Check to make sure the files we wrote out were actually valid.


       val matchingFiles = DeltaLog.filterFileList(


       txn.metadata.partitionColumns, newFiles.toDF(), predicates).as[AddFile].collect()


       val invalidFiles = newFiles.toSet -- matchingFiles


       if (invalidFiles.nonEmpty) {


       val badPartitions = invalidFiles


       .map(_.partitionValues)


       .map { _.map { case(k, v) => s"$k=$v"}.mkString("/") }


       .mkString(", ")


       throw DeltaErrors.replaceWhereMismatchException(replaceWhere.get, badPartitions)


       }


       txn.filterFiles(predicates).map(_.remove)


       case _ => Nil


      }


      newFiles ++ deletedFiles
数据写入成功后,我们可以发现 write 方法最后返回的值为:
newFiles ++ deletedFiles
即返回新增的文件和需要删除的文件,并全部记录到 Delta 事务日志中,刚才笔者也查看了对应的事务日志内容。
总结
笔者从源码层面分析了 Delta Lake 批量数据写入的整个流程,大部分内容都详细地进行了解说,大家可以根据源码进行查看,加深印象。对于 Delta Lake 流式数据写入,笔者暂未更新,以后再续。

