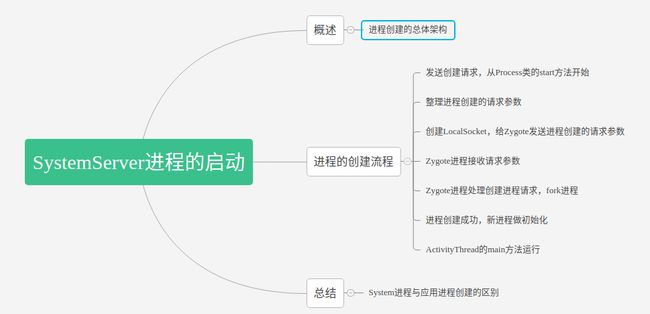
一、内容预览
二、概述
前面进程系列已经更新了四篇,本文(基于Android O源码),梳理应用进程的创建流程。
进程系列第一篇---进程基础
进程系列第二篇---Zygote进程的创建流程
Android进程第三篇---SystemServer进程创建流程
Android进程第四篇---SystemServer进程的启动流程
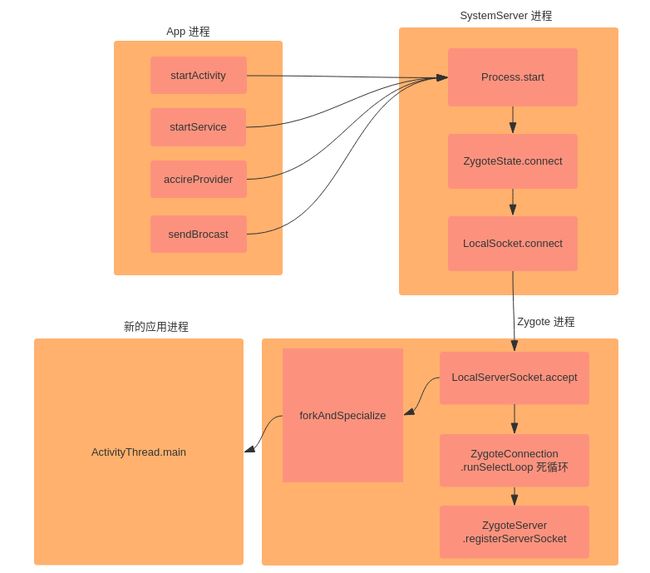
下面是一个进程创建架构图,可以了解一个进程创建的大概流程。
一共涉及了几个角色,发起进程、System进程、Zygote进程、新进程
发起进程
一个App进程可以通过startActivity等系统API请求SystemServer进程创建进程,SystemServer进程把这个活交给了Process.start,这个就是创建进程的入口。System进程
紧接着SystemServer进程通知ZygoteState创建LocalSocket,此时,SystemServer进程一直扮演的都是客户端的角色。Zygote进程
另一方面,在Android开机的过程中,Zygote进程就已经早早的启动了,所以LocalServerSocket就已经很早创建了,runSelectLoop开启了一个死循环一直accept客户端的连接,当SystemServer进程把LocalSocket创建出来之后,就可以使用LocalSocket send/recv数据了,此时就可以通知LocalServerSocket我要创建一个进程。进程fork完成之后,返回结果给System进程的AMS。新进程
Zygote进程把进程fork出来之后,需要做进程的初始化操作,比如设置进程异常的捕获方式,开始Binder线程池等等,最后进入了ActivityThread的main方法,一个有血有肉的进程正式被启动了。
三、进程的创建流程
3.1、发送创建请求,从Process类的start方法开始
所有进程创建的请求都交给Process,从Process类的start方法开始。
frameworks/base/core/java/android/os/Process.java
/**
    * Start a new process.
    *
    * If processes are enabled, a new process is created and the
    * static main() function of a processClass is executed there.
    * The process will continue running after this function returns.
    *
    * If processes are not enabled, a new thread in the caller's
    * process is created and main() of processClass called there.
    *
    * The niceName parameter, if not an empty string, is a custom name to
    * give to the process instead of using processClass.  This allows you to
    * make easily identifyable processes even if you are using the same base
    * processClass to start them.
    *
    * When invokeWith is not null, the process will be started as a fresh app
    * and not a zygote fork. Note that this is only allowed for uid 0 or when
    * debugFlags contains DEBUG_ENABLE_DEBUGGER.
    *
    * @param processClass The class to use as the process's main entry
    *                     point.
    * @param niceName A more readable name to use for the process.
    * @param uid The user-id under which the process will run.
    * @param gid The group-id under which the process will run.
    * @param gids Additional group-ids associated with the process.
    * @param debugFlags Additional flags.
    * @param targetSdkVersion The target SDK version for the app.
    * @param seInfo null-ok SELinux information for the new process.
    * @param abi non-null the ABI this app should be started with.
    * @param instructionSet null-ok the instruction set to use.
    * @param appDataDir null-ok the data directory of the app.
    * @param invokeWith null-ok the command to invoke with.
    * @param zygoteArgs Additional arguments to supply to the zygote process.
    *
    * @return An object that describes the result of the attempt to start the process.
    * @throws RuntimeException on fatal start failure
    *
    * {@hide}
    */
   public static final ProcessStartResult start(final String processClass,
                                 final String niceName,
                                 int uid, int gid, int[] gids,
                                 int debugFlags, int mountExternal,
                                 int targetSdkVersion,
                                 String seInfo,
                                 String abi,
                                 String instructionSet,
                                 String appDataDir,
                                 String invokeWith,
                                 String[] zygoteArgs) {
       return zygoteProcess.start(processClass, niceName, uid, gid, gids,
                   debugFlags, mountExternal, targetSdkVersion, seInfo,
                   abi, instructionSet, appDataDir, invokeWith, zygoteArgs);
   }
举例:当启动一个Activity的时候,发现Activity所在进程没有被创建,就会调用这个API进程进行创建。Process.start()方法是阻塞操作,等待直到进程创建完成并返回相应的新进程pid,才完成该方法。
  ProcessStartResult  startResult = Process.start(entryPoint,
                       app.processName, uid, uid, gids, debugFlags, mountExternal,
                       app.info.targetSdkVersion, seInfo, requiredAbi, instructionSet,
                       app.info.dataDir, invokeWith, entryPointArgs);
           }
为了更好的理解各个参数的含义,我debug一下,得到的各个参数值如下图(我调试的过程中发现,头条一启动就有很多进程跟着起来,做ROM工程师真是累啊,虽然只是打开一个应用,背后唤醒的都不止10个进程,每个进程都需要申请系统的资源,相信每一家ROM对进程的存活都有严格的把控!)
3.2、整理进程创建的请求参数
在Process.start之后,有几个链条式的调用,Process.start->ZygoteProcess.start->ZygoteProcess.startViaZygote,返回ZygoteState,ZygoteState封装了Socket的输入和输出流,zygoteInputStream与zygoteWrite,zygoteWrite可以把创建进程的参数从SystemServer进程传递到Zygote进程,zygoteInputStream可以把返回结果从Zygote进程返回到SystemServer进程。以下几个调用就是不断的封装并传递创建进程的请求参数。
/frameworks/base/core/java/android/os/ZygoteProcess.java
195    public final Process.ProcessStartResult start(final String processClass,
196                                                  final String niceName,
197                                                  int uid, int gid, int[] gids,
198                                                  int debugFlags, int mountExternal,
199                                                  int targetSdkVersion,
200                                                  String seInfo,
201                                                  String abi,
202                                                  String instructionSet,
203                                                  String appDataDir,
204                                                  String invokeWith,
205                                                  String[] zygoteArgs) {
206        try {
207            return startViaZygote(processClass, niceName, uid, gid, gids,
208                    debugFlags, mountExternal, targetSdkVersion, seInfo,
209                    abi, instructionSet, appDataDir, invokeWith, zygoteArgs);
210        } catch (ZygoteStartFailedEx ex) {
211            Log.e(LOG_TAG,
212                    "Starting VM process through Zygote failed");
213            throw new RuntimeException(
214                    "Starting VM process through Zygote failed", ex);
215        }
216    }
 /frameworks/base/core/java/android/os/ZygoteProcess.java
329    private Process.ProcessStartResult startViaZygote(final String processClass,
330                                                      final String niceName,
331                                                      final int uid, final int gid,
332                                                      final int[] gids,
333                                                      int debugFlags, int mountExternal,
334                                                      int targetSdkVersion,
335                                                      String seInfo,
336                                                      String abi,
337                                                      String instructionSet,
338                                                      String appDataDir,
339                                                      String invokeWith,
340                                                      String[] extraArgs)
341                                                      throws ZygoteStartFailedEx {
342        ArrayList argsForZygote = new ArrayList();
            ......
430        synchronized(mLock) {
431            return zygoteSendArgsAndGetResult(openZygoteSocketIfNeeded(abi), argsForZygote);
432        }
433    }
该过程主要工作是生成argsForZygote列表,把startViaZygote方法的参数存放到这个列表里面。并且调用zygoteSendArgsAndGetResult请求Zygotefork进程。
3.3、创建Socket,给Zygote进程发送进程创建的请求参数
 /frameworks/base/core/java/android/os/ZygoteProcess.java
454    @GuardedBy("mLock")
455    private ZygoteState openZygoteSocketIfNeeded(String abi) throws ZygoteStartFailedEx {
456        Preconditions.checkState(Thread.holdsLock(mLock), "ZygoteProcess lock not held");
457
458        if (primaryZygoteState == null || primaryZygoteState.isClosed()) {
459            try {
460                primaryZygoteState = ZygoteState.connect(mSocket);
461            } catch (IOException ioe) {
462                throw new ZygoteStartFailedEx("Error connecting to primary zygote", ioe);
463            }
464        }
465
466        if (primaryZygoteState.matches(abi)) {
467            return primaryZygoteState;
468        }
469
470        // The primary zygote didn't match. Try the secondary.
471        if (secondaryZygoteState == null || secondaryZygoteState.isClosed()) {
472            try {
473                secondaryZygoteState = ZygoteState.connect(mSecondarySocket);
474            } catch (IOException ioe) {
475                throw new ZygoteStartFailedEx("Error connecting to secondary zygote", ioe);
476            }
477        }
478        //判断当前的abi来选择与zygote还是zygote64来进行通信
479        if (secondaryZygoteState.matches(abi)) {
480            return secondaryZygoteState;
481        }
482
483        throw new ZygoteStartFailedEx("Unsupported zygote ABI: " + abi);
484    }
通过前面的文章可知道,Zygote进程有两个Socket,这里当主zygote没能匹配成功,则尝试第二个mSecondarySocket来连接。
 /frameworks/base/core/java/android/os/ZygoteProcess.java
92        public static ZygoteState connect(String socketAddress) throws IOException {
93            DataInputStream zygoteInputStream = null;
94            BufferedWriter zygoteWriter = null;
95            final LocalSocket zygoteSocket = new LocalSocket();
96
97            try {
98                zygoteSocket.connect(new LocalSocketAddress(socketAddress,
99                        LocalSocketAddress.Namespace.RESERVED));
100
101                zygoteInputStream = new DataInputStream(zygoteSocket.getInputStream());
102
103                zygoteWriter = new BufferedWriter(new OutputStreamWriter(
104                        zygoteSocket.getOutputStream()), 256);
105            } catch (IOException ex) {
106                try {
107                    zygoteSocket.close();
108                } catch (IOException ignore) {
109                }
110
111                throw ex;
112            }
113
114            String abiListString = getAbiList(zygoteWriter, zygoteInputStream);
115            Log.i("Zygote", "Process: zygote socket " + socketAddress + " opened, supported ABIS: "
116                    + abiListString);
117
118            return new ZygoteState(zygoteSocket, zygoteInputStream, zygoteWriter,
119                    Arrays.asList(abiListString.split(",")));
120        }
这个方法主要是建立了SystemServer(Client)这一边的Socket---LocalSocket,与Zygote进程的LocalServerSocket成功连接之后,获取这个LocalSocket的输入流zygoteInputStream与输出流zygoteWriter,并且将他们封装到ZygoteState中再返回。关于Socket的工作原理,移步本系列第三篇博客。
253    @GuardedBy("mLock")
254    private static Process.ProcessStartResult zygoteSendArgsAndGetResult(
255            ZygoteState zygoteState, ArrayList args)
256            throws ZygoteStartFailedEx {
257        try {
258            // Throw early if any of the arguments are malformed. This means we can
259            // avoid writing a partial response to the zygote.
260            int sz = args.size();
261            for (int i = 0; i < sz; i++) {
262                if (args.get(i).indexOf('\n') >= 0) {
263                    throw new ZygoteStartFailedEx("embedded newlines not allowed");
264                }
265            }
266
               ........
                  //1、从ZygoteState中取出输入流和输出流
277            final BufferedWriter writer = zygoteState.writer;
278            final DataInputStream inputStream = zygoteState.inputStream;
279            //2、用输入流将创建进程的参数传递给Zygote进程
280            writer.write(Integer.toString(args.size()));
281            writer.newLine();
282
283            for (int i = 0; i < sz; i++) {
284                String arg = args.get(i);
285                writer.write(arg);
286                writer.newLine();
287            }
288
289            writer.flush();
290
291            //创建Process.ProcessStartResult用于存放fork进程的返回结果
292            Process.ProcessStartResult result = new Process.ProcessStartResult();
293
294            // Always read the entire result from the input stream to avoid leaving
295            // bytes in the stream for future process starts to accidentally stumble
296            // upon.
                  //输入流读取Zygote进程创建进程之后返回的数据,保存在Process.ProcessStartResult中
297            result.pid = inputStream.readInt();
298            result.usingWrapper = inputStream.readBoolean();
299            //通过判断result.pid 是否创建成功
300            if (result.pid < 0) {
301                throw new ZygoteStartFailedEx("fork() failed");
302            }
303            return result;
304        } catch (IOException ex) {
305            zygoteState.close();
306            throw new ZygoteStartFailedEx(ex);
307        }
308    }
这段做的工作主要是从ZygoteState中取出输入流和输出流,然后和Server端的Zygote进程的LocketServerSocket进行通信。将AMS中创建进程的参数传递给Zygote进程。Zygote进程fork完成之后, inputStream.readInt()就能读取出返回结果,如果小于0,代表创建失败,不小于0代表创建成功。
这段代码存在一个问题,如果Zygote进程fork进程超时,System这段迟迟不能get到返回结果,会引起什么后果?
试想一下,当 AMS 需要创建进程时, 会通过 Socket 与 zygote 进程通信, 当 zygote 接收到请求后会 fork 出一个子进程, 并将其 pid 返回给 AMS。需要注意的是, 在收到 pid 之前, AMS 会一直持锁等待,而且这里持有的是AMS大锁, 所以就会 block 其他重要线程, 导致系统卡死,用户反馈内容也会主要围绕 "系统卡死" "按键没有反应" 等等。
那如何解决这个问题?google其实有注意到,准备加一个超时机制,但是一直没有加上,但是这种情况也是治标不治本,解决这种问题还是要具体分析,是内存碎片严重导致fork进程申请page失败,还是其他原因,需要根据Log具体对待。
3.4、Zygote进程接收请求参数
到这里,Client段的工作就全部看完了,现在去看看Socket的服务端。再次回顾一下那段“模板”代码。
  frameworks/base/core/java/com/android/internal/os/ZygoteInit.java
 public static void main(String argv[]) {
        //1、创建ZygoteServer
        ZygoteServer zygoteServer = new ZygoteServer();
        try {
            //2、创建一个Server端的Socket
            zygoteServer.registerServerSocket(socketName);
            //3、加载进程的资源和类
            preload(bootTimingsTraceLog);
            if (startSystemServer) {
                //4、开启SystemServer进程,这是受精卵进程的第一次分裂
                startSystemServer(abiList, socketName, zygoteServer);
            }
            //5、启动一个死循环监听来自Client端的消息
            zygoteServer.runSelectLoop(abiList);
             //6、关闭SystemServer的Socket
            zygoteServer.closeServerSocket();
        } catch (Zygote.MethodAndArgsCaller caller) {
             //7、这里捕获这个异常调用MethodAndArgsCaller的run方法。
            caller.run();
        } catch (Throwable ex) {
            Log.e(TAG, "System zygote died with exception", ex);
            zygoteServer.closeServerSocket();
            throw ex;
        }
    }
注释写的很详细了,不多做解释,直接看runSelectLoop方法。
 /frameworks/base/core/java/com/android/internal/os/ZygoteServer.java
136    void runSelectLoop(String abiList) throws Zygote.MethodAndArgsCaller {
137        ArrayList fds = new ArrayList();
138        ArrayList peers = new ArrayList();
139        //将服务端LocalServerSocket的fd加进fds中
140        fds.add(mServerSocket.getFileDescriptor());
141        peers.add(null);
142
143        while (true) {
144            StructPollfd[] pollFds = new StructPollfd[fds.size()];
145            for (int i = 0; i < pollFds.length; ++i) {
146                pollFds[i] = new StructPollfd();
147                pollFds[i].fd = fds.get(i);
148                pollFds[i].events = (short) POLLIN;
149            }
150            try {
                    //处理轮询状态,当pollFds有事件到来则往下执行,否则阻塞在这里
151                Os.poll(pollFds, -1);
152            } catch (ErrnoException ex) {
153                throw new RuntimeException("poll failed", ex);
154            }
                //当接收到客户端发出连接请求 或者数据处理请求到来,则往下执行;否则进入continue,跳出本次循环。
155            for (int i = pollFds.length - 1; i >= 0; --i) {
156                if ((pollFds[i].revents & POLLIN) == 0) {
157                    continue;
158                }
                     //当i为0的时候,创建ZygoteConnection,实质就创建LocalServerSocket
159                if (i == 0) {
160                    ZygoteConnection newPeer = acceptCommandPeer(abiList);
161                    peers.add(newPeer);
                          //将LocalServerSocket的fd添加到fds
162                    fds.add(newPeer.getFileDesciptor());
163                } else {
                          将LocalServerSocket的fd取出来,执行runOnce
164                    boolean done = peers.get(i).runOnce(this);
165                    if (done) {
                              //完成之后将fd与ZygoteConnection移除
166                        peers.remove(i);
167                        fds.remove(i);
168                    }
169                }
170            }
171        }
172    }
173}
runSelectLoop中有一个while死循环,接收进程创建请求,当来了一个请求,就会走runOnce方法
78    /**
79     * Waits for and accepts a single command connection. Throws
80     * RuntimeException on failure.
81     */
82    private ZygoteConnection acceptCommandPeer(String abiList) {
83        try {
84            return createNewConnection(mServerSocket.accept(), abiList);
85        } catch (IOException ex) {
86            throw new RuntimeException(
87                    "IOException during accept()", ex);
88        }
89    }
acceptCommandPeer中调用createNewConnection,返回值是一个ZygoteConnection,封装了mServerSocket的输入流mSocketReader与输出流mSocketOutStream,这个与Clinet端的ZygoteState有着异曲同工之妙啊。
/frameworks/base/core/java/com/android/internal/os/ZygoteConnection.java
91    ZygoteConnection(LocalSocket socket, String abiList) throws IOException {
92        mSocket = socket;
93        this.abiList = abiList;
94
95        mSocketOutStream
96                = new DataOutputStream(socket.getOutputStream());
97
98        mSocketReader = new BufferedReader(
99                new InputStreamReader(socket.getInputStream()), 256);
100
101        mSocket.setSoTimeout(CONNECTION_TIMEOUT_MILLIS);
102
103        try {
104            peer = mSocket.getPeerCredentials();
105        } catch (IOException ex) {
106            Log.e(TAG, "Cannot read peer credentials", ex);
107            throw ex;
108        }
109    }
3.5、Zygote进程处理创建进程请求,fork进程
在ZygoteConnection创建好了之后,就执行runOnce真正处理进程的创建请求了。
/frameworks/base/core/java/com/android/internal/os/ZygoteConnection.java
134    boolean runOnce(ZygoteServer zygoteServer) throws Zygote.MethodAndArgsCaller {
135
136        String args[];
137        Arguments parsedArgs = null;
138        FileDescriptor[] descriptors;
139
140        try {
                 //把进程创建的参数读取出来
141            args = readArgumentList();
142            descriptors = mSocket.getAncillaryFileDescriptors();
143        } catch (IOException ex) {
144            Log.w(TAG, "IOException on command socket " + ex.getMessage());
145            closeSocket();
146            return true;
147        }
148
149        if (args == null) {
150            // EOF reached.
                  //参数为null,需要关闭之前创建的Socket,进程创建请求参数为null还没有仔细的调查过
151            closeSocket();
152            return true;
153        }
              ........
162
163        int pid = -1;
164        FileDescriptor childPipeFd = null;
165        FileDescriptor serverPipeFd = null;
166
167        try {
                  //将进程创建请求参数整理成Arguments对象
168            parsedArgs = new Arguments(args);
               ........
238            //创建子进程,底层调用fork函数,返回值有两个,基于写时复制
239            pid = Zygote.forkAndSpecialize(parsedArgs.uid, parsedArgs.gid, parsedArgs.gids,
240                    parsedArgs.debugFlags, rlimits, parsedArgs.mountExternal, parsedArgs.seInfo,
241                    parsedArgs.niceName, fdsToClose, fdsToIgnore, parsedArgs.instructionSet,
242                    parsedArgs.appDataDir);
243        } catch (ErrnoException ex) {
244            logAndPrintError(newStderr, "Exception creating pipe", ex);
245        } catch (IllegalArgumentException ex) {
246            logAndPrintError(newStderr, "Invalid zygote arguments", ex);
247        } catch (ZygoteSecurityException ex) {
248            logAndPrintError(newStderr,
249                    "Zygote security policy prevents request: ", ex);
250        }
251
252        try {
                 //pid==0代表是新创建的子进程
253            if (pid == 0) {
254                //关闭从Zygote进程继承而来的Socket
255                zygoteServer.closeServerSocket();
256                IoUtils.closeQuietly(serverPipeFd);
257                serverPipeFd = null;
                      //处理子进程接下来的工作
258                handleChildProc(parsedArgs, descriptors, childPipeFd, newStderr);
259
260                // should never get here, the child is expected to either
261                // throw Zygote.MethodAndArgsCaller or exec().
262                return true;
263            } else {
264               //大于0,是父进程,也就是Zygote进程
265                IoUtils.closeQuietly(childPipeFd);
266                childPipeFd = null;
                     //处理父进程接下来的工作
267                return handleParentProc(pid, descriptors, serverPipeFd, parsedArgs);
268            }
269        } finally {
270            IoUtils.closeQuietly(childPipeFd);
271            IoUtils.closeQuietly(serverPipeFd);
272        }
273    }
在调用Zygote.forkAndSpecialize之前,需要调用readArgumentList把创建进程的请求参数从Socket中读取出来,放在一个名为result的String数组中。
/frameworks/base/core/java/com/android/internal/os/ZygoteConnection.java
631    /**
632     * Reads an argument list from the command socket/
633     * @return Argument list or null if EOF is reached
634     * @throws IOException passed straight through
635     */
636    private String[] readArgumentList()
637            throws IOException {
            ......
649        int argc;
650
651        try {
652            String s = mSocketReader.readLine();
653
654            if (s == null) {
655                // EOF reached.
656                return null;
657            }
658            argc = Integer.parseInt(s);
659        } catch (NumberFormatException ex) {
660            Log.e(TAG, "invalid Zygote wire format: non-int at argc");
661            throw new IOException("invalid wire format");
662        }
663
664        // See bug 1092107: large argc can be used for a DOS attack
665        if (argc > MAX_ZYGOTE_ARGC) {
666            throw new IOException("max arg count exceeded");
667        }
668
669        String[] result = new String[argc];
670        for (int i = 0; i < argc; i++) {
671            result[i] = mSocketReader.readLine();
672            if (result[i] == null) {
673                // We got an unexpected EOF.
674                throw new IOException("truncated request");
675            }
676        }
677
678        return result;
679    }
参数有了就调用Zygote.forkAndSpecialize方法fork进程了,关于进程的fork,第三篇写的更详细,这里不赘述。
99    public static int forkAndSpecialize(int uid, int gid, int[] gids, int debugFlags,
100          int[][] rlimits, int mountExternal, String seInfo, String niceName, int[] fdsToClose,
101          int[] fdsToIgnore, String instructionSet, String appDataDir) {
102        VM_HOOKS.preFork();
103        // Resets nice priority for zygote process.
104        resetNicePriority();
             //jni技术调用fork函数
105        int pid = nativeForkAndSpecialize(
106                  uid, gid, gids, debugFlags, rlimits, mountExternal, seInfo, niceName, fdsToClose,
107                  fdsToIgnore, instructionSet, appDataDir);
108        // Enable tracing as soon as possible for the child process.
109        if (pid == 0) {
110            Trace.setTracingEnabled(true);
111
112            // Note that this event ends at the end of handleChildProc,
113            Trace.traceBegin(Trace.TRACE_TAG_ACTIVITY_MANAGER, "PostFork");
114        }
115        VM_HOOKS.postForkCommon();
116        return pid;
117    }
3.6、进程创建成功,新进程做初始化
当forkAndSpecialize完成之后,进程就被创建出来了,但是这个进程是光秃秃的,还需一些工作要处理,即走进handleChildProc方法。
786    private void handleChildProc(Arguments parsedArgs,
787            FileDescriptor[] descriptors, FileDescriptor pipeFd, PrintStream newStderr)
788            throws Zygote.MethodAndArgsCaller {
               .......
               //设置进程名字
811        if (parsedArgs.niceName != null) {
812            Process.setArgV0(parsedArgs.niceName);
813        }
814
815        // End of the postFork event.
816        Trace.traceEnd(Trace.TRACE_TAG_ACTIVITY_MANAGER);
817        if (parsedArgs.invokeWith != null) {
818            WrapperInit.execApplication(parsedArgs.invokeWith,
819                    parsedArgs.niceName, parsedArgs.targetSdkVersion,
820                    VMRuntime.getCurrentInstructionSet(),
821                    pipeFd, parsedArgs.remainingArgs);
822        } else {
                   //做进程的一些初始化操作,与System进程创建一致的
823            ZygoteInit.zygoteInit(parsedArgs.targetSdkVersion,
824                    parsedArgs.remainingArgs, null /* classLoader */);
825        }
826    }
/frameworks/base/core/java/com/android/internal/os/ZygoteInit.java
829    public static final void zygoteInit(int targetSdkVersion, String[] argv,
830            ClassLoader classLoader) throws Zygote.MethodAndArgsCaller {
831        if (RuntimeInit.DEBUG) {
832            Slog.d(RuntimeInit.TAG, "RuntimeInit: Starting application from zygote");
833        }
834
835        Trace.traceBegin(Trace.TRACE_TAG_ACTIVITY_MANAGER, "ZygoteInit");
          //见本系列第三篇文章3.5.1
836        RuntimeInit.redirectLogStreams();
837       //见本系列第三篇文章3.5.2
838        RuntimeInit.commonInit();
           //见本系列第三篇文章3.5.3
839        ZygoteInit.nativeZygoteInit();
          //见本系列第三篇文章3.5.4
840        RuntimeInit.applicationInit(targetSdkVersion, argv, classLoader);
841    }
842
zygoteInit与System进程创建是一致的,每个进程在创建出来之后,都需要做四件事情。
- 重定向log输出
- 通用的一些初始化,比如设置进程的异常捕获方式、时区等
- 调用nativeZygoteInit进行Zygote的初始化,开启Binder线程池
- 调用applicationInit进行应用的初始化
在此不赘述,可移步见本系列第三篇文章。这里看一下applicationInit进行应用的初始化。
 /frameworks/base/core/java/com/android/internal/os/RuntimeInit.java
289    protected static void applicationInit(int targetSdkVersion, String[] argv, ClassLoader classLoader)
290            throws Zygote.MethodAndArgsCaller {
              .....
303        final Arguments args;
304        try {
305            args = new Arguments(argv);
306        } catch (IllegalArgumentException ex) {
307            Slog.e(TAG, ex.getMessage());
308            // let the process exit
309            return;
310        }
              .....
315        // 唤醒进程的main方法
316        invokeStaticMain(args.startClass, args.startArgs, classLoader);
317    }
此处的args.startClass为android.app.ActivityThread.java,当fork System进程的时候,args.startClass为com.android.server.SystemServer.java。
/frameworks/base/core/java/com/android/internal/os/RuntimeInit.java
231    private static void invokeStaticMain(String className, String[] argv, ClassLoader classLoader)
232            throws Zygote.MethodAndArgsCaller {
233        Class cl;
234
235        try {
236            cl = Class.forName(className, true, classLoader);
237        } catch (ClassNotFoundException ex) {
238            throw new RuntimeException(
239                    "Missing class when invoking static main " + className,
240                    ex);
241        }
242
243        Method m;
244        try {
                  //"main是写死的,Android所有应用进程的入口就是android.app.ActivityThread.java中的main方法
245            m = cl.getMethod("main", new Class[] { String[].class });
246        } catch (NoSuchMethodException ex) {
247            throw new RuntimeException(
248                    "Missing static main on " + className, ex);
249        } catch (SecurityException ex) {
250            throw new RuntimeException(
251                    "Problem getting static main on " + className, ex);
252        }
        .......
266        throw new Zygote.MethodAndArgsCaller(m, argv);
267    }
invokeStaticMain主要反射了android.app.ActivityThread.java中的main方法,得到Method对象m,为了清除栈帧,为新创建的进行一个干净的环境,最后抛出一个异常Zygote.MethodAndArgsCaller。这个异常会在ZygoteInit的main中被捕获。
  frameworks/base/core/java/com/android/internal/os/ZygoteInit.java
 public static void main(String argv[]) {
       .....
            //1、启动一个死循环监听来自Client端的消息
            zygoteServer.runSelectLoop(abiList);
             //2、关闭SystemServer的Socket
            zygoteServer.closeServerSocket();
        } catch (Zygote.MethodAndArgsCaller caller) {
             //3、这里捕获这个异常调用MethodAndArgsCaller的run方法。
            caller.run();
        } catch (Throwable ex) {
            Log.e(TAG, "System zygote died with exception", ex);
            zygoteServer.closeServerSocket();
            throw ex;
        }
    }
捕获之后,调用MethodAndArgsCaller的run方法,终于进入了ActivityThread的main方法了,一个有血有肉的进程就启动成功了。
225    public static class MethodAndArgsCaller extends Exception
226            implements Runnable {
227        /** method to call */
228        private final Method mMethod;
229
230        /** argument array */
231        private final String[] mArgs;
232
233        public MethodAndArgsCaller(Method method, String[] args) {
234            mMethod = method;
235            mArgs = args;
236        }
237
238        public void run() {
239            try {
240                mMethod.invoke(null, new Object[] { mArgs });
241            } catch (IllegalAccessException ex) {
242                throw new RuntimeException(ex);
243            } catch (InvocationTargetException ex) {
244                Throwable cause = ex.getCause();
245                if (cause instanceof RuntimeException) {
246                    throw (RuntimeException) cause;
247                } else if (cause instanceof Error) {
248                    throw (Error) cause;
249                }
250                throw new RuntimeException(ex);
251            }
252        }
253    }
254}
进程被创建出来了,系统中资源和类我们就可以直接使用了,这是怎么回事?由于Android系统基本所有进程的创建都是交给Zygote进程创建的,而进程的fork基于写时复制技术,所以Zygote进程启动时候加载的资源也会被应用进程所使用,如下图,原来进程中所需要的资源,库等都是由它老子办好了,继承过来就行。资源的加载过程参考本系列第二篇博客。
四、总结
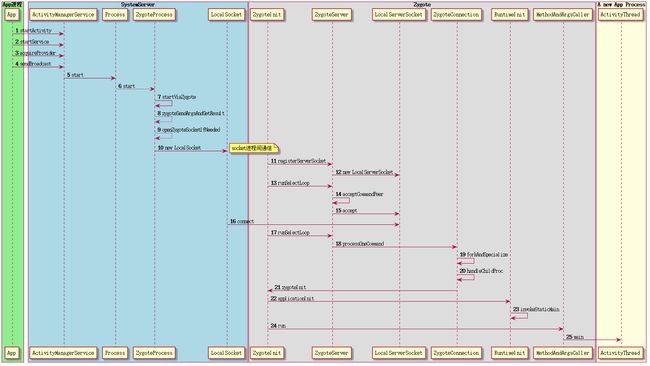
应用进程的创建和System进程的创建基本上一致,尤其是在fork进程之后的逻辑,是一模一样的,不同的是,System进程是Zygote进程的大儿子,由自己亲手创建,而其他应用进程是通过Process.start发送创建请求,Zygote帮忙创建的。这个过程其实不算复杂,创建流程的详细序列图如下。
进程的创建花了四篇的篇幅,从Zygote进程的创建,System进程的创建和启动,在到应用进程的创建,到此就结束了,下面将会梳理AMS中进程的数据结构---ProcessRecord。


