tensorflow框架到caffe框架的模型转换
本文参考以下系列内容:
tensorflow2caffe(1) : caffemodel解析,caffemodel里面到底记录了什么?
tensorflow2caffe(2) : 如何在tensorflow中取出模型参数
tensorflow2caffe(3) : 如何将tensorflow框架下训练得到的权重转化为caffe框架下的权重参数
tensorflow2caffe(4) : caffemodel的生成与tensorflow2caffe框架转换的总结
tensorflow训练好的模型转caffe模型---2019cvpr的人脸关键点PFLD模型为例
1、提取tensorflow模型的权重参数
tensorflow模型文件结构:
(1)checkpoint文件:这是一个训练结果的索引,可以看到我们保存的模型(对应保存模型的程序在tensorflow的训练程序中,比较爱使用tf.Train.Saver.save接口存储模型参数)
(2)**.mata文件:一个记录Graph的文件,在tensorflow中,Graph记录了所有数据的流向,规定了整个模型的结构。
(3) **.data-00000-of-00001文件:这个文件比较大(往往几十甚至上百M),这个文件是记录了我们训练得到的数据,
是以压缩性形式存储的。
(4) **.index文件:这个文件记录了数据的index,就是需要提取参数的时候,在meta文件中找到了参数名,
然后通过这个index,再从训练数据文件中提取数据具体的值。
提取出tensorflow的训练参数步骤:
(1)载入数据流图;
(2)通过checkpoint找到目前最新的训练保存结果;
(3)提取训练得到的所有参数。
import numpy as np
import tensorflow as tf

os.environ["CUDA_VISIBLE_DEVICES"] = "0"
config = tf.ConfigProto(allow_soft_placement=True)
with tf.Session(config=config) as sess:
    new_saver = tf.train.import_meta_graph('WingLoss_v1_300.meta')  #load graph
    new_saver.restore(sess, WingLoss_v1_300)
    all_vars = tf.trainable_variables()  #get the param names
    for v in all_vars:
        name = v.name.replace('/', '_').replace(":0","")
        fname = layer_params_save_path+ name + '.prototxt'
        print(v.name)
        print(fname)
        v_4d = np.array(sess.run(v))
        print(v_4d.shape)
2、训练的权重参数由 tf 转成caffe
目前手里面已经有的东西:
(1)我们有自己的tensorflow训练程序,即:知道训练的网络架构。
(2)我们能够得到tensorflow架构训练得到的参数,并且我们知道我们的主要目的是得到一个caffemodel。
现在还缺少的东西:
当我们使用caffe框架训练模型完毕后,需要测试这个模型,我们必须的东西什么?
(1)我们需要一个caffemodel,
(2)在模型测试的时候,我们需要一个.prototxt文件,该文件记录了网络前传的逻辑顺序。
当使用caffe框架训练模型的时候,我们会使用一个prototxt文件,姑且就叫他train.prototxt吧。
那么,在测试模型的时候,我们同样使用了一个prototxt文件,姑且将该文件称为test.prototxt。
那么,如何将train.prototxt、训练得到的caffemodel文件还有test.prototxt文件关联起来呢?
答案是这样的:caffemodel里面包含了绝大部分train.prototxt的内容。
为什么要这么做,是因为train.prototxt除了约定了训练网络架构与参数配置,
更重要的是规定了键名,这个键名就是layer中的"name"参数,而该键名也会记录在caffemodel中。
在我们训练完毕模型并使用test.prototxt结合caffemodel对模型进行测试时,
相当于是根据test.prortotxt中的layer的"name"参数去取得键名,然后根据这个键名在caffemodel中取得参数
,然后才能进行网络的前向传播。到这里,请读者朋友们明白,test.prototxt是根据键名去caffemodel中取参数的,
也就是说,如果提供的键名在caffemodel中找寻不到,那么也就无从取值。
这其实和我们使用caffe框架训练模型时需要去finetune成熟模型的部分层的参数,
于是我们就将我们的模型中需要finetune的layer的"name"参数改成finetune的caffemodel中对应layer的"name"一样是同一个道理.
经过上面一段话的阐述,就明白了目前还缺少什么东西:
(1) 我们需要一个test.prototxt。
(2) 我们需要将tensorflow训练出来的参数转化成文本,并且写在test.prototxt里面。
在撰写test.prototxt的时候,网络架构应该按照tensorflow训练程序的网络架构来。
也就是说,在写作test.prototxt的时候,需要对tensorflow框架下面的训练网络架构相当熟悉,
并且明了tensorflow和caffe下面的框架协议规范。
举个栗子,在写tensorflow卷积层时候,有很多读者朋友可能会使用padding = "SAME" 这个参数,
可是在caffe,没有那么智能的操作,因此在写test.prototxt框架下面卷积层的定义参数的时候,需要人为地去pad,
再比如说,tensorflow下面的卷积实现的时候有时没有在权重中加上bias,只有weight,
那么在撰写test.prototxt的时候,就需要在该卷积层convolution_param的大括号中,加上"bias_term: false"的定义。
在1中,已经能够打印出tensorflow下训练得到的权重参数的名字了,也就是说可以得到权重。
以卷积层为例,tesorflow框架下卷积层的权重shape是[kernel_height, kernel_width, input_channels, output_channels],
即[H W C N],(相反,反卷积层的权重shape是[kernel_height, kernel_width, output_channels, input_channels])
caffemodel在每一个layer中,记录参数的blobs大括号尾部,有一个shape属性,里面的dims就记录了caffe框架下的参数格式,
在caffe框架中,卷积层权重参数shape是[output_channels, input_channels, kernel_height, kernel_width],即 [N C H W]
(相反地,反卷积层权重参数是[input_channels, output_channels, kernel_height, kernel_width])。
因此,我们需要将参数的维度通过numpy的swapaxes函数加以变换。
具体代码如下:
# coding=utf-8
import os
import numpy as np
import tensorflow as tf

os.environ["CUDA_VISIBLE_DEVICES"] = "0"

layer_params_save_path = "./layer_params_save/"

config = tf.ConfigProto(allow_soft_placement=True)
with tf.Session(config=config) as sess:
    new_saver = tf.train.import_meta_graph(WingLoss_v1_300.meta)
    new_saver.restore(sess, WingLoss_v1_300)
    all_vars = tf.trainable_variables()
    for v in all_vars:
        name = v.name.replace('/', '_').replace(":0","")
        fname = layer_params_save_path+ name + '.prototxt'
        print(v.name)
        print(fname)
        v_4d = np.array(sess.run(v))
        print(v_4d.shape)
        # 维度为4的是卷积层权重
        if v_4d.ndim == 4:
            # 两个框架之间对卷积的处理顺序不一致,
            # 将TensorFlow的维度[ H, W, C, N ]顺序变换为caffe的维度[ N, C, H, W ]
            # 使用numpy的swapaxes函数进行顺序变换
            v_4d = np.swapaxes(v_4d, 0, 2)  # swap H, C
            v_4d = np.swapaxes(v_4d, 1, 3)  # swap N, W
            v_4d = np.swapaxes(v_4d, 0, 1)  # swap C, N

            f = open(fname, 'w')
            vshape = v_4d.shape[:]
            v_1d = v_4d.reshape(v_4d.shape[0] * v_4d.shape[1] * v_4d.shape[2] * v_4d.shape[3])
            f.write('  blobs {\n')
            for vv in v_1d:
                f.write('    data: %8f' % vv)
                f.write('\n')
            f.write('    shape {\n')
            for s in vshape:
                f.write('      dim: ' + str(s))
                f.write('\n')
            f.write('    }\n')
            f.write('  }\n')

        # 维度为1的是偏置项(包含卷积与全连接层)
        elif v_4d.ndim == 1:
            f = open(fname, 'w')
            # conv/fc 这个参数可以自行更改 根据TensorFlow训练代码的name更改
            # 这里加个if的目的是区分卷积层与全连接层
            # 如果是全连接层就直接写入权重文件(反正就是个矩阵)#原作者的不经过这一步
            if 'fc'in fname:
                f.write('  blobs {\n')
                for vv in v_4d:
                    f.write('    data: %.8f\n' % vv)
                f.write('    shape {\n')
                f.write('      dim: ' + str(v_4d.shape[0]))  # print dims
                f.write('\n')
                f.write('    }\n')
                f.write('  }\n')
            # 其余的是卷积层 就加上caffe的模板格式
            else:
                f.write('  blobs {\n')
                for vv in v_4d:
                    f.write('    data: %.8f' % vv)
                    f.write('\n')
                f.write('    shape {\n')
                f.write('      dim: ' + str(v_4d.shape[0]))  # print dims
                f.write('\n')
                f.write('    }\n')
                f.write('  }')
        #     if 'BatchNorm_moving_variance' in fname:
        #         print(gamma_name)  # 如果是bn层的话,就多数值是1的gamma参数,并打印名字
        #         f1 = open(gamma_name, 'w')
        #         f1.write('  blobs {\n')
        #         for vv in v_4d:
        #             f1.write('    data: 1')
        #             f1.write('\n')
        #         f1.write('    shape {\n')
        #         f1.write('      dim: ' + str(v_4d.shape[0]))  # print dims
        #         f1.write('\n')
        #         f1.write('    }\n')
        #         f1.write('  }')
        #         f1.close()

        # 维度为2的是全连接层的权重
        elif v_4d.ndim == 2:
            f = open(fname, 'w')
            vshape = v_4d.shape[:]
            # 将TensorFlow的维度[ C, N ]顺序变换为caffe的维度[ N, C ]
            v_4d = np.swapaxes(v_4d, 0, 1)  # swap C, N ,tf和cf不同之处
            v_1d = v_4d.reshape(v_4d.shape[0] * v_4d.shape[1])
            f.write('  blobs {\n')
            for vv in v_1d:
                f.write('    data: %8f\n' % vv)
            f.write('    shape {\n')
            f.write('      dim: ' + str(v_4d.shape[0]))  # print dims
            f.write('\n')
            f.write('      dim: ' + str(v_4d.shape[1]))  # print dims
            f.write('\n')
            f.write('    }\n')
            f.write('  }')
        else:
            print(v_4d.ndim)  # 打印一下,防止有些层忽略了
        f.close()
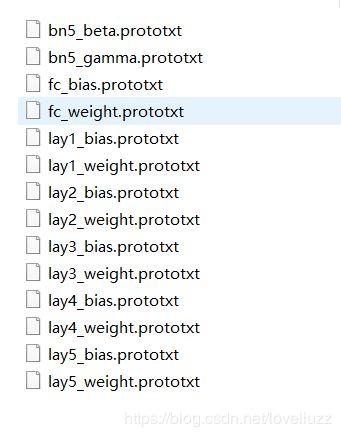
可以看到,转化为caffe框架格式的各层权重参数文件已经保存在了路径下,随便打开一个卷积文件头尾部如下:
我们有了一个test.prototxt文件,还有了各个层的参数,那么,下面就将我们转化得到的参数写入test.prototxt文件就好了。
那么,参数应该写到层里面的什么地方呢?很简单,直接将我们得到的参数文件写入对应层的大括号内就好
如下代码示意:
layer {

	name: "conv_layer_name"
	type: "Convolution"
	bottom: "bottom_blob"
	top: "top_blob"
	param { lr_mult: ... }
	convolution_param {
		num_output: output_dims
		kernel_size: kernel_size
		pad: padding_size
		stride: stride
		bias_term: false
	}
	#add params
        blobs: {
          data: ...
          ...
          shape {
            dim: ...
            dim: ...
            dim: ...
            dim: ...
          }
        }
}
3、生成caffemodel
caffemodel文件里面记载了什么,而在读caffemodel文件的时候,我们使用了ReadProtoFromBinaryFile函数将参数从二进制读出到proto中,搭配WriteProtoToTextFile函数将参数从proto中写入文件。
在生成caffemodel时,正好是该过程的逆。
根据读caffemodel的经验,凭借直觉直接进入了caffe-master/src/caffe/util/io.cpp文件,
并从中找到了可以利用的函数。我们可以先使用ReadProtoFromTextFile将文件中的参数写入proto,
然后再使用WriteProtoToBinaryFile函数将proto中的参数转化为caffemodel。
具体代码如下:
#include
#include
#include
#include
#include
#include
#include
#include
#include
#include
#include
#include "caffe/common.hpp"
#include "caffe/proto/caffe.pb.h"
#include "caffe/util/io.hpp"

using namespace caffe;
using namespace std;
using google::protobuf::io::FileInputStream;
using google::protobuf::io::FileOutputStream;
using google::protobuf::io::ZeroCopyInputStream;
using google::protobuf::io::CodedInputStream;
using google::protobuf::io::ZeroCopyOutputStream;
using google::protobuf::io::CodedOutputStream;
using google::protobuf::Message;

int main()
{
	NetParameter proto;
	ReadProtoFromTextFile("/home/cvlab/model/model.prototxt", &proto);
	WriteProtoToBinaryFile(proto, "/home/cvlab/model/model.caffemodel");
	return 0;
}
到这里,tensorflow2caffe框架转换的工作就正式完成了,得到了caffemodel。
4、测试转换后的caffe模型推理效果
要得到网络的前传结果,就直接使用c++或者python的网络前传程序调用测试网络文件和模型参数进行网络前传得到结果就行了。可参照博客:在c++程序中调用caffe训练完毕的模型进行分类
下面介绍了在python中调用转换后的caffe模型代码以及效果图
import caffe
import cv2
import numpy as np
path_prototxt = "D:/project/2_landmark/Landmark67_net_nodropout_bn.prototxt"
path_caffemodel = "D:/project/2_landmark/Landmark67_model_nodropout_bn.caffemodel"

img_path = 'D:/project/2_landmark/base/3Test/images/'
img_name = 'a.jpg'#
img_save = 'a_save.jpg'

net = caffe.Net(path_prototxt, path_caffemodel, caffe.TEST)
print(net.blobs['data'].data.shape) # (1, 1, 60, 60)
image = caffe.io.load_image(img_path + img_name, color=False)
print(image.shape)
transformer = caffe.io.Transformer({'data': net.blobs['data'].data.shape})
transformer.set_transpose('data', (2, 0, 1)) # 将图像的通道数设置为outermost的维数
# transformer.set_raw_scale('data', 1)  # 将像素值从[0,255]变换到[0,1]之间
# transformer.set_channel_swap('data', (2, 1, 0)) # 交换通道,从RGB变换到BGR
transformed_image = transformer.preprocess('data', image) #执行上面设置的图片预处理操作,
net.blobs['data'].data[...] = transformed_image  # 并将图片载入到blob中
detections = net.forward()['fc']
pre_landmark = detections.reshape(-1)
print(pre_landmark.shape)
image1 = cv2.imread(img_path + img_name)
LAND_NUM = int(len(pre_landmark)/2)
for i in range(LAND_NUM):
    x = pre_landmark[i]
    y = pre_landmark[i+LAND_NUM]
    cv2.circle(image1, (x, y), 1, (0, 0, 255))
cv2.imwrite(img_path + img_save, image1)


