OpenCV图像特征提取与检测C++(三)SURF特征检测、SIFT特征检测、HOG特征检测、LBP特征检测、Haar特征
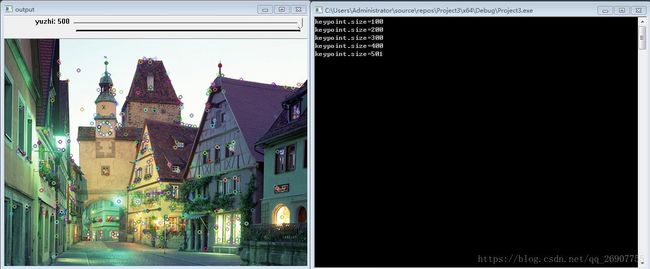
SURF特征检测
SURF(Speeded Up Robust Features 加速的稳定的特征,不会随着环境变化而改变)特征关键特性:
- -特征检测
- -尺度空间 放缩到不同尺度空间,尺度不变性
- -选择不变性 光照不变性,旋转不变性
- -特征向量 将上面的特性描述成特征向量,然后就可以进行特征匹配
尺度不变性:人类在识别一个物体时,不管这个物体或远或近,都能对它进行正确的辨认,这就是所谓的尺度 不变性。尺度空间理论经常与生物视觉关联,有人也称图像局部不变性特征为基于生物视觉的不变性方法。
旋转不变性:当这个物体发生旋转时,我们照样可以正确地辨认它,这就是所谓的旋转不变性
SURF特征检测 工作原理:
- 选择图像中POI( Points of Interest) 通过 Hessian Matrix 寻找
- 在不同的尺度空间发现关键点,非最大信号压制(通过3*3矩阵做卷积,如果覆盖的中心像素值是局部最大值,保留,否则丢弃)
- 发现特征点方法、旋转不变性要求 (旋转不变性 可忽略)
- 光照不变性:假设{12,24,48} {6,12,24} 两组数据,将它们归一化到 0-1 之间,得到的结果都是 {0,0.5,1},这个就叫光照不变 性(随着光的变化,各像素值呈同比例增减)
- 生成特征向量 有了上述不变性特征,就可以生成特征描述子
一般来说,标准的SURF算子比SIFT算子快好几倍,并且在多幅图片下具有更好的稳定性。SURF最大的特征在于采用了harr特征以及积分图像的概念,这大大加快了程序的运行时间。SURF可以应用于计算机视觉的物体识别以及3D重构中。
API:
static Ptr cv::xfeatures2d::SURF::create(
double hessianThreshold=100, // -HessianThreshold 最小的Hessian阈值  值可选300~500之间
int nOctaves = 4, // -Octaves – 4表示在四个尺度空间
int nOctaveLayers = 3, // OctaveLayers – 表示每个尺度的层数
bool extended = false,
bool upright = false // -upright 0- 表示计算选择不变性, 1表示不计算,速度更快
);
代码:
#include
#include
using namespace cv;
using namespace std;
using namespace cv::xfeatures2d;
Mat src, graysrc;
int minHesssian = 100;
int maxhessian = 500;
void Surf(int, void*) {
Ptr detector = SURF::create(minHesssian);// SURF特征检测类,Ptr 智能指针
vector SIFT特征检测(斑点检测)
SIFT(Scale-Invariant Feature Transform 尺度不变性特征变换)特征检测关键特性:
- -建立尺度空间,寻找极值(最小最大值)
- -关键点定位(寻找关键点准确位置与删除弱边缘)
- -关键点方向指定
- -关键点描述子
计算图像 x y 方向梯度获取像素位置的梯度,并以梯度计算直方图,最后统计出bins最高的梯度,这个梯度就是关键点的方向。
算法特点:
- 特征是图像的局部特征,其对旋转,尺度缩放,亮度变化保持不变形,对视角变化,仿射变换,噪声也保持一定的稳定性。
- 独立性好,信息丰富使用与海量特征数据库中进行快速准确的匹配。
- 多量性,即使少数的几个物体也可以产生大量的SIFT特征向量。
- 高速
解决的问题:
- 目标的旋转,缩放平移
- 图像仿射/投影变换
- 光照影响
- 目标遮挡
- 杂物场景
- 噪声
SIFT算法的实质是在不同的尺度空间上查找关键点(特征点),并计算出关键点的方向。SIFT所查找到的关键点是一些十分突出,不会因光照,仿射变换和噪音等因素而变化的点,如角点、边缘点、暗区的亮点及亮区的暗点等。
SIFT在图像的不变特征提取方面拥有无与伦比的优势,但并不完美,仍然存在:
1. 实时性不高。
2. 有时特征点较少。
3. 对边缘光滑的目标无法准确提取特征点。
API:
static Ptr cv::xfeatures2d::SIFT::create( // SIFT特征检测
int nfeatures = 0, // number of features 想求的特征的数量,越多计算量越大
int nOctaveLayers = 3, // 高斯金字塔的层级数,最小3,小于3就没有SIFT的尺度不变性的特点了
double contrastThreshold = 0.04, // 对比度,用于关键点定位
double edgeThreshold = 10, // 边缘阈值
double sigma = 1.6 // 高斯方差 σ
);
代码:
#include
#include
using namespace cv;
using namespace std;
using namespace cv::xfeatures2d;
Mat src;
int numPoint = 100;
int max_count = 500;
void sift_detect(int, void*) {
Ptr detector = SIFT::create(numPoint);// SIFT特征检测类
vector HOG特征算法
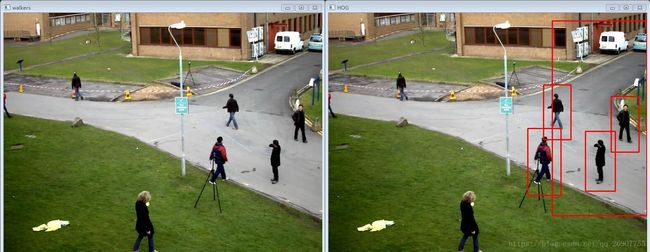
一种解决人体目标检测的图像描述子,是一种用于表征图像的局部梯度强度分布特性的描述符主要思想:在边缘具体位置未知的情况下,边缘方向的分布也可以很好的表示行人目标的外形轮廓。
步骤:
- 颜色空间归一化(图像灰度化,Grammar矫正
- 梯队计算
- 梯度方向直方图
- 重叠块直方图归一化
- HOG特征
API:
cv::HOGDescriptor HOGDescriptor( // HOG特征描述子提取
Size _winSize, // 窗口大小,对应上面举例的 64x128
Size _blockSize, // 2x2个_cellSize,也就是 16x16
Size _blockStride, // 每次移动步长,也就是 _cellSize的尺寸 8x8
Size _cellSize, // 8x8
int _nbins, // 对梯度方向直方图中的bins 9
int _derivAperture=1, // 求梯度的参数
double _winSigma=-1,
int _histogramNormType=HOGDescriptor::L2Hys, // 求直方图的参数
double _L2HysThreshold=0.2, // 归一化阈值参数
bool _gammaCorrection=false, // 对于灰度的输入图像是否要做伽马校正
int _nlevels=HOGDescriptor::DEFAULT_NLEVELS,
bool _signedGradient=false)
代码:
#include
#include
using namespace cv;
using namespace std;
using namespace cv::xfeatures2d;
int main() {
Mat src = imread("C:/Users/Administrator/Desktop/pic/5.jpg");
imshow("input", src);
//HOG特征描述
Mat dst, dstgray;
resize(src, dst, Size(64, 128));
imshow("resize", dst);
cvtColor(dst, dstgray, COLOR_BGR2GRAY);
HOGDescriptor detector(Size(64, 128), Size(16, 16), Size(8, 8),Size(8,8), 9);
vector<float> descriptors;
vector//行人检测
Mat walkers = imread("C:/Users/Administrator/Desktop/pic/HOG2.jpg");
imshow("walkers", walkers);
HOGDescriptor hog = HOGDescriptor();
hog.setSVMDetector(hog.getDefaultPeopleDetector());
vector LBP特征:
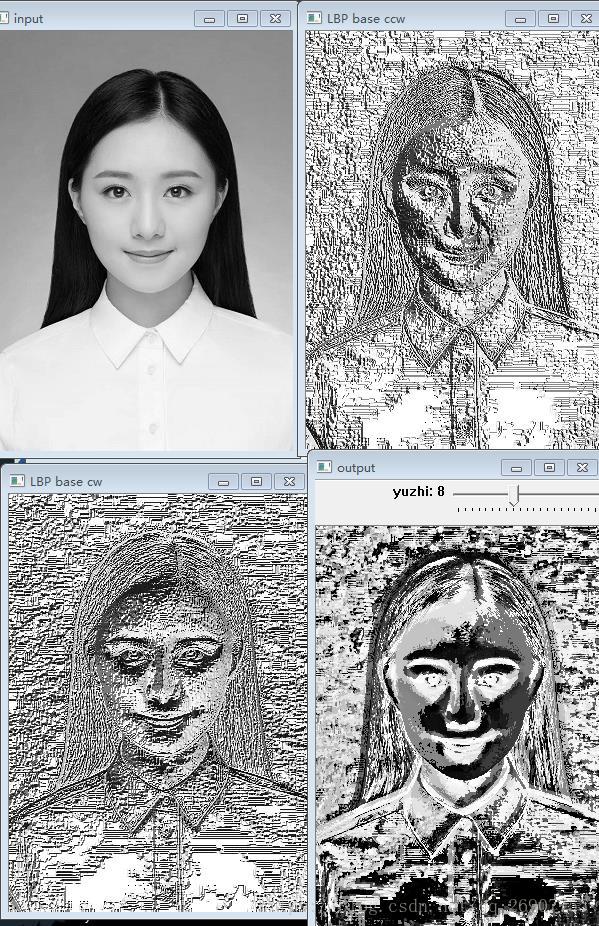
(局部二值模式)是一种能够有效的度量和提取图像局部纹理信息的算子,具有旋转不变性进和灰度不变性等显著优点,它是人脸识别中一种特征提取的重要方法,具有对光照不敏感的特性,但是对姿态和表情的鲁棒性不强。
将LBP用于人脸识别时,一般不将LBP图作为特征用于识别,而是统计LBP特征图的直方图作为特征向量用于分类识别。
对LBP特征向量进行特征提取的步骤:
- 首先将一张图片分成若干个子块图区域(cell)。
- 对于每个cell中的一个像素,将相邻的8个像素的灰度值与其进行比较,若周围像素值大于中心像素值,则该像素点的位置标记为1,否则0,这样,3*3领域内的8个点经比较可产生8位二进制数,即得到该窗口像素点LBP值。
- 计算每个cell的直方图,即每个数字(假定是十进制LBP值)出现的频率,然后对直方图进行归一化处理。
- 将得到的每个cell的统计直方图进行连接成为一个特征向量,也就是整幅图的LBP纹理特征向量。
- 通过一定的方法比较两张图片的LBP特征向量相似度来实现人脸识别。
代码:
#include
#include
using namespace cv;
using namespace std;
using namespace cv::xfeatures2d;
Mat gray;
int current_radius = 3;
int max_radius = 20;
void m_lbp(int, void*) {
int offset = current_radius * 2;// 边缘未计算的像素行列数
Mat elbpImage = Mat::zeros(gray.rows - offset, gray.cols - offset, CV_8UC1);//减去边缘未计算的像素行列数
int width = gray.cols;
int height = gray.rows;
int numNeighbors = 8;//为了简化算法,不管LBP圆形半径多大,p值都取8
for (int n = 0; n < numNeighbors; n++) {
//从x坐标正方向开始,逆时针选取像素坐标点,
float x = static_cast<float>(current_radius) * cos(2.0 * CV_PI*n / static_cast<float>(numNeighbors));
float y = static_cast<float>(current_radius) * -sin(2.0 * CV_PI*n / static_cast<float>(numNeighbors));
//取当前点的周围四个点,做双线性插值
int fx = static_cast<int>(floor(x));//向下取整数,即不大于x的最大整数
int fy = static_cast<int>(floor(y));
int cx = static_cast<int>(ceil(x));//向上转整数
int cy = static_cast<int>(ceil(y));
//取小数部分
float ty = y - fy;
float tx = x - fx;
//当前点的周围四个点的权重,这个四个点的权重加起来等于1
float w1 = (1 - tx)*(1 - ty);//(0,0)
float w2 = tx * (1 - ty);//(1,0)
float w3 = (1 - tx)*ty;//(0,1)
float w4 = ty * tx;//(1,1)
for (int row = current_radius; row < (height - current_radius); row++) {
for (int col = current_radius; col < (width - current_radius); col++) {
float t = w1 * gray.at(row + fy, col + fx) + w2 * gray.at(row + fy, col + cx) +
w3 * gray.at(row + cy, col + fx) + w4 * gray.at(row + cy, col + cx);//计算当前点的像素值
uchar center = gray.at(row, col);//中心像素值
// numeric_limits C++11 模板类 std::numeric_limits::epsilon()表示的是最小非0浮点数
// 三元表达式就是在判断 t >= center , 然后移位
// 浮点数间判断等于: == 完全一样才相等, std::numeric_limits::epsilon() 差值若在浮点数的精度范围内表示相等
elbpImage.at(row - current_radius, col - current_radius) +=
((t > center) && (abs(t - center) > std::numeric_limits<float>::epsilon())) << n; // 移位相加,最终得到二进制转十进制的值
}
}
}
cout << std::numeric_limits<float>::epsilon() << endl;// 1.19209e-07 这里的e不是自然常数(2.71828),而是10,所以为 0.000000119209
imshow("output", elbpImage);
}
int main() {
gray = imread("C:/Users/Administrator/Desktop/pic/z2.jpg",0);
imshow("input",gray);
//LBP基本演示
int width = gray.cols;
int height = gray.rows;
Mat lbpImage_cw = Mat::zeros(gray.rows - 2, gray.cols - 2, CV_8UC1);//顺时针,减去2是因为卷积时上下左右两行像素忽略掉
Mat lbpImage_ccw = Mat::zeros(gray.rows - 2, gray.cols - 2, CV_8UC1);//逆时针
for (int row = 1; row < height - 1; row++) {
for (int col = 1; col < width - 1; col++) {
uchar center = gray.at(row, col);
uchar code_cw = 0;
code_cw |= (gray.at(row - 1, col - 1) >= center) << 7; // (0,0)位置最高位, 只判断大于 与 判断大于等于,图像结果差别很大
code_cw |= (gray.at(row - 1, col) >= center) << 6;
code_cw |= (gray.at(row - 1, col + 1) >= center) << 5;
code_cw |= (gray.at(row, col + 1) >= center) << 4;
code_cw |= (gray.at(row + 1, col + 1) >= center) << 3;
code_cw |= (gray.at(row + 1, col) >= center) << 2;
code_cw |= (gray.at(row + 1, col - 1) >= center) << 1;
code_cw |= (gray.at(row, col - 1) >= center) << 0;
lbpImage_cw.at(row - 1, col - 1) = code_cw;
uchar code_ccw = 0;
code_ccw |= (gray.at(row - 1, col - 1) >= center) << 0; // (0,0)位置最低位
code_ccw |= (gray.at(row - 1, col) >= center) << 1;
code_ccw |= (gray.at(row - 1, col + 1) >= center) << 2;
code_ccw |= (gray.at(row, col + 1) >= center) << 3;
code_ccw |= (gray.at(row + 1, col + 1) >= center) << 4;
code_ccw |= (gray.at(row + 1, col) >= center) << 5;
code_ccw |= (gray.at(row + 1, col - 1) >= center) << 6;
code_ccw |= (gray.at(row, col - 1) >= center) << 7;
lbpImage_ccw.at(row - 1, col - 1) = code_ccw;
}
}
imshow("LBP base cw", lbpImage_cw);
imshow("LBP base ccw", lbpImage_ccw);
//LBP扩展与多尺度表达
m_lbp(0, 0);
createTrackbar("yuzhi", "output", ¤t_radius, max_radius, m_lbp);
waitKey(0);
}
Haar特征
Haar-like特征最早是由Papageorgiou等应用于人脸表示,Viola和Jones在此基础上,使用3种类型4种形式的特征。
Haar特征分为三类:边缘特征、线性特征、中心特征和对角线特征,组合成特征模板。特征模板内有白色和黑色两种矩形,并定义该模板的特征值为白 色矩形像素和减去黑色矩形像素和。Haar特征值反映了图像的灰度变化情况。例如:脸部的一些特征能由矩形特征简单的描述,如:眼睛要比脸颊颜色要深,鼻 梁两侧比鼻梁颜色要深,嘴巴比周围颜色要深等。但矩形特征只对一些简单的图形结构,如边缘、线段较敏感,所以只能描述特定走向(水平、垂直、对角)的结构。
Haar-like特征的计算—积分图
积分图就是只遍历一次图像就可以求出图像中所有区域像素和的快速算法,大大的提高了图像特征值计算的效率。
积分图主要的思想是将图像从起点开始到各个点所形成的矩形区域像素之和作为一个数组的元素保存在内存中,当要计算某个区域的像素和时可以直接索引 数组的元素,不用重新计算这个区域的像素和,从而加快了计算(这有个相应的称呼,叫做动态规划算法)。积分图能够在多种尺度下,使用相同的时间(常数时 间)来计算不同的特征,因此大大提高了检测速度。
API:
void integral( // 积分图计算
    InputArray src, // 输入图像,灰度图
    OutputArray sum, // 求和,输出的尺寸比原图行列都要加1 , 不想行列变化的,自己实现积分图算法
    OutputArray sqsum, // 求和的平方,输出的尺寸比原图行列都要加1
    OutputArray tilted, // 旋转45°的积分图
    int sdepth = -1,
    int sqdepth = -1
);
代码:
#include
#include
using namespace cv;
using namespace std;
using namespace cv::xfeatures2d;
int main() {
Mat src = imread("C:/Users/Administrator/Desktop/pic/1.jpg",0);
imshow("input", src);
Mat dst1 = Mat::zeros(src.rows + 1, src.cols + 1, CV_32FC1);
Mat dst2 = Mat::zeros(src.rows + 1, src.cols + 1, CV_64FC1);
integral(src, dst1, dst2);
Mat res1, res2;
normalize(dst1, res1, 0, 255, NORM_MINMAX,CV_8UC1);
imshow("dst1", dst1);
normalize(dst2, res2, 0, 255, NORM_MINMAX,CV_8UC1);
imshow("dst2", dst2);
waitKey(0);
}


