【小家Spring】面向切面编程之---Spring AOP的原理讲解以及源码分析(Cannot find current proxy: Set 'exposeProxy' property on )
每篇一句
沾酒不醉是喝得少,见色不迷是摸不着,以德服人是打不过,淡泊名利是实在没有招
相关阅读
【小家Spring】Spring AOP的核心类:AbstractAdvisorAutoProxy自动代理创建器深度剖析(AnnotationAwareAspectJAutoProxyCreator)
【小家Spring】Spring AOP各个组件概述与总结【Pointcut、Advice、Advisor、Advised、TargetSource、AdvisorChainFactory…】
【小家Spring】Spring AOP之Advisor、PointcutAdvisor、IntroductionAdvisor、IntroductionInterceptor(引介增强)
【小家Spring】Spring AOP核心类Pointcut解析,对PointcutExpression切点表达式解析原理分析(以AspectJExpressionPointcut为例)
【小家Spring】从@Async案例找到Spring框架的bug:exposeProxy=true不生效;原因大剖析+提供最佳解决方案
前言
一说Spring AOP大家肯定不陌生,它作为Spring Framwork的两大基石之一,在Spring的产品线中有着大量的应用。相信小伙伴们在平时工作的项目中,自己也写过类似的AOP代码。
那么本文主要从Spring AOP运行过程上,结合一定的源码整体上介绍Spring AOP的一个运行过程。
知其然,知其所以然,相信我们使用起来才更有底气。
什么是AOP
AOP是Spring框架面向切面的编程思想,AOP采用一种称为“横切”的技术,将涉及多业务流程的通用功能抽取并单独封装,形成独立的切面,在合适的时机将这些切面横向切入到业务流程指定的位置中。
请注意,本文所指、所讲的AOP,只代表AOP在Spring中的应用
另外,需要说明的是,本文对AOP最基本的概念、和最基本的使用,将不再占用篇幅说明了,因为默认你已经掌握了这些概念和基础知识
AOP能做什么
Spring框架的AOP机制可以让开发者把业务流程中的通用功能抽取出来,单独编写功能代码。在业务流程执行过程中,Spring框架会根据业务流程要求,自动把独立编写的功能代码切入到流程的合适位置。
比如:登录校验、日志输出等等。。。
前面我们已经大篇幅得聊了Spring IoC技术的原理和源码分析,那么本篇文章将从实践到理论上分析一下Spring得另外一大强大基石技术:Spring AOP
环境准备
导入jar包,基于之前得基础spring-web基础环境,还需导入如下jar包
        <dependency>
            <groupId>org.springframeworkgroupId>
            <artifactId>spring-aopartifactId>
            <version>${spring.framework.version}version>
        dependency>
        <dependency>

            <groupId>org.aspectjgroupId>
            <artifactId>aspectjweaverartifactId>
            <version>1.9.2version>
        dependency>
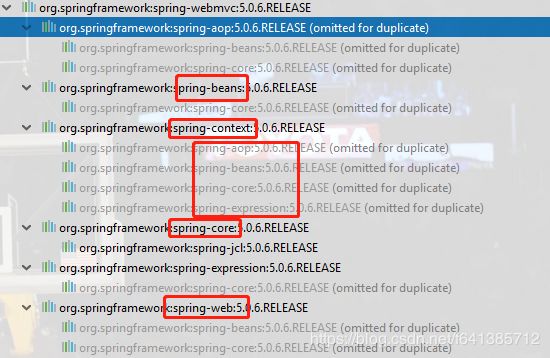
对于jar包的导入,这里做一个说明:像spring-core、spring-context、spring-beans这几个基础的jar包,一般都是不需要显示的导入的。因为只要你使用到了它的功能包比如spring-web、spring-aop等都会自动帮你导入进来。
另外说明一点:导入spring-context就自动导入了aop包。而我们最常导入的
spring-webmv包,它其实包含了非常多的jar,都不建议再重复导入了。放过pom.xml,让它更清爽点吧
创建一个切面:
@Aspect
public class HelloAspect {

    // 只拦截service层的所有方法
    @Pointcut("execution(* com.fsx.service.*.*(..)) ")
    public void point() {

    }

    @Before("point()")
    public void before() {
        System.out.println("this is from HelloAspect#before...");
    }

    @After("point()")
    public void after() {
        System.out.println("this is from HelloAspect#after...");
    }

    @AfterReturning("point()")
    public void afterReturning() {
        System.out.println("this is from HelloAspect#afterReturning...");
    }

    @AfterThrowing("point()")
    public void afterThrowing() {
        System.out.println("this is from HelloAspect#afterThrowing...");
    }

	// 此处需要注意:若写了@Around方法,那么最后只会执行@Around和@AfterReturning 其它的都不会执行
    //@Around("point()")
    //public void around() {
    //    System.out.println("this is from HelloAspect#around...");
    //}

}
这里需要说明几点
- Spring自己没有定义关于切面相关的注解,而是使用来自
org.aspectj这个Jar包里面的注解的(但是没有用它的技术解析,这点需要明白) org.aspectj.lang.annotation还有很多其余的注解,但是这里列出Spring只支持的注解如下:
@Aspect、@Before、@After、@AfterReturning、@AfterThrowing、@Around其余的注解Spring都是不予解析的(由AspectJ内部技术去解析)
把切面加入容器 和 开启AspectJ得支持(二者缺一不可)
@Component
@EnableAspectJAutoProxy
@Aspect
public class HelloAspect {
	...
}
本文为了简便,就直接采用@Component以及直接把@EnableAspectJAutoProxy写在切面类上面了,但是大多数情况我们都用@Bean的方式注册切面,且@EnablXXX写在对应的Config类上,方便管理(我是推荐这么做的,但是本文仅仅是为了方便而已)
至于为什么我可以这么
乱写也都能生效,这个在前面博文中都有重点分析过,不明白的可以出门左拐~~~
执行结果如下:
this is from HelloAspect#before...
this is my method~~
this is from HelloAspect#after...
this is from HelloAspect#afterReturning...
从执行结果来看,我们的切面已经生效了。并且我们也能看得到各通知的执行时机
附:
    @Override
    public Object hello() {
        System.out.println("this is my method~~");

        // 此处特意把this输出来对比,请务必注意差别
        System.out.println(this.getClass()); //class com.fsx.service.HelloServiceImpl
        System.out.println(beanFactory.getBean(HelloService.class).getClass()); //class com.sun.proxy.$Proxy32   是JDK的动态代理了
        return "service hello";
    }
此处做一步输出,我们发现this代表还是本对象。而Spring容器内的HelloServiceImpl已经是一个JDK得动态代理对象了(HelloServiceImpl实现了接口)
@After和@AfterReturning的区别如下:
try{
    try{
        //@Before
        method.invoke(..);
    }finally{
        //@After
    }
    //@AfterReturning
}catch(){
    //@AfterThrowing
}
- 它俩得执行时机不同,@After先执行,@AfterReturning后执行
- @AfterReturning它能拿到目标方法执行完的返回值,但是@After不行
- @After它在finnaly里面,所以它不管怎么样都会执行(哪怕目标方法抛出异常),但是@AfterReturning如国目标方法没有正常return(比如抛出异常了),它是不会执行的
AspectJ 框架它定义的通知类型有 6 种:
- 前置通知 @Before 相当于 BeforeAdvice
- 后置通知 @AfterReturning 相当于 AfterReturningAdvice
- 环绕通知 @Around 相当于 MethodInterceptor
- 抛出通知 @AfterThrowing 相当于 ThrowAdvice
- 最终通知 @After 不管是否异常,该通知都会执行
引介增强:org.springframework.aop.IntroductionInterceptor,表示在目标类中添加一些新的方法和属性。
引介增强是一种比较特殊的增强类型,它不是在目标方法周围织入增强,而是为目标类创建新的方法和属性,所以引介增强的连接点是类级别的,而非方法级别的。通过引介增强,可以为目标类创建实现某接口的代理。
引介增强的配置与一般的配置有较大的区别:首先,需要指定引介增强所实现的接口;其次,由于只能通过为目标类创建子类的方式生成引介增强的代理,所以必须将proxyTargetClass设置为true。
从上面可以看出,@AspectJ的方式相比较于传统的方式, 多了一个最终通知
切点类型:Spring提供了六种类型切点
- 静态方法切点:org.springframework.aop.support.StaticMethodMatcherPointcut是静态方法切点的抽象基类,默认情况下它匹配所有的类。(NameMatchMethodPointcut提供简单字符串匹配方法签名,AbstractRegexpMethodPointcut使用正则表达式匹配方法签名。) 它不考虑方法入参个数、类型匹配
- 动态方法切点:org.springframework.aop.support.DynamicMethodMatcherPointcut是动态方法的抽象基类,默认情况下它匹配所有的类 它会考虑方法入参个数、类型匹配
- 注解切点:org.springframework.aop.support.annotation.AnnotationMatchingPointcut实现类表示注解切点。使用AnnotationMatchingPointcut支持在Bean中直接通过JDK 5.0注解标签定义切点
表达式切点:org.springframework.aop.support.ExpressionPointcut接口主要是为了支持AspectJ切点表达式语法而定义的接口。 这个是最强大的,Spring支持11种切点表达式- 流程切点:org.springframework.aop.support.ControlFlowPointcut实现类表示控制流程切点。ControlFlowPointcut是一种特殊的切点,它根据程序执行堆栈的信息查看目标方法是否由某一个方法直接或间接调用,以此判断是否为匹配的连接点。
- 复合切点:org.springframework.aop.support.ComposablePointcut实现类是为创建多个切点而提供的方便操作类。它所有的方法都返回ComposablePointcut类。
切面类型
切面的分类:
- Advisor:代表一般切面,它仅包含一个Advice。这个切面太宽泛,一般不会直接使用。
- PointcutAdvisor:代表具有切点的切面,它包含Advice和Pointcut两个类。
- IntroductionAdvisor:代表引介切面。引介切面是对应引介增强的特殊的切面,它应用于类层面上。
PointcutAdvisor主要有6个具体的实现类:
- DefaultPointcutAdvisor:最常用的切面类型
- NameMatchMethodPointcutAdvisor:通过该类可以定义按方法名定义切点的切面
- RegexpMethodPointcutAdvisor:对于按正则表达式匹配方法名进行切点定义的切面,可以通过扩展该实现类进行操作。
- StaticMethodMatcherPointcutAdvisor:静态方法匹配器切点定义的切面,默认情况下,匹配所有的目标类。
- AspectJExpressionPointcutAdvisor:用于AspectJ切点表达式定义切点的切面
- AspectJPointcutAdvisor:用于AspectJ语法定义的切面。
原理/源码分析
从Spring的@EnableXXX设计模式我们知道,源头就是@EnableAspectJAutoProxy这个注解,下面先来看看它做了什么
@EnableAspectJAutoProxy注解分析
//Enables support for handling components marked with AspectJ's {@code @Aspect} annotation,
//similar to functionality found in Spring's {@code } XML element.

//Note: {@code @EnableAspectJAutoProxy} applies to its local application context only,(说明此注解只会作用于本容器,对子、父容器是无效得)
@Target(ElementType.TYPE)
@Retention(RetentionPolicy.RUNTIME)
@Documented
@Import(AspectJAutoProxyRegistrar.class)
public @interface EnableAspectJAutoProxy {

	// 决定该类采用CGLIB代理还是使用JDK的动态代理(需要实现接口),默认为false,表示使用的是JDK得动态代理技术
	boolean proxyTargetClass() default false;

	// @since 4.3.1 代理的暴露方式:解决内部调用不能使用代理的场景  默认为false表示不处理
	// true:这个代理就可以通过AopContext.currentProxy()获得这个代理对象的一个副本(ThreadLocal里面),从而我们可以很方便得在Spring框架上下文中拿到当前代理对象(处理事务时很方便)
	// 必须为true才能调用AopContext得方法,否则报错:Cannot find current proxy: Set 'exposeProxy' property on Advised to 'true' to make it available.
	boolean exposeProxy() default false;

}
当然,最重点的,还是这一句@Import(AspectJAutoProxyRegistrar.class),下面看看它
AspectJAutoProxyRegistrar:为容器注册 自动代理创舰器
class AspectJAutoProxyRegistrar implements ImportBeanDefinitionRegistrar {
	@Override
	public void registerBeanDefinitions(
			AnnotationMetadata importingClassMetadata, BeanDefinitionRegistry registry) {

	//这部非常重要,就是去注册了一个基于注解的自动代理创建器(如国需要的话)  当然,下面还会着重分析
		AopConfigUtils.registerAspectJAnnotationAutoProxyCreatorIfNecessary(registry);

		AnnotationAttributes enableAspectJAutoProxy =
				AnnotationConfigUtils.attributesFor(importingClassMetadata, EnableAspectJAutoProxy.class);
		if (enableAspectJAutoProxy != null) {
			// 若为true,表示强制指定了要使用CGLIB,那就强制告知到时候使用CGLIB的动态代理方式
			if (enableAspectJAutoProxy.getBoolean("proxyTargetClass")) {
				AopConfigUtils.forceAutoProxyCreatorToUseClassProxying(registry);
			}
			// 告知,强制暴露Bean的代理对象到AopContext
			if (enableAspectJAutoProxy.getBoolean("exposeProxy")) {
				AopConfigUtils.forceAutoProxyCreatorToExposeProxy(registry);
			}
		}
	}
}
再来一个具相得认识:

我们发现当我们开启Spring AOP功能的时候,它只为我们向容器里加入了一个基础Bean~,也就是这个自动代理创建器
注册自动代理创建器AutoProxyCreator(AnnotationAwareAspectJAutoProxyCreator)
	public static BeanDefinition registerAutoProxyCreatorIfNecessary(BeanDefinitionRegistry registry,
			@Nullable Object source) {
		return registerOrEscalateApcAsRequired(InfrastructureAdvisorAutoProxyCreator.class, registry, source);
	}
	public static BeanDefinition registerAspectJAutoProxyCreatorIfNecessary(BeanDefinitionRegistry registry,
			@Nullable Object source) {
		return registerOrEscalateApcAsRequired(AspectJAwareAdvisorAutoProxyCreator.class, registry, source);
	}

	private static BeanDefinition registerOrEscalateApcAsRequired(Class<?> cls, BeanDefinitionRegistry registry,
			@Nullable Object source) {

		// 很显然,这里如果我们自己定义了这样一个自动代理创建器,也是Ok的
		if (registry.containsBeanDefinition(AUTO_PROXY_CREATOR_BEAN_NAME)) {
			BeanDefinition apcDefinition = registry.getBeanDefinition(AUTO_PROXY_CREATOR_BEAN_NAME);

			// 如果我们自定义的并不是cls这个class类型的Bean,那就做如下处理一下
			if (!cls.getName().equals(apcDefinition.getBeanClassName())) {

				// 这个处理非常有意思,总之就是`InfrastructureAdvisorAutoProxyCreator`/AspectJAwareAdvisorAutoProxyCreator/AnnotationAwareAspectJAutoProxyCreator的一个逻辑~~~~(就是防止怕用户注册错了,做了一个容错处理~~~)
				int currentPriority = findPriorityForClass(apcDefinition.getBeanClassName());
				int requiredPriority = findPriorityForClass(cls);

				// currentPriority < requiredPriority  如果当前用户注册进来的Aop代理类的级别,是低于我们要求的级别的,Spring内部也会对它进行提升成我们要求的那个class类型
				// 这样我符合我们的建议:最好不要自己去使用低级别的自动代理创建器
				if (currentPriority < requiredPriority) {
					apcDefinition.setBeanClassName(cls.getName());
				}
			}
			return null;
		}

		// 若用户自己没有定义,那就用系统定义好的吧  AnnotationAwareAspectJAutoProxyCreator
		RootBeanDefinition beanDefinition = new RootBeanDefinition(cls);
		beanDefinition.setSource(source);
		// 此处注意,增加了一个属性:最高优先级执行
		beanDefinition.getPropertyValues().add("order", Ordered.HIGHEST_PRECEDENCE);
		// 角色为Spring自己使用
		beanDefinition.setRole(BeanDefinition.ROLE_INFRASTRUCTURE);
		// 注册此Bean定义信息
		registry.registerBeanDefinition(AUTO_PROXY_CREATOR_BEAN_NAME, beanDefinition);
		return beanDefinition;
	}

	//findPriorityForClass这个方法非常有意思:相当于找到index角标,然后
	//APC_PRIORITY_LIST 的内容是下面这几个  按照顺序排好的
	private static final List<Class<?>> APC_PRIORITY_LIST = new ArrayList<>();
	static {
		APC_PRIORITY_LIST.add(InfrastructureAdvisorAutoProxyCreator.class);
		APC_PRIORITY_LIST.add(AspectJAwareAdvisorAutoProxyCreator.class);
		APC_PRIORITY_LIST.add(AnnotationAwareAspectJAutoProxyCreator.class);
	}
这样一来,我们就成功的注入了一个Bean:AnnotationAwareAspectJAutoProxyCreator 基于注解的自动代理创建器
此处有个细节我们应该发现:应尽量避免自己创建
AutoProxyCreator,而是统一交给Spring来智能处理。至于为何?后面会有专文分析利与弊~~~
AnnotationAwareAspectJAutoProxyCreator:自动代理创建器(AOP自动代理的核心)
由于介绍此创建器得篇幅颇长,因此我把它放在了此处单独成文进行介绍,请务必移步查看:
【小家Spring】Spring AOP的核心类:AbstractAdvisorAutoProxy自动代理创建器深度剖析(AnnotationAwareAspectJAutoProxyCreator)
总结
本篇探讨了AOP的编程思想、过程,其主要思想是让开发者把诸多业务流程中的通用功能抽取出来,单独编写功能代码,形成独立的模块,这些模块也被称为切面。在业务流程执行过程中,Spring框架会根据业务流程要求,自动把切面切入到流程的合适位置
知识交流
![]()
若群二维码失效,请加微信号(或者扫描下方二维码):fsx641385712。
并且备注:“java入群” 字样,会手动邀请入群
![]()
