Ultra96基础学习篇——(6)PetaLinux创建BOOT.bin升级版
开发板:Ultra96
Xilinx Vivado:2018.2
PetaLinux:2018.2
Ubuntu:16.04
如上一篇最后提到的,最初接触PetaLinux也不懂,只能去尝试去找资料。我是通过用ZCU102的一个BSP去生成工程时,读到了其中的README,找到了如何去配置相应的开发板,只介绍Ultra96的相关配置问题。
对于README

其关于Ultra96的配置主要如下
 5. ultra96 board
     $ cat >>  project-spec/meta-user/recipes-core/images/petalinux-image.bbappend <
其实就是说在petalinux-config时候进行相应的配置就行,这样看的话就简单了。创建工程,根据README进行配置:
petalinux-create --type project --template zynqMP --name Ultra96_0
cd Ultra96_0
cd project-spec/meta-user/recipes-core/images/
(1)对petalinux-image.bbappend文件进行添加:


(2)petalinux-config
在(1)中执行完后保存退出,然后继续config
cd ../../../
petalinux-config --get-hw-description=./
主要做以下配置
Subsystem AUTO Hardware Settings ——>Serial Settings ——> Primary stdin/stdout (psu_uart_1)

Image Packaging Configuration ——> Root filesystem type (INITRAMFS) ——>INITRAMFS
u-boot Configuration ——>(xilinx_zynqmp_zcu102_rev1_0_defconfig) u-boot config target ——> xilinx_zynqmp_zcu100_revC_defconfig

DTG Settings ——> MACHINE NAME——>zcu100-revc

Yocto Settings——>(plnx-zynqmp) YOCTO_MACHINE_NAME ——>ultra96-zynqmp

配置完成,保存退出。
(2)执行congfig rootfs
petalinux-config -c rootfs
其中,apps,user package全选

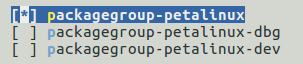
Petalinux Package Groups中选择packagegroup-petalinux和packagegroup-petalinux-self-hosted

Filesystem Packages中选择console——>utils——>git

注:后面如果系统起不来,一直在重启的情况,在这里去掉下面四项:
lmsensors-sensorsdetect
packagegroup-petalinux-self-hosted
packagegroup-petalinux-ultra96-webapp
packagegroup-petalinux-96boards-sensors
(4)config u-boot
执行petalinux-config -c u-boot,根据README进行配置
petalinux-config -c u-boot选中Networking Support,并全选其中内容,
CONFIG_BOOTDELAY 配置为2,
Command Line interface——>Network commands——>选择bootp tftpboot,tftp put,nfs三项。


保存退出,执行
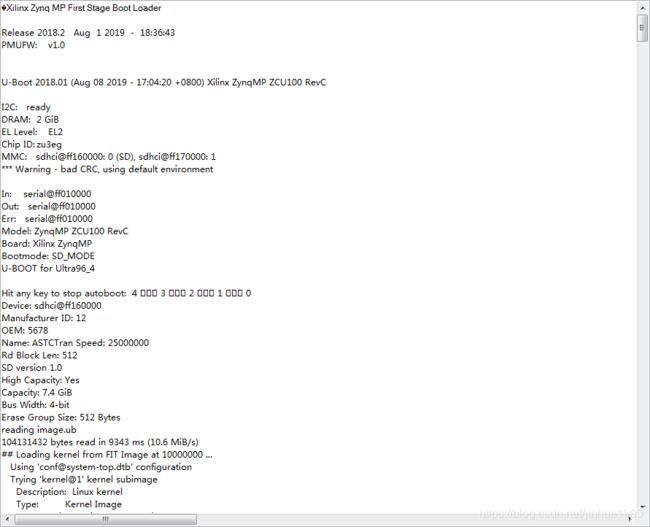
petalinux-buildbuild时间取决于网络好坏及电脑配置,build完成状态如下:

接下来生成BOOT.bin即可
cd images/linux
petalinux-package --boot --fsbl zynqmp_fsbl.elf --u-boot u-boot.elf --pmufw pmufw.elf --fpga system.bit --force
这样就大功告成了,只是GUI有点简单而已,这个可以自己移植一个系统,然后使用Petalinux生成的boot即可。

关于boot的初选项,好多都可以在petalinux-config的时候配置,具体需要什么添加即可。
基础内容感觉差不多就这些,刚入门也找不着什么门道,后续再记录分享~~~