其实这段时间我自己感觉很迷茫,在国内高强度的工作压力承受习惯之后,突然处于一个相对比较轻松的环境反而还不适应,我总担心到了国内自己毫无竞争力,所以我依然保持对新技术的学习和关注,今天正儿八经的教大家如何写vue2,前提是有一定基础spa和node的同学。
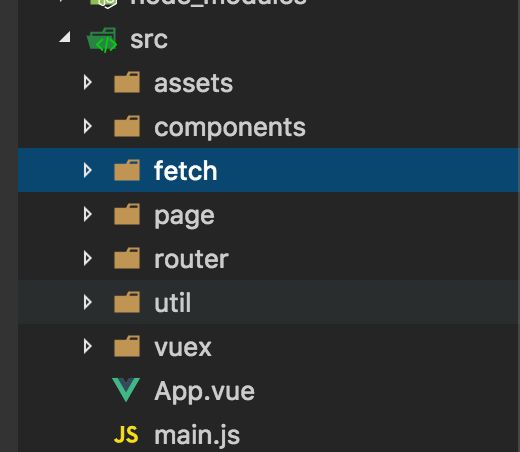
1 项目目录结构
- asserts 放置静态资源的目录,包括css和image。
- components 这是大家比较熟悉的组件目录。
- fetch 如果对es6fetch 比较熟悉的同学就知道,抓取数据的。
- page 自定义的小组件目录,往往都是component里面的子组件。
- router 路由控制页面的跳转,spa的关键。
- util 自定义工具类函数。
- vuex vue的状态管理工具。
我们来看一下入口app.vue的代码
通过这里你能够看到如何引用css文件,所有的内容都会被渲染到
如果我需要引用的是scss文件
step 1
npm install sass-loader node-sass --save-dev

step 2  webpack.base.config.js在loaders里面加上
{
      test: /\.scss$/,
      loaders: ["style", "css", "sass"]
    }

step 3
接下来就是app.js这个入口js文件了,这个很关键。
import Vue from 'vue'
import App from './App'
import router from './router'
import MintUI from 'mint-ui'
import 'mint-ui/lib/style.css'
// 引入swiper
import VueAwesomeSwiper from 'vue-awesome-swiper'
import iView from 'iview'
import 'iview/dist/styles/iview.css'
// Vuex
import Vuex from 'vuex'
import store from './vuex/store'
require('vue2-animate/dist/vue2-animate.min.css')
Vue.config.productionTip = false
Vue.use(Vuex)
Vue.use(VueAwesomeSwiper)
Vue.use(MintUI)
Vue.use(iView)
new Vue({
el: '#app',
router,
Vuex,
store,
template: '这个入口文件有许多写的是Vue.use,这就是想在项目中用插件的方式,本例中有VueAwesomeSwiper,MintUI,iView三个控件都是视图方面的,如果我想用jquery,那么你需要自己安装jquery,然后import进来,用Vue.use(jquery)。
需要注意的是vuex也需要这样操作。
问题来了,当我们npm run dev之后首先进入的是哪个页面?
来看一下router目录下的index.js
import Vue from 'vue'
import Router from 'vue-router'

// 首页
import Index from '@/page/index/index'
import Recommend from '@/page/index/recommend'
import Limit from '@/page/index/limit'
import Home from '@/page/index/home'
import Cook from '@/page/index/cook'
import Parts from '@/page/index/parts'
import Cloth from '@/page/index/cloth'
import Wash from '@/page/index/wash'
import Baby from '@/page/index/baby'
import Messy from '@/page/index/messy'
import Drink from '@/page/index/drink'
import Hobby from '@/page/index/hobby'
Vue.use(Router)

export default new Router({
  routes: [
    {
      path: '/',
      name: 'Index',
      component: Index,
      meta: { scrollToTop: true },
      children: [
        {
          path: '/',
          name: 'indexIndex',
          component: Recommend
        },
        {
          path: '/recommend',
          name: 'Recommend',
          component: Recommend
        },
        {
          path: '/limit',
          name: 'Limit',
          component: Limit
        },
        {
          path: '/home',
          name: 'Home',
          component: Home
        },
        {
          path: 'cook',
          name: 'Cook',
          component: Cook
        },
        {
          path: '/parts',
          name: 'Parts',
          component: Parts
        },
        {
          path: '/cloth',
          name: 'Cloth',
          component: Cloth
        },
        {
          path: '/wash',
          name: 'Wash',
          component: Wash
        },
        {
          path: '/baby',
          name: 'Baby',
          component: Baby
        },
        {
          path: '/messy',
          name: 'Messy',
          component: Messy
        },
        {
          path: '/drink',
          name: 'Drink',
          component: Drink
        },
        {
          path: '/hobby',
          name: 'Hobby',
          component: Hobby
        }
      ]
    }
]
一上来就搞事情,这么复杂的一个路由。。。
分析:进入项目,第一步是 '/',那么就会使用name=Index组件,注意他还有chilren路由,所以默认还会在Index组件里面加载name=indexIndex组件,也就是Recommend。想到这里我们肯定能想到Index组件里肯定有
@/page/index/index
我们看到这段template代码就会知道,这是一个普通的首页模式,一个header,content用来占坑,一个footer,一个gotop返回顶部。
问题来了,这里有router-view占坑,但是router-link在哪里呢?先卖个官司,看一下这个文件里的js代码。
import Header from '@/components/public/Header'
import Footer from '@/components/public/Footer'
import IndexTabs from '@/components/public/Tabs'
import goTop from '@/components/public/GoTop'
export default {
  name: 'index',
  created () {
    console.log('created')
    this.$Loading.config({
      color: '#b4282d',
      failedColor: '#f0ad4e',
      height: 5
    })
    this.$Loading.start()
    this.$store.dispatch('changeActive', 0)
  },
  mounted () {
    this.$Loading.finish()
    console.log('recommend mounted')
  },
  components: {
    'v-header': Header,
    'v-footer': Footer,
    'v-indexTabs': IndexTabs,
    goTop
  }
}
我们看到了create和mounted这种关键钩子函数,create在mounted之前,mouted是挂载dom节点,具体这里不讲了。
this.$store.dispatch这是vuex里面的,等会儿会讲到。
需要注意的是
components: {
'v-header': Header,
'v-footer': Footer,
'v-indexTabs': IndexTabs,
goTop
}
我们要将引进的组件注册,你可以重新命名,也可以不必,如goTop组件。
我们来看看header头部是如何写的。
@/component/public/header
商品搜索, 共 5116 款好物
好了我们这里看到了v-indexTabs就知道所有的菜单选择都在这个里面,
:tabs="tabs"父组件传递数据给子组件,这里tabs = this.$store.getters.headertabList,之前我有写过vuex的文章,看过的都知道这是在干嘛,等下再讲,咱们继续看IndexTabs。
@/components/public/Tabs
{{item.name}}
这里通过一个v-for指令把一个router-link渲染出来了,:class="{active: item.isActive}"这个我也不多说了,相信大家都懂,注意router-link里面要写:to,通过activethis控制跳转。
this.$route.path.indexOf('type') >= 0 这里是判断当前路由里面是否包含type
到这里大家宏观上应该已经完全把控,接下里就看一下vuex里面是如何写的,因为这里路由跳转也是通过dispatch来实现的。
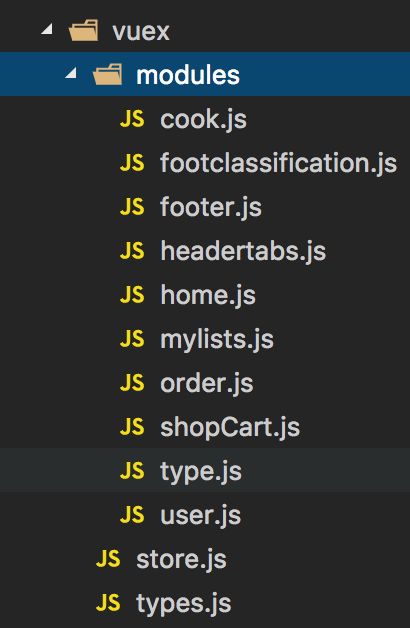
2 状态管理
下面我们来看下vuex目录结构
我们来看下store.js里面是如何写的
store.js
import Vue from 'vue'
import Vuex from 'vuex'

import user from './modules/user'
import footer from './modules/footer'
// 头部分类
import headerTabs from './modules/headertabs'
import home from './modules/home'
import cook from './modules/cook'
import type from './modules/type'
// 脚部分类
import footclassification from './modules/footclassification'
import shopCart from './modules/shopCart'
import order from './modules/order'
import mylist from './modules/mylists'

Vue.use(Vuex)

export default new Vuex.Store({
  modules: {
    user,
    footer,
    home,
    cook,
    type,
    shopCart,
    order,
    mylist,
    footclassification,
    headerTabs
  }
})
如果没记错我们是通过tabs是通过this.$store.getters.headertabList获得的,这个store把modules里面的每一个状态都包含进来了。我们来看下hedertabs的内容
import * as types from '../types'
const state = {
  headertabList: [
        {id: 0, name: '推荐', isActive: true, linkTo: '/recommend'},
        {id: 1, name: '居家', isActive: false, linkTo: '/home'},
        {id: 2, name: '餐厨', isActive: false, linkTo: '/cook'},
        {id: 3, name: '配件', isActive: false, linkTo: '/parts'},
        {id: 4, name: '服装', isActive: false, linkTo: '/cloth'},
        {id: 5, name: '洗护', isActive: false, linkTo: '/wash'},
        {id: 6, name: '婴童', isActive: false, linkTo: '/baby'},
        {id: 7, name: '杂货', isActive: false, linkTo: '/messy'},
        {id: 8, name: '饮食', isActive: false, linkTo: '/drink'},
        {id: 9, name: '志趣', isActive: false, linkTo: '/hobby'}
  ]
}

const actions = {
  changeHeadertabActive ({commit}, id) {
    commit(types.CHANGE_HEADER_TAB, id)
  },
  changeTypesabActive ({commit}, id) {
    commit(types.CHANGE_TYPES_TAB, id)
  },
  changeMylistActive ({commit}, id) {
    commit(types.CHANGE_MYLIST_TAB, id)
  }
}
const getters = {
  headertabList: state => state.headertabList,
  typesTabs: state => state.typesTabs,
  selfmylist: state => state.mylist
}
const mutations = {
  [types.CHANGE_HEADER_TAB] (state, id) {
    state.headertabList.forEach(list => {
      list.isActive = false
    })
    state.headertabList[id].isActive = true
  },
  [types.CHANGE_TYPES_TAB] (state, id) {
    state.typesTabs.forEach(list => {
      list.isActive = false
    })
    state.typesTabs[id].isActive = true
  },
  [types.CHANGE_MYLIST_TAB] (state, id) {
    state.mylist.forEach(list => {
      list.isActive = false
    })
    state.mylist[id].isActive = true
  }
}
export default {
  state,
  actions,
  getters,
  mutations
}
注意在module下面的文件格式都是这样的,一个state,一个actions,一个getters,一个mutations,最后别忘了
export default {
  state,
  actions,
  getters,
  mutations
}
所以我们弄清楚了tabs内容的来源,就是headertabs里面的state.headertabList。
我们继续看一个module下面的文件
shopCart.js
import * as types from '../types'
import Util from '../../util/common'
const STORAGE_CARTLIST_KEY = 'STORAGE_CARTLIST_KEY'
const state = {
  cartList: Util.getLocal(STORAGE_CARTLIST_KEY) || [],
  isExist: false
}
const actions = {
  // set
  setCartList ({commit}, obj) {
    commit(types.SET_CART_LISTS, obj)
  },
  saveCartList ({commit}) {
    commit(types.SAVE_CART_LIST)
  },
  checkIsExist ({commit}, obj) {
    commit(types.CHECK_CART_ISEXIST, obj)
  },
  delCart ({commit}, obj) {
    commit(types.DEL_CART_CART, obj)
  }
}
const getters = {
  cartList: state => state.cartList,
  total: state => state.cartList.length,
  isExist: state => state.isExist,
  // 已经加入购物车的商品总量
  allNum: state => {
    let total = 0
    state.cartList.forEach(item => {
      total += item.number
    })
    return total
  }
}
const mutations = {
  [types.SET_CART_LISTS] (state, obj) {
    state.cartList.push(obj)
  },
  // 保存到购物车到本地
  [types.SAVE_CART_LIST] (state) {
    Util.setLocal(state.cartList, STORAGE_CARTLIST_KEY)
  },
  // exist this.++ else insert a new record
  [types.CHECK_CART_ISEXIST] (state, obj) {
    // 没有数据不做检查
    if (state.cartList.length === 0) return false
    let existIndex = state.cartList.findIndex((item) => {
      return item.type === obj.type && item.gid === obj.gid && item.picked === obj.picked
    })
    console.log(existIndex)
    // exist
    if (existIndex >= 0) {
      console.log(state.cartList[existIndex].number)
      state.cartList[existIndex].number ++
      state.isExist = true
    } else {
      state.isExist = false
    }
  },
  [types.DEL_CART_CART] (state, objs) {
    console.log(objs.length)
    objs.forEach(obj => {
      let index = state.cartList.findIndex((item) => {
        return item.gid === obj.id && item.type === obj.type
      })
       // 找出索引删除一个
      state.cartList.splice(index, 1)
    })
    Util.setLocal(state.cartList, STORAGE_CARTLIST_KEY)
  }
}
export default {
  state,
  actions,
  getters,
  mutations
}
里面的内容不重要,关键是我们看得出来他的写法,都是这种形式,另外可以通过this.$store.getters. 获取任意一个module下面的数据。
当我们初次进入'/'会调用this.$store.dispatch('changeHeadertabActive', 0)。
调用路线:
changeHeadertabActive ({commit}, id) {
    commit(types.CHANGE_HEADER_TAB, id)
  }

[types.CHANGE_HEADER_TAB] (state, id) {
    state.headertabList.forEach(list => {
      list.isActive = false
    })
    state.headertabList[id].isActive = true
  }
所以其实任何改动都是在mutation里面进行的。
3 页面分析
当我们点击tab为home时,会用home组件加载。
each-tab很明显是home下面每个商品的描述组件,在进入此组件时同样的会调用changeHeadertabActive来改变tab状态切换,同时会调用gethomeDesc来填充数据,最后在computed的时候就会将数据呈上。
所以我只需看下home.js里面是如何写的即可
@/index/home.js
import * as types from '../types'
import data from '@/fetch/api'
const state = {
  homeDesc: {},
  homeDetail: {}
}
const actions = {
  // home简要
  gethomeDesc ({commit}, type) {
    console.log('type', type)
    data.getTypeDesc(type).then(res => {
      // console.log('type data:', res)
      commit(types.SET_HOME_DESC, res)
    })
  },
  gethomeDetail ({commit}, type, id) {
    data.getTypeDetail(type, id).then(res => {
      console.log('type data:', res)
      commit(types.SET_HOME_DETAIL, res)
    })
  }

}
const getters = {
  homeDesc: state => state.homeDesc
}
const mutations = {
  [types.SET_HOME_DESC] (state, res) {
    state.homeDesc = res
  },
  [types.SET_HOME_DETAIL] (state, res) {
    state.homeDetail = res
  }
}
export default {
  state,
  actions,
  getters,
  mutations
}
我们可以看出来gethomeDesc是按照type来fetch数据填充到homedesc里面,这个fetch涉及到promise,下节我们再讲。
接下来看each-tab
很明显最后商品列表都被渲染进了goods-grid。
goods-grid
{{eachdata.title}}
{{eachdata.subtitle}}
-

{{item.desc}}
{{item.name}}
¥{{item.price}}
每个li.item就是具体商品,然后点击它可以跳转到这个商品详情页,注意这里的路由。
 {
          path: '/detail/:type/id/:id',
          name: 'seeDetails',
          component: seeDetails
        }
router里面有这样一段,我们就知道了上面的意思是说到seeDetails,并把params的参数携带过去。问题来了,商品详情都是用seeDeatils组件,那么这个数据填充是如何做的。。
来看goodsDetail.vue


这里面有许多swiper这种ui插件,暂且不管,我们来看看是如何做到把商品详情的数据拿到的
let type = this.$route.path.split('/')[2]
    let id = this.$route.path.split('/')[4]
    console.log('detail', {type, id})
    this.$store.dispatch('getDetail', {type, id})

computed: {
    detail () {
      Indicator.close()
      console.log(this.$store.getters.Detail)
      return this.$store.getters.Detail
    }
  }
所以我们看到是用this.$route.path拿到地址的参数进而去dispatch改变数据,做到的。
getDetail ({commit}, obj) {
    console.log(`post ${obj.type}${obj.id} data:`)
    data.getTypeDetail(obj.type, obj.id).then(res => {
      // console.log('res', res)
      commit(types.SET_TYPE_DETAIL, res)
    })
  }

[types.SET_TYPE_DESC] (state, res) {
    state.Desc = res
  }
之前一直在搞angular,现在发现框架对这样的问题处理都一样,所以我劝那些想把前端学好的同学先不要慌着搞这些,js基础才是王道,基础好了学什么都是一下午的事。。。

