先看几个概念:
线程:进程中负责程序执行的执行单元。正在运行的程序,是系统进行资源分配和调用的独立单位。每一个进程都有它自己的内存空间和系统资源。
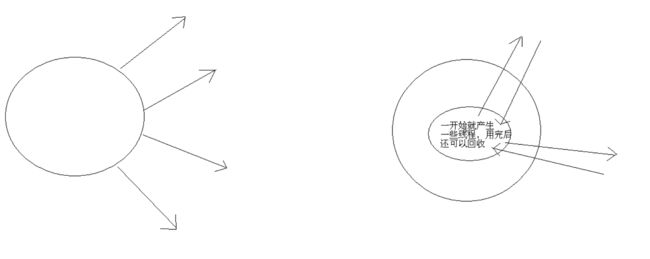
是进程中的单个顺序控制流,是一条执行路径,一个进程如果只有一条执行路径,则称为单线程程序。
一个进程如果有多条执行路径,则称为多线程程序。
线程池:基本思想还是一种对象池的思想,开辟一块内存空间,里面存放了众多(未死亡)的线程,池中线程执行调度由池管理器来处理。当有线程任务时,从池中取一个,执行完成后线程对象归池,这样可以避免反复创建线程对象所带来的性能开销,节省了系统的资源。
总结:
- 如果程序只有一条执行路径,那么该程序是单线程程序.
- 如果程序有多条执行路径,那么该程序是多线程程序.
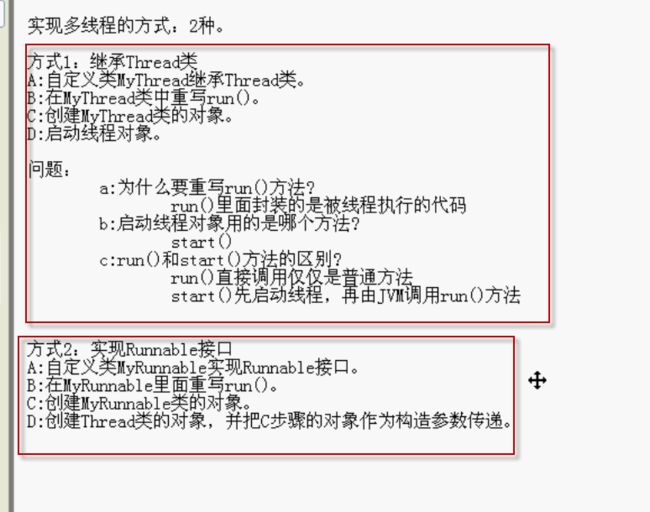
创建线程 方式一
package com.toltech.springboot.test;

/**
 * @author Wgs
 * @version 1.0
 * @create:2017/11/27 两种创建方式:
 * 方式一:继承Thread类
 * 步骤:
 * A: 自定义类继承Thread类
 * B: 重写Run方法
 * C: 创建对象
 * D: 启动线程
 */
public class MyThreadDemo extends Thread {
    public MyThreadDemo(){}
    public MyThreadDemo(String name){
        super(name);
    }

    @Override
    public void run() {
        for (int i = 0; i <= 100; i++) {
            System.out.println(getName());
        }
    }
}

/**
 * 获取线程名称
 *public final String getName();
 */
class Test{
    public static void main(String[] args) {
      /*  // 创建对象
        MyThreadDemo myThreadDemo1 = new MyThreadDemo();
        MyThreadDemo myThreadDemo2 = new MyThreadDemo();

        // 设置民称
        myThreadDemo1.setName("tom");
        myThreadDemo2.setName("jack");

        myThreadDemo1.run();
        myThreadDemo2.run();*/

      /*  // 创建对象
        MyThreadDemo myThreadDemo1 = new MyThreadDemo("tom");
        MyThreadDemo myThreadDemo2 = new MyThreadDemo("jack");

        myThreadDemo1.run();
        myThreadDemo2.run();*/
        //我要获取main方法所在的线程对象的名称,该怎么办呢?
        //遇到这种情况,Thread类提供了一个很好玩的方法:
        //public static Thread currentThread():返回当前正在执行的线程对象
        System.out.println(Thread.currentThread().getName());
    }
}

/*
名称为什么是:Thread-? 编号

class Thread {
    private char name[];

    public Thread() {
        init(null, null, "Thread-" + nextThreadNum(), 0);
    }

    private void init(ThreadGroup g, Runnable target, String name,
                      long stackSize) {
        init(g, target, name, stackSize, null);
    }

     private void init(ThreadGroup g, Runnable target, String name,
                      long stackSize, AccessControlContext acc) {
        //大部分代码被省略了
        this.name = name.toCharArray();
    }

    public final void setName(String name) {
        this.name = name.toCharArray();
    }


    private static int threadInitNumber; //0,1,2
    private static synchronized int nextThreadNum() {
        return threadInitNumber++; //return 0,1
    }

    public final String getName() {
        return String.valueOf(name);
    }
}

class MyThread extends Thread {
    public MyThread() {
        super();
    }
}

*/
方式二
package com.toltech.springboot.test;

/**
 * @author Wgs
 * @version 1.0
 * @create:2017/11/27
 */
public class MyRunnable implements Runnable {

    @Override
    public void run() {
        for (int x = 0; x < 100; x++) {
            // 由于实现接口的方式就不能直接使用Thread类的方法了,但是可以间接的使用
            System.out.println(Thread.currentThread().getName() + ":" + x);
        }
    }

}

/*
 * 方式2:实现Runnable接口
 * 步骤:
 *      A:自定义类MyRunnable实现Runnable接口
 *      B:重写run()方法
 *      C:创建MyRunnable类的对象
 *      D:创建Thread类的对象,并把C步骤的对象作为构造参数传递
 */
class MyRunnableDemo {
    public static void main(String[] args) {
        // 创建MyRunnable类的对象
        MyRunnable my = new MyRunnable();

        // 创建Thread类的对象,并把C步骤的对象作为构造参数传递
        // Thread(Runnable target)
        // Thread t1 = new Thread(my);
        // Thread t2 = new Thread(my);
        // t1.setName("林青霞");
        // t2.setName("刘意");

        // Thread(Runnable target, String name)
        Thread t1 = new Thread(my, "林青霞");
        Thread t2 = new Thread(my, "刘意");

        t1.start();
        t2.start();
    }
}
方式三
package com.toltech.springboot.test;

/**
 * @author Wgs
 * @version 1.0
 * @create:2017/11/27
 */
/*
 * 匿名内部类的格式:
 *      new 类名或者接口名() {
 *          重写方法;
 *      };
 *      本质:是该类或者接口的子类对象。
 */
public class ThreadDemo {
    public static void main(String[] args) {
        // 继承Thread类来实现多线程
        new Thread() {
            public void run() {
                for (int x = 0; x < 100; x++) {
                    System.out.println(Thread.currentThread().getName() + ":"
                            + x);
                }
            }
        }.start();

        // 实现Runnable接口来实现多线程
        new Thread(new Runnable() {
            @Override
            public void run() {
                for (int x = 0; x < 100; x++) {
                    System.out.println(Thread.currentThread().getName() + ":"
                            + x);
                }
            }
        }) {
        }.start();

        // 更有难度的
        new Thread(new Runnable() {
            @Override
            public void run() {
                for (int x = 0; x < 100; x++) {
                    System.out.println("hello" + ":" + x);
                }
            }
        }) {
            public void run() {
                for (int x = 0; x < 100; x++) {
                    System.out.println("world" + ":" + x);
                }
            }
        }.start();
    }
}
睡眠
package com.toltech.springboot.test;

import java.util.Date;

/**
 * @author Wgs
 * @version 1.0
 * @create:2017/11/27
 */
public class ThreadSleep extends Thread {
    @Override
    public void run() {
        for (int i = 0; i <= 100; i++) {
            System.out.println(getName() + ": " + i + new Date());
            // 睡眠 一秒钟
            try {
                Thread.sleep(1000);
            } catch (InterruptedException e) {
                e.printStackTrace();
            }
        }
    }
}

class Test{
    public static void main(String[] args) {
        ThreadSleep threadSleep = new ThreadSleep();
        ThreadSleep threadSleep1 = new ThreadSleep();

        threadSleep.setName("tom");
        threadSleep1.setName("jack");

        threadSleep.run();
        threadSleep1.run();
    }
}
守护线程
package com.toltech.springboot.test;


class ThreadDaemon extends Thread {
    @Override
    public void run() {
        for (int x = 0; x < 100; x++) {
            System.out.println(getName() + ":" + x);
        }
    }
}


/*
 * public final void setDaemon(boolean on):将该线程标记为守护线程或用户线程。
 * 当正在运行的线程都是守护线程时,Java 虚拟机退出。 该方法必须在启动线程前调用。
 *
 * 游戏:坦克大战。
 */
public class ThreadDaemonDemo {
    public static void main(String[] args) {
        ThreadDaemon td1 = new ThreadDaemon();
        ThreadDaemon td2 = new ThreadDaemon();

        td1.setName("关羽");
        td2.setName("张飞");

        // 设置收获线程
        td1.setDaemon(true);
        td2.setDaemon(true);

        td1.start();
        td2.start();

        Thread.currentThread().setName("刘备");
        for (int x = 0; x < 5; x++) {
            System.out.println(Thread.currentThread().getName() + ":" + x);
        }
    }
}
加入线程
package com.toltech.springboot.test;

/**
 * @author Wgs
 * @version 1.0
 * @create:2017/11/27
 */
public class ThreadJoin extends Thread {
    @Override
    public void run() {
        for (int x = 0; x < 100; x++) {
            System.out.println(getName() + ":" + x);
        }
    }
}

/*
 * public final void join():等待该线程终止。
 */
 class ThreadJoinDemo {
    public static void main(String[] args) {
        ThreadJoin tj1 = new ThreadJoin();
        ThreadJoin tj2 = new ThreadJoin();
        ThreadJoin tj3 = new ThreadJoin();


        tj1.setName("李渊");
        tj2.setName("李世民");
        tj3.setName("李元霸");

        tj1.start();
        try {
            // 执行完后 tj2 tj3 在执行
           tj1.join();
        } catch (InterruptedException e) {
            e.printStackTrace();
        }

        tj2.start();
        tj3.start();
    }
}
优先级
package com.toltech.springboot.test;

/**
 * @author Wgs
 * @version 1.0
 * @create:2017/11/27
 */
public class ThreadPriority extends Thread {
    @Override
    public void run() {
        for (int x = 0; x < 100; x++) {
            System.out.println(getName() + ":" + x);
        }
    }
}

/*
 * 我们的线程没有设置优先级,肯定有默认优先级。
 * 那么,默认优先级是多少呢?
 * 如何获取线程对象的优先级?
 *      public final int getPriority():返回线程对象的优先级
 * 如何设置线程对象的优先级呢?
 *      public final void setPriority(int newPriority):更改线程的优先级。
 *
 * 注意:
 *      线程默认优先级是5。
 *      线程优先级的范围是:1-10。
 *      线程优先级高仅仅表示线程获取的 CPU时间片的几率高,但是要在次数比较多,或者多次运行的时候才能看到比较好的效果。
 *
 * IllegalArgumentException:非法参数异常。
 * 抛出的异常表明向方法传递了一个不合法或不正确的参数。
 *
 */
class ThreadPriorityDemo {
    public static void main(String[] args) {
        ThreadPriority tp1 = new ThreadPriority();
        ThreadPriority tp2 = new ThreadPriority();
        ThreadPriority tp3 = new ThreadPriority();

        tp1.setName("东方不败");
        tp2.setName("岳不群");
        tp3.setName("林平之");

        // 获取默认优先级
        // System.out.println(tp1.getPriority());
        // System.out.println(tp2.getPriority());
        // System.out.println(tp3.getPriority());

        // 设置线程优先级
        // tp1.setPriority(100000);

        //设置正确的线程优先级
        tp1.setPriority(10);
        tp2.setPriority(1);

        tp1.start();
        tp2.start();
        tp3.start();
    }
}
终止线程
package com.toltech.springboot.test;

import java.util.Date;

/**
 * @author Wgs
 * @version 1.0
 * @create:2017/11/27
 */
public class ThreadStop extends Thread {
    @Override
    public void run() {
        System.out.println("开始执行:" + new Date());

        // 我要休息10秒钟,亲,不要打扰我哦
        try {
            Thread.sleep(10000);
        } catch (InterruptedException e) {
            // e.printStackTrace();
            System.out.println("线程被终止了");
        }

        System.out.println("结束执行:" + new Date());
    }
}

/*
 * public final void stop():让线程停止,过时了,但是还可以使用。
 * public void interrupt():中断线程。 把线程的状态终止,并抛出一个InterruptedException。
 */
class ThreadStopDemo {
    public static void main(String[] args) {
        ThreadStop ts = new ThreadStop();
        ts.start();

        // 你超过三秒不醒过来,我就干死你
        try {
            Thread.sleep(3000);
            // ts.stop();
            ts.interrupt();
        } catch (InterruptedException e) {
            e.printStackTrace();
        }
    }
}
暂停线程
package com.toltech.springboot.test;

/**
 * @author Wgs
 * @version 1.0
 * @create:2017/11/27
 */
public class ThreadYield extends Thread {
    @Override
    public void run() {
        for (int x = 0; x < 100; x++) {
            System.out.println(getName() + ":" + x);
            Thread.yield();
        }
    }
}

/*
 * public static void yield():暂停当前正在执行的线程对象,并执行其他线程。
 * 让多个线程的执行更和谐,但是不能靠它保证一人一次。
 */
class ThreadYieldDemo {
    public static void main(String[] args) {
        ThreadYield ty1 = new ThreadYield();
        ThreadYield ty2 = new ThreadYield();

        ty1.setName("林青霞");
        ty2.setName("刘意");

        ty1.start();
        ty2.start();
    }
}
线程池
线程池实现方式一
package com.toltech.springboot.test;

import java.util.concurrent.ExecutorService;
import java.util.concurrent.Executors;

/**
 * @author Wgs
 * @version 1.0
 * @create:2017/11/27
 */


 class MyRunnables implements Runnable {

    @Override
    public void run() {
        for (int x = 0; x < 100; x++) {
            System.out.println(Thread.currentThread().getName() + ":" + x);
        }
    }

}


/*
 * 线程池的好处:线程池里的每一个线程代码结束后,并不会死亡,而是再次回到线程池中成为空闲状态,等待下一个对象来使用。
 *
 * 如何实现线程的代码呢?
 *      A:创建一个线程池对象,控制要创建几个线程对象。
 *          public static ExecutorService newFixedThreadPool(int nThreads)
 *      B:这种线程池的线程可以执行:
 *          可以执行Runnable对象或者Callable对象代表的线程
 *          做一个类实现Runnable接口。
 *      C:调用如下方法即可
 *          Future submit(Runnable task)
 *           Future submit(Callable task)
 *      D:我就要结束,可以吗?
 *          可以。
 */
public class ExecutorsDemo {
    public static void main(String[] args) {
        // 创建一个线程池对象,控制要创建几个线程对象。
        // public static ExecutorService newFixedThreadPool(int nThreads)
        ExecutorService pool = Executors.newFixedThreadPool(2);

        // 可以执行Runnable对象或者Callable对象代表的线程
        pool.submit(new MyRunnables());
        pool.submit(new MyRunnables());

        //结束线程池
        pool.shutdown();
    }
}
线程池实现方式二
package com.toltech.springboot.test;

import java.util.concurrent.Callable;
import java.util.concurrent.ExecutorService;
import java.util.concurrent.Executors;

/**
 * @author Wgs
 * @version 1.0
 * @create:2017/11/27
 */
/*
 * 多线程实现的方式3:
 *      A:创建一个线程池对象,控制要创建几个线程对象。
 *          public static ExecutorService newFixedThreadPool(int nThreads)
 *      B:这种线程池的线程可以执行:
 *          可以执行Runnable对象或者Callable对象代表的线程
 *          做一个类实现Runnable接口。
 *      C:调用如下方法即可
 *          Future submit(Runnable task)
 *           Future submit(Callable task)
 *      D:我就要结束,可以吗?
 *          可以。
 */
public class CallableDemo {
    public static void main(String[] args) {
        //创建线程池对象
        ExecutorService pool = Executors.newFixedThreadPool(2);

        //可以执行Runnable对象或者Callable对象代表的线程
        pool.submit(new MyCallable());
        pool.submit(new MyCallable());

        //结束
        pool.shutdown();
    }
}

//Callable:是带泛型的接口。
//这里指定的泛型其实是call()方法的返回值类型。
 class MyCallable implements Callable {

    @Override
    public Object call() throws Exception {
        for (int x = 0; x < 100; x++) {
            System.out.println(Thread.currentThread().getName() + ":" + x);
        }
        return null;
    }

}

