6、Python 文件读写及文件系统
文章目录
- 一、文件的打开与关闭
- 1. 文件的打开
- 2. 文件的关闭
- 二、文件的读写操作
- 1. 文件对象的方法及使用详解
- 2. 文件对象转换为列表及迭代
- 三、复杂数据类型(列表、字典甚至类的实例)的读写
- 1. pickle:腌制一缸美味的泡菜
- 2. pickle 模块的方法
- 四、文件系统
- 1. **`os`** 模块中关于 **`文件/目录`** 常用的函数使用方法
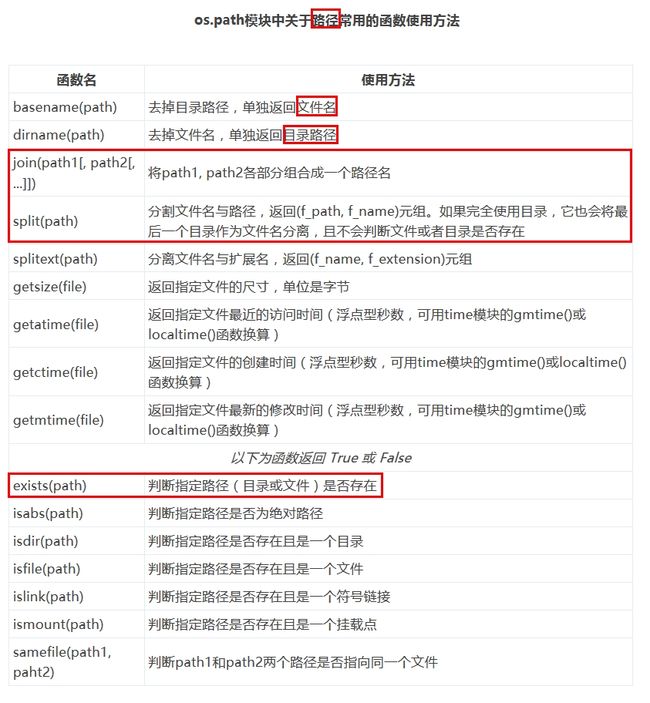
- 2. **`os.path`** 模块中关于 **`路径`** 常用的函数使用方法
- 五、glob 模块:文件模式匹配
一、文件的打开与关闭
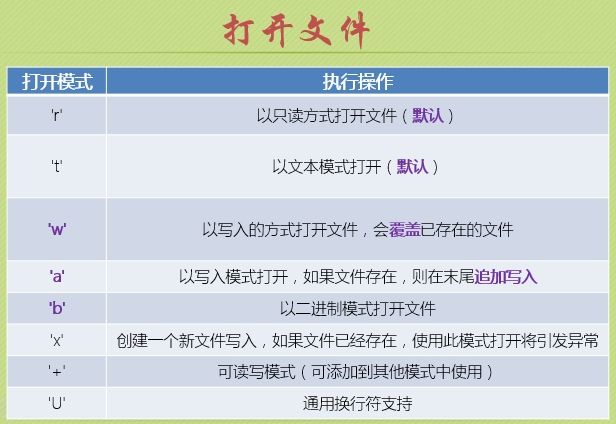
1. 文件的打开
-
使用open()这个函数来打开文件,并返回文件对象,拿到这个文件对象,就可以读取或修改这个文件了。
-
现代操作系统不允许普通的程序直接操作磁盘,所以读写文件就是请求操作系统打开一个文件对象 (传入路径名+文件名, 打开模式)
-
f = open(r'E:\hello.txt', 'rt', encoding='utf-8') # 以只读的方式打开,'rt'为默认,可省略 -
f = open(os.path.join(save_dir, 'pos_12.txt'), 'w', encoding='utf-8') # 以写入的方式打开
2. 文件的关闭
- 文件使用完毕后必须关闭
f.close(),因为文件对象会占用操作系统的资源,并且操作系统同一时间能打开的文件数量也是有限的,而且一般关闭文件时,内容才被写入磁盘 - 但是每次都这么写实在太繁琐,所以 Python 引入
with 上下文管理器来自动帮我们调用close()方法
# py3 文件读写
with open('/path/to/file', 'rt', encoding='utf-8') as f:
    annotations = f.readlines()
    num = len(annotations)

# py2 文件读写
import sys
import codecs
reload(sys)  # 这里必须reload一下才能找到 setdefaultencoding method
sys.setdefaultencoding('utf-8') # 更改 py2 解释器的默认编码方式(ASCII-->UTF-8)

with codecs.open('/path/to/file', "r", encoding="utf-8") as f:
    annotations = f.readlines()
    num = len(annotations)


# py3 读取 gbk(ansi) 编码的文件(图像)并重命名
def rename(data_dir):
    cnt = 0
    for img_name in os.listdir(data_dir):
        try:
            img_path = os.path.join(data_dir, img_name)
            with open(img_path, "r", encoding="gbk", errors="ignore") as f:
                annos = f.read().split('Plate=')[1].split(', shootRear')[0]
                plate_num = annos.split(',')[0]
                plate_color = annos.split(',')[1].split('=')[1][:-1]

            img_name_new = plate_num + plate_color + '_' + str(cnt) + '.bmp'
            dst = os.path.join(data_dir, img_name_new)
            os.rename(img_path, dst)

            cnt += 1
            print("process the: %2d example" % cnt)

        except Exception as e:
            print('error reason is {}'.format(e))
            print(img_name)
            continue

    print("job done!")
二、文件的读写操作
1. 文件对象的方法及使用详解
2. 文件对象转换为列表及迭代
- 把整个文件对象(
f)中的数据(每一行以字符串的形式存放,字符串种包括\n)存放进列表中:list(f) == f.readlines()- 注意:这两种方式是等价的,都会自动将文件内容分析成一个行的列表
- 可以使用
len(f.readlines())读取列表的长度
- 文件对象本身是支持迭代的(每一行以\n为结束标志),所以可以用for语句迭代读取文本文件中的每一行:
for each_line in f: print(each_line)
三、复杂数据类型(列表、字典甚至类的实例)的读写
1. pickle:腌制一缸美味的泡菜
- 从一个文件中读取字符串非常简单,但是当要保存像列表、字典甚至是类的实例这些更复杂的数据类型时,普通的文件操作就会变得不知所措。
- pickle 模块几乎可以把所有的 Python 对象都转化为二进制的形式存放。
2. pickle 模块的方法
import pickle

my_list = [123, 3.14, 'fishc', ['hello', 'world']] # 待存储的数据

# 文件的存储,后缀名可随意,但一般用.pkl, 以'wb'的模式打开目标存储文件,若目标文件不存在,则自动创建
with open(r'E:\my_list.pkl', 'wb') as f:
	pickle.dump(my_list, f)              # 调用dump方法来保存数据,第一个参数是待保存数据,第二个参数是目标存储文件对象

# 文件的打开,后缀名可随意,但一般用.pkl, 以'rb'的模式打开目标存储文件,若目标文件不存在,则自动创建
with open(r'E:\my_list.pkl', 'rb') as f1:
	my_list1 = pickle.load(f1)           # 使用load方法把数据加载进来
	print(my_list1)
四、文件系统
Python 是跨平台的语言,也就是说,同样的源代码在不同的操作系统上不需要修改就可以同样实现。有了os 模块,不需要关心什么操作系统下使用什么模块,os 模块会帮你选择正确的模块并调用。
1. os 模块中关于 文件/目录 常用的函数使用方法
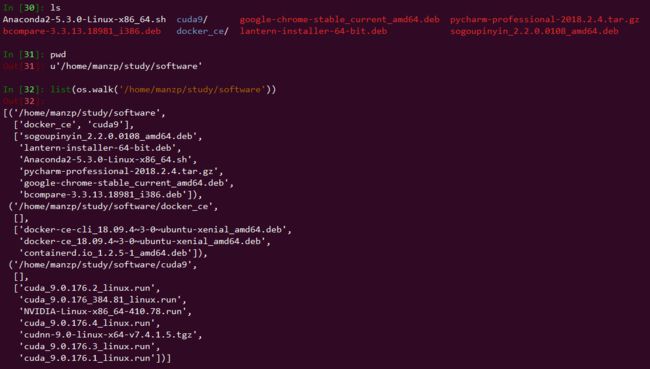
os.listdir(path)  # 返回给定目录下的所有文件夹和文件名的列表(相当于ls)

os.system('mkdir -p test/sub')  # Execute the command (a string) in a subshell

# 返回 file_dir(str)、file_dir 下的子目录列表(list)、file_dir 下的所有文件名列表(list)
os.walk(file_dir)

# 获取图像的绝对路径
def get_file(file_dir):
	img_list = []

	for img_name in os.listdir(file_dir):
		img_path = os.path.join(file_dir, img_name) + '\n'
		img_list.append(img_path)

	np.random.shuffle(img_list)

	list_len = len(img_list)
	train_list = img_list[:int(list_len * 0.9)]  # 90%
	test_list = img_list[int(list_len * 0.9):]  # 10%

	return train_list, test_list

# 将图像的绝对路径保存到文件中
train_img_list, test_img_list = get_file(r'E:\test_img')
with open('train_img_list.txt', 'w', encoding='utf-8') as f1:
    f1.writelines(train_img_list)

with open('test_img_list.txt', 'w', encoding='utf-8') as f2:
    f1.writelines(test_img_list)


# 当有多个不同类型的数据时,可用 + 号连接 list,然后 shuffle,最后再写入文件中
train_single_line_list, test_single_line_list = get_file(single_line_dir)
train_double_line_list, test_double_line_list = get_file(double_line_dir)

train_sum_list = train_single_line_list + train_double_line_list
test_sum_list = test_single_line_list + test_double_line_list
np.random.shuffle(train_sum_list)
np.random.shuffle(test_sum_list)

print('train data sum is {}'.format(len(train_sum_list)))
print('test data sum is {}'.format(len(test_sum_list)))

with open(os.path.join(base_dir, "train_plate_cls.txt"), "w") as f1:
	f1.writelines(train_sum_list)

with open(os.path.join(base_dir, "test_plate_cls.txt"), "w") as f2:
	f2.writelines(test_sum_list)
-
os.walk(file_dir):返回 file_dir(str)、file_dir 下的子目录列表(list)、file_dir 下的所有文件名列表(list)

# 循环迭代每个文件夹,保存所有文件到 list 中
def get_all_labels(label_dir):
    all_label = []
    for folder_dir, sub_folder_dir, file_names in os.walk(label_dir):
        for name in file_names:
            all_label.append(os.path.join(folder_dir, name))
    return all_label
2. os.path 模块中关于 路径 常用的函数使用方法
os.path.join('/home/manzp/jupyter_notebook', 'fishc.txt')
'/home/manzp/jupyter_notebook/fishc.txt'

os.path.split('/home/manzp/jupyter_notebook/log.py')
('/home/manzp/jupyter_notebook', 'log.py')

# 创建单层目录
if not os.path.exists(save_dir):
    os.mkdir(save_dir)

# 递归创建多层目录
if not os.path.exists(save_dir):
    os.makedirs(save_dir)

# 循环创建多个目录
for dir_path in [pos_save_dir, part_save_dir, neg_save_dir]:
    if not os.path.exists(dir_path):
        os.makedirs(dir_path)
五、glob 模块:文件模式匹配
- glob 函数支持三种格式的语法:
*匹配单个或多个字符?匹配任意单个字符[]匹配指定范围内的字符,如:[0-9]匹配数字
- 代码实践
import glob

glob.glob('*.md')
['index.md', 'README.md']

glob.glob('./[0-9].*')
['./1.gif', './2.txt']

# 示例,* 表示可匹配各种后缀的图片,注意字符串中特殊字符[]{}等存在可能匹配不上
img_path = glob.glob(anno_xml.replace('Label', 'Image').replace('xml', '*'))[0]
img_path = anno_xml.replace('Label', 'Image').replace('xml', 'jpg')  # 当确定图片后缀时,可用此法


