Retrofit2结合Picasso在项目当中的简单使用
作为开博的第一篇文章,最近看到Retrofit无论在GitHub上还是在CSDN都比较活跃。最近新开发一个 项目,决定来使用它看看效果如何,所以看了好多大牛对Retrofit2的介绍及使用详解。终于配置完成了,这样网络请求库有了,就缺一套图片加载库了,,在github上选几个缓冲库,fresso,ImageLoader,Picasso这几套框架口碑都比较好!所以我准备在他们三个 选一套用到我的项目当中!仔细了解后发现Picasso和Retrofit2是一个公司开发的,square 公司的杰作,写到这里,小鸟弱弱的说一句老司机们不要喷呐,继续,既然他两属于一个公司的,配合起来使用不就很好用了吗?于是看看了两者的源码,才知道两者的内部都是使用okhttpClient,一个 是Okhttp3包下的,一个不是,,所以我决定他两结合进一步优化使用到我的项目当中。Retrofit比较强大既可以结合MVP模式或者MVP+Dagger+Retrofit实现更清晰的架构,这里我就不再详细介绍了,大牛写这个的很多了。
下面简单介绍一下Retrofit2框架.
Retrofit2.0 项目主页
Retrofit2.0 官方文档
Retrofit框架是square公司出品的目前非常流行的网络框架,效率高,实现简单。用运注解动态代理,极大的简化了网络请求的繁琐步骤,非常适合处理REST full 网络请求。
特点:
性能好,处理快,使用简单,目前android最流行的HTTPClient库之一;(速度上臂Volley更快)
使用REST API非常方便
支持NIO;(新的Io APi 可以代替java的Io API)
Retrofit默认使用Okhttp处理网络请求
默认使用Gson解析,这也是我比较喜欢的地方,少了很多步骤,结合Studio的插件GSON Format 快速生成javaBean,快速开发。节省了时间。
下面一起来看看如何使用吧:
首先在Studio加入Retrofit2这套框架吧:
在Build.Gradle 加入依赖和权限
compile files('libs/picasso-2.5.2.jar')
compile 'com.squareup.retrofit2:converter-gson:2.0.0-beta4'
android:name="android.permission.INTERNET" /> 同步后External Library中增加
Retrofit-2.0.0-bete4
okhttp 3.0.1
oki -1.6.0
gson-2.4
converter-gson-2.0.0-bete4
这几个依赖包都是square公司团队开发
使用
(1)创建Retrofit实例
public static final String BASE_URL = "http://api.myservice.com";
Retrofit retrofit = new Retrofit.Builder()
    .baseUrl(BASE_URL)
.build();public interface GitHubService {
@GET("users/list")Call getUserList(@Quary("userId") String userId); }
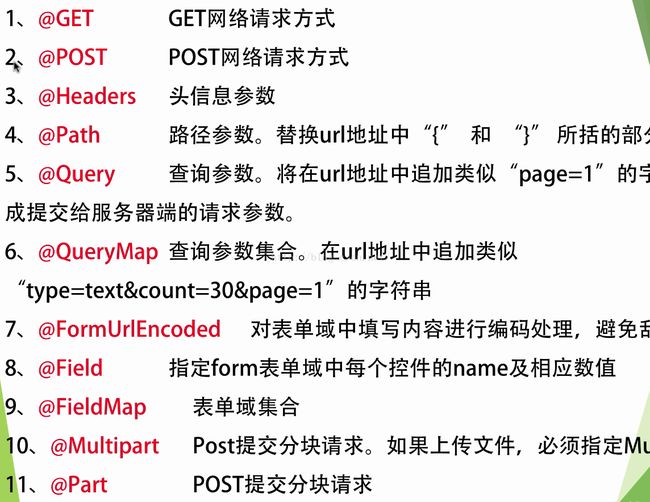
请求的URL可以在函数中使用替换块和参数进行动态更新,替换块是{ and }包围的字母数字组成的字符串,相应的参数必须使用相同的字符串被@Path进行注释
@GET("group/{id}/users")
Call> groupList(@Path("id") int groupId);
也可以添加查询参数
@GET("group/{id}/users")
Call> groupList(@Path("id") int groupId, @Query("sort") String sort);
复杂的查询参数可以使用Map进行组合
@GET("group/{id}/users")
Call> groupList(@Path("id") int groupId, @QueryMap Map options);
可以通过@Body注解指定一个对象作为Http请求的请求体
@POST("users/new")
Call createUser(@Body User user);
使用@FormUrlEncoded发送表单数据,使用@Field注解和参数来指定每个表单项的Key,Value为参数的值。
@FormUrlEncoded
@POST("user/edit")
Call getUser(@Field("name") String name, @Field("password") String password);
使用@FormUrlEncoded发送表单数据时,表单项过多时可以使用Map进行组合
@FormUrlEncoded
@POST("user/edit")
Call getUser(@FieldMap Map map);
使用@Multipart可以进行文件上传,使用@Part指定文件路径及类型
@Multipart
@POST("/user/edit")
Call upload(@Part("image\"; filename=\"文件名.jpg") RequestBody file);
使用@MapPart可以方便批量上传
@Multipart
@POST("/user/edit")
Call upload(@PartMap Map params);
RequestBody fileBody = RequestBody.create(MediaType.parse("image/png"), imgFile);
map.put("image\"; filename=\""+imgFile.getName()+"", fileBody);异步请求这个API
String username = "sarahjean";
Call call = apiService.getUser(username);
call.enqueue(new Callback() {
    @Override
    public void onResponse(Response response) {
        int statusCode = response.code();
        User user = response.body();
    }
    @Override
    public void onFailure(Throwable t) {
        // Log error here since request failed
    }
});
同步请求
String username = "sarahjean";


Call call = apiService.getUser(username);


User user = call.execute(); (1)我们在同步方法使用时可以直接调用execute方法,但是这个方法只能调用一次。解决办法:需要用clone方法生成一个新的之后在调用execute方法:
Call> call = gitHubService.repoContributors("square", "retrofit");
response = call.execute();
// This will throw IllegalStateException:
response = call.execute();
Call> call2 = call.clone();
// This will not throw:
response = call2.execute();
(2)当我们执行的同步或异步加入队列后,可以随时使用cancel方法取消请求:
Call> call = gitHubService.repoContributors("square", "retrofit");

call.enqueue(...);
// or...
call.execute();

// later...
call.cancel();
通过官方极少相比知道如何使用我们的Retrofit框架了。下面说一下我在项目中使用Retrofit2和Picasso结合使用。我没有用Retrofit结合RX,对于我的项目Retrofit自带的CallBack就够用了。下面贴出代码
import okhttp3.OkHttpClient;


public class OkHttp3Utils {
    private static OkHttpClient okHttpClient = null;

    public  static OkHttpClient getOkHttpSingletonInstance() {
        if (okHttpClient == null) {
            synchronized (OkHttpClient.class) {
                if (okHttpClient == null) {
                    okHttpClient = new OkHttpClient();
                }
            }
        }
        return okHttpClient;
    }
}
因为Picasso和Retrofit都使用okHttpClient,所以写一个单列,继承okhttp3包下的。
import android.net.Uri;
import com.squareup.picasso.NetworkPolicy;

import java.io.IOException;

import okhttp3.CacheControl;
import okhttp3.OkHttpClient;
import okhttp3.Request;
import okhttp3.ResponseBody;

/** A {@link Downloader} which uses OkHttp to download images. */
public class OrangeDownLoader implements Downloader {
    private static OkHttpClient defaultOkHttpClient() {
        OkHttpClient client = OkHttp3Utils.getOkHttpSingletonInstance();
        return client;
    }

    private final OkHttpClient client;

    public OrangeDownLoader() {
        this(defaultOkHttpClient());
    }

    /**
     * Create a new downloader that uses the specified OkHttp instance. A response cache will not be
     * automatically configured.
     */
    public OrangeDownLoader(OkHttpClient client) {
        this.client = client;
    }

    protected final OkHttpClient getClient() {
        return client;
    }

    @Override public Response load(Uri uri, int networkPolicy) throws IOException {
        CacheControl cacheControl = null;
        if (networkPolicy != 0) {
            if (NetworkPolicy.isOfflineOnly(networkPolicy)) {
                cacheControl = CacheControl.FORCE_CACHE;
            } else {
                CacheControl.Builder builder = new CacheControl.Builder();
                if (!NetworkPolicy.shouldReadFromDiskCache(networkPolicy)) {
                    builder.noCache();
                }
                if (!NetworkPolicy.shouldWriteToDiskCache(networkPolicy)) {
                    builder.noStore();
                }
                cacheControl = builder.build();
            }
        }

        Request.Builder builder = new Request.Builder().url(uri.toString());
        if (cacheControl != null) {
            builder.cacheControl(cacheControl);
        }

        okhttp3.Response response = client.newCall(builder.build()).execute();
        int responseCode = response.code();
        if (responseCode >= 300) {
            response.body().close();
            throw new ResponseException(responseCode + " " + response.message(), networkPolicy,
                    responseCode);
        }

        boolean fromCache = response.cacheResponse() != null;

        ResponseBody responseBody = response.body();
        return new Response(responseBody.byteStream(), fromCache, responseBody.contentLength());
    }

    @Override public void shutdown() {
        okhttp3.Cache cache = client.cache();
        if (cache != null) {
            try {
                cache.close();
            } catch (IOException ignored) {
            }
        }
    }
}
Picasso配置需要一个downloader所以也需要自定义一个类,目的也是继承偶看http3包下的,代开Picasso 的downloader源码复制粘贴把包名换成okhttp3包。
* @author fengxuhui * @version 创建时间:2016/4/12. * 类说明 :Retrofit 回调的接口 * @E-mail: [email protected] */ public interface RestApiService { /** * 登录获取验证码 */ @FormUrlEncoded @POST("push/send") Call接着就是定义访问网络的interfacesendCode(@Field("mobile") String mobile); /** * 登录 */ @FormUrlEncoded @POST("account/login") Call login(@Field("mobile") String mobile ,@Field("code") String code); /** * 会员信息 */ @GET("member/info") Call getUserInfo(@Query("token") String token);
下面就改定义一个公用的util类了
public class ServiceGenerator {

    private static  OkHttpClient httpClient = OkHttp3Utils.getOkHttpSingletonInstance();
    private static ServiceGenerator servericeInstance = null;


    private ServiceGenerator(){

    }

    public static ServiceGenerator getServiceInstance(){
        if (servericeInstance == null){
            synchronized (ServiceGenerator.class){
                if(servericeInstance==null){
                    servericeInstance = new ServiceGenerator();
                }
            }
        }
        return servericeInstance;
    }

    private static Retrofit retrofit = new Retrofit.Builder()
            .baseUrl(UrisServerDefine.API_BASE_URL)
            .client(httpClient)
            .addConverterFactory(GsonConverterFactory.create())
            .build();


    public static <S> S createService(Class<S> serviceClass) {
        return retrofit.create(serviceClass);
    }

}
下面就是配置Picasso了
    private DiskLruLoader mDiskLruCache = null;
    public final static String LOCAL_FILE = "file://";
    public final static String HTTP_FILE = "http://";

   private volatile static ImageLoader instance;

   /** Returns singleton class instance */
   public static ImageLoader getInstance() {
      if (instance == null) {
         synchronized (ImageLoader.class) {
            if (instance == null) {
               instance = new ImageLoader();
            }
         }
      }
      return instance;
   }

   protected ImageLoader() {
   }

   private Context mContext;
   private Picasso  picasso;

   public synchronized void init(Context context) {
      this.mContext = context;
      //文件缓存
//    Picasso.with(mContext).setIndicatorsEnabled(true);
//    Picasso.with(mContext).setLoggingEnabled(true);
      /**
       * 保证全局只有一个OkHttpClient
       */
        mDiskLruCache = new DiskLruLoader(StorageUtils.getIndividualCacheDirectory(mContext));

              picasso = new Picasso.Builder(context)
            .memoryCache(new LruCache(10<< 20 ))
            .defaultBitmapConfig(Bitmap.Config.RGB_565)
            .downloader(new OrangeDownLoader())
            .indicatorsEnabled(true)
            .build();

   }

   public boolean isInited() {
      return true;
   }

   public void displayImage(String uri, ImageView imageAware) {
      displayImage(uri, imageAware, null, null, null);
   }

   public void displayImage(File uri, ImageView imageAware, DisplayImageOptions options) {
      if(options == null)
         options = ImageLoaderOptions.OPTIONS_BASIC;

      picasso.with(mContext)
         .load(uri)
         .placeholder(options.getImageResOnLoading())
         .error(options.getImageResOnFail())
         .fit()
         .centerInside()
         .into(imageAware);
   }

   public void displayImage(String uri, ImageView imageAware, DisplayImageOptions options) {
      displayImage(uri, imageAware, options, null, null);
   }

   public ViewScaleType getScaleType(ImageView imageView) {
      if (imageView != null) {
         return ViewScaleType.fromImageView(imageView);
      }
      return ViewScaleType.CROP;
   }

   public void displayImage(String uri, ImageView imageAware, int loadingAndFailedResource) {
      DisplayImageOptions options = new DisplayImageOptions.Builder()
         .showImageForEmptyUri(loadingAndFailedResource)
         .showImageOnFail(loadingAndFailedResource)
         .showImageOnLoading(loadingAndFailedResource).build();
      displayImage(uri, imageAware, options, null, null);
   }

   public void displayImage(String uri, ImageView imageAware, DisplayImageOptions options,
                      final Target listener, ImageSize imageSize) {
      if(options == null){
         options = ImageLoaderOptions.OPTIONS_BASIC;
      }
      if(imageSize == null){
         imageSize = DeviceUtil.getDeviceImageSize(mContext);
      }
      if(uri != null){
         if(imageAware != null){
            RequestCreator request = picasso.with(mContext)
               .load(uri)
               .placeholder(options.getImageResOnLoading())
               .error(options.getImageResOnFail())
               .fit();
            if(getScaleType(imageAware) == ViewScaleType.CROP){
               request.centerCrop();
            }else{
               request.centerInside();
            }
            request.into(imageAware);
         }else if(listener != null){
            picasso.with(mContext)
               .load(uri)
               .placeholder(options.getImageResOnLoading())
               .error(options.getImageResOnFail())
               .resize(imageSize.getWidth(), imageSize.getHeight())
               .centerInside()
               .into(listener);
         }
      }else{
         if(imageAware != null){
            imageAware.setImageResource(options.getImageResOnFail());
         }
      }
   }

   public void loadImage(String uri, Target listener) {
      loadImage(uri, null, null, listener);
   }


   public void loadImage(String uri, ImageSize targetImageSize, Target listener) {
      loadImage(uri, targetImageSize, null, listener);
   }

   public Bitmap loadLocalImageSyncNoZoom(String uri, ImageSize imageSize){
      if(uri == null){
         return null;
      }
      try {
         if(uri.startsWith(LOCAL_FILE)){
            uri = uri.replace(LOCAL_FILE, "");
         }
         if(uri.startsWith(HTTP_FILE)){
            return loadImageSync(uri, imageSize);
         }
         BitmapFactory.Options options = ImageUtil.getBitmapDimensions(uri);
         if(options == null){
            return null;
         }
         if(options.outWidth < imageSize.getWidth() && options.outHeight < imageSize.getHeight()){
            return picasso.with(mContext)
                  .load(new File(uri))
                  .skipMemoryCache()
                  .get();
         }else{
            return picasso.with(mContext)
               .load(new File(uri))
               .resize(imageSize.getWidth(), imageSize.getHeight())
               .centerInside()
               .skipMemoryCache()
               .get();
         }
      } catch (Exception e) {
         Log.e(LogTag.TAG, "loadImageSync exception - ", e);
      }
      return null;
   }

   public Bitmap loadImageSync(String uri, ImageSize imageSize){
      if(uri == null){
         return null;
      }
      try {
         return picasso.with(mContext)
               .load(uri)
               .resize(imageSize.getWidth(), imageSize.getHeight())
               .centerInside()
               .skipMemoryCache()
               .get();
      } catch (Exception e) {
         Log.e(LogTag.TAG, "loadImageSync exception - ", e);
      }
      return null;
   }

   public void loadImage(String uri, DisplayImageOptions options, Target listener) {
      loadImage(uri, null, options, listener);
   }

   public void loadImage(String uri, ImageSize targetImageSize, DisplayImageOptions options, Target listener) {
      displayImage(uri, null, options, listener, null);
   }
在application中init啦
public class BaseApplication extends Application {

    private static Context mContext;
    @Override
    public void onCreate() {
        super.onCreate();
        mContext = this;
        JPushInterface.setDebugMode(true);     // 设置开启日志,发布时请关闭日志
        JPushInterface.init(getApplicationContext());
        AppPreference.initPreference(getApplicationContext());
        initOhkttp();
        initShare();
    }

    private void initShare() {
        PlatformConfig.setWeixin("wx47390cde9742fe2e", "af1eaa0e3474eb6427cc306b66184f1b");
        PlatformConfig.setSinaWeibo("2937546527", "04b48b094faeb16683c32669824ebdad");
        PlatformConfig.setQQZone("1105329735", "CIEO8SkfBT4BowbQ");
    }
   //只要保证全局只有一个okhttp实例
    private void initOhkttp() {
        OkHttp3Utils.getOkHttpSingletonInstance();
    }

    public static Context getContext() {
        return mContext;
    }
}
所有的都配置完成了就可以使用,打印Log,没错确实全局只有一个okhttpClient.
请求的是偶就简单了贴上代码
Call以上就是我在项目中使用Retrofit2配合Picasso来完成网络和图片的使用。简介好用。目前这些我觉得还是够用了!如果有和我一样喜欢用两者的不仿考虑考虑这样来写,万般忐忑之下写了我的第一篇博客,感觉确实很爽,,以后学到好的东西一定会把他记下来作为一次成长的见证。importCall = ServiceGenerator.createService(RestApiService.class).getManagerImportInfo(AppPreference.getInstance().getMyToken(), order_id); showloadingDilog(); importCall.enqueue(new Callback //异步之后是在主线程,可以更新Ui线程啦 onBindViewTo(model); } } @Override public void onFailure(Call() { @Override public void onResponse(Call call, Response response) { if(response.body() != null && response.isSuccess()){ call , Throwable t) { showNetErr(); } });
通过RxJava + Retrofit可以让多个REST调用组合成一个变得更简单。
RxJava教程:
- 给 Android 开发者的 RxJava 详解
- 深入浅出RxJava(一:基础篇)
- 深入浅出RxJava(二:操作符)
- 深入浅出RxJava三–响应式的好处
- 深入浅出RxJava四-在Android中使用响应式编程
Retrofit代码混淆配置
-dontwarn retrofit.**
-keep class retrofit.** { *; }
-keepattributes Signature
-keepattributes Exceptions