从Objective-C向Swift转换学习到的经验
摘要: SendBird是国外一款针对移动App和网站的Chat API,其开发团队成员Jed Gyeong分享了他们在将产品从Objective-C向Swift转换过程中所学习到的一些心得体会。
SendBird为常见系统均提供了示例UI,方便开发者构建自己的聊天和短信功能。以前只有Objective-C的iOS示例UI,后来听到诸多要求开发Swift版本的呼声,于是我们将示例UI的语言从Objective-C转换成了Swift。此过程中的最大感受是:两种语言确实存在不少差异。今天特意分享一些心得给大家,希望对你们有借鉴价值。
注意:示例UI并不使用Interface Builder(IB,Mac OS X平台上用于设计和测试用户界面的应用程序),而是从零开始构建的。所以以下范例不适用于使用Interface Builder的开发者。
Objective-C和Swift语言示例项目
SendBird示例UI可从Github库下载。Objective-C和Swift语言项目均在同一个库中,我们建议比较两种代码库以更好理解其差异。
初始化UIView的子类
在iOS应用上实现UI就需要子类化UIView,也就是要重写UIView的init方法。注意:两种语言有所区别。
Objective-C只需在UIView子类中重写必要的init方法。要初始化一个UIView框架,就要重写initWithFrame:框架,如下所示:
@implementation SubUIView
- (id) initWithFrame:(CGRect)frame
{
    self = [super initWithFrame:frame];
    if (self != nil) {
        // ...
    }
    return self;
}
@end
然而Swift需要多一些步骤来重写同一个init方法。首先,重写使用CGRect框架作为其参数的init方法。根据UIView文档,用Swift语言构建时,须重写init(coder:),但我们不需要这种方法,就用如下代码处理。类属性初始化所需的代码可以在init(frame:)中执行。
class SubUIView: UIView {
    override init(frame: CGRect) {
        super.init(frame: frame)
        // ...
    }
    required init?(coder aDecoder: NSCoder) {
        fatalError("init(coder:) has not been implemented")
    }
}
初始化UIViewController的子类
子类化UIViewController是iOS开发的重要步骤。使用Interface Builder的开发者需要重写initWithNibName:bundle:,但既然我们用代码来构建UI,就不需要执行这一方法了。只需重写init方法,在其中初始化类属性即可。
@implementation SubUIViewController
- (id) init
{
    self = [super init];
    if (self != nil) {
        // ...
    }
    return self;
}
@end
Swift也一样要重写init()方法。实现指定的初始化init(nibName:bundle:)来子类化UIViewController。重申:此过程不适用Interface Builder,所以无需定义nibName和bundle的值,而是调用比指定初始化更简单的convenience初始化,将指定初始化init(nibName:bundle:)设为零。现在调用init()来初始化类,用重写的(nibName:bundle:)执行类属性。
class SubUIViewController: UIViewController {
    convenience init() {
        self.init(nibName: nil, bundle: nil)
    }
    override init(nibName nibNameOrNil: String?, bundle nibBundleOrNil: NSBundle?) {
        super.init(nibName: nibNameOrNil, bundle: nibBundleOrNil)
        // Initialize properties of class
    }
    required init?(coder aDecoder: NSCoder) {
        fatalError("init(coder:) has not been implemented")
    }
}
现在可以创建和调用UIViewController的子类,如下所示:
let viewController: SubUIViewController = SubUIViewController()
self.navigationController?.pushViewController(viewController, animated: false)
使用Auto Layout来实现View
没有Interface Builder的情况下,就用Auto Layout中的NSLayoutConstraint类来设置View的大小和位置——注意Objective-C和Swift在这里有微妙差别。
Objective-C使用NSLayoutConstraint类中的constraintWithItem方法。
+ (instancetype)constraintWithItem:(id)view1
                         attribute:(NSLayoutAttribute)attr1
                         relatedBy:(NSLayoutRelation)relation
                            toItem:(id)view2
                         attribute:(NSLayoutAttribute)attr2
                        multiplier:(CGFloat)multiplier
                          constant:(CGFloat)c
Swift使用同一个类中的init方法。
convenience init(item view1: AnyObject,
       attribute attr1: NSLayoutAttribute,
       relatedBy relation: NSLayoutRelation,
          toItem view2: AnyObject?,
       attribute attr2: NSLayoutAttribute,
      multiplier multiplier: CGFloat,
        constant c: CGFloat)
如果是Objective-C,则执行以下代码。这段代码将创建NSLayoutConstraint(定义self.profileImageView和self之间的位置),然后添加到self上。
[self addConstraint:[NSLayoutConstraint constraintWithItem:self.profileImageView attribute:NSLayoutAttributeLeading relatedBy:NSLayoutRelationEqual toItem:self attribute:NSLayoutAttributeLeading multiplier:1 constant:kMessageCellLeftMargin]];使用Swift也可以创建NSLayoutConstraint,具体如下:
self.addConstraint(NSLayoutConstraint.init(item: self.profileImageView!, attribute: NSLayoutAttribute.Leading, relatedBy: NSLayoutRelation.Equal, toItem: self, attribute: NSLayoutAttribute.Leading, multiplier: 1, constant: kMessageCellLeftMargin))比较两种语言版本你会发现,不同于Objective-C,Swift是从NSLayoutConstraint调用init方法的,而且属性和relatedBy的枚举值也有差别。
两种语言NSLayoutConstraint中的枚举值分别是:
NSLayoutAttribute
Objective-C
typedef enum: NSInteger {
   NSLayoutAttributeLeft = 1,
   NSLayoutAttributeRight,
   NSLayoutAttributeTop,
   NSLayoutAttributeBottom,
   NSLayoutAttributeLeading,
   NSLayoutAttributeTrailing,
   NSLayoutAttributeWidth,
   NSLayoutAttributeHeight,
   NSLayoutAttributeCenterX,
   NSLayoutAttributeCenterY,
   NSLayoutAttributeBaseline,
   NSLayoutAttributeLastBaseline = NSLayoutAttributeBaseline,
   NSLayoutAttributeFirstBaseline,

   NSLayoutAttributeLeftMargin,
   NSLayoutAttributeRightMargin,
   NSLayoutAttributeTopMargin,
   NSLayoutAttributeBottomMargin,
   NSLayoutAttributeLeadingMargin,
   NSLayoutAttributeTrailingMargin,
   NSLayoutAttributeCenterXWithinMargins,
   NSLayoutAttributeCenterYWithinMargins,

   NSLayoutAttributeNotAnAttribute = 0
} NSLayoutAttribute;
Swift
enum NSLayoutAttribute : Int {
    case Left
    case Right
    case Top
    case Bottom
    case Leading
    case Trailing
    case Width
    case Height
    case CenterX
    case CenterY
    case Baseline
    static var LastBaseline: NSLayoutAttribute { get }
    case FirstBaseline
    case LeftMargin
    case RightMargin
    case TopMargin
    case BottomMargin
    case LeadingMargin
    case TrailingMargin
    case CenterXWithinMargins
    case CenterYWithinMargins
    case NotAnAttribute
}
NSLayoutRelation
Objective-C
enum {
   NSLayoutRelationLessThanOrEqual = -1,
   NSLayoutRelationEqual = 0,
   NSLayoutRelationGreaterThanOrEqual = 1,
};
typedef NSInteger NSLayoutRelation;
Swift
enum NSLayoutRelation : Int {
    case LessThanOrEqual
    case Equal
    case GreaterThanOrEqual
}
选择器
使用UIButton、NSNotificationCenter、NSTimer等时,使用选择器来分配要执行的方法。在Objective-C中,@selector指令代表使用选择器。
- (void)test
{
    // ...
    mTimer = [NSTimer scheduledTimerWithTimeInterval:1 target:self selector:@selector(timerCallback:) userInfo:nil repeats:YES];
}

- (void)timerCallback:(NSTimer *)timer
{
    // ...
}
在Swift中,不需要使用指令或字符串来分配方法。
func test() {
    // ...
    self.mTimer = NSTimer.scheduledTimerWithTimeInterval(1, target: self, selector: "timerCallback:", userInfo: nil, repeats: true)
    // ...
}

func timerCallback(timer: NSTimer) {
    // ...
}
字符串
尽管在Swift代码中也可以用Objective-C专门处理字符串的NSString,但要使用以String对象为属性的UITextField上的文本或其他的话,就要清楚NSString和String的区别。
在Objective-C中,UITextField上的文本为NSString,所以属性的长度就是字符串的长度。
- (BOOL)textFieldShouldReturn:(UITextField *)textField
{
    NSString *message = [textField text];
    if ([message length] > 0) {
        // ...
    }

    return YES;
}
Swift是没有长度属性的,所以要用characters属性的count属性。
func textFieldShouldReturn(textField: UITextField) -> Bool {
    let message: String = textField.text!
    if message.characters.count > 0 {
        // ...
    }

    return true
}
在Objective-C中,我们用stringWithFormat:来创建一个格式化字符串。
[self.typingLabel setText:[NSString stringWithFormat:@"%d Typing something cool....", count]];但在Swift中,String里没有stringWithFormat方法,所以用init(format:_ arguments:)代之。我们可以分配一个与NSString格式化结构相同的格式化字符串来创建一个新字符串,然后给arguments赋以相关的值。
self.typingLabel?.text = String.init(format: "%d Typing something cool...", count)从数据类型得到最小&最大值
就从数字格式上得到最小和最大值而言,Objective-C和Swift也有差别。Objective-C使用一个预定义宏来得到最小和最大值,但Swift则可以直接从数据类型上得到这些值。Objective-C使用的是如下的宏:
CGFLOAT_MAX
CGFLOAT_MIN
INT32_MAX
INT32_MIN
LLONG_MAX
LLONG_MIN
而Swift则从数据类型上得到最小和最大值,如下:
CGFloat.max
CGFloat.min
Int32.max
Int32.min
Int64.max
Int64.min
字典和枚举值
Objective-C用NSDictionary来定义NSAttributedString的属性。Swift则用Dictionary而不是NSDictionary,但想为Dictionary分配枚举值的时候,做法稍有不同。
Objective-C直接为NSDictionary分配键值,如下所示:称为NSUnderlineStyleSingle的枚举值不能作为NSDictionary值直接分配,所以要先用@()将它转换成一个对象。
NSDictionary *underlineAttribute = @{NSUnderlineStyleAttributeName: @(NSUnderlineStyleSingle)};Swift可以直接为Dictionary分配键值(如下所示)。如果该值定义为AnyObject,那么Swift就跟Objective-C一样不能直接使用枚举值,而是使用rawValue属性代之。
let underlineAttribute: [String: AnyObject] = [NSUnderlineStyleAttributeName: NSUnderlineStyle.StyleSingle.rawValue]其他心得
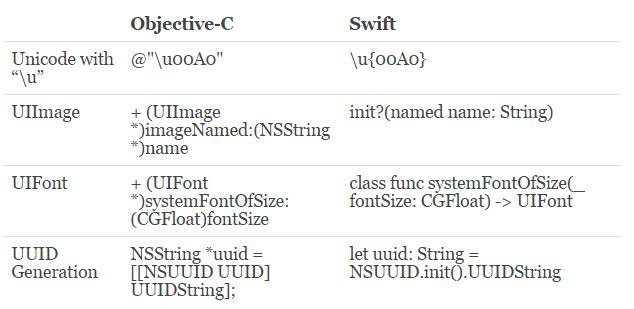
下表列出了SendBird示例UI项目语言转换过程中所发现的Objective-C和Swift的其他差异。
结论
- 相比Objective-C,Swift有更为严格的类型转换原则,就算有Xcode的自动纠正功能也须严格遵守;
- 学习类指定初始化和convenience初始化可以让语言转化更轻松一些;
- Xcode的自动代码补全和纠正让Objective-C到Swift的转换更方便,但太依赖这一功能并不能让你一劳永逸,还是以Swift的语言指南(Language Guide)为准;
- 即使使用相同名称的类,也会在两种语言中遇到针对同一功能的不同方法名称,所以以类参考文件为准比较保险。
如果决定使用Swift,建议先学习其基本知识,并试着将手头现有的Objective-C项目转化为Swift版本练练手。
祝好运!
英文来源:Lessons Learned from Converting Objective-C Project into Swift Language
作者:Jed Gyeong
翻译:张新慧
审校/责任编辑:唐小引,欢迎技术投稿、约稿,给文章纠错,请邮件[email protected]
第一时间掌握最新移动开发相关信息和技术,请关注mobilehub公众微信号(ID: mobilehub)。
2016年3月18日-19日,由CSDN重磅打造的数据库核心技术与实战应用峰会、互联网应用架构实战峰会将在上海举行。这两场峰会将邀请业内顶尖的架构师和技术专家,共同探讨高可用/高并发系统架构设计、新技术应用、移动应用架构、微服务、智能硬件架构、云数据库实战、新一代数据库平台、产品选型、性能调优、大数据应用实战等领域的热点话题与技术。
2月29日24点前仍处于最低六折优惠票价阶段,单场峰会(含餐)门票只需799元,5人以上团购或者购买两场峰会通票更有特惠,限量供应,预购从速。(票务详情链接)。

