Caffe学习(九)使用Nsight Eclipse调试py-faster-rcnn(C++/python混合代码调试)
实验目的
由于py-faster-rcnn均采用的是python接口,但是在内部调用了caffe的C++共享库_caffe.so,若想要搞清楚数据在网络中的具体流向,就必须要能够联合调试python和C++的混合代码,本文讲述如何使用Nsight实现这种功能。
软件版本说明
Nsight Eclipse版本:Nsight Version 8.0,对应的Eclipse版本为Juno,Eclipse 4.2
JDK版本:1.8.0_101
Pydev版本:4.5.0
gdb版本:7.7.1
Pydev安装
根据Eclipse和JDK版本,选择安装Pydev 4.5.0
强调:Pydev 2.8.2版本最高版本只支持 Eclipse 3.x,最高版本Pydev 5.3.0要求Eclipse最低版本为Eclipse 4.6,因此均能用,使用版本不一致的Pydev会导致安装后Eclipse环境里不出现Pydev选项。Pydev 4.5.0.经验证可使用
安装方式如下:
(1)选择help->Install new software,出现以下界面

(2)按上述图片输入更新源http://www.pydev.org/update_sites/4.5.0/
(3)在上述‘work with’框中输入’pydev’进行查询,出现以下查询结果,在结果中选择第一个选项,然后点击右下方的’next’按钮即可向下继续下载安装

(4)安装完成以后,重启Nsight,查看windows->preferences菜单栏即可出现以下图形,界面有段出现pydev选项则说明pydev安装成功

新安装完的nsight一般存放在 /usr/local/cuda-8.0/libnsight下
新建工程
新建C++ makefile工程:caffe-fast-rcnn
(1) file->new->makefile project with existing files
(2)新建三个如下图所示的make target

(3)添加工程的debug configuration
第一个如下图,主要作为单独调试时使用,在main应用出输入要调试的caffe科执行文件(存放在build/tools/caffe处),在Argument出输入’train –solver=examples/mnist/lenet_solver.prototxt’,此时就可以对单独的LENET网络的训练进行调试了。

第二个如下图,主要是作为与py-faster-rcnn工程联合调试时使用,也是本文所要介绍的一个。其类型为’C/C++ Attach to Application’,要调试的文件主要为’python/caffe/_caffe.so’,该文件也是最终要引入python里的caffe库里的最主要的函数来源(其余的均为python源文件)。

需要注意的是Nsight的默认调试器为cuda-gdb,这里需要将其换为gdb(点击图下方的’select other’),如下图。不换的话会出现’coalescing of the cuda commands outputs is off’的问题

新建Pydev工程:py-faster-rcnn
(1)file->new->Pydev工程,新建py-faster-rcnn工程
(2)原始的py-faster-rcnn里demo.py里都是相对路径,在这里调试时都要将其改为绝对路径(主要就三个:test.prototxt,yml配置文件)
修改后的demo.py的main函数如下:
if __name__ == '__main__':
    cfg.TEST.HAS_RPN = True  # Use RPN for proposals

    prototxt = 'models/pascal_voc_person/VGG16/test.prototxt'
    caffemodel ='models/pascal_voc_person/VGG16//vgg16_faster_rcnn_iter_50000.caffemodel'

    prototxt = sys.path[4] + '/' + prototxt
    caffemodel = sys.path[4] + '/' + caffemodel
    print caffemodel,prototxt
    caffe.set_device(0)
    caffe.set_mode_gpu()
    cfg.GPU_ID = 0
    net = caffe.Net(prototxt, caffemodel, caffe.TEST)
    print '\n\nLoaded network {:s}'.format(caffemodel)

    im_names = ['000456.jpg', '000542.jpg', '001150.jpg',
                '001763.jpg', '000002.jpg', '000001.jpg','000003.jpg','000004.jpg','000005.jpg']
    for im_name in im_names:
        print '~~~~~~~~~~~~~~~~~~~~~~~~~~~~~~~~~~~'
        print 'Demo for data/demo/{}'.format(im_name)
        demo(net, im_name)

    plt.show()
    exit()
python/C++联合调试
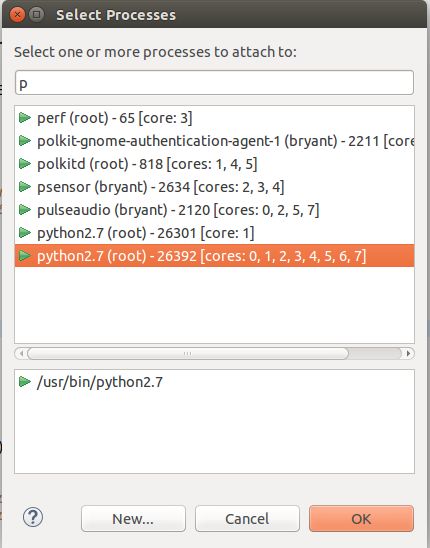
(1)首先在demo.py里加断点,然后进行python run debug,停止断点处。此时Nsight的控制台上会显示出当前demo.py的python线程的PID,如下图PID为26392

(2)运行caffe-fast-rcnn的第二个调试配置,选择正确PID的python线程,如下图,此时可以在_caffe.cpp里加断点,然后数据就能从python进入到_caffe.cpp里进行调试了
(3)调试正常工作界面
