用树莓派学编程系列2——环境温湿度测量
树莓派用DHT11读取环境温湿度
树莓派系列2——环境温湿度测量
前期准备
- 环境要求
DHT11,树莓派系统,Python,rpi.gpio等组件
相关软件安装方式见上章:
http://blog.csdn.net/weixiazailaide/article/details/52740167
环境温湿度测量
创建temhum应用
- 具体方法见上章
- 修改地方
helloworld/settings.py
INSTALLED_APPS = [
    'raspberrypistate.apps.RaspberrypistateConfig',
    'temhum.apps.TemhumConfig',
    'django.contrib.admin',
    'django.contrib.auth',
    'django.contrib.contenttypes',
    'django.contrib.sessions',
    'django.contrib.messages',
    'django.contrib.staticfiles',
]
helloworld/urls.py
urlpatterns = [
    url(r'^raspberrypistate/', include('raspberrypistate.urls',namespace="raspberrypistate")),
    url(r'^temhum/', include('temhum.urls',namespace="temhum")),
    url(r'^admin/', admin.site.urls),
]
DHT11与树莓派连接
DHT11简介
DHT11是一款有已校准数字信号输出的温湿度传感器。 精度湿度+-5%RH, 温度+-2℃,量程湿度20-90%RH, 温度0~50℃。
DHT11厂家说明书
产品参数
- 相对湿度
分 辨 率:16Bit
重 复 性:±1%RH
精 度:25℃ ±5%RH
互 换 性:可完全互换
响应时间:1/e(63%)25℃ 6s
1m/s 空气 6s
迟 滞:<±0.3%RH
长期稳定性:<±0.5%RH/yr - 温度
分 辨 率:16Bit
重 复 性:±1℃
精 度:25℃ ±2℃
响应时间:1/e(63%) 10S - 电气特性
供 电:DC 3.3~5.5V
供电电流:测量 0.3mA 待机 60μA
采样周期:次 大于 2 秒 - 引脚说明
1、VDD 供电 3.3~5.5V DC
2、DATA 串行数据,单总线
3、NC 空脚
4、GND 接地,电源负极
单总线传送数据位定义
DATA 用于微处理器与 DHT11 之间的通讯和同步,采用单总线数据格式,一次传送 40 位数据,高位先出。
- 数据格式:
8bit 湿度整数数据 + 8bit 湿度小数数据+8bit 温度整数数据 + 8bit 温度小数数据+8bit 校验位。
注:其中温湿度小数部分为 0。
- 校验位数据定义
“8bit 湿度整数数据 + 8bit 湿度小数数据+8bit 温度整数数据 + 8bit 温度小数数据”8bit 校验位等于所得结果的末 8 位。
时序

DHT11上电后停1s,主机进入输出模式,主机拉低总线电位至少18ms,主机拉高电位,主机进入输入模式,DHT响应,拉低总线电位80us,在拉高电位80us,开始发送数据,数据是50us低电平加上26-28us高电平为0,50us低电平加上70us高电平为1,40位数据依次读取,发送结束DHT11拉低电位50us,释放总线,等待下次检测
- 主机从 DHT11 读取的温湿度数据总是前一次的测量值,如两次测间隔时间很长,请连续读两次以第二次获得的值为实时温湿度值。
接线
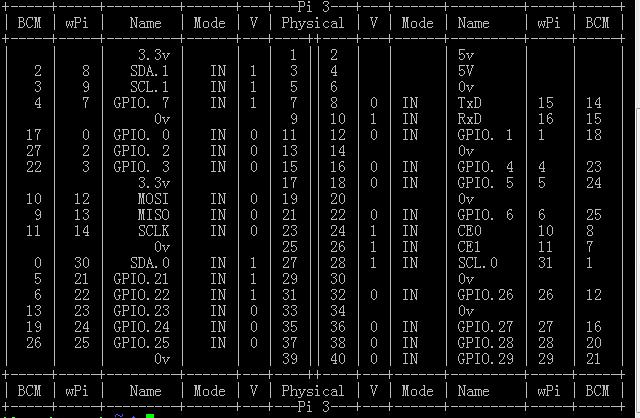
- 树莓派3B管脚图
gpio readall
Physical(物理位置)
把DHT11模块正接2脚,负接6脚,data接7脚
环境温湿度测量
程序
- DHT11的对应Python程序temhum.py
 cd /home/pi/helloworld/temhum
 vim temhum.py
temhum.py
# -*- coding:utf-8 -*-
import RPi.GPIO as GPIO
import time
channel = 4 #管脚7
#第一次读取状态位
first = True

#获取温湿度
def readTemHum():
    global first
    #上电第一次读取需要等待1s
    if first==True:
        time.sleep(1) #停止1s
        first=False

    #读取次数,DHT11读的是前一次测量的结果,为了避免错误,读取俩次或以上结果
    times=0
    while True:

        #向DHT11发送读取请求
         GPIO.setmode(GPIO.BCM) #管脚模式BCM
         GPIO.setup(channel, GPIO.OUT) #管脚设为输出模式
         GPIO.output(channel, GPIO.LOW) #输出低电位
         time.sleep(0.02) #延时20us
         GPIO.output(channel, GPIO.HIGH) #输出高电位
         GPIO.setup(channel, GPIO.IN) #输入模式

         #DHT11响应
         #80us低电平,接收到高电平结束循环
         while GPIO.input(channel) == GPIO.LOW:
             continue
         #80us高电平,接收到低电平结束循环
         while GPIO.input(channel) == GPIO.HIGH:
             continue

         #数据
         data = []
         #数据长度j
         j = 0
         while j < 40:
             k = 0
             while GPIO.input(channel) == GPIO.LOW:
                 continue
             while GPIO.input(channel) == GPIO.HIGH:
                 k += 1 #高电平,k自加1
                 if k > 100: #k超过100就退出,防止时序错误,卡死这儿
                     break
             if k < 8: #经实际测算26-28us,大概计数6-7个,data写0
                 data.append(0)
             else:     #大于8,date写1
                 data.append(1)

             j += 1 #j自加1,共读取40位

         #数据处理
         humidity = count(data[0:8])
         humidity_point = count(data[8:16])
         temperature = count(data[16:24])
         temperature_point = count(data[24:32])
         checksum = count(data[32:40])

         #读得数据数据的校验和
         tmp=humidity+humidity_point+temperature+temperature_point

         #读取次数增加1
         times+=1
         #数据校验和与读得数据一致,则读数正确,返回数据
         if checksum==tmp:
             if times > 1:
                break

         #为了增加保护,不频繁读取,停顿0.5s
         time.sleep(0.5)

    #GPIO复位
    GPIO.cleanup()
    return {'temperature':temperature,'humidity':humidity}

def count(data):
    res=0
    for i in range(len(data)):
        res+=data[i]*2**(7-i)
    return res

#返回结果
def getTemHum():
    res=readTemHum()
    temperature=res['temperature']
    humidity=res['humidity']
    result="温度: "+str(temperature)+"℃  湿度:"+str(humidity)
return result- 建立urls.py,使配置连接
内容和raspberrypistate/urls.py一样,拷贝过去一份就行
cp /home/pi/helloworld/raspberrypistate/urls.py /home/pi/helloworld/temhum- 更改views.py,加载视图
# -*- coding:utf-8 -*-
from django.http import HttpResponse
from . import temhum

# Create your views here.
def index(request):
    tem=temhum.getTemHum()
    return HttpResponse(tem)
测试
重启uwsgi服务
sudo systemctl restart emperor.uwsgi.service在树莓派浏览器输入
http://127.0.0.1/temhum
或者在电脑浏览器输入 http://raspberrypi/temhum

成功
安全与曲线监控
多线程读取以及多连接读取导致的一系列问题,会不会烧掉IO的问题都有待解决。
数据库写入以及数据读出,绘制历史曲线,定时读取温湿度等
参考教程
Python官方文档
Python中文文档