Spring Boot中的@ConfigurationProperties,@Value和@Bean注解讲解
一、这篇博客主要是介绍Srping Boot中的@ConfigurationProperties,@Value和@Bean这三个注解的用法,以及@Value获取值与@ConfigurationProperties的区别。
二、@ConfigurationProperties,@Value作用
【1】@ConfigurationProperties是spring-boot 提供该注解将配置文件的值映射到类上使用,如下代码所示:
package com.czd.springbootdemo.bean;
import org.springframework.boot.context.properties.ConfigurationProperties;
import org.springframework.context.annotation.PropertySource;
import org.springframework.stereotype.Component;
import java.util.Date;
import java.util.List;
import java.util.Map;
/**
* @author czd
* 将配置文件的属性映射到这个类的组件中
* @ConfigurationProperties代表告诉SrpingBoot将本类中的属性与配置文件中的属性进行绑定,默认从全局配置文件中获取值
*/
@Component
@ConfigurationProperties(prefix = "person")
@PropertySource("classpath:application.yml")
public class Person {
private String name;
private Integer age;
private Boolean man;
private Date birth;
private Map map;
private List application.yml文件如下所示:
person:
  name: 张三
  age: 20
  man: true
  birth: 12/3/12
  map: { width: 25,height: 25}
  list: [1,2,3,4,5]
  cat:
    name: coffee
    age: 8
【2】@Value有三种用法,如下代码所示:
- @Value(“普通值”)
- @Value("${person.man}")
- @Value("#{10*20}")
package com.czd.springbootdemo.bean;

import org.springframework.beans.factory.annotation.Value;
import org.springframework.context.annotation.PropertySource;
import org.springframework.stereotype.Component;

import javax.validation.constraints.Email;

/**
 * @author czd
 * 将配置文件的属性映射到这个类的组件中
 */
@Component
@PropertySource("classpath:application.yml")
public class Person {
    /**
     * @Value支持:字面量,${key}从配置文件中获取/#{springEL}
     */
    @Email
    @Value("${person.name}")
    private String name;
    @Value("#{20*2}")
    private Integer age;
    @Value("${person.man}")
    private Boolean man;

    //下面省略Setter和Getter方法以及toString方法
}
三、@Value获取值与@ConfigurationProperties的区别:
【1】@ConfigurationProperties能够批量注入配置文件中的属性给bean,而@Valie只能一个个注入。
【2】@ConfigurationProperties支持松散绑定,而@Value不支持。
【3】@ConfigurationProperties不支持spEL,而@Value支持,例如#{10*20}。
【4】@ConfigurationProperties支持JSR303数据校验,而@Value不支持。
【5】@ConfigurationProperties支持复杂类型的数据注入,而@Value不支持复杂类型,例如Map。
四、@Value与@ConfigurationProperties符合什么样的应用场景?
①、若是在某个业务逻辑中只需要获取一下配置文件中的某个值,则用@Value即可。
②、若是专门写了一个JavaBean来与配置文件的值进行映射,则使用@ConfigurationProperties。
五、Spring Boot的容器添加组件的方式: @Bean
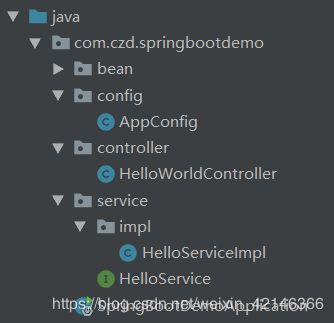
【1】创建一个config包,里面用来放配置类的,配置类就相当于之前Spring中的xml的配置文件,用来给容器添加组件,如下图所示:

【2】创建一个AppConfig配置类,用来给Spring Boot容器添加组件的,语法如下代码所示:
package com.czd.springbootdemo.config;

import com.czd.springbootdemo.service.HelloService;
import com.czd.springbootdemo.service.impl.HelloServiceImpl;
import org.springframework.context.annotation.Bean;
import org.springframework.context.annotation.Configuration;

/**
 * @author czd
 * @Configuration:指明当前类是配置类,和之前Spring的配置文件一样,可以说是替代
 */
@Configuration
public class AppConfig {
    /**
     * 将方法的返回值添加到到容器中,容器中的组件默认id就是方法名
     * @return
     */
    @Bean
    public HelloService helloService(){
        return new HelloServiceImpl();
    }
}
【3】在service包下创建HelloServic接口,以及在此包下创建一个impl包在放HelloServiceImpl实现类,如下所示:
①、HelloServic接口。
package com.czd.springbootdemo.service;

/**
 * @author czd
 */
public interface HelloService {
}
②、HelloServiceImpl实现类。
package com.czd.springbootdemo.service.impl;

import com.czd.springbootdemo.service.HelloService;

/**
 * @author czd
 */
public class HelloServiceImpl implements HelloService {
}
结果如图所示:

【4】在SpringBootDemoApplicationTests测试类中实现以下代码
package com.czd.springbootdemo;

import com.czd.springbootdemo.bean.Person;
import com.czd.springbootdemo.service.HelloService;
import org.junit.Test;
import org.junit.runner.RunWith;
import org.springframework.beans.factory.annotation.Autowired;
import org.springframework.boot.test.context.SpringBootTest;
import org.springframework.context.ApplicationContext;
import org.springframework.test.context.junit4.SpringRunner;

@RunWith(SpringRunner.class)
@SpringBootTest
public class SpringBootDemoApplicationTests {
    @Autowired
    ApplicationContext ioc;
    @Test
    public void hello(){
        HelloService helloService = (HelloService)ioc.getBean("helloService");
        System.out.println(helloService);
    }

}
输出结果
com.czd.springbootdemo.service.impl.HelloServiceImpl@57ce634f