以太坊分析之 以太坊网络
以太坊介绍
以太坊(Ethereum)是一个建立在区块链技术之上,去中心化应用平台。它允许任何人在平台中建立和使用通过区块链技术运行的去中心化应用。
以太坊网络
以太坊区块链的基础是参与节点的点对点网络,以太坊节点加入到以太坊网络形成去中心化的共识系统。以太坊网络有以下几种:
- 生产环境网络: 以太坊的生产网络顾名思义,也就是产生真正有价值的 的以太币的网络。目前生产网络目前已经生成了300万以上的区块,还在持续生成中。
- 测试网络: 以太坊的测试网络也是官方提供的,顾名思义就是专供用户来开发、调试和测试的。上面的合约执行不消耗真实的以太币。
- 私有网络:以太坊的私有网络,顾名思义就是由用户自己创建的私有网络。
生产环境网络对应的是以太坊共有链,私有网络对应的是以太坊私有链或联盟链,
- 公有链:世界上所有人都可以阅读和发送交易,世界上任何人都能参与到共识形成过程——决定在链条上添加什么区块以及现状是怎样的。公有链受加密经济的保护,用类似工作量证明或权益证明的机制。这类区块链通常被认为是"完全去中心化"。
- 联盟链:共识形成过程由预先选择的一系列的节点所掌控,例如,设想一个有15个金融机构的团体,每个机构都操作一个节点,为了使区块生效,其中的10个必须签署那个区块。这类区块链被认为是"部分去中心化"。
- 私有链: 只限于私人或者私有组织连接。
Geth
Geth是Go Ethereum开源项目的简称,它是使用Go语言编写且实现了Ethereum协议的客户端软件,也是目前用户最多,使用最广泛的客户端。通过Geth客户端与以太坊网络进行连接和交互可以实现账户管理、合约部署、挖矿等众多有趣且实用的功能。
Geth的安装方法:
$ gitclone https://github.com/ethereum/go-ethereum.git $ cd go-ethereum $ git checkout v1.7.2 $ make geth $ make all $ cp ./build/bin/geth/usr/bin |
安装成功后执行:
$ geth version Geth Version: 1.7.2-stable Git Commit: 1db4ecdc0b9e828ff65777fb466fc7c1d04e0de9 Architecture: amd64 Protocol Versions: [63 62] Network Id: 1 |
搭建以太坊私有网络
1.初始化一个创世区块
初始化创世区块时,要先创建一个genesis.json文件,
genesis.json:
{ "config": { "chainId": 10, "homesteadBlock": 0, "eip155Block": 0, "eip158Block": 0 }, "coinbase": "0x0000000000000000000000000000000000000000", "difficulty": "0x20000", "extraData": "", "gasLimit": "0x2fefd8", "nonce": "0x0000000000000042", "mixhash": "0x0000000000000000000000000000000000000000000000000000000000000000", "parentHash": "0x0000000000000000000000000000000000000000000000000000000000000000", "timestamp": "0x00", "alloc": {} } |
- mixhash 与nonce配合用于挖矿,由上一个区块的一部分生成的hash。注意他和nonce的设置需要满足以太坊的Yellow paper, 4.3.4. Block Header Validity, (44)章节所描述的条件。
- nonce nonce就是一个64位随机数,用于挖矿,注意他和mixhash的设置需要满足以太坊的Yellow paper, 4.3.4. Block Header Validity, (44)章节所描述的条件。
- difficulty 设置当前区块的难度,如果难度过大,cpu挖矿就很难,这里设置较小难度
- alloc 用来预置账号以及账号的以太币数量,因为私有链挖矿比较容易,所以我们不需要预置有币的账号,需要的时候自己创建即可以。
- coinbase 矿工的账号,随便填
- timestamp 设置创世块的时间戳
- parentHash 上一个区块的hash值,因为是创世块,所以这个值是0
- extraData 附加信息,随便填,可以填你的个性信息
- gasLimit 该值设置对GAS的消耗总量限制,用来限制区块能包含的交易信息总和,因为我们是私有链,所以填最大。
然后进行创世区块的初始化:
$ geth init ./genesis.json --datadir ./chain WARN [05-22|11:16:36] No etherbase set and no accounts found as default INFO [05-22|11:16:36] Allocated cache and file handles database=/home/geth/chain/geth/chaindata cache=16 handles=16 INFO [05-22|11:16:36] Writing custom genesis block INFO [05-22|11:16:36] Successfully wrote genesis state database=chaindata hash=5e1fc7…d790e0 INFO [05-22|11:16:36] Allocated cache and file handles database=/home/geth/chain/geth/lightchaindata cache=16 handles=16 INFO [05-22|11:16:36] Writing custom genesis block INFO [05-22|11:16:36] Successfully wrote genesis state database=lightchaindata hash=5e1fc7…d790e0 |
2.启动私有网络
执行命令,其中参数nodiscover表示私有链地址,不会被网上看到,命令congsole表示同时会启动Geth的JavaScript控制台
$ geth --datadir ./chain --nodiscover console 2>>eth_output.log Welcome to the Geth JavaScript console!
instance: Geth/v1.7.2-stable-1db4ecdc/linux-amd64/go1.9.2 modules: admin:1.0 debug:1.0 eth:1.0 miner:1.0 net:1.0 personal:1.0 rpc:1.0 txpool:1.0 web3:1.0
> |
启动Geth的控制台后就可以进行操作,Geth的控制台是JavaScript开发的,实现了web3.jsAPI。web3.js 是一个通过RPC 调用 和本地以太坊节点进行通信的js库。web3.js可以与任何暴露了RPC接口的以太坊节点连接。web3中提供了eth对象 - web3.eth来与以太坊区块链进行交互。
备注:
web3 API =》 http://web3js.readthedocs.io/en/1.0/index.html
中文版:http://web3.tryblockchain.org/Web3.js-api-refrence.html#toc_22
账户
创建帐户:
> web3.personal.newAccount("password") "0xb518124a8e586b18cb16bf4a6a74b376f48db2cd" |
返回的字符串就是账户
查询账户:
> web3.eth.accounts ["0xb518124a8e586b18cb16bf4a6a74b376f48db2cd"] |
挖矿
挖矿执行以下命令:
> miner.start(1) null |
执行成功后,控制台范围null,通过日志可以看到已经在进行挖矿:
$ tailf eth_output.log INFO [05-22|13:17:36] Successfully sealed new block number=4 hash=4c2ded…26ee60 INFO [05-22|13:17:36] mined potential block number=4 hash=4c2ded…26ee60 INFO [05-22|13:17:36] Commit new mining work number=5 txs=0 uncles=0 elapsed=163.749µs INFO [05-22|13:17:37] Successfully sealed new block number=5 hash=f30c33…e14fb3 INFO [05-22|13:17:37] mined potential block number=5 hash=f30c33…e14fb3 INFO [05-22|13:17:37] Commit new mining work number=6 txs=0 uncles=0 elapsed=241.586µs INFO [05-22|13:17:39] Successfully sealed new block number=6 hash=76363f…460004 INFO [05-22|13:17:39] block reached canonical chain number=1 hash=377d55…8d0308 INFO [05-22|13:17:39] mined potential block number=6 hash=76363f…460004 INFO [05-22|13:17:39] Commit new mining work number=7 txs=0 uncles=0 elapsed=155.252µs |
如果要停止挖矿的话,可以执行命令:
> miner.stop() null |
备注:停止挖矿后,以太币则不会产生,同样智能合约、转帐等操作也不会起作用。
账户余额
执行挖矿后,挖矿产生的以太币会默认保持到创建的第一个账户(也就是0xb518124a8e586b18cb16bf4a6a74b376f48db2cd),我们可以查询账户余额:
> web3.eth.getBalance("0xb518124a8e586b18cb16bf4a6a74b376f48db2cd") 555000000000000000000
#查看格式化的以太币 > web3.fromWei(web3.eth.getBalance("0xb518124a8e586b18cb16bf4a6a74b376f48db2cd")) 555 |
因为GethJavascript Console是基于Javascript的,所以也可以创建js函数,查看所有帐户余额:
> function checkAllBalances() { ... var totalBal = 0; ... for (var acctNum in eth.accounts) { ...... var acct = eth.accounts[acctNum]; ...... var acctBal = web3.fromWei(eth.getBalance(acct), "ether"); ...... totalBal += parseFloat(acctBal); ...... console.log(" eth.accounts[" + acctNum + "]: \t" + acct + " \tbalance: " + acctBal + " ether"); ...... } ... console.log(" Total balance: " + totalBal + " ether"); ... }; > checkAllBalances() eth.accounts[0]: 0xb518124a8e586b18cb16bf4a6a74b376f48db2cd balance: 715 ether Total balance: 715 ether |
转账
转账至少需要2个账户,所以首先再创建一个账户:
> web3.personal.newAccount("password") "0xbd4a62c2832b3ef2205c23cfec8ba3dacc875b75" > web3.eth.accounts ["0xb518124a8e586b18cb16bf4a6a74b376f48db2cd", "0xbd4a62c2832b3ef2205c23cfec8ba3dacc875b75"] |
支持操作账户字符串比较麻烦,可以复制给变量:
> account0 = web3.eth.accounts[0] "0xb518124a8e586b18cb16bf4a6a74b376f48db2cd" > account1 = web3.eth.accounts[1] "0xbd4a62c2832b3ef2205c23cfec8ba3dacc875b75" |
然后从账户1转账给账户2,注意转账前需要先解锁被转账的账户:
> web3.personal.unlockAccount(account0,"password") true
> web3.eth.sendTransaction({from:account0,to:account1,value:web3.toWei(3,"ether")}) "0xd9f95d44de1f4858f23f9e326859713a527922498955cf84eb8bb75296b35fd6" |
查询账户余额:
> checkAllBalances() eth.accounts[0]: 0xb518124a8e586b18cb16bf4a6a74b376f48db2cd balance: 1832 ether eth.accounts[1]: 0xbd4a62c2832b3ef2205c23cfec8ba3dacc875b75 balance: 3 ether Total balance: 1835 ether |
可以到账户2的余额正是3 ether,说明转账成功。如果把挖矿命令停了以后,再进行转账的话将不会成功。
连接以太网测试网络
以太坊是一个去中心化的平台,往往需要较多节点共同运作才能得到理想的测试效果,搭建私有网络比较难构建多节点,所以可以连接以太网提供的测试网络,以太坊公开的测试网络共有4个,目前仍在运行的有3个。每个网络都有自己的创世区块和名字,按开始运行时间的早晚,依次为:
- Morden(已退役)
Morden是以太坊官方提供的测试网络,自2015年7月开始运行。到2016年11月时,由于难度炸弹已经严重影响出块速度,不得不退役,重新开启一条新的区块链。Morden的共识机制为PoW。
- Ropsten
https://ropsten.etherscan.io/
Ropsten也是以太坊官方提供的测试网络,是为了解决Morden难度炸弹问题而重新启动的一条区块链,目前仍在运行,共识机制为PoW。测试网络上的以太币并无实际价值,因此Ropsten的挖矿难度很低,目前在755M左右,仅仅只有主网络的0.07%。这样低的难度一方面使一台普通笔记本电脑的CPU也可以挖出区块,获得测试网络上的以太币,方便开发人员测试软件,但是却不能阻止攻击。
- Kovan
https://kovan.etherscan.io/
为了解决测试网络中PoW共识机制的问题,以太坊钱包Parity的开发团队发起了一个新的测试网络Kovan。Kovan使用了权威证明(Proof-of-Authority)的共识机制,简称PoA。
Kovan目前仍在运行,但仅有Parity钱包客户端可以使用这个测试网络。
- Rinkeby
https://rinkeby.etherscan.io/
Rinkeby也是以太坊官方提供的测试网络,使用PoA共识机制。与Kovan不同,以太坊团队提供了Rinkeby的PoA共识机制说明文档,理论上任何以太坊钱包都可以根据这个说明文档,支持Rinkeby测试网络,目前Rinkeby已经开始运行。
目前开发人员最常用的测试网络是Rinkeby,本文说明连接到Rinkeby
连接Rinkeby测试网络
使用Geth连接到Rinkeby测试网络,加上参数--rinkeby,或者指定--networkid=4(1=Frontier, 2=Morden (disused),3=Ropsten, 4=Rinkeby)。
因为连接测试网络就需要同步区块链数据,Geth的参数可以指定--syncmode来设置同步模块:
- full 模式,从开始到结束,获取区块的header,获取区块的body,从创始块开始校验每一个元素,需要下载所有区块数据信息。速度最慢,但是能获取到所有的历史数据。
- fast模式,获取区块的header,获取区块的body,在同步到当前块之前不处理任何事务。然后获得一个快照,此后,像full节点一样进行后面的同步操作。这种方法用得最多,目的在不要在意历史数据,将历史数据按照快照的方式,不逐一验证,沿着区块下载最近数据库中的交易,有可能丢失历史数据。此方法可能会对历史数据有部分丢失,但是不影响今后的使用。
- light模式,仅获取当前状态。验证元素需要向full节点发起相应的请求。
本文采用ligth模式进行同步Rinkeyby测试网络:
$ geth --datadir ./rinkeby_light \ --rinkeby \ --syncmode light \ --rpc console 2>eth_rinkeby_out.log |
同步需要花点时间,同步情况可以通过web3.eth.syncing查询:
> web3.eth.syncing { currentBlock: 168256, //已经同步的区块数 highestBlock: 2331548, //总共的区块数 knownStates: 0, pulledStates: 0, startingBlock: 74688 } |
当web3.eth.syncing返回false说明同步完成,要等同步完成后才能进行账户余额查询和转账的操作
使用以太坊测试网络同样需要创建账号:
> web3.personal.newAccount("password") "0xb2e149dc56c65bd0ee10c76fb7a92b140cec1adf" |
申请Rinkeby以太币
Rinkeby测试网络使用的是PoA共识机制,我们不能通过挖矿来获取以太币。想获取Rinkeby测试网络中的以太币,需要去申请,这个申请Rinkeby以太币的功能被称为水龙头(Faucet),水龙头会源源不断的产生以太币,并且受到权威节点控制,以确保不会被滥用。
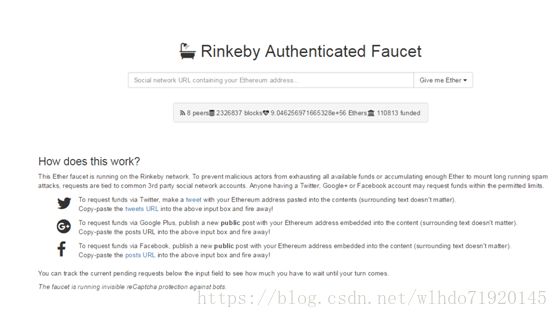
水龙头网站:https://www.rinkeby.io/#faucet
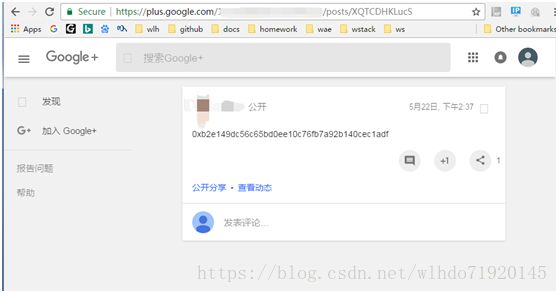
获取方法:有三种在推特、脸书、google+等上发布消息,并将消息的网址粘贴到上面截图的输入框中选个获取就可以。本文采用google+的方式,在google+发布一条消息,消息内容就是你的账号:
然后将这个消息的连接输入到水龙头网站的输入框,并点击“Give me Ether”,有三种选项,前面是获得的以太币数量,后面是冷却时间,在冷却时间过后才能进行下一次以太币申请。例如第一项是生成3个以太币,8小时后才能再次申请。本文选择的就是第一项3个以太币。
申请成功后,可以在https://rinkeby.etherscan.io查到转账记录:
https://rinkeby.etherscan.io/tx/0x2caf8eb8e6b90a4577c80ff17165e36cdf3a9f8d71bba25539a2fc5af5814144

然后我们查询账户余额,可以查询到是3000000000000000000Wei=3以太币
> web3.eth.getBalance("0xb2e149dc56c65bd0ee10c76fb7a92b140cec1adf") 3000000000000000000 |
参考
- https://blog.csdn.net/ethchinese/article/details/62220851
- https://www.cnblogs.com/lion.net/p/7809862.html
- http://wiki.jikexueyuan.com/project/ethereum/public-chain-chain.html
- https://zhuanlan.zhihu.com/p/29010231
作者简介
吴龙辉,《Kubernetes实战》作者,活跃于技术开源社区,贡献代码和撰写技术文档。邮箱: [email protected]

