【graphql】react调用graphql接口方法
前言
- 上一篇写了制作graphql接口,接口必须有前台客户端连接它实现增删改查,这次使用react进行连接。记录下实现方法。
流程
- 首先创建项目使用create-react-app。
- 还需要安装:
cnpm install apollo-boost @apollo/react-hooks graphql --save
- 先在react的index.js里测试下是否能跑通:
import React from 'react';
import ReactDOM from 'react-dom';
import ApolloClient, {gql} from 'apollo-boost'
const client=new ApolloClient ({
    uri:'http://localhost:4000/graphql'
})
client.query({
    query:gql`
        query{
            getCategories{
                id,name
            }
        }
    `
}).then(result=>console.log(result))
- 控制台如果打印出结果说明ok。
- 也就是说,如果要发请求,直接使用client.query发就行了。但是很多组件都会用到,直接传肯定不方便,所以使用上下文传递:
import React from 'react';
import ReactDOM from 'react-dom';
import ApolloClient, {gql} from 'apollo-boost'
import {ApolloProvider} from '@apollo/react-hooks'
import App from './App'


const client=new ApolloClient ({
    uri:'http://localhost:4000/graphql'
})

ReactDOM.render(
    <ApolloProvider client = {client}>
        <App></App>
    </ApolloProvider>,document.getElementById('root')
)
- 下面就是如何在组件里查询graphql,为了有点样式,我引入了antd。
index.js
import React from 'react';
import ReactDOM from 'react-dom';
import ApolloClient from 'apollo-boost'
import {ApolloProvider} from '@apollo/react-hooks'
import App from './App'
import 'antd/dist/antd.css';

const client=new ApolloClient ({
    uri:'http://localhost:4000/graphql'
})
ReactDOM.render(
    <ApolloProvider client = {client}>
        <App></App>
    </ApolloProvider>,document.getElementById('root')
)
App.js
import React from 'react';
import { Layout, Menu, Breadcrumb } from 'antd';
import MyContent from './mycontent'
const {Footer,Header,Content} = Layout
export default function (){
    return (
        <Layout className="layout">
        <Header>
          <div className="logo" />
          <Menu
            theme="dark"
            mode="horizontal"
            defaultSelectedKeys={['2']}
            style={{ lineHeight: '64px' }}
          >
            <Menu.Item key="1">nav 1</Menu.Item>
            <Menu.Item key="2">nav 2</Menu.Item>
            <Menu.Item key="3">nav 3</Menu.Item>
          </Menu>
        </Header>
        <Content style={{ padding: '0 50px' }}>
          <Breadcrumb style={{ margin: '16px 0' }}>
            <Breadcrumb.Item>Home</Breadcrumb.Item>
            <Breadcrumb.Item>List</Breadcrumb.Item>
            <Breadcrumb.Item>App</Breadcrumb.Item>
          </Breadcrumb>
          <div style={{ background: '#fff', padding: 24, minHeight: 280 }}> <MyContent></MyContent></div>

        </Content>
        <Footer style={{ textAlign: 'center' }}>Ant Design ©2018 Created by Ant UED</Footer>
      </Layout>
    )
}
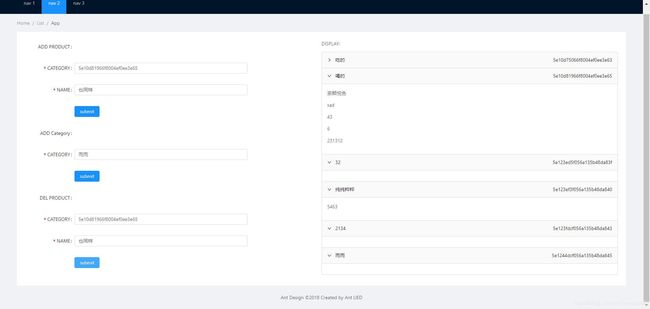
- 我们做一个左边进行增删改查,右边展示的功能。
- 最后样式是这样:
- 当时删除和增加写的是需要用id删除的接口,所以这里就靠id,也可以改成别的,但需要改接口。
- 我们需要把查询语句统一做在一个文件里:
query.js
import {gql} from 'apollo-boost'
export const CATEGORIES_PRODUCT=gql`
    query{
        getCategories {
        id,
        name,
        products{
            id,
            name,
        }
        }
        getProducts {
        id
        name,
        category{
            id,
            name,
            products{
            id,
            name,
            }
        }
        }
}`
export const CATEGORIES = gql`
    query{
        getCategories {
        id
        name
        }
    }
`;
export const PRODUCTS = gql`
    query{
        getProducts {
        id
        name,
        category{
            id,
            name
        }
        }
}`;
export const ADD_PRODUCT = gql`
    mutation($name:String!,$category: String!){
    addProduct(name: $name,category:$category) {
        id,
        name,
        category{
        id,
        name
        }
    }
}`;
export const ADD_CATEGORY = gql`
    mutation($name:String!){
        addCategory(name:$name) {
        id,
        name
    }
}`;

export const DEL_PRODUCT = gql`
    mutation ($name:String!,$categoryId: String!){
        delProductByName(name: $name, category: $categoryId) {
        id
        name
        category {
            id
            name
            products {
            id
            name
            }
        }
        }
    }
`
- 这个带变量的写法都是固定写法,详情可以参照阿波罗react钩子官网。
- 这个使用的时候会靠usequery或者usemutation钩子,生成一个方法,利用方法去查询:
//使用语句修改
const [addcategory]=useMutation(ADD_CATEGORY)
addcategory({variables:values,refetchQueries:[{query:CATEGORIES_PRODUCT}]})
//使用语句查询
const {data}=useQuery(CATEGORIES_PRODUCT);
- 这个variables就是对象里那个变量了,注意这个变量名要和查询语句变量名对上。
- 特别说一下这个refetchQueries,这个属性就可以做完操作之后紧接着去做个查询。乍看之下好像没啥特别的,但是依赖这个查询结果的变量会自动刷新,不用自己写useState,useEffect这些,非常方便。这感觉就好像是查询的这些变量都在一个store里,你mutation改完后,调个更新,然后依赖这数据生成的结构也会自动刷新。
mycontent.js
import React from 'react'
import { useQuery } from '@apollo/react-hooks';
import {CATEGORIES_PRODUCT} from './query';
import ChangeProduct from './content/changeproduct'
import DisplayProduct from './content/displayproduct'

export default function(){
    const {data}=useQuery(CATEGORIES_PRODUCT);

    return (<div style={{display:"flex"}}>
    <ChangeProduct ></ChangeProduct>
    <DisplayProduct getProducts = {data}> </DisplayProduct>
    </div>)
}
changeproduct.js
import React from 'react'
import Addcategory from './addcategory';
import Addproduct from './addproduct';
import Deleteproduct from './deleteproduct'

function ChangeProduct(props) {
    return (
        <div style={{flex:'1'}} >
            <Addproduct></Addproduct>
            <Addcategory></Addcategory>
            <Deleteproduct></Deleteproduct>
        </div>
    )
}
export default ChangeProduct
addcategory.js
import React from 'react'
import { Form, Input, Button } from 'antd';
import { useMutation } from '@apollo/react-hooks';
import { CATEGORIES_PRODUCT,ADD_CATEGORY} from '../query';


function AddCategory(props){
    const formItemLayout ={
        labelCol: { span: 4 },
        wrapperCol: { span: 14 },
      }
    const buttonItemLayout ={
        wrapperCol: { span: 14, offset: 4 },
      }
    const { getFieldDecorator } = props.form;
    const [addcategory]=useMutation(ADD_CATEGORY)
    function categorySubmit(e){
        e.preventDefault();
        props.form.validateFields((err, values) => {
          if (!err) {
            console.log('Received values of form: ', values);
            addcategory({variables:values,refetchQueries:[{query:CATEGORIES_PRODUCT}]})
          }
        });
    }
    return (
        <Form layout="horizontal" onSubmit={categorySubmit}>
          <Form.Item label="ADD Category" {...formItemLayout}>
          </Form.Item>

        <Form.Item label="CATEGORY" {...formItemLayout}>
            {getFieldDecorator('name', {
                rules: [{ required: true, message: 'input category' }],
            })(
                <Input placeholder="input category"/>,
            )}
        </Form.Item>

        <Form.Item {...buttonItemLayout}>
          <Button type="primary" htmlType="submit" className="login-form-button">submit</Button>
        </Form.Item>
        </Form>
    )
}
const WrappedForm = Form.create({})(AddCategory);
export default WrappedForm
- 其他修改跟addcategory大同小异,套路都是一个套路。
- 展示组件那里只要渲染出来即可自动刷新,就不放了。
- 最后,需要代码自取。
