Linux-4.9.2内核在mini2440上的移植(四)——修改Nand Flash分区表
本篇目标:在linux-4.9.2的源码中,配置nand flash的分区表。
4.1 修改mach-mini2440.c
切换回之前的putty窗口,用vim打开mach-mini2440.c文件,在第148行之后添加如下代码:(红色部分)
.lpcsel = ((0xCE6) & ~7) | 1<<4,
};
/* NAND parititon from 2.4.18-swl5 */
static struct mtd_partitionmini2440_default_nand_part[] = {
[0]= {
.name = "boot",
.offset = 0,
.size = 0x00040000, //256K
},
[1]= {
.name = "param",
.offset = 0x00040000,
.size = 0x00020000,
},
[2]= {
.name = "kernel", //;内核所在的分区,大小为5M
.offset = 0x00060000,
.size = 0x00500000,
},
[3]= {
.name = "rootfs", //;文件系统分区,友善之臂主要用来存放yaffs2文件系统内容,对应/dev/mtdblock3
.offset = 0x00560000,
.size = 100 * 1024 * 1024, //100*1024*1024,100MB
},
[4]= {
.name = "nand", //;此区域代表了整片的nand flash,主要是预留使用,比如以后可以通过应用程序访问读取/dev/mtdblock4就能实现备份整片nand flash 了。
.offset = 0x00000000,
.size = 256 * 1024 * 1024, //256*1024*1024,256MB
}
};
/*;这里是开发板的nand flash设置表,因为板子上只有一片,因此也就只有一个表*/
static struct s3c2410_nand_setmini2440_nand_sets[] = {
[0]= {
.name = "NAND",
.nr_chips = 1,
.nr_partitions = ARRAY_SIZE(mini2440_default_nand_part),
.nr_chips = 1,
.nr_partitions = ARRAY_SIZE(mini2440_default_nand_part),
.partitions =mini2440_default_nand_part,
},
};
/* choose a set of timings which should suit most512Mbit
* * chips and beyond.
* */
static struct s3c2410_platform_nandmini2440_nand_info = {
.tacls = 20,
.twrph0 = 60,
.twrph1 = 20,
.nr_sets = ARRAY_SIZE(mini2440_nand_sets),
.sets = mini2440_nand_sets,
.ignore_unset_ecc = 1,
};
4.2 把nand flash 设备注册到系统中
static struct platform_device *mini2440_devices[] __initdata = {
&s3c_device_ohci,
&s3c_device_lcd,
&s3c_device_wdt,
&s3c_device_i2c0,
&s3c_device_iis,
&s3c_device_nand,
};
4.3加入编译头文件
在上面的文件中定位到47行附近,加入一下头文件:
#include
#include
#include
#include
#include
4.4 传入mini2440_nand_info结构体初始化参数
定位到233行附近,修改如下:
static void __init mini2440_machine_init(void)
{
s3c24xx_fb_set_platdata(&mini2440_fb_info);
s3c_i2c0_set_platdata(NULL);
s3c_device_nand.dev.platform_data = &mini2440_nand_info;
platform_add_devices(mini2440_devices, ARRAY_SIZE(mini2440_devices));
// smdk_machine_init();
}
然后保存。
4.5 修改配置
切换到另一个编译的putty窗口
root@ubuntu:~/linux-4.9.2# make menuconfig
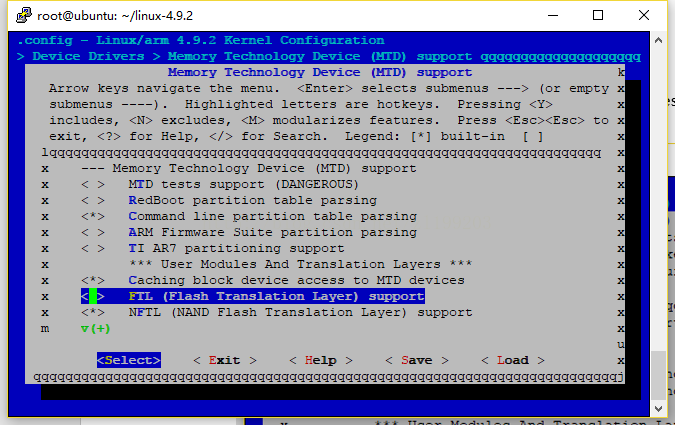
在配置菜单->DeviceDrivers ->Memory Technology Devices (MTD),如图
按空格键取消选择,然后选“Exit”退出,最后出现保存提示时选择“Yes”保存。然后在终端中执行:
root@ubuntu:~/linux-4.9.2# make -j8
root@ubuntu:~/linux-4.9.2# ./mkuImage.sh
4.6 重启开发板
看到串口打印中的nand flash分区情况,移植nand flash成功。
nand: 256 MiB, SLC, erase size: 128 KiB, page size: 2048, OOB size:64
Scanning device for bad blocks
Bad eraseblock 1620 at 0x00000ca80000
Bad eraseblock 1935 at 0x00000f1e0000
Creating 5 MTD partitions on "NAND":
0x000000000000-0x000000040000 : "boot"
0x000000040000-0x000000060000 : "param"
0x000000060000-0x000000560000 : "kernel"
0x000000560000-0x000006960000 : "rootfs"
0x000000000000-0x000010000000 : "nand"
ohci_hcd: USB 1.1 'Open' Host Controller (OHCI) Driver
ohci-s3c2410:OHCI S3C2410 driver