Android Telephone初始化流程分析
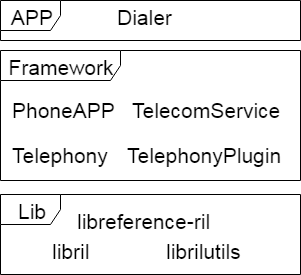
Telephone 系统框图
Tel系统中的服务
从功能方面进行区分,Tel可以分为以下几部分:
1.TelecomLoaderService。这部分主要是处理上层app的关系
2.TelephonyRegistry。这部分主要是处理Phone状态的通知。
3.PhoneAPP 这部分是系统core app
4.lib库
4.1 libril.so的作用
这个库的作用有如下:
1.接受来自framework中的socket,建立连接之后,等待framework发送消息过来
2.接收到framework中的消息之后,分析,之后调用libreference-ril的接口进行查询
3.接受到libreference-ril中的response之后反馈给framework
这个文件是一个中间层,能够操作event list
4.2 libreference-ril.so
这个库的作用有
1.打开与驱动的socket,用来与moden进行通讯
2.接收来自libril.so的请求
3.将libril中的请求通过socket发送给底层moden
4.把底层moden的response反馈给libril.so
下面对前三部分进行分析
各个服务的启动
在Android中,系统服务的起点都是从SystemServer中启动的。Tel的服务也不例外。
private void run() {
	try {
    	startBootstrapServices();
        startCoreServices();
        startOtherServices();
    } catch (Throwable ex) {
    }
}
在Android中系统中的服务是按照上面的顺序启动的。Tel的服务是在startOtherServices中进行初始化和启动的。
下面看一下Tel的服务是如何初始化和启动的。
private void startBootstrapServices() {
mSystemServiceManager.startBootPhase(SystemService.PHASE_WAIT_FOR_DEFAULT_DISPLAY);
}
private void startOtherServices() {
...
	mSystemServiceManager.startService(TelecomLoaderService.class);
	Slog.i(TAG, "Telephony Registry");
    telephonyRegistry = new TelephonyRegistry(context);
    ServiceManager.addService("telephony.registry", telephonyRegistry);
...
	mSystemServiceManager.startBootPhase(SystemService.PHASE_LOCK_SETTINGS_READY);
	mSystemServiceManager.startBootPhase(SystemService.PHASE_SYSTEM_SERVICES_READY);
...
	mSystemServiceManager.startBootPhase(SystemService.PHASE_THIRD_PARTY_APPS_CAN_START);
...
	mActivityManagerService.systemReady(new Runnable() {
		@Override
		public void run() {
			Slog.i(TAG, "Making services ready");
			mSystemServiceManager.startBootPhase(
					SystemService.PHASE_ACTIVITY_MANAGER_READY);
	···
			try {
				if (telephonyRegistryF != null) telephonyRegistryF.systemRunning();
			} catch (Throwable e) {
				reportWtf("Notifying TelephonyRegistry running", e);
			}
	···
	}
}
TelecomLoaderService分析
Telecom相关启动流程
public class TelecomLoaderService extends SystemService {
	private class TelecomServiceConnection implements ServiceConnection {

	}
	public void onBootPhase(int phase) {
        if (phase == PHASE_ACTIVITY_MANAGER_READY) {
            connectToTelecom();
        }
    }
	private void connectToTelecom() {
        synchronized (mLock) {
            //如果之前连接过,断开从新连接
            if (mServiceConnection != null) {
                // TODO: Is unbinding worth doing or wait for system to rebind?
                mContext.unbindService(mServiceConnection);
                mServiceConnection = null;
            }

            TelecomServiceConnection serviceConnection = new TelecomServiceConnection();
            Intent intent = new Intent(SERVICE_ACTION);
            intent.setComponent(SERVICE_COMPONENT);
            int flags = Context.BIND_IMPORTANT | Context.BIND_FOREGROUND_SERVICE
                    | Context.BIND_AUTO_CREATE;

            // Bind to Telecom and register the service
            if (mContext.bindServiceAsUser(intent, serviceConnection, flags, UserHandle.OWNER)) {
                mServiceConnection = serviceConnection;
            }
        }
    }
}
从上面的代码来看,TelecomLoaderService继承SystemService。当系统的ActivityManagerService启动完成之后,就bind TelecomService。
下面看一下在bind TelecomService之后又进行了什么动作
public class TelecomService extends Service implements TelecomSystem.Component {
    public IBinder onBind(Intent intent) {
        initializeTelecomSystem(this);
        synchronized (getTelecomSystem().getLock()) {
            return getTelecomSystem().getTelecomServiceImpl().getBinder();
        }
    }
	static void initializeTelecomSystem(Context context) {
		if (TelecomSystem.getInstance() == null) {
			TelecomSystem.setInstance(new TelecomSystem());
		}
	}
}

public final class TelecomSystem {
	    public TelecomSystem(
            Context context,
            MissedCallNotifier missedCallNotifier,
            CallerInfoAsyncQueryFactory callerInfoAsyncQueryFactory,
            HeadsetMediaButtonFactory headsetMediaButtonFactory,
            ProximitySensorManagerFactory proximitySensorManagerFactory,
            InCallWakeLockControllerFactory inCallWakeLockControllerFactory,
            ViceNotifier vicenotifier) {

        mCallsManager = new CallsManager();
        mCallIntentProcessor = new CallIntentProcessor(mContext, mCallsManager);
        mTelecomBroadcastIntentProcessor = new TelecomBroadcastIntentProcessor(
                mContext, mCallsManager);
        mTelecomServiceImpl = new TelecomServiceImpl(
                mContext, mCallsManager, mPhoneAccountRegistrar, mLock);
    }
}
从中可以看到,bind TelecomService之后,就开始初始化TelecomSystem。
在TelecomSystem中主要初始化了下面几个个对象:
1.CallsManager:用来处理多个通话之间的逻辑关系,以及接受CallIntentProcessor的call
2.CallIntentProcessor:用来处理CallIntent,并且调用将call 放入CallsManager中的队列中
3.TelecomBroadcastIntentProcessor:用来处理用户的操作(短信回复,从notifier中回复)
4.TelecomServiceImpl:用来处理账户信息,调用CallIntentProcessor处理intent
TelephonyRegistry的服务
上面看到只是初始化TelephonyRegistry之后调用systemRunning接口。下面看一下做了什么
    TelephonyRegistry(Context context) {
        CellLocation  location = CellLocation.getEmpty();

        mContext = context;
        mBatteryStats = BatteryStatsService.getService();

        int numPhones = TelephonyManager.getDefault().getPhoneCount();
        if (DBG) log("TelephonyRegistor: ctor numPhones=" + numPhones);
        mNumPhones = numPhones;
        //分配空间
        mConnectedApns = new ArrayList[numPhones];
        mCallState = new int[numPhones];
        mDataActivity = new int[numPhones];
        mDataConnectionState = new int[numPhones];
        mDataConnectionNetworkType = new int[numPhones];
        mCallIncomingNumber = new String[numPhones];
        mServiceState = new ServiceState[numPhones];
        mSignalStrength = new SignalStrength[numPhones];
        mMessageWaiting = new boolean[numPhones];
        mDataConnectionPossible = new boolean[numPhones];
        mDataConnectionReason = new String[numPhones];
        mDataConnectionApn = new String[numPhones];
        mCallForwarding = new boolean[numPhones];
        mCellLocation = new Bundle[numPhones];
        mDataConnectionLinkProperties = new LinkProperties[numPhones];
        mDataConnectionNetworkCapabilities = new NetworkCapabilities[numPhones];
        mCellInfo = new ArrayList<List<CellInfo>>();
        //初始化上面分配的空间
        for (int i = 0; i < numPhones; i++) {
            mConnectedApns[i] = new ArrayList<String>();
            mCallState[i] =  TelephonyManager.CALL_STATE_IDLE;
            mDataActivity[i] = TelephonyManager.DATA_ACTIVITY_NONE;
            mDataConnectionState[i] = TelephonyManager.DATA_UNKNOWN;
            mCallIncomingNumber[i] =  "";
            mServiceState[i] =  new ServiceState();
            mSignalStrength[i] =  new SignalStrength();
            mMessageWaiting[i] =  false;
            mCallForwarding[i] =  false;
            mDataConnectionPossible[i] = false;
            mDataConnectionReason[i] =  "";
            mDataConnectionApn[i] =  "";
            mCellLocation[i] = new Bundle();
            mCellInfo.add(i, null);
        }

        // Note that location can be null for non-phone builds like
        // like the generic one.
        if (location != null) {
            for (int i = 0; i < numPhones; i++) {
                location.fillInNotifierBundle(mCellLocation[i]);
            }
        }

        mAppOps = mContext.getSystemService(AppOpsManager.class);
    }
    // 注册多用户切换删除的广播,接收SUBSCRIPTION_CHANGED广播
    //也就是到此为止,framework层的初始化就已经完成了
    //之后就是等待app初始化Tel的部分了
    public void systemRunning() {
        // Watch for interesting updates
        final IntentFilter filter = new IntentFilter();
        filter.addAction(Intent.ACTION_USER_SWITCHED);
        filter.addAction(Intent.ACTION_USER_REMOVED);
        filter.addAction(TelephonyIntents.ACTION_DEFAULT_SUBSCRIPTION_CHANGED);
        log("systemRunning register for intents");
        mContext.registerReceiver(mBroadcastReceiver, filter);
    }
从上面看到这两个函数就是根据phone的个数初始化一系列的数组,之后注册了广播。
这个类的接收其他类的listener,主要有如下两个interface
public void listen(String pkgForDebug, IPhoneStateListener callback, int events,
            boolean notifyNow);
public void addOnSubscriptionsChangedListener(String callingPackage,
            IOnSubscriptionsChangedListener callback)
这两个方法都是将注册的参数封装成Record,放入一个list里。如果有状态变化,就会遍历整个list,调用listener的回调函数。
因此,在SystemServer中几乎没有做什么事情。
这个类的作用是接受注册listener,当notifier有消息之后,就调用这些listener,将状态变化反馈给listener。
下面看一下在Tel app中是如何操作的。
Telephony App启动
TelePhoney App的位置为packages/services/Telephony
首先看一下这个app的manifest
<manifest xmlns:android="http://schemas.android.com/apk/res/android"
        xmlns:androidprv="http://schemas.android.com/apk/prv/res/android"
        package="com.android.phone"
        coreApp="true"
        android:sharedUserId="android.uid.phone"
        android:sharedUserLabel="@string/phoneAppLabel">

    <application android:name="PhoneApp"
                 android:persistent="true"
                 android:label="@string/phoneAppLabel"
                 android:icon="@mipmap/ic_launcher_phone"
                 android:allowBackup="false"
                 android:supportsRtl="true"
                 android:usesCleartextTraffic="true">
看到这个app是core app,并且是常驻内存的app。
接下来看一下app启动时都做了什么初始化
packages/services/Telephony/src/com/android/phone/PhoneApp.java
    public void onCreate() {
        if (UserHandle.myUserId() == 0) {
            // We are running as the primary user, so should bring up the
            // global phone state.
            mPhoneGlobals = new PhoneGlobals(this);
            mPhoneGlobals.onCreate();

            mTelephonyGlobals = new TelephonyGlobals(this);
            mTelephonyGlobals.onCreate();
        }
    }
这里面TelephonyGlobals是负责UI上层的处理,例如拨号界面,来电显示等。而PhoneGlobals相对于TelephonyGlobals更深一层,在这一部分进行了phone的初始化。
下面看一下这个类中主要的部分
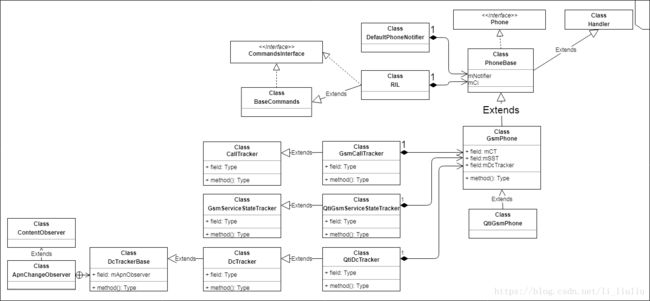
在介绍Phone的初始化流程之间,先看一下Phone的类图

这里面涉及的几个类主要作用:
1.RIL:建立socket,与rild进行通信。
2.CallTracker:负责电话的拨打,接通,挂断操作。与RIL交互
3. ServiceStateTracker:用来更新时间,时区,信号强度,locale,Gprs,网络类型,数据流量,spn,漫游等
4. DcTracker:用来设置apn
5. PhoneNotifier:在实例化Phone时作为参数。当Phone有状态变化时调用TelephonyRegistry进行状态改变通知。
6. PhoneInterfaceManager:实现TelephonyManager的接口。主要是调用Phone中的接口,用来获取Phone的状态和配置。
7. SubscriptionController:更新数据库中的内容,之后发送给TelephonyRegistry;根据slot、package name获取subid或者subInfo.
Phone instance create
packages/services/Telephony/src/com/android/phone/PhoneGlobals.java
public void onCreate() {

        if (mCM == null) {
            // Initialize the telephony framework
            //这里就是创建一个QtiTelephonyPlugin。
            //也就是这个时候才会调用PhoneFactory去开始初始化Phone
            TelephonyPluginDelegate.init(this);
			//在数据库中保存有多少个phone
            TelephonyPluginDelegate.getInstance().makeDefaultPhones(this);

			//本身是一个static,自身初始化
            mCM = CallManager.getInstance();
            //这里应该是只有一个,这里需要注意的是这时候返回的就是proxy了
            for (Phone phone : PhoneFactory.getPhones()) {
                mCM.registerPhone(phone);//将这些phone注册到CallManager,添加到列表,注册event及callback
            }

            // Create the CallController singleton, which is the interface
            // to the telephony layer for user-initiated telephony functionality
            // (like making outgoing calls.)
            callController = CallController.init(this, callLogger, callGatewayManager);

            // Monitors call activity from the telephony layer
			//CallStateMonitor注册到CallManager,调用listener来处理来自CallManager中的消息
            callStateMonitor = new CallStateMonitor(mCM);
            //这里初始化,用来配合TelephonyManager使用
            phoneMgr = PhoneInterfaceManager.init(this, PhoneFactory.getDefaultPhone());
			//bind CarrierService
            configLoader = CarrierConfigLoader.init(this);
		···
        }

    }
看一下TelephonyPluginDelegate.init函数做了什么
    public static void init(Context context) {
        if (sMe == null) {
            //com.qti.internal.telephony.QtiTelephonyPlugin
            String fullClsName = context.getResources()
                .getString(R.string.telephony_plugin_class_name);
            //system/framework/qti-telephony-common.jar
            String libPath = context.getResources().getString(R.string.telephony_plugin_lib_path);

            PathClassLoader classLoader = new PathClassLoader(libPath,
                    ClassLoader.getSystemClassLoader());
            try {
                cls = Class.forName(fullClsName, false, classLoader);
                Rlog.d(LOG_TAG, "cls = " + cls);
                Constructor custMethod = cls.getConstructor();
                Rlog.d(LOG_TAG, "constructor method = " + custMethod);
                //创建QtiTelephonyPlugin的一个实例
                sPlugin = (TelephonyPluginBase) custMethod.newInstance();
            } catch (Exception  e) {
            }

            sMe = new TelephonyPluginDelegate();
        } else {

        }
    }
这里就是加载qualcom扩展的jar包。
在上面这段代码中最终实现Phone实例的函数为TelephonyPluginDelegate.getInstance().makeDefaultPhones(this);
这个函数最终会调用PhoneFactory.makeDefaultPhone()
下面分析一下这个函数做了什么样的操作
    public static void makeDefaultPhone(Context context) {
        synchronized (sLockProxyPhones) {
            if (!sMadeDefaults) {
                sContext = context;

                //这个类就是调用TelephonyRegistry.进行状态的发送
				//这里面的TelephonyRegistry就是在sysystemServer中初始化的。
                sPhoneNotifier = new DefaultPhoneNotifier();

                int numPhones = TelephonyManager.getDefault().getPhoneCount();
                int[] networkModes = new int[numPhones];
                sProxyPhones = new PhoneProxy[numPhones];
                sCommandsInterfaces = new RIL[numPhones];
				//这部分就是实例化Phone。这里将会把RIL和notifier重新封装,最终生成Phone对象
                for (int i = 0; i < numPhones; i++) {
                    // reads the system properties and makes commandsinterface
                    // Get preferred network type.
                   try {
                        networkModes[i]  = TelephonyManager.getIntAtIndex(
                                context.getContentResolver(),
                               Settings.Global.PREFERRED_NETWORK_MODE , i);
                    } catch (SettingNotFoundException snfe) {

                    }

                    sCommandsInterfaces[i] = new RIL(context, networkModes[i],
                            cdmaSubscription, i);
                }

                //这里初始化了QtiSubscriptionController
                TelephonyPluginDelegate.getInstance().initSubscriptionController(context,
                        sCommandsInterfaces);

                for (int i = 0; i < numPhones; i++) {
                    PhoneBase phone = null;
                    int phoneType = TelephonyManager.getPhoneType(networkModes[i]);
                    if (phoneType == PhoneConstants.PHONE_TYPE_GSM) {
                        phone = TelephonyPluginDelegate.getInstance().makeGSMPhone(context,
                                sCommandsInterfaces[i], sPhoneNotifier, i);
                    } else if (phoneType == PhoneConstants.PHONE_TYPE_CDMA) {
                        phone = TelephonyPluginDelegate.getInstance().makeCDMALTEPhone(context,
                                sCommandsInterfaces[i], sPhoneNotifier, i);
                    }


                    sProxyPhones[i] = TelephonyPluginDelegate.getInstance().makePhoneProxy(phone);
                }
···
            }
        }
    }
下面就开始实例化RIL,这个类实例化之后,就建立了与Rild之间的socket通讯。
RIL主要组成部分如下图所示

看一下RIL的初始化过程:
public final class RIL extends BaseCommands implements CommandsInterface{
	 public RIL(Context context, int preferredNetworkType,
            int cdmaSubscription, Integer instanceId) {
		//创建sender thread
		mSenderThread = new HandlerThread("RILSender" + mInstanceId);
        mSenderThread.start();

        Looper looper = mSenderThread.getLooper();
        mSender = new RILSender(looper);
		//创建Receiver thread
		mReceiver = new RILReceiver();
		mReceiverThread = new Thread(mReceiver, "RILReceiver" + mInstanceId);
		mReceiverThread.start();

	}
}
在初始化函数里面主要建立了sender 和receiver 两个thread,用来发送command 给rild,接受来自rild的消息。
在看sender是如何工作之前先看一下消息是如何发送到sender的。
下面以一个小的例子进行说明
    public void getRadioCapability(Message response) {
        RILRequest rr = RILRequest.obtain(
                RIL_REQUEST_GET_RADIO_CAPABILITY, response);
        send(rr);
    }
    private void  send(RILRequest rr) {
        Message msg;

        msg = mSender.obtainMessage(EVENT_SEND, rr);

        acquireWakeLock();

        msg.sendToTarget();
    }
就是将发送的内容封装到RILRequest中,之后调用send进行发送。
下面看sender是如何接受处理消息的。
class RILSender extends Handler implements Runnable {
        public RILSender(Looper looper) {
            super(looper);
        }

        //***** Handler implementation
        @Override public void
        handleMessage(Message msg) {
            RILRequest rr = (RILRequest)(msg.obj);
            RILRequest req = null;

            switch (msg.what) {
                case EVENT_SEND:
                    try {
                        LocalSocket s;
                        //TODO:这个socket是在什么地方创建的
                        //虽然在receive的函数中创建了socket,但是如果SOCket读取不到数据的时候就会关闭,除非始终都能读到数据。
                        //需要等后面再分析
                        s = mSocket;

                        //将request放到列表中
                        synchronized (mRequestList) {
                            mRequestList.append(rr.mSerial, rr);
                        }

                        byte[] data;

                        data = rr.mParcel.marshall();
                        rr.mParcel.recycle();
                        rr.mParcel = null;

                        // parcel length in big endian
                        dataLength[0] = dataLength[1] = 0;
                        dataLength[2] = (byte)((data.length >> 8) & 0xff);
                        dataLength[3] = (byte)((data.length) & 0xff);

                        //Rlog.v(RILJ_LOG_TAG, "writing packet: " + data.length + " bytes");
                        //将数据写入到socket
                        s.getOutputStream().write(dataLength);
                        s.getOutputStream().write(data);
                    } catch (IOException ex) {

                    } catch (RuntimeException exc) {

                    }

                    break;

                case EVENT_WAKE_LOCK_TIMEOUT:
                    break;
            }
        }
    }
看到sender继承Handler,所以发送消息与handler是一样的。接受到EVENT_SEND的消息之后,加入到mRequestList中,之后就通过socket发送给了rild了。
这里把request放入到mRequestList里是为了在得到response时能够知道与哪个request相对应。
下面分析一下receiver这个thread。
    class RILReceiver implements Runnable {
        byte[] buffer;

        RILReceiver() {
            buffer = new byte[RIL_MAX_COMMAND_BYTES];
        }

        @Override
        public void
        run() {
            int retryCount = 0;
            String rilSocket = "rild";

            try {
                for (;;) {
					LocalSocket s = null;
					LocalSocketAddress l;

					if (mInstanceId == null || mInstanceId == 0 ) {
						rilSocket = SOCKET_NAME_RIL[0];//rild1
					} else {
						rilSocket = SOCKET_NAME_RIL[mInstanceId];//根据之前是否有连接过返回之前的socket
					}

					try {
						s = new LocalSocket();
						l = new LocalSocketAddress(rilSocket,
								LocalSocketAddress.Namespace.RESERVED);
						s.connect(l);
						//创建socket,并且连接rild*
					} catch (IOException ex){
					}
					//这就是sender中mSocket的来源
					mSocket = s;

					int length = 0;
					try {
						InputStream is = mSocket.getInputStream();

						for (;;) {
							Parcel p;

							length = readRilMessage(is, buffer);

							if (length < 0) {
								// End-of-stream reached
								break;
							}

							p = Parcel.obtain();
							p.unmarshall(buffer, 0, length);
							p.setDataPosition(0);

							//从socket中获取到了消息,接下来就是处理消息了
							processResponse(p);
							p.recycle();
						}
					} catch (java.io.IOException ex) {

					} catch (Throwable tr) {

					}
					//读取消息成功,关闭socket
					setRadioState (RadioState.RADIO_UNAVAILABLE);

					try {
						mSocket.close();
					} catch (IOException ex) {
					}

					mSocket = null;
					RILRequest.resetSerial();

					// Clear request list on close
					clearRequestList(RADIO_NOT_AVAILABLE, false);
				}
            } catch (Throwable tr) {
                Rlog.e(RILJ_LOG_TAG,"Uncaught exception", tr);
            }

            /* We're disconnected so we don't know the ril version */
            notifyRegistrantsRilConnectionChanged(-1);
        }
    }
整个receiver就是建立socket,之后从socket中读取数据最后调用processResponse进行消息的处理。
Receiver中接受到的消息分为两种:
1.Request 的 reponse
2.Unsolicited reponse
    private void
    processResponse (Parcel p) {
        int type;
        type = p.readInt();
        if (type == RESPONSE_UNSOLICITED) {
            processUnsolicited (p);
        } else if (type == RESPONSE_SOLICITED) {
            RILRequest rr = processSolicited (p);
            if (rr != null) {
                rr.release();
                decrementWakeLock();
            }
        }
    }
由于request发送的时候是加入到了RequestList中的。所以在处理完消息 之后要释放资源。
下面主要看request对应的reponse是如何处理的。下面还以RIL_REQUEST_SCREEN_STATE为例
private RILRequest   processSolicited (Parcel p) {

        serial = p.readInt();
        error = p.readInt();

        RILRequest rr;
		//根据serial找到request
        rr = findAndRemoveRequestFromList(serial);

		try {
			switch (rr.mRequest) {
				···
				case RIL_REQUEST_GET_RADIO_CAPABILITY: ret =  responseRadioCapability(p); break;
				···
			}

		}catch{}
			//处理完消息之后,如果没有错误就返回结果
		    if (rr.mResult != null) {
                AsyncResult.forMessage(rr.mResult, ret, null);
                rr.mResult.sendToTarget();
            }
}
至此RIL的初始化以及发送接收信息的流程也就介绍完了。
之后makeGSMPhone的调用顺序为:TelephonyPluginDelegate->QtiTelephonyPlugin.makeGSMPhone
    public PhoneBase makeGSMPhone(Context context, CommandsInterface ci,
            PhoneNotifier notifier, int phoneId) {
        return new QtiGSMPhone(context, ci, notifier, phoneId);
    }
	public class QtiGSMPhone extends GSMPhone {
		public QtiGSMPhone(Context context,
            CommandsInterface ci, PhoneNotifier notifier, int phoneId) {
        super(context, ci, notifier, phoneId);
    }
	}

	    public  GSMPhone(Context context, CommandsInterface ci,
            PhoneNotifier notifier, boolean unitTestMode, int phoneId) {
        super("GSM", notifier, context, ci, unitTestMode, phoneId);
		//设置电话类型为Gsm
        mCi.setPhoneType(PhoneConstants.PHONE_TYPE_GSM);
        mCT = new GsmCallTracker(this);

        mSST = TelephonyPluginDelegate.getInstance().makeGsmServiceStateTracker(this);
        mDcTracker = TelephonyPluginDelegate.getInstance().makeDcTracker(this);
		···
        mCi.registerForAvailable(this, EVENT_RADIO_AVAILABLE, null);
        mCi.registerForOffOrNotAvailable(this, EVENT_RADIO_OFF_OR_NOT_AVAILABLE, null);
        mCi.registerForOn(this, EVENT_RADIO_ON, null);
        mCi.setOnUSSD(this, EVENT_USSD, null);
        mCi.setOnSuppServiceNotification(this, EVENT_SSN, null);
        mSST.registerForNetworkAttached(this, EVENT_REGISTERED_TO_NETWORK, null);
        mCi.setOnSs(this, EVENT_SS, null);
		···
    }
GsmServiceStateTracker、DcTracker的实例化过程是一样的,最终会调用GsmPhone中的实例化函数。
至此Phone的初始化就完成了。
在GsmPhone/GsmServiceStateTracker/DcTracker等初始化的时候,很多都涉及到Ci.registerForXXX()函数。
通过之前Phone的类图知道,RIL继承BaseCommands。在BaseCommands中将注册进来的对象进行保存。
并且Phone都继承Handler。
例如GSMPhone中的mCi.registerForAvailable(this, EVENT_RADIO_AVAILABLE, null);
public abstract class BaseCommands implements CommandsInterface {

	protected RegistrantList mAvailRegistrants = new RegistrantList();
    @Override
    public void registerForAvailable(Handler h, int what, Object obj) {
        Registrant r = new Registrant (h, what, obj);

        synchronized (mStateMonitor) {
            mAvailRegistrants.add(r);

            if (mState.isAvailable()) {
                r.notifyRegistrant(new AsyncResult(null, null, null));
            }
        }
    }
	protected void setRadioState(RadioState newState) {
		if (mState.isAvailable() && !oldState.isAvailable()) {
                mAvailRegistrants.notifyRegistrants();
                onRadioAvailable();
        }
	}
}
当Phone初始化时就注册了event,event发生的时候就会回调注册的handler,也就是phone。
从源码看Radio的状态属于Unsolicited event。
private void  processUnsolicited (Parcel p) {
	···
	case RIL_UNSOL_RESPONSE_RADIO_STATE_CHANGED:
		RadioState newState = getRadioStateFromInt(p.readInt());
		switchToRadioState(newState);
	···
}

private void switchToRadioState(RadioState newState) {
        setRadioState(newState);
}
大体流程为
![enter description here][6]
以上部分介绍了Phone的初始化部分,至于SST、DC,CM中的细节没有涉及很多,以后再详细介绍。
TelephonyGlobals分析
下面在简单介绍一下TelephonyGlobals的一些情况.
TelephonyGlobals的主要部分在onCreate函数中。
    public void onCreate() {
        // Make this work with Multi-SIM devices
        Phone[] phones = PhoneFactory.getPhones();
        for (Phone phone : phones) {
            mTtyManagers.add(new TtyManager(mContext, phone));
        }

        TelecomAccountRegistry.getInstance(mContext).setupOnBoot();
    }
TtyManager这个类中主要设置了TTS模式。
	    void setupOnBoot() {

        SubscriptionManager.from(mContext).addOnSubscriptionsChangedListener(
                mOnSubscriptionsChangedListener);

        mTelephonyManager.listen(mPhoneStateListener, PhoneStateListener.LISTEN_SERVICE_STATE);
    }
在这个函数里面就涉及到了上面Telephony中涉及到的注册listener。用来接受phone的状态变化。
下面的流程图反映了上述Phone实例过程
CallManager初始化
PhoneInterfaceManager(Telephony Service)
注意PhoneInterfaceManager的初始化一定要提前完成,否则后面TelephonyManager就无法使用。
PhoneGlobals的初始化过程中关于 Telephony的主要就是这些。
libril.so接收到消息的处理流程
RIL_register->startListen->注册listenCallback函数
当framework connect rild socket后就会调用listenCallback函数。
当有framework commands时调用processCommandsCallback->processCommandBuffer->dispatchFunction->dispatchXXX-CALL_ONREQUEST->reference-ril.onRequest
libreference-ril处理消息之后调用RIL_onRequestComplete函数,通知libril已经处理完成。之后libril再将处理结果反馈给framework。
[1]: ./images/Telephone%20%E6%A1%86%E5%9B%BE-Page-4.png “Telephone 框图-Page-4”
[2]: ./images/Telephone%E6%80%BB%E4%BD%93%E5%9B%BE.png “Telephone总体图”
[3]: ./images/Telecom.png “Telecom”
[4]: ./images/Telephone%20%E6%A1%86%E5%9B%BE.png “Telephone 框图”
[5]: ./images/RIL.png “RIL”
[6]: ./images/Regist.png “Regist”

