android之AIDL跨进程通信详解
背景
一直以来都只是听说AIDL是跨进程的,但都由于项目中也没涉及到,所以也从来都没彻底去了解过,最近空闲下来去了解插件化开发原理,看着看着正好涉及到Ibinder以及android用到的AIDL,于是乎按图索骥一条条来探索到底是个怎么回事儿,按照读者推荐,我们就先从AIDL使用以及原理开始挖掘。
前言
对于跨进程,我们都知道android底层是linux,所以进程管理也是linux系统的那一套,即进程之间是相互独立的互不干扰的,数据是独享的,所以要进行进程间的通信也是通过老掉牙的方案Binder机制去搞,而android的AIDL底层也是基于Binder机制来搞的,只不过封装的比较好,android开发不需要知道Binder机制也能使用AIDL跨进程开发,只需要遵循一定的流程,一一步步创建就好;由于android的每个app对应一个独立进程(不是自己开启新的进程前提),要想跨应用访问共享数据,那就得掌握进程间的通信。接下来我们一步步教大家如何使用以及对其原理讲解。
资料
这个博主的一系列进程通信的讲解与比较是比较完美的,推荐想了解的要细读深究,并手动编写代码
http://blog.csdn.net/hitlion2008/article/details/9773251
Binde原理详解
http://weishu.me/2016/01/12/binder-index-for-newer/
AIDL使用简述
1、创建client/service的aidl文件(如IRemoteService.aidl),client/service使用的是同一份,分别放置在各自的src目录下
2、创建完后,重新build项目,会在app\build\generated\source\aidl目录下自动生成相应的java文件,
想深究的可以对着原理扒扒里边的源码,后边会简述
3、创建service,并实现IRemoteService.Stub,通过onBind()返回
4、创建client,并实现ServiceConnection,然后通过以下方式启动进行绑定,并建立进程间的通道
 Intent intent = new Intent();
 intent.setClassName("包名", "包名+service的类名");
 bindService(intent, serviceConnection, Context.BIND_AUTO_CREATE);
5、最后在ServiceConnection的onServiceConnected中通过IRemoteBankService.Stub.asInterface(service)获取client的代理,通过这个代理就可以和service相互通信了。
AIDL的创建步骤
1、创建所有的aidl文件,包括实现的进程间要通信的实体类也要定义

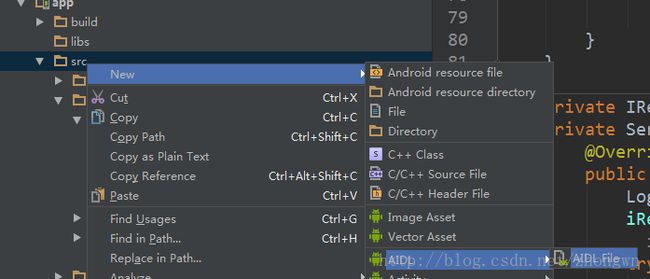
创建aidl文件 如图所示,名字随意命名,这里我命名为银行的aidl,名字为IRemoteBankService
创建完成后就会在src/main/aidl下自动生成和应用包名一致的包名,打开就看到我们创建的aidl文件,打开如下
// IRemoteBankService.aidl
package com.example.zwr.myapplication;

// Declare any non-default types here with import statements

interface IRemoteBankService{
    /**
     * Demonstrates some basic types that you can use as parameters
     * and return values in AIDL.
     */
    void basicTypes(int anInt, long aLong, boolean aBoolean, float aFloat,
            double aDouble, String aString);
}
这样我们就创建完毕!
2、在aidl文件中编写自定想要的接口。
3、编辑实体类.aidl,删除除了包名外的所有内容,写下parcelable 类名;(如parcelable User;)parcelable 中的p必须是小写的;
4、将IRemoteBankService.aidl定义的接口中所使用到的实体类,将对应的包名+类名导入IRemoteBankService.aidl;
(如:
import com.example.zwr.myapplication.User;
import com.example.zwr.myapplication.RemoteClientCallBack;
)
5、创建自己实现的实体类,这个类必须要是实现Parcelable
6、重新编译:即重新build就完毕了
注意:
自定义的接口方法的返回类型以及参数类型:类型有一定的限制
(1) 支持java的基本类型:float/int/String…..
(2)支持实现Parcelable的实体类
(3)支持Stub/aidl接口
基本类型不用说,看看实体类是怎么玩的
一般来说我们会定义自己传递的实体类,但在定义之前,我们要先在aidl/包名/创建实体类同名的aidl(如这里是User.aidl),然后在创建java/包名/实体类的.java,否则如果先创建类,有可能无法创建aidl,这是as工具的问题
AIDL的Demo详解
1、创建aidl
这里我的demo中是创建了3个aidl,所以先将这3个aidl文件创建

<1>、IRemoteBankService.aidl
创建完后得到一个类似java的接口,同样我们可以在里边自定义自己要通信的接口;比如我定义如下

这里创建了4个方法:
//—-以下方法都是客户端直接调用,将数据传给服务端,顺带从服务端拿取数据—–类似,客户端发送请求,拿取数据
/*客户端注册回调接口,用以服务端主动通过调用回调方法,向客户端发送消息—类似服务端主动推送数据给客户端/
/*存钱 存款/
boolean despoistMoney(int money);
/*取款/
int drawMoney(int money);
/*当前存取款用户/
User getUser();
//—-以上方法都是客户端直接调用,将数据传给服务端,顺带从服务端拿取数据—–类似,客户端发送请求,拿取数据
/*客户端注册回调接口,用以服务端主动通过调用回调方法,向客户端发送消息—类似服务端主动推送数据给客户端/
void registerClientOberser(RemoteClientCallBack clientCallBack);
正如注释写的,我们存取款以及获取用户信息都是通过定义的前3个方法获取,前3个方法相当于client向service发送请求,然后获取或者发送信息,主动方是在client,而最后一个方法是client首先向service注册一个观察者,然后当service有什么更新的状态想要通知client时都是通过这个观察者来通知更新,即主动权在service,由service主动推送消息,这样就达到了信息互通
以上3个aidl中,IRemoteBankService.aidl中声明的接口方法中用到了User和RemoteClientCallBack,所以需要导包:
import com.example.zwr.myapplication.User;
import com.example.zwr.myapplication.RemoteClientCallBack;
<2>、User.aidl
接下来看看User.aidl做了什么:
// User.aidl
package com.example.zwr.myapplication;
// Declare any non-default types here with import statements
parcelable User;
其实创建aidl时会生成和之前一模一样的接口类型,这里我们把它都给删除,然后写下parcelable 类名;(这里是parcelable User;)
这样就算声明完了。
<3>RemoteClientCallBack.aidl
// RemoteClientCallBack.aidl
package com.example.zwr.myapplication;
// Declare any non-default types here with import statements
interface RemoteClientCallBack {
void transferToClientByServer(String transferData);
}
这里声明了接口方法,但是参数是普通类型,不需要导入任何包;这个方法就是service主动将消息推送后,客户端回调的方法
以上就是aidl的玩法。
<4>、创建aidl使用参数的实体类
接下来我们要在java/aidl文件同包名/创建aidl相应的实体类User,如本demo:java\com\example\zwr\myapplication\User.java
如下所示
package com.example.zwr.myapplication;

import android.os.Parcel;
import android.os.Parcelable;

/**
 * author : zhongwr on 2017/2/22
 */
public class User implements Parcelable {
    private String name;
    private String id;
    /**进程Id*/
    private String pId;

    public User(String name, String id, String pId) {
        this.name = name;
        this.id = id;
        this.pId = pId;
    }

    public User() {
    }

    @Override
    public String toString() {
        return "name = " + name + " id = " + id + " pid = " + pId;
    }

    @Override
    public int describeContents() {
        return 0;
    }

    @Override
    public void writeToParcel(Parcel dest, int flags) {
        dest.writeString(this.name);
        dest.writeString(this.id);
        dest.writeString(this.pId);
    }

    protected User(Parcel in) {
        this.name = in.readString();
        this.id = in.readString();
        this.pId = in.readString();
    }

    public static final Creator CREATOR = new Creator() {
        @Override
        public User createFromParcel(Parcel source) {
            return new User(source);
        }

        @Override
        public User[] newArray(int size) {
            return new User[size];
        }
    };
}
看着要生成这么多东东,其实我们不用自己手写,直接使用as自带的工具:
打开当前文件右键-》generate-》Parcelable
这样就会自动生成
这里我们要注意如下:
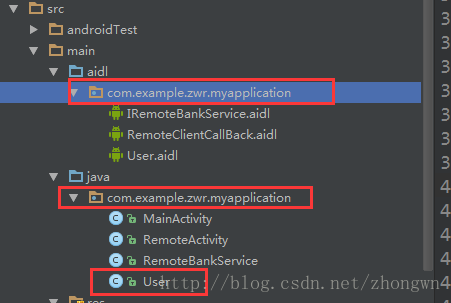
实现的Parcelable 类(User) 必须放在src/main/java目录下,包名与aidl的包名一致(这里是com.example.zwr.myapplication)
如图:

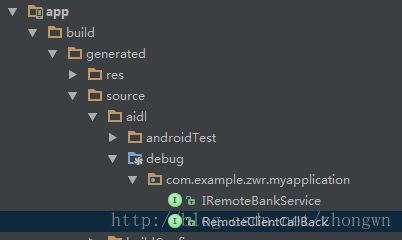
这样前提准备工作就基本完事,最后一步,重新build项目,然后不出什么意外的话会在pp\build\generated\source\aidl目录下自动生成相应的java文件

里边的内容先不关心,后续会讲解
2、服务端:创建RemoteBankService.java
这里就跟平时创建的service一样,继承service之后 主要是这个方法返回的IBinder
@Override
    public IBinder onBind(Intent intent) {
        return mRemoteBind;
    }
这里实现的是我们创建的aidl自动生成的java文件IRemoteBankService中的IRemoteBankService.Stub
private IRemoteBankService.Stub mRemoteBind = new IRemoteBankService.Stub() {
        /**存钱*/
        @Override
        public boolean despoistMoney(int money) throws RemoteException {
            Log.d(TAG, "despoistMoney pid = " + android.os.Process.myPid());
            if (money > 0) {
                return true;
            }
            return false;
        }

        /**取钱*/
        @Override
        public int drawMoney(int money) throws RemoteException {
            Log.d(TAG, "drawMoney pid = " + android.os.Process.myPid());
            clientCallBackInstance.transferToClientByServer("当前用户存钱成功
             余额 :"+money+"当前进程Id = "+android.os.Process.myPid());
            return money;
        }

        /**
         * 用户信息
         * @return
         * @throws RemoteException
         */
        @Override
        public User getUser() throws RemoteException {
            Log.d(TAG, "getUser pid = " + android.os.Process.myPid());
            return new User("张三", "" + System.currentTimeMillis(),
             "" + android.os.Process.myPid());
        }

        /**
         * 注册客户端的观察者,用以服务端更新后主动通知其更新
         * @param clientCallBack
         * @throws RemoteException
         */
        @Override
        public void registerClientOberser(RemoteClientCallBack clientCallBack)
        throws RemoteException {
            clientCallBackInstance =clientCallBack;
            Message msg = Message.obtain();
            msg.obj = clientCallBack;
            timeHandler.sendMessageDelayed(msg, 10000);
        }
    };
    private RemoteClientCallBack clientCallBackInstance;
看到这个实现的Stub中实现了我们在aidl定义的接口方法,我们就是通过这些方法进行通信的
由于前三个是client主动调用的方法,而最后registerxxx()是client注册后,service主动推送消息,所以我们这里使用handler延时模拟推送。
service的完整代码如下
     package com.example.zwr.myapplication;

import android.app.Service;
import android.content.Context;
import android.content.Intent;
import android.content.ServiceConnection;
import android.os.*;
import android.os.Process;
import android.util.Log;

/**
 * 独立进程运行的服务
 */
public class RemoteBankService extends Service {
    private static final String TAG = "RemoteBankService";

    public static void bindService(Context context, ServiceConnection connection) {
        Log.d(TAG, "bindService pid = " + android.os.Process.myPid());
        Intent intent = new Intent(context, RemoteBankService.class);
//        intent.setClassName("com.example.zwr.myapplication","com.example.zwr.myapplication.RemoteBankService");
        context.bindService(intent, connection, Context.BIND_AUTO_CREATE);
    }

    public static void doUnbindService(Context context, ServiceConnection connection) {
        Log.d(TAG, "doUnbindService pid = " + android.os.Process.myPid());
        if (connection != null) {
            context.unbindService(connection);
            context.stopService(new Intent(context, RemoteBankService.class));
        }
    }

    public RemoteBankService() {
    }

    @Override
    public void onCreate() {
        Log.d(TAG, "onCreate pid = " + android.os.Process.myPid());
        super.onCreate();
    }

    @Override
    public void onDestroy() {
        Log.d(TAG, "onDestroy pid = " + android.os.Process.myPid());
        super.onDestroy();
        Process.killProcess(Process.myPid());
    }

    @Override
    public IBinder onBind(Intent intent) {
        return mRemoteBind;
    }

    private IRemoteBankService.Stub mRemoteBind = new IRemoteBankService.Stub() {
        /**存钱*/
        @Override
        public boolean despoistMoney(int money) throws RemoteException {
            Log.d(TAG, "despoistMoney pid = " + android.os.Process.myPid());
            if (money > 0) {
                return true;
            }
            return false;
        }

        /**取钱*/
        @Override
        public int drawMoney(int money) throws RemoteException {
            Log.d(TAG, "drawMoney pid = " + android.os.Process.myPid());
            clientCallBackInstance.transferToClientByServer("当前用户存钱成功
            余额 :"+money+"当前进程Id = "+android.os.Process.myPid());
            return money;
        }

        /**
         * 用户信息
         * @return
         * @throws RemoteException
         */
        @Override
        public User getUser() throws RemoteException {
            Log.d(TAG, "getUser pid = " + android.os.Process.myPid());
            return new User("张三", "" + System.currentTimeMillis(),
             "" + android.os.Process.myPid());
        }

        /**
         * 注册客户端的观察者,用以服务端更新后主动通知其更新
         * @param clientCallBack
         * @throws RemoteException
         */
        @Override
        public void registerClientOberser(RemoteClientCallBack clientCallBack)
        throws RemoteException {
            clientCallBackInstance =clientCallBack;
            Message msg = Message.obtain();
            msg.obj = clientCallBack;
            timeHandler.sendMessageDelayed(msg, 10000);
        }
    };
    private RemoteClientCallBack clientCallBackInstance;

    private TimeHander timeHandler = new TimeHander();
    static class TimeHander extends Handler{
        public TimeHander(){
            Looper looper = Looper.myLooper();
            if(null == looper){
                Looper.prepare();
                Looper.loop();
            }
        }
        @Override
        public void handleMessage(Message msg) {
            if(null!=msg.obj){
                RemoteClientCallBack clientCallBackInstance
                = (RemoteClientCallBack)msg.obj;
                try {
                    clientCallBackInstance.transferToClientByServer(
                    "已延期10s后发送 当前进程Id = "+ Process.myPid());
                } catch (RemoteException e) {
                    e.printStackTrace();
                }
            }
        }
    }
}
这样service工作已完成99%了,最后一步就是要注册,这里我们起一个独立进程来跑;
AndroidManifest.xml:
<service
     ndroid:name=".RemoteBankService"
    android:enabled="true"
    android:exported="true"
    android:process=":remoteservice">
service>
3、本应用的客户端Client:创建RemoteActivity
实现ServiceConnection:建立连接
  private IRemoteBankService iRemoteBankService;
    private ServiceConnection serviceConnection = new ServiceConnection() {
        @Override
        public void onServiceConnected(ComponentName name, IBinder service) {//建立通信链接成功
            Log.d(TAG, "onServiceConnected pid = " + android.os.Process.myPid());
            iRemoteBankService = IRemoteBankService.Stub.asInterface(service);//跨进程的处理方式
//            iRemoteBankService = (IRemoteBankService)service;//统一进程的处理方式
            try {
                iRemoteBankService.registerClientOberser(remoteClientCallBack);
            } catch (RemoteException e) {
                e.printStackTrace();
            }
        }

        @Override
        public void onServiceDisconnected(ComponentName name) {//断开链接
            Log.d(TAG, "onServiceDisconnected pid = " + android.os.Process.myPid());
            iRemoteBankService = null;
        }
    };
当建立连接之后会回调onServiceConnected();在这里我们获取远程的IBinder,由于这个是服务端的IBinder,这里又是不同的进程所以不能直接强转成IRemoteBankService,否则会抛出类型转换异常所以要使用
iRemoteBankService = IRemoteBankService.Stub.asInterface(service);来获取客户端的Binder代理;
获取到iRemoteBankService 后我们将客户端的观察者注册到service中:
iRemoteBankService.registerClientOberser(remoteClientCallBack);
再来看看remoteClientCallBack是何方妖物:
private RemoteClientCallBack.Stub remoteClientCallBack = new RemoteClientCallBack.Stub() {
        @Override
        public void transferToClientByServer(final String transferData) throws RemoteException {
            Log.d(TAG, "transferData = " + transferData +
            " client Pid = " + android.os.Process.myPid());
            //如果是service通过handler调用的这个的,由于service的进程调用,所以这个回调不是在
            //主线程而是工作线程中,直接更新或toast会抛出如下异常,所以定要在主线程中更新
            //Uncaught remote exception! (Exceptions are not yet supported across processes.)
            runOnUiThread(new Runnable() {

                @Override
                public void run() {
                    Toast.makeText(RemoteActivity.this, transferData, Toast.LENGTH_SHORT).show();
                }
            });

        }
    };
这里实现的就是我们定义的RemoteClientCallBack.aidl文件自动生成的RemoteClientCallBack.java文件中的Stub;到了这里其实这里注册观察者,可以理解为把client当作service,service当作client互换角色吧。
然后通过回调就可以互相通信互相拿到消息了。
这里你可能注意到了在回调方法中使用runOnUiThread()来Toast,这是因为,回调后不是主线程,而是从系统线程池中获取到一个空闲工作线程来传递消息的,直接Toast则报异常(Exceptions are not yet supported across processes.)
ok!主要代码都写完了,这下需要绑定启动服务然后操纵看看是不是能够通信了;完整代码如下:package com.example.zwr.myapplication;
import android.content.ComponentName;
import android.content.Context;
import android.content.Intent;
import android.content.ServiceConnection;
import android.os.IBinder;
import android.os.RemoteException;
import android.support.v7.app.AppCompatActivity;
import android.os.Bundle;
import android.util.Log;
import android.view.View;
import android.widget.Toast;
public class RemoteActivity extends AppCompatActivity implements View.OnClickListener {

    public static void startInstance(Context context){
        context.startActivity(new Intent(context,RemoteActivity.class));
    }
    private static final String TAG = "RemoteActivity";

    @Override
    protected void onCreate(Bundle savedInstanceState) {
        super.onCreate(savedInstanceState);
        setContentView(R.layout.activity_remote);
        initView();
    }

    private void initView() {
        findViewById(R.id.tv_bindService).setOnClickListener(this);
        findViewById(R.id.tv_despoistMoney).setOnClickListener(this);
        findViewById(R.id.tv_drawMoney).setOnClickListener(this);
        findViewById(R.id.tv_getuser).setOnClickListener(this);
        Log.d(TAG, "initView pid = " + android.os.Process.myPid());
    }

    @Override
    public void onClick(View v) {
        switch (v.getId()) {
            case R.id.tv_bindService:
                RemoteBankService.bindService(this,serviceConnection);
                break;
            case R.id.tv_despoistMoney:
                try {
                   boolean  isDesMoney = iRemoteBankService.despoistMoney(5);
                    Log.d(TAG,"isDesMoney1 = "+isDesMoney);
                     isDesMoney = iRemoteBankService.despoistMoney(-5);
                    Log.d(TAG,"isDesMoney2 = "+isDesMoney);
                } catch (RemoteException e) {
                    e.printStackTrace();
                }
                break;
            case R.id.tv_drawMoney:
                try {
                    int  drawMoney = iRemoteBankService.drawMoney(5);
                    Log.d(TAG,"drawMoney = "+drawMoney);
                } catch (RemoteException e) {
                    e.printStackTrace();
                }
                break;
            case R.id.tv_getuser:
                try {
                    User user = iRemoteBankService.getUser();
                    Log.d(TAG,"user = "+user.toString());
                } catch (RemoteException e) {
                    e.printStackTrace();
                }
                break;

        }
    }

    private IRemoteBankService iRemoteBankService;
    private ServiceConnection serviceConnection = new ServiceConnection() {
        @Override
        public void onServiceConnected(ComponentName name, IBinder service) {//建立通信链接成功
            Log.d(TAG, "onServiceConnected pid = " + android.os.Process.myPid());
            iRemoteBankService = IRemoteBankService.Stub.asInterface(service);//跨进程的处理方式
//            iRemoteBankService = (IRemoteBankService)service;//统一进程的处理方式
            try {
                iRemoteBankService.registerClientOberser(remoteClientCallBack);
            } catch (RemoteException e) {
                e.printStackTrace();
            }
        }

        @Override
        public void onServiceDisconnected(ComponentName name) {//断开链接
            Log.d(TAG, "onServiceDisconnected pid = " + android.os.Process.myPid());
            iRemoteBankService = null;
        }
    };

    private RemoteClientCallBack.Stub remoteClientCallBack = new RemoteClientCallBack.Stub() {
        @Override
        public void transferToClientByServer(final String transferData) throws RemoteException {
            Log.d(TAG, "transferData = " + transferData + " client Pid = "
            + android.os.Process.myPid());
            //如果是service通过handler调用的这个的,由于service的进程调用,所以这个回调不是
            //在主线  程而是工作线程中,直接更新或toast会抛出如下异常,所以定要在主线程中更新
            //Uncaught remote exception! (Exceptions are not yet supported across processes.)
            runOnUiThread(new Runnable() {

                @Override
                public void run() {
                    Toast.makeText(RemoteActivity.this, transferData, Toast.LENGTH_SHORT).show();
                }
            });

        }
    };
    @Override
    protected void onDestroy() {
        super.onDestroy();
        RemoteBankService.doUnbindService(this,serviceConnection);
    }
}service:

通过日志可以发现,这两个是在独立进程中,而且是可以正常通信的
以上是同一个应用中进行的,下边我们看看在不同应用中的通信
4、新创建应用为ClientAIDLDEMO :为client
先创建完后,将创建的所有aidl文件以及相关的类全部复制到这个项目中
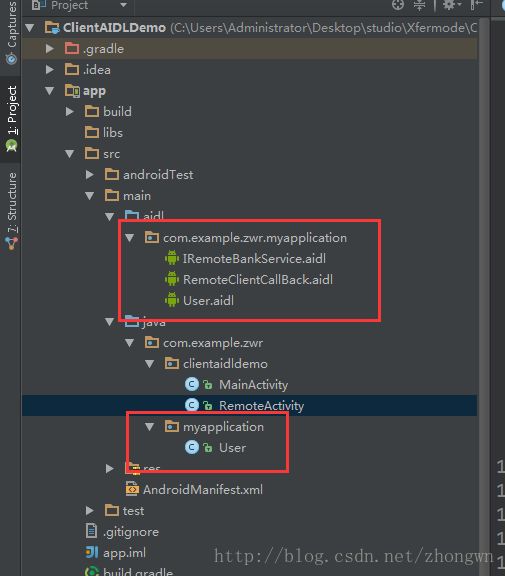
注意:包名也是要一致的
如图:

然后将RemoteActivity也一同复制过来,唯一要修改的只有绑定和解绑,修改为:通过包名隐式意图启动进行绑定:如下
    Intent intent = new Intent();
    intent.setClassName(
   "com.example.zwr.myapplication",  "com.example.zwr.myapplication.RemoteBankService");
    bindService(intent, serviceConnection, Context.BIND_AUTO_CREATE);

    Intent intent = new Intent();
    intent.setClassName(
    "com.example.zwr.myapplication", "com.example.zwr.myapplication.RemoteBankService");
     unbindService(serviceConnection);
     stopService(intent);
然后运行:点击绑定,结果如同上边,就不再重复!
跨进程通信讲解完毕!,有不对的地方请不吝指正!
demo:
同一个应用demo
不同应用的demo
