初识android vector drawable
VectorDrawable
在处理Android开发布局适配的时候,我们会经常遇到图片图标因为缩放引起的模糊等问题。虽然能够通过多套图片来解决这个问题,但是这种方法带来的一个弊端就是应用的体积会变得很大。提到缩放而不失真我们可能会很快想到了矢量图这个词,从Android5.0开始(API21)Google提供了对于矢量图片的支持——VectorDrawable。使用VectorDrawable能够在Android中使用矢量图,推荐针对于简单的图形来进行使用,特别是图标一类的简单图像。
VectorDrawable能够带来哪些方便:
- 不会因为不同分辨率出现模糊等失真的情况。
- 替换png图片能够在一定程度上减小应用程序的体积。
- 配合使用属性动画能够做出一些比较绚丽的动画效果。
使用中一些不方便的地方:因为矢量图形主要数据部分是一些“轨迹”命令,VectorDrawable只能支持部分。编写起来要费尽一些。不过一些简单的内容就能够帮我们解决一些问题,所以对于开发的帮助还是非常有帮助的。
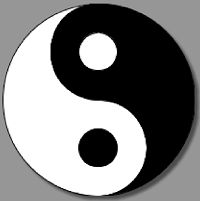
一个简单的矢量图例子
<vector xmlns:android="http://schemas.android.com/apk/res/android"
    android:width="100dp"
    android:height="100dp"
    android:viewportHeight="200"
    android:viewportWidth="200"
    >

  <path
      android:name="left_ellipse"
      android:strokeColor="@android:color/background_dark"
      android:strokeWidth="1"
      android:fillColor="@android:color/background_light"
      android:pathData="M100,100 A50,50 0 1,1 100,200 A100,100 0 1,1 100,0 A50,50, 0, 1,0 100,100"
      />

  <path
      android:name="left_ellipse"
      android:strokeColor="@android:color/background_dark"
      android:strokeWidth="1"
      android:fillColor="@android:color/background_dark"
      android:pathData="M100,100 A50,50 0 1,1 100,0 A100,100 0 1,1 100,200 A50,50, 0, 1,0 100,100"
      />

  <path
      android:name="left_inner_circle"
      android:strokeColor="@android:color/background_dark"
      android:strokeWidth="1"
      android:fillColor="@android:color/background_dark"
      android:pathData="M100,130 A20,20 0 1,1 99,130"
      />

  <path
      android:name="left_inner_circle"
      android:strokeColor="@android:color/background_dark"
      android:strokeWidth="1"
      android:fillColor="@android:color/background_light"
      android:pathData="M100,30 A20,20 0 1,1 99,30"

      />


vector>
各节点属性解释
解释为个人理解并非直译,没有翻译的部分没有用到所以贴出来原句。个人理解可能有偏差,若有错望指正。
vector为根节点,定义一个vector drawable
常用属性以及解释:
1.android:width/android:height:矢量图形的大小,这个应该理解很简单
2.android:viewportHeight/android:viewportWidth:矢量图形xy的坐标长度,
    可以理解为画布的尺寸,这里设置为长X宽=200X200,图形的位置,线条的尺寸等等都与此有关。
3.android:name:节点的名称,可以通过此名称来引用该节点。例如设置图像的一部分有动画效果。
    group和path的本属性同理。
4.android:alpha:透明度

一下为不常用属性:
5.android:tintMode:着色方式,可参考http://segmentfault.com/a/1190000003038675
6.android:tint:可设置着色颜色
7.android:autoMirrored:Indicates if the drawable needs to be mirrored
    when its layout direction is RTL (right-to-left).
group 为一组path的集合,可以用于一组path的位移,旋转,缩放等状态和动画。
属性以及解释:
1.android:name:节点的名称,可以通过此名称来引用该节点。例如设置图像的一部分有动画效果。
2.android:rotation:该部分的旋转角度
3.android:pivotX/Y:旋转中心的位置
4.android:scaleX/Y:缩放中心的位置
5.android:translateX/Y:移动的距离
path 定义了要绘制的path的属性
属性以及解释:
1.android:name:节点的名称,可以通过此名称来引用该节点。例如设置图像的一部分有动画效果。
2.android:pathData:矢量绘制指令
3.android:fillColor:填充颜色
4.android:strokeColor:边线颜色
5.android:strokeWidth:线条的宽度
6.android:strokeAlpha:线条的透明度
7.android:fillAlpha:填充的透明度
8.android:trimPathStart:可设置为0-1,会呈现绘制逆过程的动画
9.android:trimPathEnd:可设置0-1,呈现绘制过程的动画
10.android:trimPathOffset:Shift trim region
  (allows showed region to include the start and end), in the range from 0 to 1
11.android:strokeLineCap:线头属性: butt, round, square.
12.android:strokeLineJoin:Sets the lineJoin for a stroked path: miter,round,bevel.
13.android:strokeMiterLimit:Sets the Miter limit for a stroked path.
不常用的clip-path:Defines path to be the current clip.Note that the clip path only apply to the current group and its children.
1.android:name:Defines the name of the clip path
2.android:pathData:Defines clip path using the same format as "d" attribute in the SVG's path data.
SVG PATH绘制指令简介
常用的绘制指令
M:moveto 移动,用法Mx,y移动到x,y
L:line to,绘制直线,用法Lx,y直线连到x,y,起点为上一步的结尾点或者是(0,0),还有简化命令H(x) 水平连接、V(y)垂直连接 参数为线的结束点的x/y坐标
Z:没有参数,连接起点和终点
C:三次贝塞尔曲线,用法C(x1 y1 x2 y2 x y)控制点x1,y1 x2,y2,终点x,y
Q:二次贝塞尔曲线,用法Q(x1 y1 x y),控制点x1,y1,终点x,y
A:椭圆圆弧,用法A(rx ry x-axis-rotation large-arc-flag sweep-flag x y) ,X轴半径rx,Y轴半径ry, x-axis-rotation为X轴偏角, large-arc-flag为0取小弧度,1取大弧度,sweep-flag为0逆时针,1顺时针,终点x,y
关于贝塞尔曲线的深入理解可以参考:http://www.zhangxinxu.com/wordpress/2014/06/deep-understand-svg-path-bezier-curves-command/
关于圆弧的参数的更深入理解:http://blog.csdn.net/xu_fu/article/details/44004841
