vcpkg安装使用经验总结
考虑到vcpkg,个人认为是一个不是特别成熟的proj,所以这个文章会持续记录我遇到的问题和解决方案。
综述
经过实验,vs15(包括vs15 update3)并不行得通:我的总是显示cl.exe无法编译通过simple test。至少在我的机器上是这样,尽管一般说法是:Vcpkg仅支持Visual Studio 2015 update 3及以上版本(包括Visual Studio 2017)。
cl.exe?cl.exe 是控制 Microsoft C 和 C++ 编译器以及链接器的工具。cl.exe 只能在支持 Microsoft Visual Studio 的操作系统中运行。 编译器产生通用对象文件格式 (COFF) 对象 (.obj) 文件。 链接器产生可执行文件 (.exe) 或动态链接库文件 (DLL)。
所以我换成了vs17 community。
一个问题是:是不是会影响我之前利用vs15编译配置的库?可以参见:https://blog.csdn.net/OOFFrankDura/article/details/104530271
如果你想能够实现pip那样可以安装指定版本的包:
很遗憾这一点好像还不是支持的很好,vcpkg发布者一般只维护最新的。
通过和community的朋友请教与交流,我发现人们使用vcpkg的方式分为两种类型:
- 将vcpkg只是当做包管理器(pkg manager):在这种情况下,他们更喜欢使用比如cmake来链接vcpkg的cmake chain来构建项目(不一定使用vs)。
- 将vcpkg与vs的使用紧紧绑定在一起的用户:他们更关心能够直接在vs中调用安装好的包的便利性。比如使用vs集成或者使用NuGet等。
这一点vcpkg都可以很好的满足。
安装步骤
安装vs17:需要安装一些额外的包,请参考:https://blog.csdn.net/baidu_40840693/article/details/84704988
如果已经安装vs17:在开始部分->Visual studio installer安装额外的包即可。
![]()
如果你安装的时候,速度特别慢(很多报告过vs17更新慢的问题)
参见
https://blog.csdn.net/birdfly2015/article/details/102720974
注意
- 请设置语言为English,不要中文。
重启电脑
安装vcpkg,直接按照github教程即可。
https://github.com/microsoft/vcpkg
重启电脑
对于下载速度慢的问题,可以按照方法:
https://blog.csdn.net/qq_39690181/article/details/82910610
也可以用一些比较靠谱的工具。设置好proxy:网速的问题也挺玄学,有一些网站你设置了代理访问速度可以,有一些依然不work。
对于包的安装,vcpkg也有一些坑:
对于有些库,默认可能不是所有的依赖都安装,如ceres-solver,默认不支持suitesparse,cxsparse,此时可以通过命令.\vcpkg install ceres[suitesparse,cxsparse]:x64-windows --recurse重新安装,其中–recurse表示可以卸载之前的库。更多install参数可以通过命令.\vcpkg help install查看。
对于集成操作
Enabling user-wide integration (vcpkg integrate install) changes the default for some project properties. In particular, “C/C++/General/Additional Include Directories” and “Linker/General/Additional Library Directories” are normally blank without user-wide integration. With integration, a blank value means that the augmented default supplied by vcpkg is overridden, and headers/libraries will not be found. To reinstate the default, set the properties to inherit from parent.
启用用户范围的集成(vcpkg integration install)会更改某些项目属性的默认值。特别是,“C/ c++ /General/Additional Include directory”和“Linker/General/Additional Library directory”通常是空的,没有用户范围的集成。使用integration时,空白值意味着覆盖vcpkg提供的扩展的默认值,并且不会找到头/库。若要恢复默认值,请将属性设置为从父级继承。
如果集成失败也没关系:
I can’t use user-wide integration. Can I use a per-project integration?
答案是可以:NuGet
作为开发者,使用一个global的集成环境是很烦的,可以使用
.\vcpkg integrate remove
针对每一个项目:
参见 4.4.1 at https://blog.csdn.net/cjmqas/article/details/79282847
更多信息参见
https://github.com/Microsoft/vcpkg/blob/master/docs/about/faq.md#i-cant-use-user-wide-integration-can-i-use-a-per-project-integration
使用vcpkg安装的库,只需通过命令-DCMAKE_TOOLCHAIN_FILE=[vcpkg root]/scripts/buildsystems/vcpkg.cmake将其加入CMake命令行中即可。例如
cmake .. -DCMAKE_TOOLCHAIN_FILE=vcpkg/scripts/buildsystems/vcpkg.cmake (Linux/MacOS)
cmake .. -DCMAKE_TOOLCHAIN_FILE=vcpkg\scripts\buildsystems\vcpkg.cmake (Windows)
再比如,如果要用VS2017编译器,输入下面命令即可:
cmake .. -DCMAKE_TOOLCHAIN_FILE=D:\vcpkg\scripts\buildsystems\vcpkg.cmake -G "Visual Studio 15 2017 Win64"
还有一种方法,直接在CMakeLists.txt文件中指定CMAKE_TOOLCHAIN_FILE,即
set(CMAKE_TOOLCHAIN_FILE "D:\vcpkg\scripts\buildsystems\vcpkg.cmake")
project(PROJECT_NAME)
这里需要注意的是,设置CMAKE_TOOLCHAIN_FILE要在project()命令之前。
一些命令
.\vcpkg install ceres[suitesparse,cxsparse]:x64-windows
.\vcpkg install opencv[cuda]:x64-windows
参见:
https://vvingerfly.github.io/2018/05-08-Cpp-Tips4vcpkg/
安装结果
下载
请注意如果你的版本是64bit请设置x64-windows
vcpkg测试安装sqlite3
vcpkg.exe install sqlite3:x64-windows
- 如果你设置集成,那么此时在vs17新建项目可以直接使用。
VS17新建工程,main.cpp如下
#include
#include

int main(int argc,char** argv)
{
    printf("%s\n",sqlite3_libversion()):
    return 0;
}
- 如果你不想设置集成,下面给出如何为单独的项目配置包
输入:
.\vcpkg integrate project

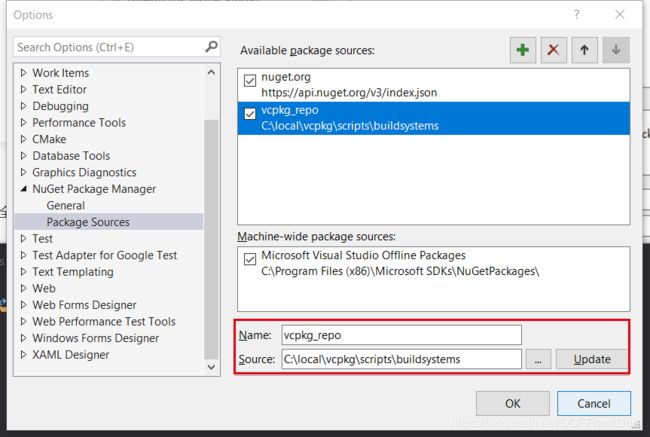
注意:**Install-Package vcpkg.C.local.vcpkg -Source “C:\local\vcpkg\scripts\buildsystems”**目录下,已经生成nuget配置文件.
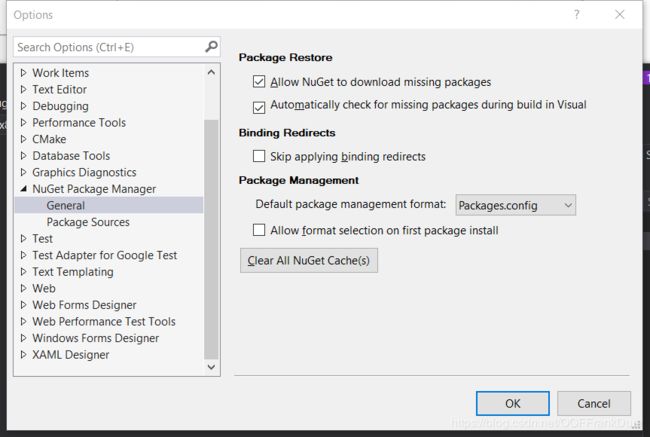
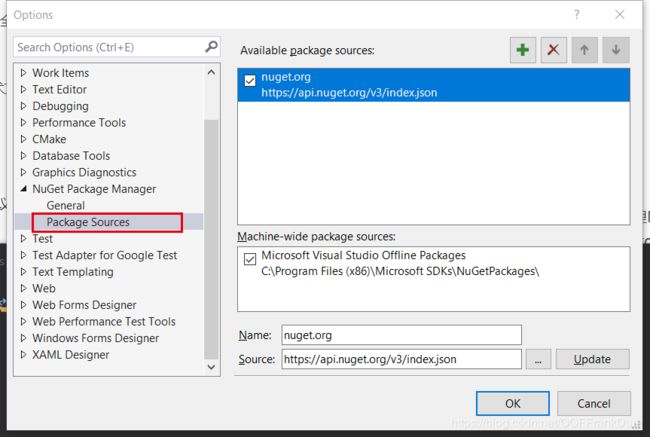
工具->NuGet包管理器->程序包管理器设置:


右键点击需要设置的工程,选择“管理NuGet程序包”。
在右上角的“程序包源”中选择刚刚设置的“vcpkg”。这样在“浏览”选项卡中就可以看到“vcpkg.H.Repos.vcpkg”。点击最右侧的“安装”。这样就可以集成到某个工程了。

点击install。
#include
#include

int main(int argc,char** argv)
{
    printf("%s\n",sqlite3_libversion()):
    return 0;
}
高级操作
控制包的下载
如果你希望可以使用自己设置的download package而不是使用网上下载的,请参考
@Frank-Dz
vcpkg will first check the download file according to the url in portfile.cmake (Yes: use the downloaded file in downloads, no: download source), and determine whether the port has been updated and corrected according to the version number (Yes: use the downloaded file to restart Extract, no: use the decompressed source in buildtrees directly), then build the port.
I also thought about adding a synchronous repo to the Chinese environment, but most of the download tasks of vcpkg are in other upstream, what we really need is a source like 163 or aliyun.
同时其实官方也在开始为CN区设置镜像包。
感受
因为vcpkg对我需要的一个库封装的挺好(如果想要full package在windows上安装可能需要处理超过10个包),而且也有人已经使用vcpkg测试通过。从头配置该库代价很大。所以我就选择了vcpkg。


