Linux驱动开发(十八):I2C驱动
简介
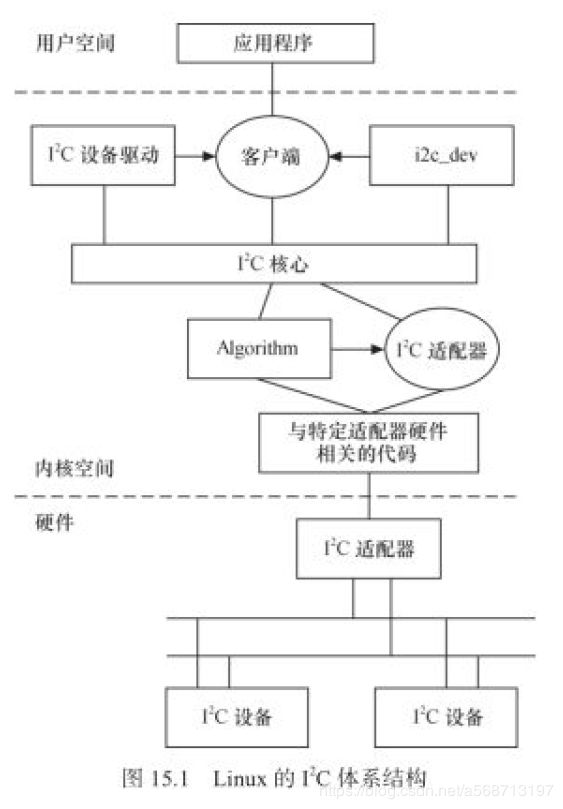
I2C是我们在单片机开发时时常会用到的通讯接口,用来与一些字符型设备进行通信,比如:陀螺仪、温度传感器等等,同样的在Linux下I2C驱动也是十分重要的。有了操作系统的加持,我们不用像在32上那样去软件实现IIC协议,更多的是去学习Linux I2c的驱动框架,首先我们先来了解一下它的驱动框架,如下图

Linux 的I2C体系结构主要分为3个部分
- I2C核心
提供了I2C总线驱动和设备注册、注销方法,I2C通信方法(Algorithm)上层的与具体适配器无关的代码以及探测设备、探测设备地址的上层代码等 - I2C总线驱动
对I2C适配器端的实现,适配器可由CPU控制,甚至可以集成在CPU内部(一般CPU都会有I2C适配器)
I2C总线驱动中主要包含I2C适配器数据结构i2c_adapter、I2C适配器的Algorithm数据结构i2c_algorithm和控制I2C适配器产生通信信号的函数
经过 I2C总线驱动的代码,我们可以控制I2C适配器产生开始位、停止位、读写周期以及读写、产生ACK等信号 - I2C设备驱动
也称为客户驱动是对I2C硬件体系结构中设备端的实现,设备一般挂载在受CPU控制的I2C适配器上,通过I2C适配器与CPU交换数据
主要包含数据结构i2c_driver和i2c_client
文件结构
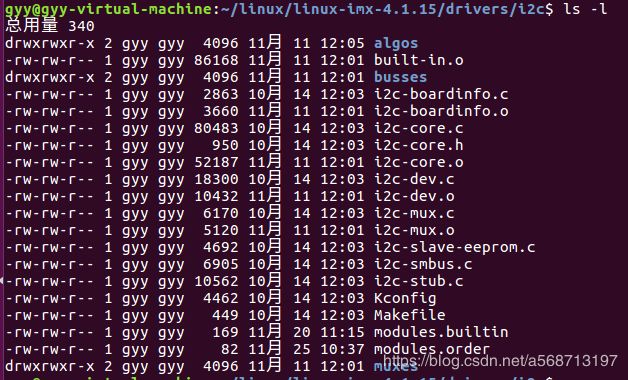
- i2c-core.c、i2c-core.h是I2C核心的实现
- I2C-dev.c 实现了I2C适配器设备文件的功能,每一个I2C适配器都被分配了一个设备
- busses文件夹
包含了各种厂家的I2C主机控制器(I2C适配器)的驱动
就比如我们使用的恩智浦家的i2c-imx.c - algos文件夹
实现了一些I2C总线适配器的通信方法
I2C总线驱动
I2C总线驱动重点是I2C适配器(也就是SOC的I2C接口控制器)
用到两个重要的数据结构:i2c_adapter和i2c_algorithm
1、i2c_adapter
struct i2c_adapter {
	struct module *owner;
	unsigned int class;		  /* classes to allow probing for */
	const struct i2c_algorithm *algo; /* the algorithm to access the bus */
	void *algo_data;

	/* data fields that are valid for all devices	*/
	struct rt_mutex bus_lock;

	int timeout;			/* in jiffies */
	int retries;
	struct device dev;		/* the adapter device */

	int nr;
	char name[48];
	struct completion dev_released;

	struct mutex userspace_clients_lock;
	struct list_head userspace_clients;

	struct i2c_bus_recovery_info *bus_recovery_info;
	const struct i2c_adapter_quirks *quirks;
};
2、i2c_algorithm
struct i2c_algorithm {
	/* If an adapter algorithm can't do I2C-level access, set master_xfer
	   to NULL. If an adapter algorithm can do SMBus access, set
	   smbus_xfer. If set to NULL, the SMBus protocol is simulated
	   using common I2C messages */
	/* master_xfer should return the number of messages successfully
	   processed, or a negative value on error */
	int (*master_xfer)(struct i2c_adapter *adap, struct i2c_msg *msgs,
			   int num);
	int (*smbus_xfer) (struct i2c_adapter *adap, u16 addr,
			   unsigned short flags, char read_write,
			   u8 command, int size, union i2c_smbus_data *data);

	/* To determine what the adapter supports */
	u32 (*functionality) (struct i2c_adapter *);

#if IS_ENABLED(CONFIG_I2C_SLAVE)
	int (*reg_slave)(struct i2c_client *client);
	int (*unreg_slave)(struct i2c_client *client);
#endif
};
master_xfer是I2C适配器的传输函数,可以通过此函数来完成与IIC设备之间的通信
smbus_xfer就是SMBUS总线的传输函数
I2C总线驱动,或者说 I2C适配器驱动的主要工作就是初始化 i2c_adapter结构体变量,然后设置 i2c_algorithm中的 master_xfer函数。完成以后通过 i2c_add_numbered_adapter或 i2c_add_adapter这两个函数向系统注册设置好的 i2c_adapter
注册函数:
int i2c_add_adapter(struct i2c_adapter *);
int i2c_add_numbered_adapter(struct i2c_adapter *);
删除I2C适配器:
void i2c_del_adapter(struct i2c_adapter *);
一般SOC的I2C总线驱动都是由半导体厂商编写的,不需要用户去编写,对于我们这些SOC使用者来说是被屏蔽掉的,我们主要专注于I2C设备驱动即可
I2C设备驱动
数据结构
主要关注两个数据结构: i2c_client和i2c_driver
1、i2c_client
struct i2c_client {
	unsigned short flags;		/* div., see below		*/
	unsigned short addr;		/* chip address - NOTE: 7bit	*/
					/* addresses are stored in the	*/
					/* _LOWER_ 7 bits		*/
	char name[I2C_NAME_SIZE];
	struct i2c_adapter *adapter;	/* the adapter we sit on	*/
	struct device dev;		/* the device structure		*/
	int irq;			/* irq issued by device		*/
	struct list_head detected;
#if IS_ENABLED(CONFIG_I2C_SLAVE)
	i2c_slave_cb_t slave_cb;	/* callback for slave mode	*/
#endif
};
2、i2c_driver
类似于platform_driver,是我们编写设备驱动重点要处理的内容
struct i2c_driver {
	unsigned int class;

	/* Notifies the driver that a new bus has appeared. You should avoid
	 * using this, it will be removed in a near future.
	 */
	int (*attach_adapter)(struct i2c_adapter *) __deprecated;

	/* Standard driver model interfaces */
	int (*probe)(struct i2c_client *, const struct i2c_device_id *);
	int (*remove)(struct i2c_client *);

	/* driver model interfaces that don't relate to enumeration  */
	void (*shutdown)(struct i2c_client *);

	/* Alert callback, for example for the SMBus alert protocol.
	 * The format and meaning of the data value depends on the protocol.
	 * For the SMBus alert protocol, there is a single bit of data passed
	 * as the alert response's low bit ("event flag").
	 */
	void (*alert)(struct i2c_client *, unsigned int data);

	/* a ioctl like command that can be used to perform specific functions
	 * with the device.
	 */
	int (*command)(struct i2c_client *client, unsigned int cmd, void *arg);

	struct device_driver driver;
	const struct i2c_device_id *id_table;

	/* Device detection callback for automatic device creation */
	int (*detect)(struct i2c_client *, struct i2c_board_info *);
	const unsigned short *address_list;
	struct list_head clients;
};
这里面也有设备和驱动匹配成功后会执行的probe函数
id_table是传统的未使用设备树的设备匹配ID表
对于我们I2C设备驱动编写人来说,重点工作是构建i2c_driver
注册i2c_driver,使用i2c_register_driver
int i2c_register_driver(struct module *, struct i2c_driver *);
也可以使用i2c_add_driver
#define i2c_add_driver(driver) \
   i2c_register_driver(THIS_MODULE, driver)
实际也是调用i2c_register_driver
注销i2c_driver,使用i2c_del_driver
void i2c_del_driver(struct i2c_driver *);
设备和驱动的匹配过程
I2C设备和驱动的匹配过程是由I2C核心来完成的,\drivers\i2c\i2c-core.c,I2C核心提供了一些与具体硬件无关的API函数
1、 i2c_adapter注册 /注销函数
int i2c_add_adapter(struct i2c_adapter *adapter)
int i2c_add_numbered_adapter(struct i2c_adapter *adap)
void i2c_del_adapter(struct i2c_adapter * adap)
2、 i2c_driver注册 /注销函数
	int i2c_register_driver(struct module *owner, struct i2c_driver *driver)
	int i2c_add_driver (struct i2c_driver *driver)
	void i2c_del_driver(struct i2c_driver *driver)
设备和驱动的匹配过程也是有I2C总线完成的,I2C总线的数据结构为i2c_bus_type
struct bus_type i2c_bus_type = {
	.name		= "i2c",
	.match		= i2c_device_match,
	.probe		= i2c_device_probe,
	.remove		= i2c_device_remove,
	.shutdown	= i2c_device_shutdown,
};
i2c_device_match函数就是总线额定设备和驱动匹配函数
I2C适配器驱动分析
I2C适配器就是SOC的I2C控制器驱动
在设备树中找到IMX6U的I2C1控制器节点
i2c1: i2c@021a0000 {
				#address-cells = <1>;
				#size-cells = <0>;
				compatible = "fsl,imx6ul-i2c", "fsl,imx21-i2c";
				reg = <0x021a0000 0x4000>;
				interrupts = <GIC_SPI 36 IRQ_TYPE_LEVEL_HIGH>;
				clocks = <&clks IMX6UL_CLK_I2C1>;
				status = "disabled";
			};
重点关注compatible 属性值,适配器驱动将根据这个来进行驱动和设备的匹配
在在\drivers\i2c\busses\i2c-imx.c中有如下的代码
static struct platform_device_id imx_i2c_devtype[] = {
	{
		.name = "imx1-i2c",
		.driver_data = (kernel_ulong_t)&imx1_i2c_hwdata,
	}, {
		.name = "imx21-i2c",
		.driver_data = (kernel_ulong_t)&imx21_i2c_hwdata,
	}, {
		/* sentinel */
	}
};
MODULE_DEVICE_TABLE(platform, imx_i2c_devtype);

static const struct of_device_id i2c_imx_dt_ids[] = {
	{ .compatible = "fsl,imx1-i2c", .data = &imx1_i2c_hwdata, },
	{ .compatible = "fsl,imx21-i2c", .data = &imx21_i2c_hwdata, },
	{ .compatible = "fsl,vf610-i2c", .data = &vf610_i2c_hwdata, },
	{ /* sentinel */ }
};
MODULE_DEVICE_TABLE(of, i2c_imx_dt_ids);

static struct platform_driver i2c_imx_driver = {
	.probe = i2c_imx_probe,
	.remove = i2c_imx_remove,
	.driver	= {
		.name = DRIVER_NAME,
		.owner = THIS_MODULE,
		.of_match_table = i2c_imx_dt_ids,
		.pm = IMX_I2C_PM,
	},
	.id_table	= imx_i2c_devtype,
};
其中的i2c_imx_dt_ids就是根据设备树进行匹配的匹配表
我们可以看出imx6的i2c适配器驱动是一个典型的platform驱动
在probe函数中的主要工作
- 初始化 i2c_adapter,设置 i2c_algorithm为i2c_imx_algo,最后向 Linux内核注册i2c_adapter
- 初始化I2C1控制器的相关寄存器
i2c_imx_algo包含I2C1适配器与I2C设备的通信函数,master_xfer
static struct i2c_algorithm i2c_imx_algo = {
	.master_xfer	= i2c_imx_xfer,
	.functionality	= i2c_imx_func,
};
functionality用于返回此I2C适配器支持什么样的通信协议,这里的就是 i2c_imx_func
重点关注i2c_imx_xfer,最终就是通过此函数来完成与I2C设备通信
I2C设备驱动编写流程
I2C设备描述信息
未使用设备树时
在BSP里面使用i2c_board_info结构体来描述一个具体的 I2C设备。
struct i2c_board_info {
	char		type[I2C_NAME_SIZE];
	unsigned short	flags;
	unsigned short	addr;
	void		*platform_data;
	struct dev_archdata	*archdata;
	struct device_node *of_node;
	struct fwnode_handle *fwnode;
	int		irq;
};
type和addr这两个成员变量必须设置,一个是I2C设备名字,一个是I2C器件地址
一般使用宏I2C_BOARD_INFO来设置
#define I2C_BOARD_INFO(dev_type, dev_addr)
	.type = dev_type, .addr = (dev_addr)
例子:static struct i2c_board_info mx27_3ds_i2c_camera = {
		I2C_BOARD_INFO("ov2640", 0x30),
		 };
名字ov2640,期间地址0x30
使用设备树以后
I2C设备描述信息通过创建对应的节点
例子:
&i2c1 {
	clock-frequency = <100000>;
	pinctrl-names = "default";
	pinctrl-0 = <&pinctrl_i2c1>;
	status = "okay";

	mag3110@0e {
		compatible = "fsl,mag3110";
		reg = <0x0e>;
		position = <2>;
	};
	ap3216c@1e {
		compatible = "ap3216c";
		reg = <0x1e>;
	};
};
在I2C1上两个节点mag3110和ap3216c,重点关注compatible和reg,一个用于匹配驱动,一个用于设置器件地址
I2C设备数据收发处理流程
I2C设备驱动首先要做的就是初始化 i2c_driver并向 Linux内核注册。当设备和驱动匹配以后 i2c_driver里面的 probe函数就会执行
一般需要在probe函数中初始化I2C设备,要初始化I2C设备就必须能够对I2C设备寄存器进行读写操作,这里就要用到 i2c_transfer函数了
i2c_transfer函数最终会调用I2C适配器中的master_xfer函数,对于imx6u来说就是 i2c_imx_xfer这个函数
原型如下:
	int i2c_transfer(struct i2c_adapter *adap,
			 struct i2c_msg *msgs,
			 int num)
adap:所使用的I2C适配器,i2c_client会保存其对应的i2c_adapter
msgs:I2C要发送的一个或多个消息
num:消息数量
重点关注msgs这个参数,这是一个i2c_msg类型的指针,I2C进行数据收发就是消息的传递,Linux内核使用i2c_msg结构体来描述一个消息,结构体内容如下
struct i2c_msg {
	__u16 addr;	/* 从机地址*/
	__u16 flags; /*标志位*/
#define I2C_M_TEN		0x0010	/* this is a ten bit chip address */
#define I2C_M_RD		0x0001	/* read data, from slave to master */
#define I2C_M_STOP		0x8000	/* if I2C_FUNC_PROTOCOL_MANGLING */
#define I2C_M_NOSTART		0x4000	/* if I2C_FUNC_NOSTART */
#define I2C_M_REV_DIR_ADDR	0x2000	/* if I2C_FUNC_PROTOCOL_MANGLING */
#define I2C_M_IGNORE_NAK	0x1000	/* if I2C_FUNC_PROTOCOL_MANGLING */
#define I2C_M_NO_RD_ACK		0x0800	/* if I2C_FUNC_PROTOCOL_MANGLING */
#define I2C_M_RECV_LEN		0x0400	/* length will be first received byte */
	__u16 len;		/*消息长度(本msg)*/
	__u8 *buf;		/* 消息数据*/
};
还有两个API函数分别用于I2C数据的收发操作,这两个函数最终都会调 i2c_transfer
int i2c_master_send(const struct i2c_client *client,
			const char *buf,
			int count);
int i2c_master_recv(const struct i2c_client *client,
			char *buf,
			int count);
注意count要小于64KB,因为i2c_msg的len成员变量是一个u16类型的数据
实验代码及分析
我们要实现AP3216C的设备驱动, AP3216C是由DYNA IMAGE推出的一款传感器,其支持环境光强度 (ALS)、接近距离 (PS)和红外线强度 (IR)这三个环境参数检测。该芯片可以通过IIC接口与主控相连,并支持中断
实验代码
修改设备树
1、pinctrl子系统
	pinctrl_i2c1: i2c1grp {
		fsl,pins = <
			MX6UL_PAD_UART4_TX_DATA__I2C1_SCL 0x4001b8b0
			MX6UL_PAD_UART4_RX_DATA__I2C1_SDA 0x4001b8b0
		>;
	};
设置引脚为I2C的功能
2、i2c1节点的设置
&i2c1 {
	clock-frequency = <100000>;
	pinctrl-names = "default";
	pinctrl-0 = <&pinctrl_i2c1>;
	status = "okay";

	mag3110@0e {
		compatible = "fsl,mag3110";
		reg = <0x0e>;
		position = <2>;
	};
	fxls8471@1e {
		compatible = "fsl,fxls8471";
		reg = <0x1e>;
		position = <0>;
		interrupt-parent = <&gpio5>;
		interrupts = <0 8>;
	};
	ap3216c@1e {
		compatible = "ap3216c";
		reg = <0x1e>;
	};
};
在i2c1节点中添加ap3216c节点
clock-frequency属性为I2C的频率,这里设置为100KHZ
pinctrl-0属性指定pinctrl节点
1e为I2C设备的地址
驱动代码
1、ap3216c_reg.h
存放器件相关寄存器地址
#ifndef AP3216C_REG_H
#define AP3216C_REG_H

#define AP3216C_ADDR    	0X1E	/* AP3216C器件地址  */

/* AP3316C寄存器 */
#define AP3216C_SYSTEMCONG	0x00	/* 配置寄存器       */
#define AP3216C_INTSTATUS	0X01	/* 中断状态寄存器   */
#define AP3216C_INTCLEAR	0X02	/* 中断清除寄存器   */
#define AP3216C_IRDATALOW	0x0A	/* IR数据低字节     */
#define AP3216C_IRDATAHIGH	0x0B	/* IR数据高字节     */
#define AP3216C_ALSDATALOW	0x0C	/* ALS数据低字节    */
#define AP3216C_ALSDATAHIGH	0X0D	/* ALS数据高字节    */
#define AP3216C_PSDATALOW	0X0E	/* PS数据低字节     */
#define AP3216C_PSDATAHIGH	0X0F	/* PS数据高字节     */

#endif
2、ap2116c_driver.c
#include 应用代码
#include "stdio.h"
#include "unistd.h"
#include "sys/types.h"
#include "sys/stat.h"
#include "sys/ioctl.h"
#include "fcntl.h"
#include "stdlib.h"
#include "string.h"
#include 代码分析
驱动部分
- 在init函数中我们调用i2c_add_driver来注册一个驱动,传入的参数就是i2c_driver 类型的i2c_add_driver,在i2c_add_driver中我们定义了probe函数、remove函数以及匹配表,当我们加载该驱动文件时会执行init函数,完成驱动和设备(driver和client)的匹配工作,当匹配成功时便会执行probe函数
- I2C设备的client一般放在我们自定义的设备结构体的private_data成员变量中,在probe函数中我们完成字符设备的注册并将client写入private_data
- I2C设备驱动实际上也是一个字符设备驱动所以自然我们也还需要file_operations结构体,在file_operations结构体中我们可以实现供用户层调用的函数
- 在file_operations操作集合中我们使用i2c_transfer来完成数据的发送和读取,这其实就是调用I2C适配器中的master_xfer函数,对于imx6u来说就是 i2c_imx_xfer这个函数,我们需要做的就是填写i2c_msg结构体
- 在open函数中我们一般要完成I2C硬件设备的初始阿(一般通过配置寄存器)
- 在read、write函数中则会进行对数据的读写
- 具体的读取以及初始化逻辑可能各个芯片是不相同的,我们重点要学习的是I2C的驱动框架,理解驱动的操作流程
应用程序部分
应用程序部分的逻辑比较简单就是循环调用read函数从模块读取数据并打印
总结
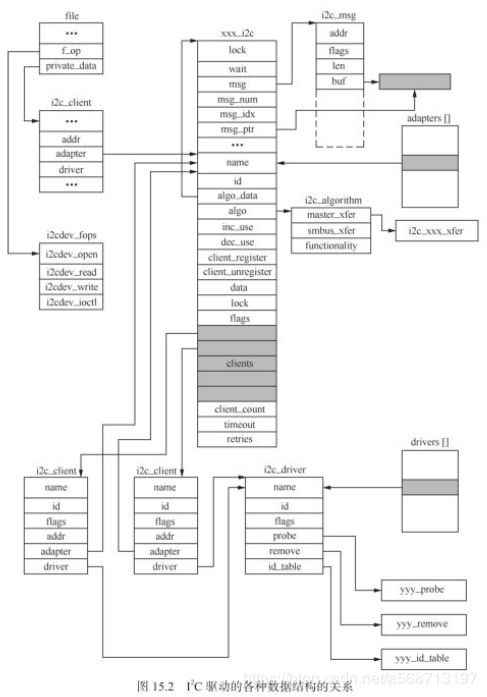
在宋宝华老师的Linux设备驱动开发详解中有这么一张图指明了I2C设备各个结构体的关系

仔细阅读这个图你会发现I2C设备的驱动框架就在你的心中展开
