学习别人的代码,不失为一种自我进步和学习的方式。
第一天,实现一个简单的计时功能的小APP的demo,做下自我的记录,方便日后进行查看;
(PS:总结很早就开始写了,但是由于这几天太忙就没导出时间去写)
首先我是从一个小白的角度去入手这个demo,因此讲解也相对的直白些,还请大牛们见谅,谢谢各位看官了!
首先,咱需要准备下使用到的工具包,,布局使用的是SnapKit的布局项目的包,需要下载这个包到本地,git地址可以google;
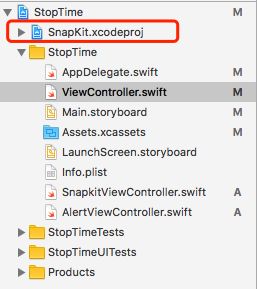
直接进行拖拽就可以实现这个过程,记得要进行拖拽的是Snapkit.xcodeproj的这个文件,

好了,说到这里可以直接上代码了,新建的工程,在ViewController.swift,里面写入相应的控制代码,创建一个代表宏定义的文件SnapKitViewController.swift:
First:在SnapKitViewController.swift的文件中写入以下内容:
import UIKit
//导入相应的包
import SnapKit
//进行配置的宏定义的文件
//定义宽度和长度的宏定义变量
let SCREEN_WIDTH = UIScreen.main.bounds.size.width
let SCREEN_HEIGHT = UIScreen.main.bounds.size.height
//定义两个颜色的变量函数,用于初始化颜色变量的值
var RGBClolor:(CGFloat,CGFloat,CGFloat)->UIColor = {red,green,blue in
    return UIColor(red:red/255,green:green/255,blue:blue/255,alpha:1)
}
var RGBAColor:(CGFloat,CGFloat,CGFloat,CGFloat)->UIColor = { red,green,blue,alpha in
    return UIColor(red:red/255,green:green/255,blue:blue/255,alpha:alpha)
}
Second:编写ViewController.swift的内容:
此文件的内容总结如下,稍后我会分块讲解。
import UIKit

//引入第三方库作为相应的,SnapKit的布局框架

//import SnapKit

class ViewController: UIViewController,alertpickdeleget{


    //添加与相应的空间关联的变量,lazy(懒加载)方式,就是用到的时候在进行加载,懒加载必须使用的是var,因此需要使用()

    //定义相应的控件和相应的time指标
    lazy var topBox = UIView()
    lazy var bottomLeft = UIView()
    lazy var bottomRight = UIView()
    lazy var resetBtn = UIButton()
    lazy var startBtn = UIButton()
    lazy var pauseBtn = UIButton()
    lazy var numberLabel = UILabel()

    var time:Timer!

    //进行展示的view

    override func viewDidLoad() {
        super.viewDidLoad()
        // Do any additional setup after loading the view, typically from a nib.

        /*在展示函数里面写展示的部分的代码
         1.添加相应的view和button放到主页面上进行回掉的过程
         2.添加相应的背景作为显示的控件的背景元素,采用的是宏定义中的相应函数进行的定义
         3.采用的是snapkit的自动布局的框架进行的布局操作,因此可以进行相应的过程
        */
        self.view.addSubview(self.topBox)
        self.view.addSubview(self.bottomLeft)
        self.view.addSubview(self.bottomRight)

        topBox.backgroundColor = RGBClolor(8,1,34)
        bottomRight.backgroundColor = RGBClolor(82,91,252)
        bottomLeft.backgroundColor = RGBClolor(102,189,9)

        topBox.snp.makeConstraints{(make) in
            make.width.equalTo(SCREEN_WIDTH)
            make.height.equalTo(SCREEN_HEIGHT*0.4)
            make.left.equalTo(self.view).offset(0)  //offset设置偏移量
            make.top.equalTo(self.view).offset(0)
        }
        resetBtn.setTitle("重置", for: .normal) //设置重置按钮的标题
        resetBtn.setTitleColor(RGBClolor(255,255,255), for: .normal)
        //增加执行的函数
        resetBtn.addTarget(self, action: #selector(resert), for: .touchUpInside)
        topBox.addSubview(resetBtn)

        //-----------------------------------

        //设定相应的格式,产生相应的显显示字体的过程
        numberLabel.text = "0.0"
        numberLabel.font = UIFont.boldSystemFont(ofSize: 100)
        numberLabel.textColor = UIColor.white
        numberLabel.textAlignment = .center
        topBox.addSubview(self.numberLabel)

        //设定布局格式,定义控件的位置
        numberLabel.snp.makeConstraints{(make) in
            make.center.equalTo(topBox) //相对的布局方式进行布局的过程
            make.width.equalTo(topBox)
            make.height.equalTo(100)
        }

        //-----------------------------------

        //设定resertBtn的布局格式
        resetBtn.snp.makeConstraints{(make) in
            make.width.equalTo(20)
            make.top.equalTo(self.topBox).offset(20)
            make.height.equalTo(20)
            make.right.equalTo(self.topBox.snp.right).offset(-20)
        }

        //-----------------------------------
        //设定bottomleft的布局格式,是view的区域显示的是一个区域的相关的布局
        bottomLeft.snp.makeConstraints{(make) in
            make.width.equalTo(SCREEN_WIDTH*0.5)
            make.top.equalTo(self.topBox.snp.bottom).offset(0)
            make.left.equalTo(self.view)
            make.bottom.equalTo(self.view)
        }

        //设置前端显示的开始的按钮的部分
        startBtn.setTitle("开始", for: .normal)
        startBtn.setTitleColor(UIColor.white, for: .normal)
        startBtn.addTarget(self, action: #selector(start), for: .touchUpInside)
        bottomLeft.addSubview(startBtn)

        //-----------------------------------
        //设定start的布局格式
        startBtn.snp.makeConstraints{(make) in
            make.width.equalTo(bottomLeft)
            make.height.equalTo(bottomLeft)
            make.left.equalTo(bottomLeft).offset(0)
            make.top.equalTo(bottomLeft).offset(0)
        }
        //-----------------------------------
        //处理bootomright的布局部分
        bottomRight.snp.makeConstraints{(make) in
            make.left.equalTo(bottomLeft.snp.right).offset(0)
            make.width.equalTo(bottomLeft)
            make.height.equalTo(bottomLeft)
            make.top.equalTo(topBox.snp.bottom).offset(0)
        }

        //暂停按钮的使用
        pauseBtn.setTitle("暂停", for: .normal)
        pauseBtn.setTitleColor(UIColor.white, for: .normal)
        pauseBtn.isUserInteractionEnabled = true
        pauseBtn.addTarget(self, action: #selector(pause), for: .touchUpInside)
        bottomRight.addSubview(pauseBtn)

        pauseBtn.snp.makeConstraints{(make) in
            make.width.equalTo(bottomRight)
            make.height.equalTo(bottomRight)
            make.left.equalTo(bottomRight).offset(0)
            make.top.equalTo(bottomRight).offset(0)
        }

    }

    override func didReceiveMemoryWarning() {
        super.didReceiveMemoryWarning()
        // Dispose of any resources that can be recreated.
    }

    //清零的点击事件
    func resert(){
        //按钮标签都是可用的,时间控件清零,初始化相应的控件得到相应的初始化信息
        self.startBtn.isUserInteractionEnabled = true
        self.pauseBtn.isUserInteractionEnabled = true
        self.numberLabel.text = "0.0"
        self.time.invalidate()
    }
    //开始按钮按下之后执行的动作
    func start() {
        //首先把按钮制成可用的状态
        startBtn.isUserInteractionEnabled = false
        pauseBtn.isUserInteractionEnabled = true
        //开始按钮使用之后,启动定时器操作的过程,开始进行计时的操作

        self.time = Timer.scheduledTimer(timeInterval: 0.1, target: self, selector: #selector(numberChange), userInfo: self, repeats: true)
        self.time.fire()
    }
    func numberChange()  {
        //显示相应的数字,并以0.1的频率进行增加
        let number = NSString(string: numberLabel.text!).doubleValue//转换成double类型的数字进行显示
        let changeNumber = number+0.1
        numberLabel.text = "\(changeNumber)" //显示相应的字符串信息到界面

    }
    func pause() {
        //暂停按钮的动作

        //self.time.invalidate()
        if(startBtn.isUserInteractionEnabled == false){
            //点击相应的部分弹出提示框
            pauseBtn.isUserInteractionEnabled = false
            startBtn.isUserInteractionEnabled = true
            self.time.invalidate()

        }
        if(startBtn.isUserInteractionEnabled == true && pauseBtn.isUserInteractionEnabled == true){
            //定义相关的操作,变成一个提示框
            /*let alertcanel = AlertViewController()
            alertcanel.deleget = self
            self.present(alertcanel, animated: true, completion: {()->Void in})*/
            //pauseBtn.isUserInteractionEnabled = false

            let alertController = UIAlertController(title: "取消", message: "取消按钮", preferredStyle: .actionSheet)

            let cancelAction = UIAlertAction(title: "取消", style: .cancel, handler: nil)

            alertController.addAction(cancelAction)
            self.present(alertController, animated: true, completion: nil)
        }

    }
    func alertchangefun(image:UIImage) {
        //实现相依协议中的方法
        //self.time.invalidate()
    }

}
代码讲解:
第一部分如下:
//添加与相应的空间关联的变量,lazy(懒加载)方式,就是用到的时候在进行加载,懒加载必须使用的是var,是有闭包的形式,因此需要使用()

    //定义相应的控件和相应的time指标
    lazy var topBox = UIView()
    lazy var bottomLeft = UIView()
    lazy var bottomRight = UIView()
    lazy var resetBtn = UIButton()
    lazy var startBtn = UIButton()
    lazy var pauseBtn = UIButton()
    lazy var numberLabel = UILabel()

    var time:Timer!
此处声明相应使用的变量,因为使用了Snapkit的布局框架,因此前端的布局都是采用的代码的形式进行的编辑。整体的布局需要一个显示时间的

time的变量负责的是进行计时的操作,逻辑上使用的变量。
第二部分如下:
在viewDidLoad的函数中进行操作,首先执行:
self.view.addSubview(self.topBox)
self.view.addSubview(self.bottomLeft)
self.view.addSubview(self.bottomRight)

topBox.backgroundColor = RGBClolor(8,1,34)
bottomRight.backgroundColor = RGBClolor(82,91,252)
bottomLeft.backgroundColor = RGBClolor(102,189,9)
执行这个的过程是对使用SnapKit的框架进行操作的前提,首先把相应的view控件加入到最底层的控件中,是为了进行布局的操作!
之后对topBox进行布局进行相应的snap的过程设置:
topBox.snp.makeConstraints{(make) in
            make.width.equalTo(SCREEN_WIDTH)
            make.height.equalTo(SCREEN_HEIGHT*0.4)
            make.left.equalTo(self.view).offset(0)  //offset设置偏移量
            make.top.equalTo(self.view).offset(0)
        }
通过snap对topbox进行相应的设置
resetBtn.setTitle("重置", for: .normal) //设置重置按钮的标题
resetBtn.setTitleColor(RGBClolor(255,255,255), for: .normal)
//增加执行的函数
 resetBtn.addTarget(self, action: #selector(resert), for: .touchUpInside)
topBox.addSubview(resetBtn)
设置重置按钮,通过addTarget函数进行,通过函数resert进行逻辑上的操作,介绍相应的函数:
//清零的点击事件
    func resert(){
        //按钮标签都是可用的,时间控件清零,初始化相应的控件得到相应的初始化信息
        self.startBtn.isUserInteractionEnabled = true
        self.pauseBtn.isUserInteractionEnabled = true
        self.numberLabel.text = "0.0"
        self.time.invalidate()
    }
self.time.invalidate()是设置相应的初始化函数
之后通过addASubview的函数把这个控件加入到它需要依附的控件;
后面的代码核心和上述的部分类似,只要注意就行;
(PS:好了,不多说了,已经半夜12点多了,改洗洗睡了,好开始一天的工作,自己加油吧,多努力,一点一滴的努力才会让自己长大!!!)