jumpserver安装
#centos6 centos7都可用
yum -y install git python-pip mysql-devel gcc automake autoconf python-devel vim sshpass lrzsz readline-devel
#下载:
#下载0.3.2版本:https://github.com/jumpserver/jumpserver
#src: D:\share\src\jumpserver-master.zip
#安装pip
wget https://bootstrap.pypa.io/get-pip.py
python get-pip.py
#centos7需要以下步聚 yum安装mariadb
    yum install -y mariadb-server mariadb mariadb-devel
    systemctl start mariadb

    [root@localhost /opt/tools 13:52:25&&34]#mysql
    Welcome to the MariaDB monitor.  Commands end with ; or \g.
    Your MariaDB connection id is 3
    Server version: 5.5.56-MariaDB MariaDB Server

    Copyright (c) 2000, 2017, Oracle, MariaDB Corporation Ab and others.

    Type 'help;' or '\h' for help. Type '\c' to clear the current input statement.

    MariaDB [(none)]> CREATE DATABASE `jumpserver` DEFAULT CHARACTER SET utf8 COLLATE utf8_general_ci;
    Query OK, 1 row affected (0.00 sec)

    MariaDB [(none)]> grant all on jumpserver.* to 'jumpserver'@'127.0.0.1' identified by '123456';
    Query OK, 0 rows affected (0.00 sec)

    MariaDB [(none)]> flush privileges;
    Query OK, 0 rows affected (0.00 sec)
#centos6直接用jumpserver新安装mysql
#上传jumpserver-master.zip 到 /opt/tools
cd /opt/tools
unzip jumpserver-master.zip
cd jumpserver-master/install
pip install -r requirements.txt
pip freeze #查看安装的包
python install.py
输入jumpserver的地址,默认为:”192.168.159.10”,回车即可。
是否安装MySQL:centos6选择”y”进行安装 centos7选择no,前面已经装过mariadb
![]()
MySQL 启动后会要求用户输入 邮件服务器及账户(后期用来发送用户名、ssh pass、web pass、ssh key)阿里云关闭25端口,要改用465加密
![]()
输入smtp信息之后发现报错了,是python的pycrypto模块问题,需要卸载重装:
pip uninstall pycrypto
easy_install pycrypto
![]()
![]()
![]()
![]()
安装之后继续 python install.py 进行安装,并且输入 web管理员用户名和管理员密码,ok
![]()
![]()
运行 crontab,定期处理失效连接,定期更新资产信息
cd /opt/tools/jumpserver-master
python manage.py crontab add
![]()
注:
1)根据提示输入相关信息,完成安装,安装完成后,请访问web,继续查看后续文档
2)如果启动失败,请返回上层目录,手动运行 ./service.sh start 启动
3)如果 ./service.sh start 启动失败
cd /opt/tools/jumpserver-master/
python manage.py runserver 0.0.0.0:80
#python run_websocket.py
4)如果启动失败,可能是由于80端口和3000端口已经被占用,或者数据库账号密码不对,请检查
五、Web登录
http://192.168.159.10
到此jumpserver安装完毕。
2)配置和使用jumpserver
2.1) cd /opt/tools/jumpserver-master/
cat jumpserver.conf #这个文件是jumpserver的配置文件。记得更改配置好要重启jumpserver
2.2)使用jumpserver
配置管理用户【此用户是客户机sudo权限的系统用户,客户机指的是要接入jumpserver管理的电脑】
例:192.168.159.10这台机器让jumpserver来管理,需要操作的步骤如下:
(1)客户机上添加管理用户,指拱sudo权限。所有需要让jumpserver来管理的客户机都需要做这个操作。不过私钥跟公钥是共用的
[root@localhost /home 16:47:17&&150]#useradd jump
[root@localhost /home 16:47:22&&151]#su - jump
[jump@localhost ~ 16:47:28&&3]$mkdir .ssh
[jump@localhost ~ 16:47:36&&4]$ssh-keygen -f jump  #一直回车,会在jump家目录下生成ssh公钥和私钥
[jump@localhost ~ 16:50:06&&12]$ls
jump  jump.pub
[jump@localhost ~ 16:50:25&&14]$cat jump.pub > .ssh/authorized_keys
[jump@localhost ~ 16:50:25&&14]$chmod 700 .ssh
[jump@localhost ~ 16:50:25&&14]$chmod 400 .ssh/authorized_keys
[jump@localhost ~ 16:51:20&&14]$exit
logout
[root@localhost /home 16:55:56&&157]#sed -i '/jump/'d /etc/sudoers && sed -i '/^root/a\jump    ALL=(ALL) NOPASSWD: ALL' /etc/sudoers
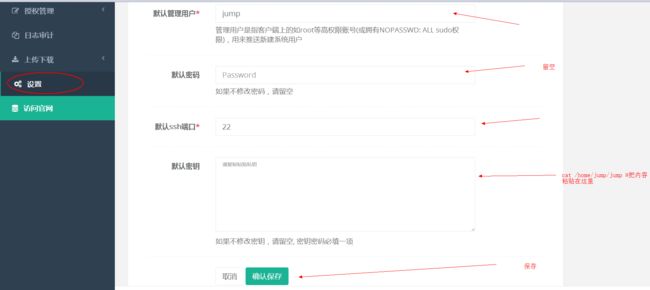
[root@localhost /home/jump 16:57:03&&163]#cat /home/jump/jump #这个私钥 配置jumpserver控制台默认管理用户要使用
(2)jumpserver控制台添加默认管理用户
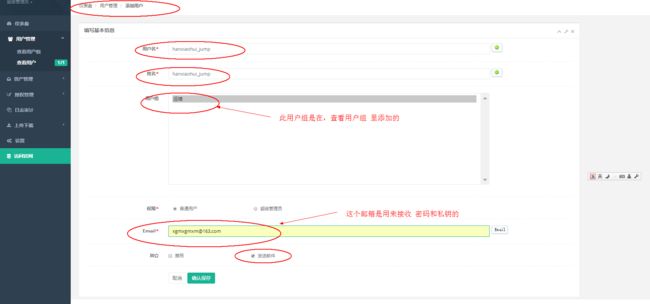
(3)添加jumpserver用户【用来登陆jumpserver控制面板,和xshell登陆jumpserver服务器】
登入邮件可以查看这个账号的密码和私钥下载地址
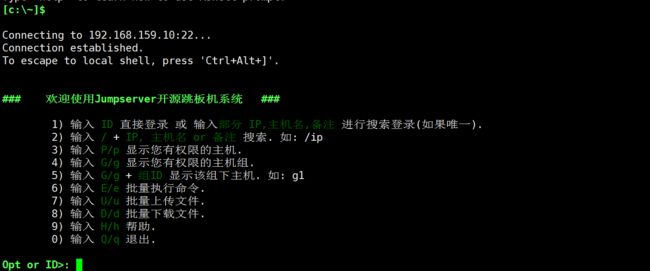
使用账号和私钥及密码登入 xshell jumpserver
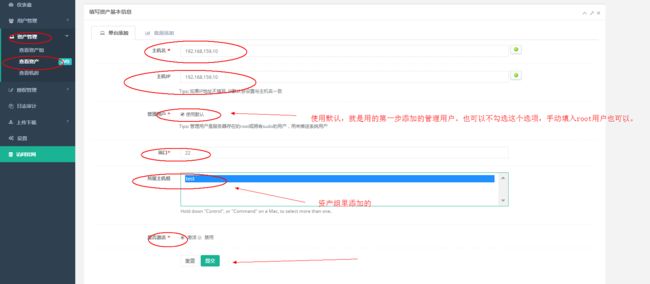
(4)添加资产
(5)授权管理
添加sudo
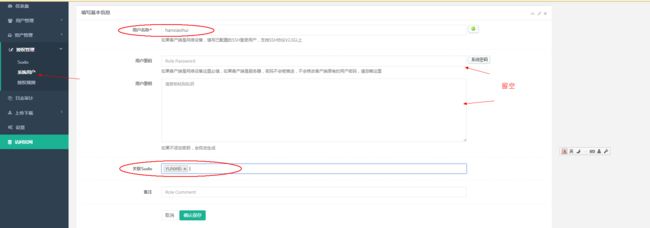
添加系统用户
推送系统用户
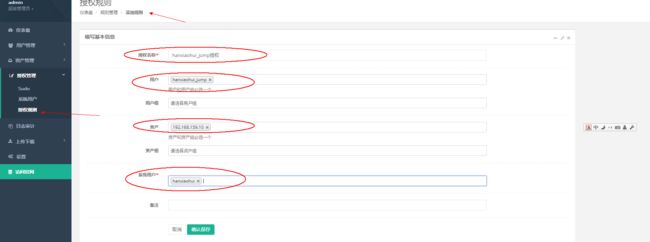
授权规则【授权名随便写,用户选择的是登入jumpserver的用户,选择完资产才能登入那台服务器,系统用户是使用哪个用户去登入服务器】
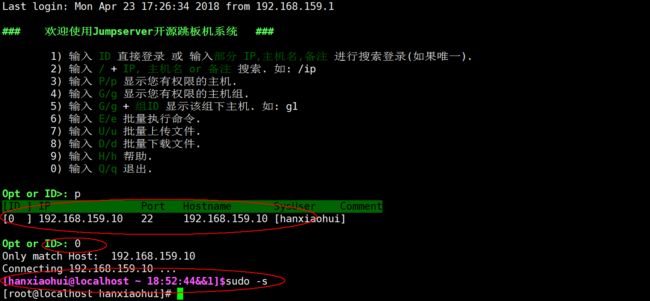
xshell登入服务器
