个人代码地址:https://github.com/zfgod/securityDemo,期待共同学习进步
1.项目环境及说明:
jdk1.7+tomcat7+IDEA14+Maven3.1+Mysql5.6
H5+AngularJs1+SpringMvc+SpringSecurity+Spring4.2.3RELEASE+Mybatis3.1
2.Security加入到项目环境:
2.1 依赖添加:
3.2.3.RELEASE


    org.springframework.security
    spring-security-core
    ${spring.security.version}


    org.springframework.security
    spring-security-config
    ${spring.security.version}


    org.springframework.security
    spring-security-taglibs
    ${spring.security.version}


    org.springframework.security
    spring-security-web
    ${spring.security.version}


    org.springframework.security
    spring-security-acl
    ${spring.security.version}
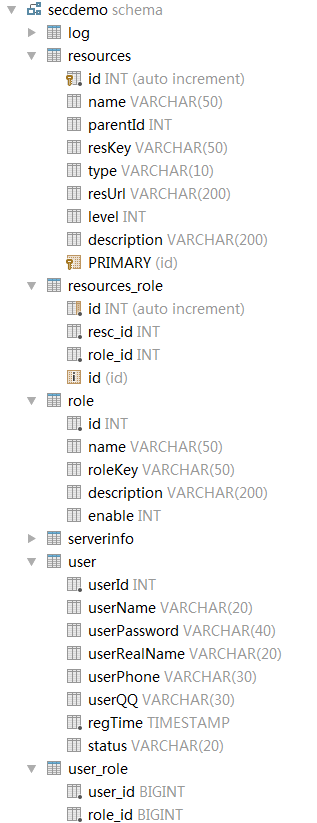
2.2 数据库建立权限表及相应实体相关:
用户user - 角色 role - 权限资源 resource
2.3 security权限设置
spring主配置文件引入spring-security.xml:
重新定义Filter细节:
@Service("mySecurityFilter")
public class MySecurityFilter extends AbstractSecurityInterceptor implements Filter {
	//与spring-security.xml里的myFilter的属性securityMetadataSource对应,
	//其他的两个组件,已经在AbstractSecurityInterceptor定义
	@Autowired
	private MySecurityMetadataSource securityMetadataSource;
	@Autowired
	private MyAccessDecisionManager accessDecisionManager;
	@Autowired
	private AuthenticationManager myAuthenticationManager;

	@PostConstruct
	public void init(){
		super.setAuthenticationManager(myAuthenticationManager);
		super.setAccessDecisionManager(accessDecisionManager);
	}

	@Override
	public SecurityMetadataSource obtainSecurityMetadataSource() {
		return this.securityMetadataSource;
	}

	public void doFilter(ServletRequest request, ServletResponse response,
			FilterChain chain) throws IOException, ServletException {
		FilterInvocation fi = new FilterInvocation(request, response, chain);
		invoke(fi);
	}

	private void invoke(FilterInvocation fi) throws IOException, ServletException {
		InterceptorStatusToken token = super.beforeInvocation(fi);
		try {
			fi.getChain().doFilter(fi.getRequest(), fi.getResponse());
		} finally {
			super.afterInvocation(token, null);
		}
	}

	public void init(FilterConfig arg0) throws ServletException {
	}

	public void destroy() {

	}

	@Override
	public Class getSecureObjectClass() {
		return FilterInvocation.class;
	}
}
a.自定义系统所有权限资源加载和资源路径权限匹配
/**
 * 加载资源与权限的对应关系
 * */
@Service
public class MySecurityMetadataSource implements FilterInvocationSecurityMetadataSource {
	@Autowired
	private ResourcesMapper resourcesMapper;

	private static Map> resourceMap = null;

	public Collection getAllConfigAttributes() {

		return null;
	}

	public boolean supports(Class clazz) {
		return true;
	}
	/**
	 * 加载所有资源与权限的关系
	 */
	@PostConstruct
	private void loadResourceDefine() {
//		System.err.println("-----------MySecurityMetadataSource loadResourceDefine ----------- ");
		if (resourceMap == null) {
			resourceMap = new HashMap>();
			List resources = this.resourcesMapper.findAll();
			ConfigAttribute configAttribute;
			String resUrl;
			for (Resources resource : resources) {
				//通过资源名称来表示具体的权限 注意:必须"ROLE_"开头
				configAttribute = new SecurityConfig("ROLE_" + resource.getResKey());
				resUrl = resource.getResUrl();
				if(resourceMap.containsKey(resUrl)){
					resourceMap.get(resUrl).add(configAttribute);
				}else {
                    //新put key-value,value list必须新建
					Collection configAttributes = new ArrayList();
					configAttributes.add(configAttribute);
					resourceMap.put(resource.getResUrl(), configAttributes);
				}
			}
		}
	}
	/**
	 * 	返回所请求资源路径 所需要的权限
	 */
	public Collection getAttributes(Object object) throws IllegalArgumentException {
		String requestUrl = ((FilterInvocation) object).getRequestUrl();
		if(resourceMap == null) {
			loadResourceDefine();
		}
		if(requestUrl.indexOf("?")> -1){//处理请求地址后面带参数
			requestUrl=requestUrl.substring(0,requestUrl.indexOf("?"));
		}
		Collection configAttributes = resourceMap.get(requestUrl);
            /*如果为null,视为系统未定义的资源路径*/
		if(configAttributes == null){
			configAttributes = resourceMap.get("undefine");//此权限每个用户都不具有,则未加入的url不会通过
		}
		return configAttributes;
	}
}
b.自定义用户登录,加载用户认证资源
in action/controller:
       if(loginFlag){//登录成功
           //进入用户认证
           //session存储
           Authentication authentication = myAuthenticationManager
                   .authenticate(
                           new UsernamePasswordAuthenticationToken(hasUser.getUserName(),hasUser.getUserPassword()));
           SecurityContext securityContext = SecurityContextHolder.getContext();
           securityContext.setAuthentication(authentication);
           session.setAttribute(ParamsUtils.user_security_sedssin, securityContext);
                   // 当验证都通过后,把用户信息放在session里
           session.setAttribute(ParamsUtils.user_sessin, hasUser);
       }
调用myAuthenticationManager.authenticate()进入自定义的用户权限加载:
@Service
public class MyUserDetailServiceImpl implements UserDetailsService {

	@Autowired
	private UserMapper userDao;
	@Autowired
	private ResourcesMapper resourcesDao ;
	// 登录成功 加载用户的资源权限
	public UserDetails loadUserByUsername(String username) throws UsernameNotFoundException {
		// 取得用户的权限
		sys.model.User users = userDao.querySingleUser(username);
		if  (users == null)
            throw new UsernameNotFoundException(username+" not exist!");
		Collection grantedAuths = obtionGrantedAuthorities(users);
		// 封装成spring security的user
        // org.springframework.security.core.userdetails.User
		User userDetail = new User(
				users.getUserName(),
				users.getUserPassword(),
				true, true, true,true,
				grantedAuths	//用户的权限
			);
		return userDetail;
	}

	// 取得用户的权限
	private Set obtionGrantedAuthorities(sys.model.User user) {
		List resources = resourcesDao.getUserResources(String.valueOf(user.getUserName()));
		Set authSet = new HashSet();
		for (Resources res : resources) {
			// (或者说用户所拥有的权限) 注意:必须"ROLE_"开头
			authSet.add(new SimpleGrantedAuthority("ROLE_" + res.getResKey()));
		}
		return authSet;
	}
}
c.自定义认证过程
请求时会先进入MySecurityMetadataSource.getAttributes() 进行路径资源匹配,获取所需权限后进入认证管理器进行认证:
@Service
public class MyAccessDecisionManager implements AccessDecisionManager {
	public void decide(Authentication authentication, Object object, Collection configAttributes)
			throws AccessDeniedException, InsufficientAuthenticationException {
		if(configAttributes == null) {
			return;
		}
		/*所请求的资源拥有的权限(一个资源对多个权限)*/
		Iterator iterator = configAttributes.iterator();
		/*当前用户的资源权限*/
		Collection authorities = authentication.getAuthorities();
		/*多个权限,这里采用只要用户具备其中一个就表示可以通过*/
		ConfigAttribute configAttribute;
		String needPermission;
		while(iterator.hasNext()) {
			configAttribute = iterator.next();
			//访问请求资源所需要的权限
			needPermission = configAttribute.getAttribute();
			//用户所拥有的权限authentication
			for(GrantedAuthority ga : authorities) {
				if(needPermission.equals(ga.getAuthority())) {
					return;
				}
			}
		}
		throw new AccessDeniedException(" 没有权限访问! ");
	}

	public boolean supports(ConfigAttribute attribute) {
		return true;
	}

	public boolean supports(Class clazz) {
		return true;
	}
}
2.4 项目security运行流程:
a. 系统启动,装载整个系统配置的权限资源
b. 自定义用户登录,登录成功调用 security: authenticate(userName,password)
进入自定义的登录用户的权限资源装载:将会获取用户持有的权限资源,转为SecurityContext,存入session
c. 用户访问资源及操作:security 在action之前进去拦截,根据url获取所需权限信息并进入自定义的认证
