ov7670的移植(寄存器的配置)——基于tq2440
前言
前几天分析了ov9650的驱动,觉得还看得懂吧。于是开始移植代码,驱动ov7670。其实那个ov9650的驱动程序架构并不好。没有使用v4l2的驱动架构,这样应用就不能用完美使用v4l2的接口了。还有,他只是采集了p-path。并没有对c-path进行任何处理,也没开放什么接口。本文主要想讲讲s3c2440的camera接口和ov7670的寄存器配置。
一、开发环境
1.开发板:tq2440(s3c2440)
2.摄像头: ov7670
二、接口电路
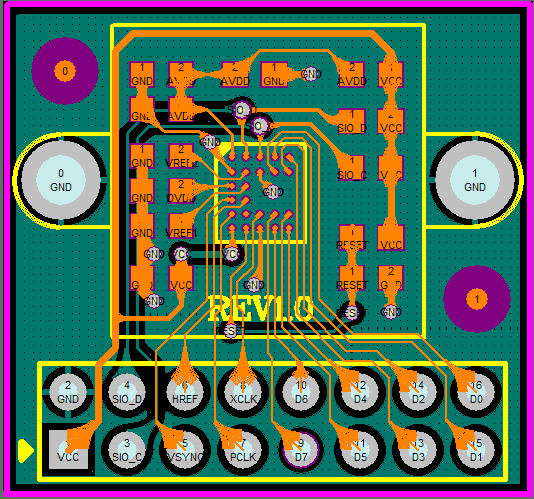
下面是我买来的ov7670的摄像头的pcb图,重点是它的引脚图。为了与tq2440的camera接口更好的做比较,我把他们放在一起吧。
我选的是3.3v的那个vdd,这根据摄像头模块要求吧。所以这里VCC-VDD33V,当我把ov7670的管脚全部接到camera接口上时,我发现这接口上有两个口,这个ov7670模块没有。是CAMRST和ENIT19。查一下datasheet,这CAMRST是用来复位cmos摄像头。原来的ov9650应是想通过驱动将该管脚拉高,从而产生硬复位。但很遗憾,这个ov9650的驱动程序并没有这么做。而我们这ov7670模块则直接将这个口连到VCC,通俗易懂。还有一个是ENIT19,这个口在ov9650的驱动程序里看到了他的用法,
staticvoid __inline__ ov9650_poweron(void)
{
s3c2410_gpio_cfgpin(S3C2410_GPG11,S3C2410_GPG11_OUTP);
s3c2410_gpio_setpin(S3C2410_GPG11,0);
mdelay(20);
}
这里的S3C2410_GPG11就是ENIT19了,目的就是用通断cmos摄像头的电。至于是高还是低电平,那要看电路设计。我这个ov7670模块没有放出这个控制口。
温馨提醒:这个东东不支持热插拔,所以请在断电情况下连接!
三、s3c2440camera interface
1.简介
下面的简介是抄自datasheet的,个人认为是学这个接口,需要知道的基础知识吧
s3c2440的摄像头接口支持ITU-RBT.601/656 YCbCr 8-bit 标准,最大的输入分辨率是4096×4096pixels(2048×2048可缩放)和拥有两个转换器。预览转换器专用于将图片缩小,就像PIP(picturein picture),而编码器专注于将图片编码,就像编成YCbCr4:2:0 or4:2:2.两个主DMA通道能对图片取镜像和旋转图片,以适应移动环境。这些特性在折叠式移动手机真的非常有用,并且他的测试模式在标准化的输入信号如CAMHREF,CAMVSYNC也相当有用。
FEATURES
— ITU-RBT. 601/656 8-bit mode external interface support
— DZI(Digital Zoom In) capability
— Programmablepolarity of video sync signals
— Max.4096 x 4096 pixel input support without scaling (2048 x 2048 pixelinput support with scaling)
— Max.4096 x 4096 pixel output support for CODEC path
— Max.640 x 480 pixel output support for PREVIEW path
— Imagemirror and rotation (X-axis mirror, Y-axis mirror, and 180°rotation)
— PIPand codec input image generation (RGB 16/24-bit format and YCbCr4:2:0/4:2:2 format)
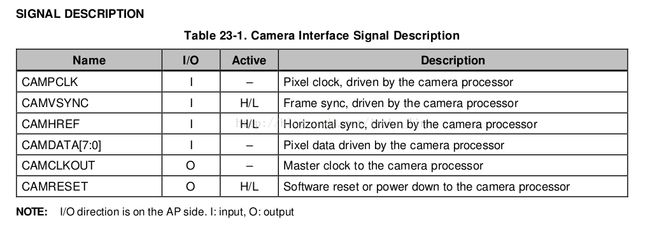
2、信号描述
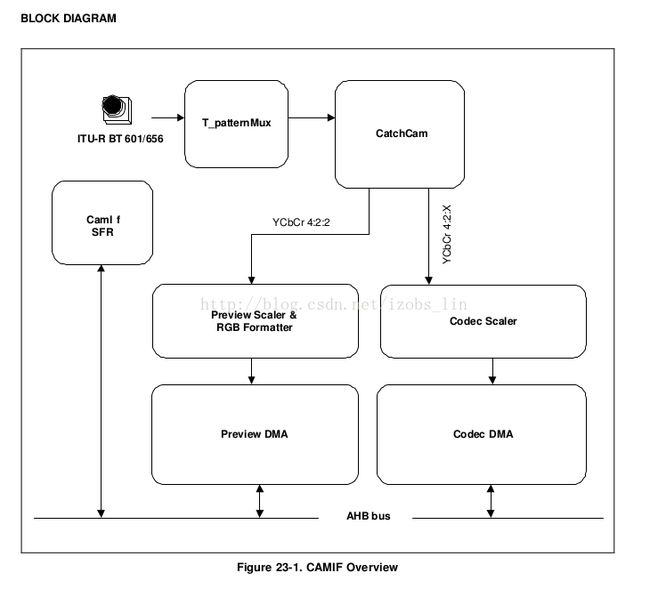
3.框图
4.摄像头接口的操作
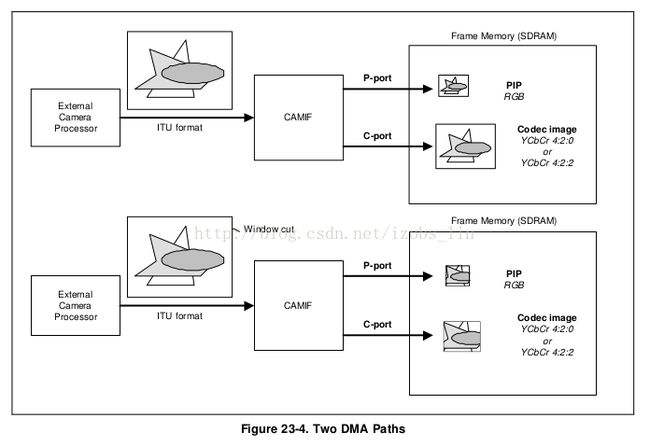
(1)两个DMA管道
CAMIF有2个DMA管道。P-path(预览管道)和C-path(编码管道)被分开接AHB总线上。从系统总线的角度看,这两条管道是独立的。P-path储存RGB格式的图片数据到内存中,以便生成预览。C-path保存YCbCr4:2:0或4:2:2图片数据到内存中,以便编码成MPEG-4,H.263等视频格式。
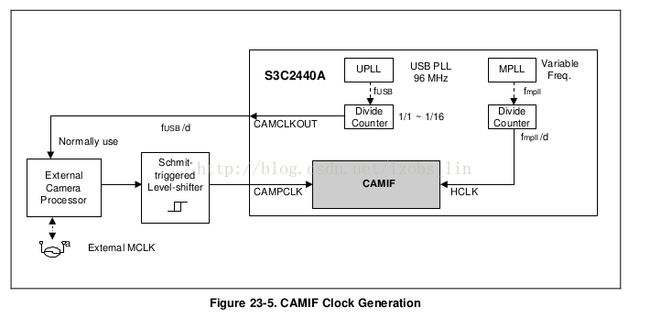
(2)时钟方面(linux下的clk http://blog.csdn.net/bingqingsuimeng/article/category/1228965)
CAMIF有两个时钟。一个是系统总线时钟,HCLK;另一个像素时钟,CAMPCLK。HCLK一定要比CAMPCLK快。
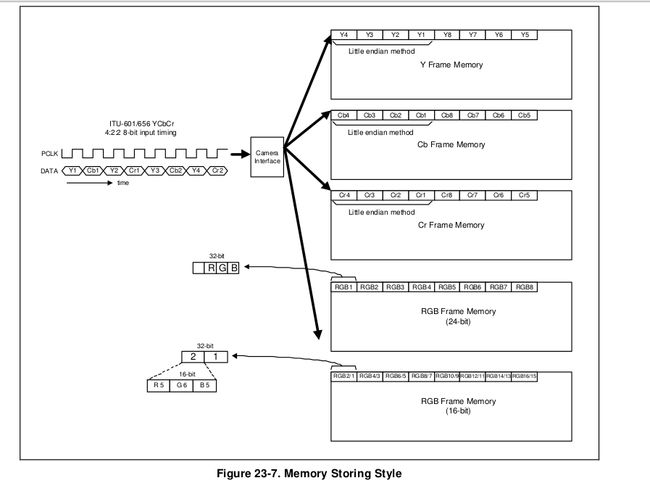
(3)内存储存方法
在c-path采用的二进制储存方法被使用于图片储存。像素数据的储存是从地位到高位的。AHB总线输送字符数据,CAMIF将每个Y-Cb-Cr字符储存成二进制。在p-path存在两种不同的格式。对于RGB24-bit格式一个像素点就是一个字符。或者,对于RGB16-bit两个像素点就是一个字符。如下图:
5.寄存器的设置时序图
第一个寄存器的设置是图片捕捉命令能出现在任何地方。不过,他推荐你先把CAMVSYNC设置成低状态,并且CAMVSYNC的信息能够从SFR状态读出。所有的命令,包括ImCptEn在CAMVSYNC的下降延都是有效的的。注意:除了第一个SFR设置,所有的指令都应该以中断的方式编写(interrupt service routine)。特别地,当与捕捉相关的信息和目标大小发生改变时,捕捉操作应该停止。
6、LastIRQ
IRQexcept LastIRQ is generated before image capturing. Last IRQ whichmeans capture-end can be set by following timing diagram. LastIRQEnis auto-cleared and ,as mentioned, SFR setting in ISR is for nextframe command. So, for adequate last IRQ, you should follow nextsequence between LastIRQEn and ImgCptEn /ImgCptEn_CoSc/ImgCptEnPrSC.It is recommended that ImgCptEn /ImgCptEn_CoSc /ImgCptEnPrSC are setat same time and at last of SFR setting in ISR. FrameCnt which isread in ISR, means next frame count. On following diagram, lastcaptured frame count is “1”. That is, Frame 1 is thelast-captured frame among frame 0~3. FrameCnt is increased by 1 atIRQ rising.
2、寄存器的配置
这个部分有些东东会必需ov7670的寄存器配置一起讲,毕竟接口是双方的,所以不要觉得太跳。
一切开始于camif_open()函数.关系如下
camif_open()——>init_camif_config(fh)——>update_camif_config(fh,CAMIF_CM_STOP)—— > update_camif_regs(fd-dev)——>{
update_source_fmt_regs(pdev);
update_target_wnd_regs(pdev);
update_target_fmt_regs(pdev);
update_target_zoom_regs(pdev);
}
下面一个一个函数讲吧。
(1)update_source_fmt_regs(pdev)
/* update CISRCFMT only. */
static void __inline__ update_source_fmt_regs(struct ov7670_camif_dev * pdev)
{
	u32 cisrcfmt;
	u32 recisrcfmt;

	recisrcfmt = ioread32(S3C244X_CISRCFMT);
       #if DEBUG_CAMIF
	printk(DEVICE_NAME"--------------before write, S3C244X_CISRCFMT is %x\n",recisrcfmt);
	#endif

	cisrcfmt = (1<<31)					// ITU-R BT.601 YCbCr 8-bit mode
		|(0<<30)				// CB,Cr value offset cntrol for YCbCr
		|(pdev->srcHsize<<16)	// source image width,640
		|(0<<14)				// input order is CbYCrY,480
		|(pdev->srcVsize<<0);	// source image height

	iowrite32(cisrcfmt, S3C244X_CISRCFMT);
	mdelay(3);

	recisrcfmt = ioread32(S3C244X_CISRCFMT);
	#if DEBUG_CAMIF
	printk(DEVICE_NAME"--------------after wirte,the S3C244X_CISRCFMT is %x\n",recisrcfmt);
	#endif
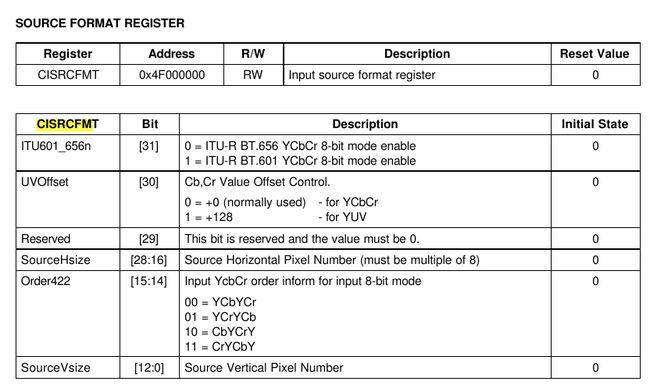
}先看第一个寄存器S3C244X_CISRCFMT
s3c2440的输入源格式必须是YCbCr的,而我选的是ITU-RBT.601 YCbCr 8-bitmode,下面很重要的一个就是YCbCr的排列顺序。我用的是YCbYCr,即00,这必需与ov7670的YUV输出格式一致,在ov7670的datasheet中,也必需选00,下面是0v7670 datasheet的相关描述
(2 )update_target_wnd_regs(pdev)
/* update CIWDOFST only. */
static void __inline__ update_target_wnd_regs(struct ov7670_camif_dev * pdev)
{
	u32 ciwdofst;
	u32 reciwdofst;
	u32 winHorOfst, winVerOfst;

	winHorOfst = (pdev->srcHsize – pdev->wndHsize)>>1;  //水平偏移量
	winVerOfst = (pdev->srcVsize – pdev->wndVsize)>>1;//垂直偏移量

	winHorOfst &= 0xFFFFFFF8;
	winVerOfst &= 0xFFFFFFF8;
	if ((winHorOfst == 0)&&(winVerOfst == 0))
	{
		ciwdofst = 0;	// disable windows offset.
	}
	else
	{
		ciwdofst = (1<<31)			// window offset enable
			|(1<<30)			// clear the overflow ind flag of input CODEC FIFO Y
			|(winHorOfst<<16)		// windows horizontal offset
			|(1<<15)			// clear the overflow ind flag of input CODEC FIFO Cb
			|(1<<14)			// clear the overflow ind flag of input CODEC FIFO Cr
			|(1<<13)			// clear the overflow ind flag of input PREVIEW FIFO Cb
			|(1<<12)			// clear the overflow ind flag of input PREVIEW FIFO Cr
			|(winVerOfst<<0);		// window vertical offset
	}

	iowrite32(ciwdofst, S3C244X_CIWDOFST);

	#if DEBUG_CAMIF
	mdelay(1);
	reciwdofst = ioread32(S3C244X_CIWDOFST);
	printk(DEVICE_NAME"----------S3C244X_CIWDOFST is %x\n",reciwdofst);
	#endif


	#if DEBUG
	printk(DEVICE_NAME"----update_target_wnd_regs is done\n");
	#endif
}看到datasheet的描述如下:
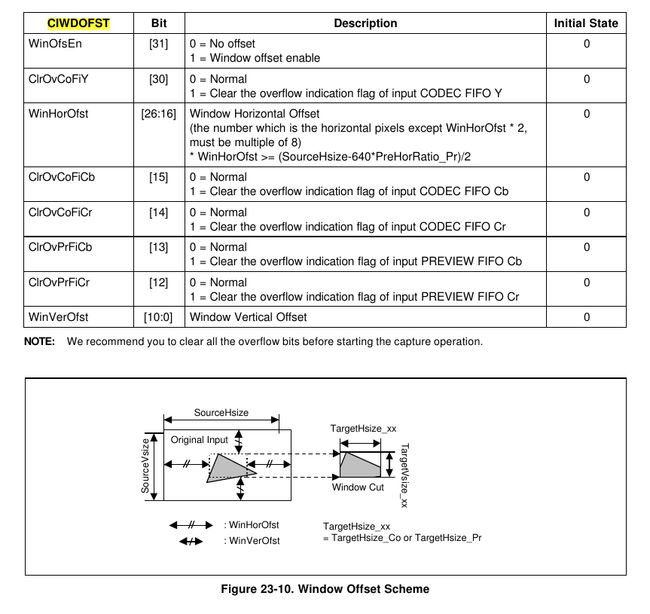
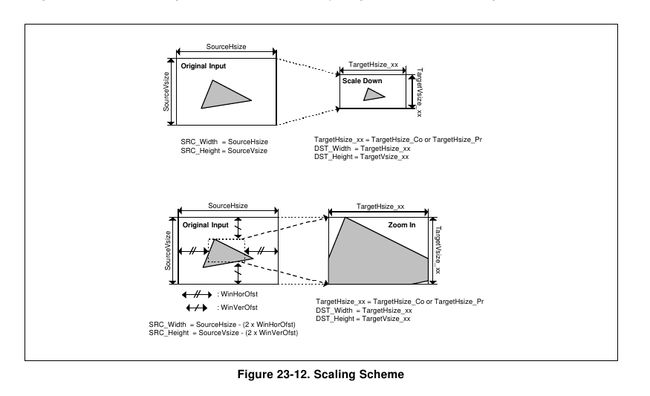
这个寄存器其实就是对sourimage进行裁剪,截出来的就是Target image。所以target image的大小与window image的大小相同。
3.update_target_fmt_regs(pdev)
static void __inline__ update_target_fmt_regs(struct ov7670_camif_dev * pdev)
{
	u32 ciprtrgfmt;
	u32 ciprctrl;
	u32 ciprscctrl;

	u32 reciprtrgfmt;
	u32 reciprctrl;

	u32 mainBurstSize, remainedBurstSize;

	/* CIPRCLRSA1 ~ CIPRCLRSA4. */
        /*RGB frame start address for preview DMA,p-path is RGB*/
	iowrite32(img_buff[0].phy_base, S3C244X_CIPRCLRSA1);
	iowrite32(img_buff[1].phy_base, S3C244X_CIPRCLRSA2);
	iowrite32(img_buff[2].phy_base, S3C244X_CIPRCLRSA3);
	iowrite32(img_buff[3].phy_base, S3C244X_CIPRCLRSA4);

	/* CIPRTRGFMT. */
	ciprtrgfmt =	(pdev->preTargetHsize<<16)		// horizontal pixel number of target image
			|(0<<14)						// don't mirror or rotation.
			|(pdev->preTargetVsize<<0);	// vertical pixel number of target image
	iowrite32(ciprtrgfmt, S3C244X_CIPRTRGFMT);


	#if DEBUG_CAMIF
	mdelay(3);
	reciprtrgfmt = ioread32(S3C244X_CIPRTRGFMT);
	printk(DEVICE_NAME"--------------the CIPRTRGFMT is %x\n",reciprtrgfmt);
	#endif


	/* CIPRCTRL. */
	/*RGB 16-bit ,2 pixle/word ,mB=16,rB=16*/
	calc_burst_size(2, pdev->preTargetHsize, &mainBurstSize, &remainedBurstSize);    //2 pixle a word
	ciprctrl = (mainBurstSize<<19)|(remainedBurstSize<<14);
	ciprctrl = ciprctrl|(1<<2);

	iowrite32(ciprctrl, S3C244X_CIPRCTRL);

	#if DEBUG_CAMIF
	mdelay(3);
	reciprctrl=ioread32(S3C244X_CIPRCTRL);
	printk(DEVICE_NAME"--------------the S3C244X_CIPRCTRL is %x\n",reciprctrl);
	#endif


	/* CIPRSCCTRL. */
	ciprscctrl = ioread32(S3C244X_CIPRSCCTRL);

	#if DEBUG_CAMIF
	printk(DEVICE_NAME"-------------before write,S3C244X_CIPRSCCTRL, is %x\n",ciprscctrl);
	#endif

	/* CIPRSCCTRL. */
	ciprscctrl &= 1<<15;	// clear all other info except 'preview scaler start'.
	ciprscctrl |= 0<<30;	// 16-bits RGB
	iowrite32(ciprscctrl, S3C244X_CIPRSCCTRL);	// 16-bit RGB

	#if DEBUG_CAMIF
	mdelay(1);
	ciprscctrl = ioread32(S3C244X_CIPRSCCTRL);
	printk(DEVICE_NAME"--------------S3C244X_CIPRSCCTRL is %x\n",ciprscctrl);
	#endif

	/* CIPRTAREA. */
	iowrite32(pdev->preTargetHsize * pdev->preTargetVsize, S3C244X_CIPRTAREA);

	#if DEBUG
	printk(DEVICE_NAME"----update_target_fmt_regs is done\n");
	#endif
}
这个函数涉及三个寄存器,一个个看:
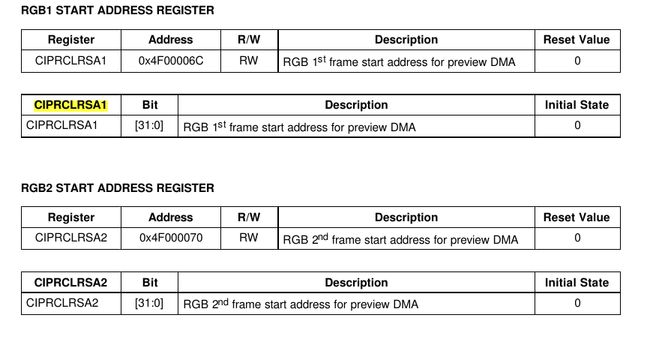
这四个寄存器放p-path的frame DMA地址,每个存放一个frame,一共四个。
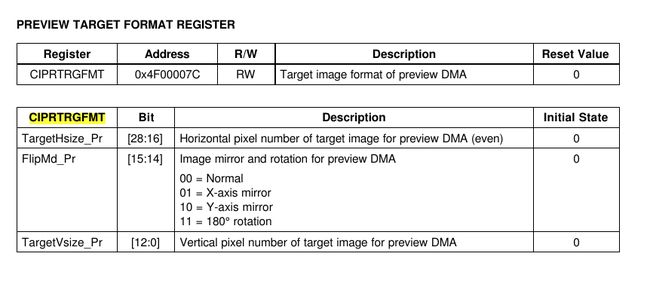
这个是CIPRTRGFMT寄存器,通过配置这个寄存器可实现图片的旋转和镜像。它还存放着target image 的大小。
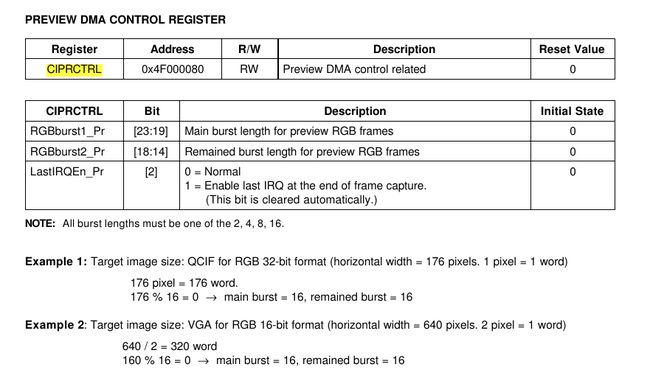
接下来是CIPRCTRL:
这个burst size和remain burst size的计算函数如下:
/* calculate main burst size and remained burst size. */
static void __inline__ calc_burst_size(u32 pixperword,u32 hSize, u32 *mainBurstSize, u32 *remainedBurstSize)
{
	u32 tmp;

	tmp = (hSize/pixperword)%16;

	switch(tmp)
	{
	case 0:
		*mainBurstSize = 16;
		*remainedBurstSize = 16;
		break;
	case 4:
		*mainBurstSize = 16;
		*remainedBurstSize = 4;
		break;
	case 8:
		*mainBurstSize=16;
		*remainedBurstSize = 8;
		break;
	default:
	       tmp=(hSize/pixperword)%8;
		switch(tmp)
		{
		case 0:
			*mainBurstSize = 8;
			*remainedBurstSize = 8;
			break;
		case 4:
			*mainBurstSize = 8;
			*remainedBurstSize = 4;
		default:
			*mainBurstSize = 4;
			tmp = (hSize/pixperword)%4;
			*remainedBurstSize = (tmp)?tmp:4;
			break;
		}
		break;
	}
}这里特别提一下,这里的LastIRQEN最好是enable,它能保证输出图片的稳定。
4.update_target_zoom_regs(pdev)
static void __inline__ update_target_zoom_regs(struct ov7670_camif_dev * pdev)
{
	u32 preHratio, preVratio;
	u32 Hshift, Vshift;
	u32 shfactor;
	u32 preDstWidth, preDstHeight;
	u32 Hscale, Vscale;
	u32 mainHratio, mainVratio;

	u32 ciprscpreratio;
	u32 ciprscpredst;
	u32 ciprscctrl;


	/* CIPRSCPRERATIO. */
	calc_prescaler_ratio_shift(pdev->wndHsize, pdev->preTargetHsize, &preHratio, &Hshift);
	calc_prescaler_ratio_shift(pdev->wndVsize, pdev->preTargetVsize, &preVratio, &Vshift);

	shfactor = 10 - (Hshift + Vshift);

	ciprscpreratio =	(shfactor<<28)		// shift factor for preview pre-scaler
			|(preHratio<<16)		// horizontal ratio of preview pre-scaler
			|(preVratio<<0);		// vertical ratio of preview pre-scaler
	iowrite32(ciprscpreratio, S3C244X_CIPRSCPRERATIO);

	/* CIPRSCPREDST. */
	preDstWidth = pdev->wndHsize / preHratio;
	preDstHeight = pdev->wndVsize / preVratio;
	ciprscpredst =	(preDstWidth<<16)		// destination width for preview pre-scaler
		   	|(preDstHeight<<0);		// destination height for preview pre-scaler
	iowrite32(ciprscpredst, S3C244X_CIPRSCPREDST);

	/* CIPRSCCTRL. */
	Hscale = (pdev->wndHsize >= pdev->preTargetHsize)?0:1;
	Vscale = (pdev->wndVsize >= pdev->preTargetVsize)?0:1;
	mainHratio = (pdev->wndHsize<<8)/(pdev->preTargetHsize<wndVsize<<8)/(pdev->preTargetVsize<
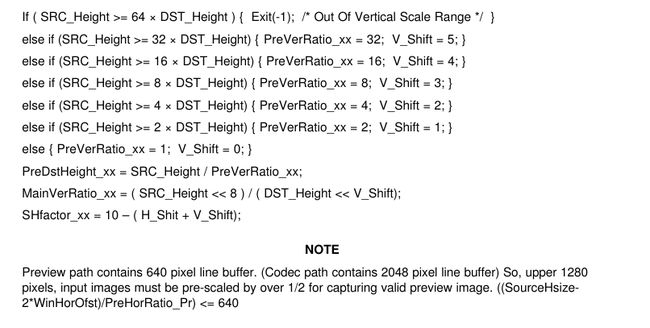
这个寄存器写的是长宽的缩放比率,datasheet 描述如下:
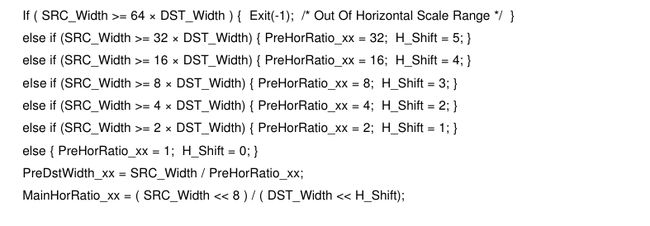
下面是这个算法代码实现:
staticvoid __inline__ calc_prescaler_ratio_shift(u32 SrcSize, u32 DstSize,u32 *ratio, u32 *shift)

{

if(SrcSize>=32*DstSize)

{

*ratio=32;

*shift=5;

}

elseif(SrcSize>=16*DstSize)

{

*ratio=16;

*shift=4;

}

elseif(SrcSize>=8*DstSize)

{

*ratio=8;

*shift=3;

}

elseif(SrcSize>=4*DstSize)

{

*ratio=4;

*shift=2;

}

elseif(SrcSize>=2*DstSize)

{

*ratio=2;

*shift=1;

}

else

{

*ratio=1;

*shift=0;

}

}
四、ov7670的寄存器配置
ov7670的寄存器真是太多了,而且有些设置要几个寄存器一起配置。
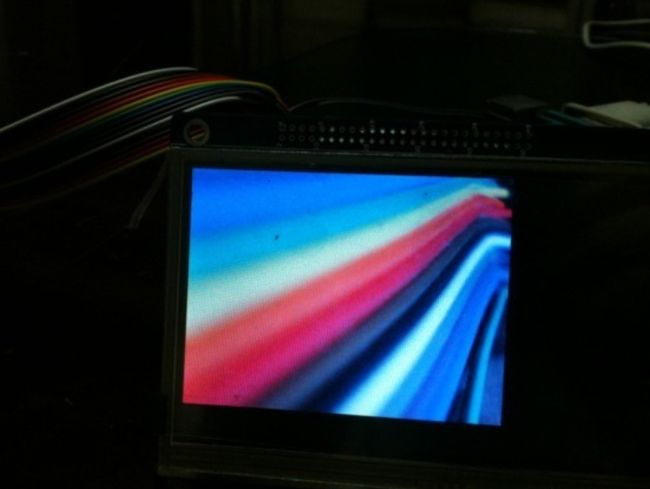
1.彩条测试
在开始摄像拍摄之前,应该先开始ov7670的摄像头的彩条测试模式,从而判断那个YUV的排列顺序是否准确。数据传输等是否正确。下面是ov7670的datasheet:
配置0x70=0x00,0x70 = 0x80,可以出来彩条。
2.我的寄存器配置
这个寄存器配置是根据内核的ov7670的寄存器配置表改的,我输出的是VGA(640*480),YUYV。
static struct ov7670_reg
{
	u8 subaddr;
	u8 value;
}
regs[] = {
	{ REG_COM7, COM7_RESET },
/*
 * Clock scale: 3 = 15fps
 *              2 = 20fps
 *              1 = 30fps
 */

        { REG_CLKRC, 0x1 },	/* OV: clock scale (30 fps) */
	{ REG_TSLB,  0x04 },	/* OV */
	{ REG_COM7, 0x00 },	/* VGA */
	/*
	 * Set the hardware window.  These values from OV don't entirely
	 * make sense - hstop is less than hstart.  But they work...
	 */
	{ REG_HSTART, 0x13 },	{ REG_HSTOP, 0x01 },
	{ REG_HREF, 0xb6 },	{ REG_VSTART, 0x02 },
	{ REG_VSTOP, 0x7a },	{ REG_VREF, 0x0a },

	{ REG_COM3, 0 },	{ REG_COM14, 0 },
	/* Mystery scaling numbers */
	{ 0x70, 0x3a },		{ 0x71, 0x35 },
	{ 0x72, 0x11 },		{ 0x73, 0xf0 },
	{ 0xa2, 0x02 },		{ REG_COM10, 0x0 },

/* Gamma curve values */
	{ 0x7a, 0x20 },		{ 0x7b, 0x10 },
	{ 0x7c, 0x1e },		{ 0x7d, 0x35 },
	{ 0x7e, 0x5a },		{ 0x7f, 0x69 },
	{ 0x80, 0x76 },		{ 0x81, 0x80 },
	{ 0x82, 0x88 },		{ 0x83, 0x8f },
	{ 0x84, 0x96 },		{ 0x85, 0xa3 },
	{ 0x86, 0xaf },		{ 0x87, 0xc4 },
	{ 0x88, 0xd7 },		{ 0x89, 0xe8 },

	/* AGC and AEC parameters.  Note we start by disabling those features,
	   then turn them only after tweaking the values. */
	{ REG_COM8, COM8_FASTAEC | COM8_AECSTEP | COM8_BFILT },
	{ 0x01, 0x58 }, { 0x02, 0x68 },
	{ REG_GAIN, 0 },	{ REG_AECH, 0 },
	{ REG_COM4, 0x40 }, /* magic reserved bit */
	{ REG_COM9, 0x18 }, /* 4x gain + magic rsvd bit */
	{ REG_BD50MAX, 0x05 },	{ REG_BD60MAX, 0x07 },
	{ REG_AEW, 0x95 },	{ REG_AEB, 0x33 },
	{ REG_VPT, 0xe3 },	{ REG_HAECC1, 0x78 },
	{ REG_HAECC2, 0x68 },	{ 0xa1, 0x03 }, /* magic */
	{ REG_HAECC3, 0xd8 },	{ REG_HAECC4, 0xd8 },
	{ REG_HAECC5, 0xf0 },	{ REG_HAECC6, 0x90 },
	{ REG_HAECC7, 0x94 },
	{ REG_COM8, COM8_FASTAEC|COM8_AECSTEP|COM8_BFILT|COM8_AGC|COM8_AEC },

	/* Almost all of these are magic "reserved" values.  */
	{ REG_COM5, 0x61 },	{ REG_COM6, 0x4b },
	{ 0x16, 0x02 },		{ REG_MVFP, 0x27 },
	{ 0x21, 0x02 },		{ 0x22, 0x91 },
	{ 0x29, 0x07 },		{ 0x33, 0x0b },
	{ 0x35, 0x0b },		{ 0x37, 0x1d },
	{ 0x38, 0x71 },		{ 0x39, 0x2a },
	{ REG_COM12, 0x78 },	{ 0x4d, 0x40 },
	{ 0x4e, 0x20 },		{ REG_GFIX, 0 },
	{ 0x6b, 0x0a },		{ 0x74, 0x10 },
	{ 0x8d, 0x4f },		{ 0x8e, 0 },
	{ 0x8f, 0 },	{0x92, 19 },	{ 0x90, 0 },
	{ 0x91, 0 }, 		{ 0x96, 0 },
	{ 0x9a, 80 },		{ 0xb0, 0x84 },
	{ 0xb1, 0x0c },		{ 0xb2, 0x0e },
	{ 0xb3, 0x82 },		{ 0xb8, 0x0a },


	/* More reserved magic, some of which tweaks white balance */
	{ 0x43, 0x14 },		{ 0x44, 0xf0 },
	{ 0x45, 0x34 },		{ 0x46, 0x58 },
	{ 0x47, 0x28 },		{ 0x48, 0x3a },
	{ 0x59, 0x88 },		{ 0x5a, 0x88 },
	{ 0x5b, 0x44 },		{ 0x5c, 0x67 },
	{ 0x5d, 0x49 },		{ 0x5e, 0x0e }, { 0x64, 0x04 }, { 0x65, 0x20 }, { 0x66, 0x05 }, { 0x94, 0x04 }, { 0x95, 0x08 },
	{ 0x6c, 0x0a },		{ 0x6d, 0x55 },
	{ 0x6e, 0x11 },		{ 0x6f, 0x9f }, /* "9e for advance AWB" */
	{ 0x6a, 0x40 },		{ REG_BLUE, 0x40 },
	{ REG_RED, 0x40 },
	{ REG_COM8, COM8_FASTAEC|COM8_AECSTEP|COM8_BFILT|COM8_AGC|COM8_AEC|COM8_AWB },


	/* Matrix coefficients */
	/*
	{ 0x4f, 0x80 },		{ 0x50, 0x80 },
	{ 0x51, 0 },		{ 0x52, 0x22 },
	{ 0x53, 0x5e },		{ 0x54, 0x80 },
	{ 0x58, 0x9e },

	{ REG_COM16, COM16_AWBGAIN },	{ REG_EDGE, 0 },
	{ 0x75, 0x04 },		{ 0x76, 0xe1 },
	{ 0x4c, 0 },		{ 0x77, 0x01 },
	{ REG_COM13, 0xc2 },	{ 0x4b, 0x09 },
	{ 0xc9, 0x60 },		{ REG_COM16, 0x38 },
	{ 0x56, 0x40 },

	{ 0x34, 0x11 },		{ REG_COM11, 0x0a },
	{ 0xa4, 0x88 },		{ 0x96, 0 },
	{ 0x97, 0x30 },		{ 0x98, 0x20 },
	{ 0x99, 0x30 },		{ 0x9a, 0x84 },
	{ 0x9b, 0x29 },		{ 0x9c, 0x03 },
	{ 0x9d, 0x4c },		{ 0x9e, 0x3f },
	{ 0x78, 0x04 },
	*/

	/* Extra-weird stuff.  Some sort of multiplexor register */
	{ 0x79, 0x01 },		{ 0xc8, 0xf0 },
	{ 0x79, 0x0f },		{ 0xc8, 0x00 },
	{ 0x79, 0x10 },		{ 0xc8, 0x7e },
	{ 0x79, 0x0a },		{ 0xc8, 0x80 },
	{ 0x79, 0x0b },		{ 0xc8, 0x01 },
	{ 0x79, 0x0c },		{ 0xc8, 0x0f },
	{ 0x79, 0x0d },		{ 0xc8, 0x20 },
	{ 0x79, 0x09 },		{ 0xc8, 0x80 },
	{ 0x79, 0x02 },		{ 0xc8, 0xc0 },
	{ 0x79, 0x03 },		{ 0xc8, 0x40 },
	{ 0x79, 0x05 },		{ 0xc8, 0x30 },
	{ 0x79, 0x26 },

	/*Set YUV output*/
	{ REG_COM7, 0x0 },  /* Selects YUV mode */
	{ REG_RGB444, 0 },	/* No RGB444 please */
	{ REG_COM1, 0 },
	{ REG_COM15, 0xc0},
	{ REG_COM9, 0x18 }, /* 4x gain ceiling; 0x8 is reserved bit */
	{ 0x4f, 0x80 }, 	/* "matrix coefficient 1" */
	{ 0x50, 0x80 }, 	/* "matrix coefficient 2" */
	{ 0x51, 0    },		/* vb */
	{ 0x52, 0x22 }, 	/* "matrix coefficient 4" */
	{ 0x53, 0x5e }, 	/* "matrix coefficient 5" */
	{ 0x54, 0x80 }, 	/* "matrix coefficient 6" */
	{ REG_COM13, COM13_GAMMA|COM13_UVSAT },


 ////////////////////////////////////////////////////////////////////

	{0xff,0xff},
};
3.寄存器颜色问题集(对于YUV格式的) a.图片只有红色和绿色
Y和U/V交换
b.红色和蓝色反了
U/V交换
c、颜色/亮度不连续
检查data[7:0]的连续
下面就是真相:
