Android采用AIDL实现两个应用间通信
Android采用AIDL实现两个应用间通信
- 一、前言
- 二、代码实现
- 1、服务端
- 2、客户端
一、前言
作为Android中实现进程间通信的一种方法,AIDL可以很方便的完成这项工作。正如AIDL的名字一样,只需定义一套Client端和Service端交互的接口即可。如需要传递数据的类型为非基本数据类型,需要先将非基本数据类型进行序列化操作。
而在很多实际情况下,Client端与Service端并不在一个应用中,他们作为两个单独的应用存在。为体现这种场景,本文模拟以下例子:Client端应用发送学生姓名及各科成绩至Service应用,由Service端完成学生总成绩的计算工作。
二、代码实现
因涉及到两个App,所以需要创建两个工程。首先实现service端。
1、服务端
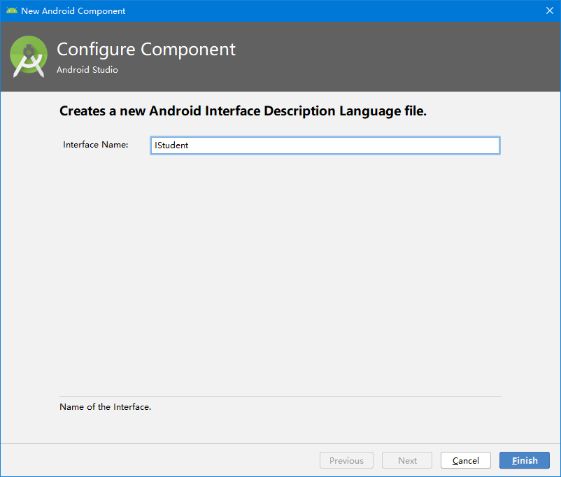
创建AIDLService工程,在工程目录下新建IStudent.aidl文件,将在该文件中定义使用的接口:选择File→New→AIDL→AIDL File(或者右键选择New→AIDL→AIDL File),输入IStudent,单击Finish后会自动帮我们创建aidl目录和对应的IStudent.aidl。
修改IStudent.aidl,添加我们需要使用的接口,client端通过调用该接口执行service端的逻辑。虽然aidl文件不是java文件,但package com.example.aidlservice.aidl;这句话一定要写,引入当前的包。
// IStudent.aidl
package com.example.aidlservice.aidl;
...
interface IStudent {
	void addStudentInfoReq(in StudtInfo studtInfo);
}
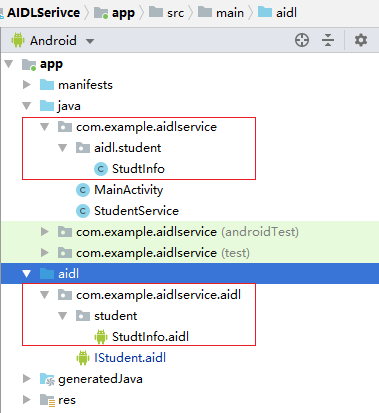
这里使用了一个自定义StudtInfo类型的对象studtInfo,一定要新建该类型同名aidl。新建StudtInfo.aidl,方法同上。为了说明各文件结构,在aidl的目录下新建一个目录,将StudtInfo.aidl移到该目录下。最终aidl目录如下。

修改StudtInfo.aidl。如移动了该文件,注意要修改package路径。使用parcelable声明StudtInfo。
// StudtInfo.aidl
package com.example.aidlservice.aidl.student;

// Declare any non-default types here with import statements

parcelable StudtInfo;
新建StudtInfo.java,注意一定要在StudtInfo.aidl中package的那个路径下创建。

实现StudtInfo类。该类型对象需要在进程间传递,所以需要进行序列化操作。继承Parcelable,添加数据的get和set方法。
package com.example.aidlservice.aidl.student;

import android.os.Parcel;
import android.os.Parcelable;

public class StudtInfo implements Parcelable {

    private String name;

    private int mathScore;

    private int englishScore;

    public StudtInfo(String name, int mathScore, int englishScore){
        this.name = name;
        this.mathScore = mathScore;
        this.englishScore = englishScore;
    }

    public String getName() {
        return name;
    }

    public void setName(String name) {
        this.name = name;
    }

    public int getMathScore() {
        return mathScore;
    }

    public void setMathScore(int mathScore) {
        this.mathScore = mathScore;
    }

    public int getEnglishScore() {
        return englishScore;
    }

    public void setEnglishScore(int englishScore) {
        this.englishScore = englishScore;
    }

    public static Creator<StudtInfo> getCREATOR() {
        return CREATOR;
    }

    private StudtInfo(Parcel in) {
        name = in.readString();
        mathScore = in.readInt();
        englishScore = in.readInt();
    }

    public static final Creator<StudtInfo> CREATOR = new Creator<StudtInfo>() {
        @Override
        public StudtInfo createFromParcel(Parcel in) {
            return new StudtInfo(in);
        }

        @Override
        public StudtInfo[] newArray(int size) {
            return new StudtInfo[size];
        }
    };

    @Override
    public int describeContents() {
        return 0;
    }

    @Override
    public void writeToParcel(Parcel parcel, int i) {
        parcel.writeString(name);
        parcel.writeInt(mathScore);
        parcel.writeInt(englishScore);
    }
}
新建StudentService类继承自Service,将在该类中完成对Client端请求的逻辑处理。创建一个IStudent.Stub对象,该对象继承自Binder类。实现IStudent.Stub()中的aidl方法,就是实现了之前在IStudent.aidl文件中添加的接口。
private IStudent.Stub stub = new IStudent.Stub() {
    @Override
    public void addStudentInfoReq(StudtInfo studtInfo) {
        Log.d(TAG, "姓名:" + studtInfo.getName()
                + " 数学成绩:" + studtInfo.getMathScore()
                + " 英语成绩:" + studtInfo.getEnglishScore());
    }
};
在onBind中返回这个对象。
public class StudentService extends Service {

    private static final String TAG = "StudentService";

    @Override
    public IBinder onBind(Intent intent) {
        return stub;
    }

    ...

}
修改AndroidManifest.xml。添加该service,并在intent-filter中添加action标签,客户端将通过该标签绑定该服务。
<service android:name=".StudentService"
    android:exported="true">
    <intent-filter>
        <action android:name="com.example.aidlserce.studentservice"/>
    </intent-filter>
</service>
到这里服务端就准备完成了,接着完成客户端。
2、客户端
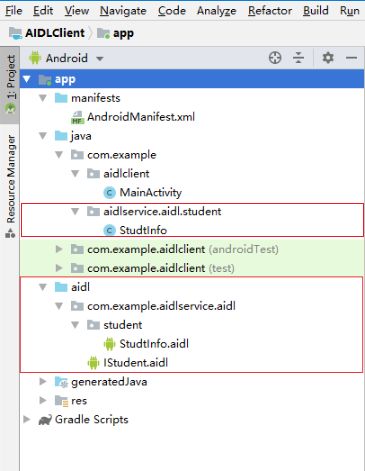
新建AIDLClient项目,将服务端工程中整个aidl文件夹复制过来,保证目录结构与服务端一致。要确保所有使用的aidl文件都复制过来并且目录一致。同时将继承Parcelable类的StudtInfo.java复制到该工程,也要保证目录与服务端一致。也就是在服务端和客户端都用到的东西一定要两边一模一样各一份,包括aidl文件及自己实现的序列化类。

修改MainActivity.java,创建一个ServiceConnection对象。在建立连接时调用IStudent.Stub.asInterface(iBinder)将IBinder对象转化为aidl接口。
private IStudent student;
...
private ServiceConnection connection = new ServiceConnection() {
    @Override
    public void onServiceConnected(ComponentName componentName, IBinder iBinder) {
        student = IStudent.Stub.asInterface(iBinder);
    }

    @Override
    public void onServiceDisconnected(ComponentName componentName) {
        unbindService(connection);
    }
};
通过Intent完成远程service的启动。如果你的Android版本高于5.0,选择隐式方式启动远程service的话,需要设置package,需要注意该package为服务端的package。
Intent intent = new Intent();
intent.setAction("com.example.aidlserce.studentservice");
intent.setPackage("com.example.aidlservice");//设置服务端的package
bindService(intent, connection, BIND_AUTO_CREATE);
服务端AndroidManifest.xml
<?xml version="1.0" encoding="utf-8"?>
<manifest xmlns:android="http://schemas.android.com/apk/res/android"
    xmlns:tools="http://schemas.android.com/tools"
    package="com.example.aidlservice">

    ...

</manifest>
将需要传递的数据进行序列化操作,通过上面得到的aidl接口就可以访问服务端的方法了。
StudtInfo studtInfo = new StudtInfo();
studtInfo.setName("小明");
studtInfo.setMathScore(50);
studtInfo.setEnglishScore(30);
try {
    student.addStudentInfoReq(studtInfo);
} catch (RemoteException e) {
    e.printStackTrace();
}
MainActivity源码:
package com.example.aidlclient;

import android.annotation.SuppressLint;
import android.content.ComponentName;
import android.content.Intent;
import android.content.ServiceConnection;
import android.os.IBinder;
import android.os.RemoteException;
import android.support.v7.app.AppCompatActivity;
import android.os.Bundle;
import android.view.View;
import android.widget.Button;

import com.example.aidlservice.aidl.IStudent;
import com.example.aidlservice.aidl.student.StudtInfo;

public class MainActivity extends AppCompatActivity {

    private IStudent student;

    @Override
    protected void onCreate(Bundle savedInstanceState) {
        super.onCreate(savedInstanceState);
        setContentView(R.layout.activity_main);

        Intent intent = new Intent();
        intent.setAction("com.example.aidlserce.studentservice");
        intent.setPackage("com.example.aidlservice");
        bindService(intent, connection, BIND_AUTO_CREATE);

        Button button1 = findViewById(R.id.button1);
        button1.setOnClickListener(new View.OnClickListener() {
            @SuppressLint("SetTextI18n")
            @Override
            public void onClick(View view) {
                StudtInfo studtInfo = new StudtInfo();
                studtInfo.setName("小明");
                studtInfo.setMathScore(50);
                studtInfo.setEnglishScore(30);
                try {
                    student.addStudentInfoReq(studtInfo);
                } catch (RemoteException e) {
                    e.printStackTrace();
                }
            }
        });
    }

    private ServiceConnection connection = new ServiceConnection() {
        @Override
        public void onServiceConnected(ComponentName componentName, IBinder iBinder) {
            student = IStudent.Stub.asInterface(iBinder);
        }

        @Override
        public void onServiceDisconnected(ComponentName componentName) {
            unbindService(connection);
        }
    };

}
整体的流程为:
首先在服务端定义好供客户端调用的方法和自定义类型的aidl,并实现序列化类。创建service,并在service中实现aidl接口。复制aidl文件及序列化类至客户端工程,在客户端中启动远程service,并通过aidl接口访问服务端的方法。
本文中StudtInfo.aidl、IStudent.aidl这两个aidl文件为了说明其中的package和import的关系,所以路径有些复杂,其实完全没有必要建这么多层目录。
项目地址:
客户端
服务端