RabbitMQ工作队列模式简介,以及简单队列模式(一)
RabbitMQ工作队列模式简介,以及简单队列模式(一)
本篇文章主要讲解RabbitMQ的简单使用、以及集成srping后的简单使用:
- 简单引入RabbitMQ的客户端使用
- 简单集成spring配置文件使用
- 简单集成springboot使用
目录
用 [TOC]来生成目录:
- RabbitMQ工作队列模式简介,以及简单队列模式(一)
-
- 目录
- 后续会逐步完善各种使用姿势、以及对使用的详解
- 下列的使用,都是围绕简单队列实现的,我们每一章,都讲一种工作模式
- 并且,后续的章节,都是以下列的demo例子的基础上,进行使用。
- 1、简单引入RabbitMQ的客户端使用
-
-
- 首先创建maven工程,pom文件配置如下:
- 创建一个获取RabbitMQ连接工具类:
- 创建一个消息生产者类:
- 创建一个消息消费者类:
- 消息发送:
- RabbitMQ管控台查看一下:
- 执行消费操作:
- 再次查看RabbitMQ管控台:
-
-
- 2、spring集成RabbitMQ
-
-
- 构建maven项目,pom文件如下:
- 在resource目录下,创建context.xml,spring配置如下:
- 在resource目录下,创建rabbitmq.xml,设置rabbitmq的配置信息,如下:
- 定义消费者
- 定义启动类,以及消息生产
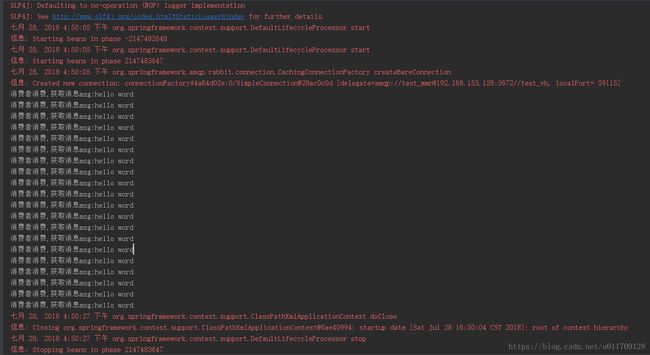
- 下面是运行情况:
-
- 3、springboot集成rabbitMQ
-
- 构建springboot项目,pom文件如下:
- 创建springboot入口程序
- 在resource目录下,创建application.yml,内容如下:
- 创建消费者
- 创建一个Controller类,进行发送消息至RabbitMQ
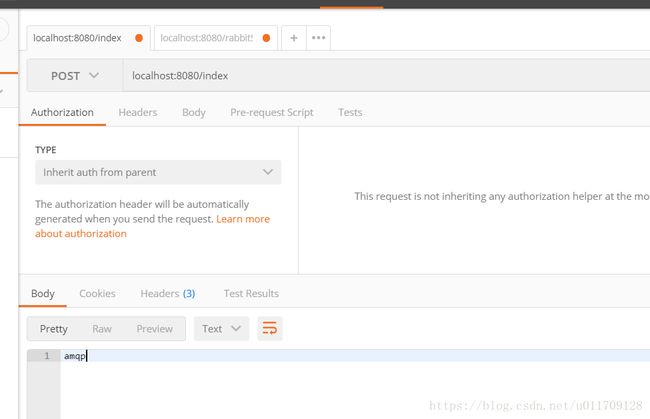
- 执行的时候,我们直接运行入口程序即可,通过网页post请求进行访问。
-
- 小结
-
-
后续会逐步完善各种使用姿势、以及对使用的详解
在使用之前,先介绍一下rabbitMQ所拥有的工作队列模式
rabbitMQ官网教程地址:http://www.rabbitmq.com/getstarted.html
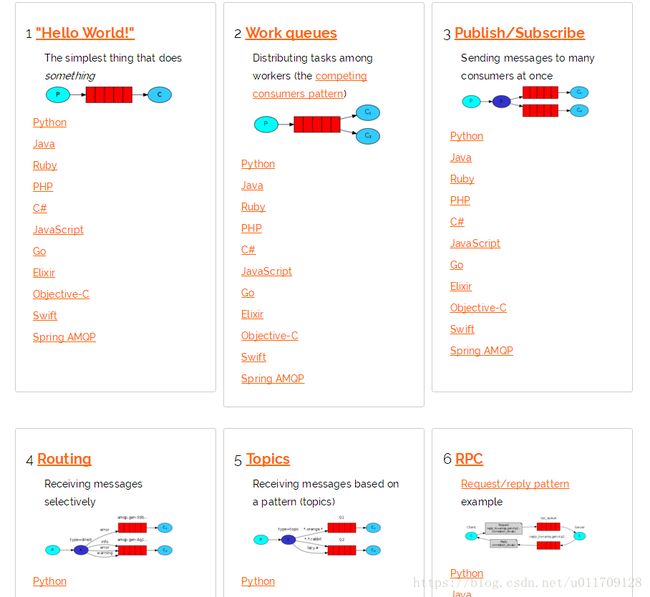
在官网教程中,描述了六类工作队列模式:
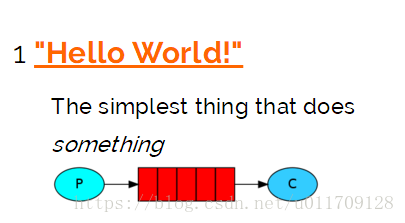
1、简单队列模式:最简单的工作队列,其中一个消息生产者,一个消息消费者,一个队列。也称为点对点模式
2、竞争消费者模式:一个消息生产者,一个交换器,一个消息队列,多个消费者。同样也称为点对点模式
3、发布/订阅模式:无选择接收消息,一个消息生产者,一个交换器,多个消息队列,多个消费者。称为发布/订阅模式
4、Routing模式:在发布/订阅模式的基础上,有选择的接收消息,也就是通过routing进行匹配条件是否满足接收消息。
5、主题模式:同样是在发布/订阅模式的基础上,根据主题匹配进行筛选是否接收消息,比第四类更灵活。
6、RPC模式:与上面其他5种所不同之处,类模式是拥有请求/回复的。也就是有响应的,上面5种都没有。
下列的使用,都是围绕简单队列实现的,我们每一章,都讲一种工作模式
并且,后续的章节,都是以下列的demo例子的基础上,进行使用。
1、简单引入RabbitMQ的客户端使用
首先创建maven工程,pom文件配置如下:
<project xmlns="http://maven.apache.org/POM/4.0.0"
         xmlns:xsi="http://www.w3.org/2001/XMLSchema-instance"
         xsi:schemaLocation="http://maven.apache.org/POM/4.0.0 http://maven.apache.org/xsd/maven-4.0.0.xsd">
    <parent>
        <artifactId>eduartifactId>
        <groupId>cn.edumqgroupId>
        <version>1.0-SNAPSHOTversion>
    parent>
    <modelVersion>4.0.0modelVersion>

    <artifactId>rabbitmqartifactId>


    <dependencies>


        <dependency>
            <groupId>com.rabbitmqgroupId>
            <artifactId>amqp-clientartifactId>
            <version>5.3.0version>
        dependency>
    dependencies>

project>
创建一个获取RabbitMQ连接工具类:
package com.edu.rabbitmq;

import com.rabbitmq.client.Connection;
import com.rabbitmq.client.ConnectionFactory;

import java.io.IOException;
import java.util.concurrent.TimeoutException;

/**
 * @author : alex
 * @version :1.0.0
 * @Date : create by 2018/7/19 22:01
 * @description :获取连接
 * @note 注意事项
 */
public class ConnectionUtils {

    //获取接连
    public static Connection getConnection() throws IOException, TimeoutException {

        ConnectionFactory factory = new ConnectionFactory();

        //设置连接MQ的IP地址
        factory.setHost("192.168.153.128");
        //设置连接端口号
        factory.setPort(5672);
        //设置要接连MQ的库(域)
        factory.setVirtualHost("/test_vh");
        //连接帐号
        factory.setUsername("root");
        //连接密码
        factory.setPassword("123456");
        return factory.newConnection();
    }

}
创建一个消息生产者类:
package com.edu.handler;

import com.edu.rabbitmq.ConnectionUtils;
import com.rabbitmq.client.Channel;
import com.rabbitmq.client.Connection;

import java.io.IOException;
import java.util.concurrent.TimeoutException;

/**
 * @author : alex
 * @version :1.0.0
 * @Date : create by 2018/7/19 22:16
 * @description :消息生产者
 * @note 注意事项
 */
public class Send {

    //队列名称
    public static String QUEUE_NAME = "test_simple_queue";

    public static void main(String[] args) throws IOException, TimeoutException {

        //获取连接
        Connection connection = ConnectionUtils.getConnection();

        //从连接中获取一个通道
        Channel channel = connection.createChannel();

        //创建消息声明
        channel.queueDeclare(QUEUE_NAME,false,false,false,null);

        //自定义消息
        String msg = "hello word";

        //发布消息
        channel.basicPublish("",QUEUE_NAME,null,msg.getBytes());
        System.out.println("-->send " + msg);


        channel.close();//关闭通道
        connection.close();//关闭连接


    }

}
创建一个消息消费者类:
package com.edu.handler;

import com.edu.rabbitmq.ConnectionUtils;
import com.rabbitmq.client.*;

import java.io.IOException;
import java.util.concurrent.TimeoutException;

/**
 * @author : alex
 * @version :1.0.0
 * @Date : create by 2018/7/19 22:16
 * @description :消息消费者
 * @note 注意事项
 */
public class Customer {

    //队列名称
    public static String QUEUE_NAME = "test_simple_queue";


    public static void main(String[] args) throws IOException, TimeoutException {

        //创建连接
        Connection connection = ConnectionUtils.getConnection();

        //获取通道
        Channel channel = connection.createChannel();

        //创建消息声明
        channel.queueDeclare(QUEUE_NAME,false,false,false,null);

        //定义消费者
        DefaultConsumer consumer = new DefaultConsumer(channel) {
            @Override
            public void handleDelivery(String consumerTag, Envelope envelope, AMQP.BasicProperties properties, byte[] body)
                    throws IOException {
                //获取并转成String
                String message = new String(body, "UTF-8");
                System.out.println("-->收到消息,msg:"+message);
            }
        };

        //监听队列
        channel.basicConsume(QUEUE_NAME, true, consumer);


    }

}
最简单的使用姿势就完成了,一共三个类,连接类,消息生产者,消息消费者。让我们来运行一下
消息发送:
RabbitMQ管控台查看一下:
执行消费操作:
再次查看RabbitMQ管控台:
2、spring集成RabbitMQ
构建maven项目,pom文件如下:
<project xmlns="http://maven.apache.org/POM/4.0.0"
         xmlns:xsi="http://www.w3.org/2001/XMLSchema-instance"
         xsi:schemaLocation="http://maven.apache.org/POM/4.0.0 http://maven.apache.org/xsd/maven-4.0.0.xsd">
    <parent>
        <artifactId>eduartifactId>
        <groupId>cn.edumqgroupId>
        <version>1.0-SNAPSHOTversion>
    parent>
    <modelVersion>4.0.0modelVersion>

    <artifactId>rabbitmq-springartifactId>

    <dependencies>


        <dependency>
            <groupId>com.rabbitmqgroupId>
            <artifactId>amqp-clientartifactId>
            <version>4.0.0version>
        dependency>

        <dependency>
            <groupId>org.springframework.amqpgroupId>
            <artifactId>spring-rabbitartifactId>
            <version>1.7.3.RELEASEversion>
        dependency>


        <dependency>
            <groupId>org.springframeworkgroupId>
            <artifactId>spring-coreartifactId>
            <version>5.0.7.RELEASEversion>
        dependency>


        <dependency>
            <groupId>org.springframeworkgroupId>
            <artifactId>spring-beansartifactId>
            <version>5.0.7.RELEASEversion>
        dependency>


        <dependency>
            <groupId>org.springframeworkgroupId>
            <artifactId>spring-contextartifactId>
            <version>5.0.7.RELEASEversion>
        dependency>
    dependencies>

project>
在resource目录下,创建context.xml,spring配置如下:
<beans xmlns="http://www.springframework.org/schema/beans"
       xmlns:xsi="http://www.w3.org/2001/XMLSchema-instance"
       xsi:schemaLocation="
    http://www.springframework.org/schema/beans
    http://www.springframework.org/schema/beans/spring-beans.xsd
    http://www.springframework.org/schema/beans
    http://www.springframework.org/schema/beans/spring-beans-4.0.xsd">


    <import resource="classpath:rabbitmq.xml" />

beans>
在resource目录下,创建rabbitmq.xml,设置rabbitmq的配置信息,如下:
在这里啰嗦两句,之前通过分析spring源码可知,spring验证xml的方式就是xsd和dtd。
那么我们使用xml配置文件进行配置的时候,需要有spring-rabbit-1.7.xsd
同时,我们也可以进入spring-rabbit-1.7.xsd这个文件内部去看各种使用的姿势,这里就不全部讲解了。
<beans xmlns="http://www.springframework.org/schema/beans"
       xmlns:xsi="http://www.w3.org/2001/XMLSchema-instance"
       xmlns:rabbit="http://www.springframework.org/schema/rabbit"
       xsi:schemaLocation="
    http://www.springframework.org/schema/beans
    http://www.springframework.org/schema/beans/spring-beans.xsd
    http://www.springframework.org/schema/rabbit
    http://www.springframework.org/schema/rabbit/spring-rabbit-1.7.xsd
    http://www.springframework.org/schema/beans
    http://www.springframework.org/schema/beans/spring-beans-4.0.xsd">


    <rabbit:connection-factory id="connectionFactory" virtual-host="/test_vh" username="test_mmr"
                               password="123456" host="192.168.153.128" port="5672"/>


    <rabbit:template id="amqpTemplate" connection-factory="connectionFactory" />


    <rabbit:admin connection-factory="connectionFactory" />


    <rabbit:queue name="test_mmr" auto-declare="true" />


    <rabbit:listener-container connection-factory="connectionFactory">
        <rabbit:listener ref="myCustomer" method="listen" queue-names="test_mmr"/>
    rabbit:listener-container>


    <bean id="myCustomer" class="com.rabbitmq.handle.MyCustomer"/>

beans>
定义消费者
package com.rabbitmq.handle;

/**
 * @author : alex
 * @version :1.0.0
 * @Date : create by 2018/7/19 23:39
 * @description :我的消费者
 * @note 注意事项
 */
public class MyCustomer {

    public void listen(String foo){
        System.out.println("消费者消费,获取消息msg:"+foo);
    }
}
定义启动类,以及消息生产
package com.rabbitmq.handle;

import org.springframework.amqp.rabbit.core.RabbitTemplate;
import org.springframework.context.support.ClassPathXmlApplicationContext;

/**
 * @author : alex
 * @version :1.0.0
 * @Date : create by 2018/7/19 23:02
 * @description :
 * @note 注意事项
 */
public class Main {

    public static void main(String[] args) throws InterruptedException {

        ClassPathXmlApplicationContext context = new ClassPathXmlApplicationContext("classpath:context.xml");

        //获取rabbit模版(等价于@Autowired)
        RabbitTemplate bean = context.getBean(RabbitTemplate.class);

        //循环发送20条消息
        for (int i =0;i<20;i++) {
            //指定发送到的队列名和消息体
            bean.convertAndSend("test_mmr","hello word"+i);
            Thread.sleep(1000);//休眠1秒
        }

        Thread.sleep(2000);//休眠2秒后,关闭spring容器
        context.close();

    }
}
下面是运行情况:
可以看到,我们的队列状态为running,后面有执行速率1.0/s
相比较第一种使用rabbit的方式,使用更方便,而且由于是交给spring去管理之后,我们不需要手动进行创建和销毁连接。
3、springboot集成rabbitMQ
构建springboot项目,pom文件如下:
<project xmlns="http://maven.apache.org/POM/4.0.0" xmlns:xsi="http://www.w3.org/2001/XMLSchema-instance"
    xsi:schemaLocation="http://maven.apache.org/POM/4.0.0 http://maven.apache.org/xsd/maven-4.0.0.xsd">
    <modelVersion>4.0.0modelVersion>

    <groupId>cn.edumqgroupId>
    <artifactId>rabbitmq-springbootartifactId>
    <version>0.0.1-SNAPSHOTversion>
    <packaging>jarpackaging>

    <name>rabbitmq-springbootname>
    <description>Demo project for Spring Bootdescription>

    <parent>
        <groupId>org.springframework.bootgroupId>
        <artifactId>spring-boot-starter-parentartifactId>
        <version>1.5.6.RELEASEversion>
        <relativePath/>
    parent>

    <properties>
        <project.build.sourceEncoding>UTF-8project.build.sourceEncoding>
        <project.reporting.outputEncoding>UTF-8project.reporting.outputEncoding>
        <java.version>1.8java.version>
    properties>

    <dependencies>

        <dependency>
            <groupId>org.springframework.bootgroupId>
            <artifactId>spring-boot-starterartifactId>
        dependency>

        <dependency>
            <groupId>org.springframework.bootgroupId>
            <artifactId>spring-boot-starter-testartifactId>
            <scope>testscope>
        dependency>

        <dependency>
            <groupId>org.springframework.bootgroupId>
            <artifactId>spring-boot-starter-webartifactId>
        dependency>


        <dependency>
            <groupId>org.springframework.bootgroupId>
            <artifactId>spring-boot-starter-amqpartifactId>
        dependency>

    dependencies>

    <build>
        <plugins>
            <plugin>
                <groupId>org.springframework.bootgroupId>
                <artifactId>spring-boot-maven-pluginartifactId>
            plugin>
        plugins>
    build>


project>
创建springboot入口程序
package cn.edumq.rabbitmqspringboot;

import org.springframework.boot.SpringApplication;
import org.springframework.boot.autoconfigure.SpringBootApplication;

@SpringBootApplication
public class RabbitmqSpringbootApplication {

    public static void main(String[] args) {
        SpringApplication.run(RabbitmqSpringbootApplication.class, args);
    }
}
在resource目录下,创建application.yml,内容如下:
yml配置其实和properties配置差不多,但是又一点点区别。
默认springboot是内置类似tomcat发布容器的,我们就直接使用就好啦。
默认端口为8080,此处就不详解springboot的配置啦。
spring:
  rabbitmq:
    username: root
    password: 123456
    host: 192.168.153.128
    port: 5672
    virtual-host: /test_vh
创建消费者
package cn.edumq.rabbitmqspringboot.rabbitUtil;

import org.springframework.amqp.rabbit.annotation.RabbitHandler;
import org.springframework.amqp.rabbit.annotation.RabbitListener;
import org.springframework.stereotype.Component;


/**
 * @author : alex
 * @version :1.0.0
 * @Date : create by 2018/7/28 15:11
 * @description :消息消费者
 * @note 此处要被spring扫描到,使用Component注解
 */
@Component
//监听的队列
@RabbitListener(queues = "test_mmr")
public class CustomerMsg {

    /**
     * 进行接收处理
     * @param string
     */
    @RabbitHandler
    public void onMessage(String string){
        System.out.println("接收时间:"+System.currentTimeMillis()+",收到消息,消息: " + string);
    }

}
创建一个Controller类,进行发送消息至RabbitMQ
这里再次啰嗦两句,此处使用AmqpTemplate和RabbitTemplate进行操作的。
相关这两个类的使用文档地址:(切记注意官网上的版本是否与使用的版本是否一致)
https://docs.spring.io/spring-amqp/docs/current/api/org/springframework/amqp/core/AmqpTemplate.html
https://docs.spring.io/spring-amqp/docs/1.7.3.BUILD-SNAPSHOT/api/
package cn.edumq.rabbitmqspringboot.Controller;

import org.springframework.amqp.core.AmqpTemplate;
import org.springframework.amqp.core.Message;
import org.springframework.amqp.rabbit.core.RabbitTemplate;
import org.springframework.beans.factory.annotation.Autowired;
import org.springframework.web.bind.annotation.PostMapping;
import org.springframework.web.bind.annotation.RestController;

/**
 * @author : alex
 * @version :1.0.0
 * @Date : create by 2018/7/28 15:04
 * @description :index
 * @note 注意事项
 */
@RestController
public class IndexController {


    @Autowired
    private AmqpTemplate amqpTemplate;

    @Autowired
    private RabbitTemplate rabbitTemplate;


    /**
     * 使用AmqpTemplate
     * @return
     * @throws Exception
     */
    @PostMapping("/index")
    public String index() throws Exception{
        String msg = "amqp";
        for (int i=0;i<20;i++){
            Thread.sleep(1000);//1秒
            amqpTemplate.convertAndSend("test_mmr",msg);//指定发送的队列名称,和数据
            System.out.println("序号:"+i+",发送时间:"+System.currentTimeMillis()+",发送消息:"+msg);
        }
        return msg;
    }

    /**
     * 使用RabbitTemplate
     * @return
     * @throws Exception
     */
    @PostMapping("/rabbitSend")
    public String rabbitSend() throws Exception{
        String msg = "rabbit";
        for (int i=0;i<20;i++) {
            Thread.sleep(1000);//1秒
            rabbitTemplate.convertAndSend("test_mmr", msg);
            System.out.println("序号:"+i+",发送时间:"+System.currentTimeMillis()+",发送消息:"+msg);
        }
        return msg;
    }


}
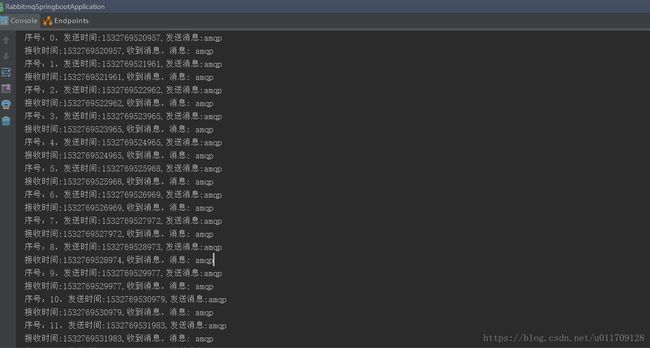
执行的时候,我们直接运行入口程序即可,通过网页post请求进行访问。
此处使用postman进行测试
小结
一步一步的从最基本的连接rabbitMQ到集成springboot,使用的方式越来越简便,但是万变不离其宗,尽管spring为我们封装使用更便捷了,但是一直也是围绕着最基本的参数配置去使用,学习扎实的基础还是至关重要的。
由于作者水平有限,不足之处,希望能多多包涵和指出。
