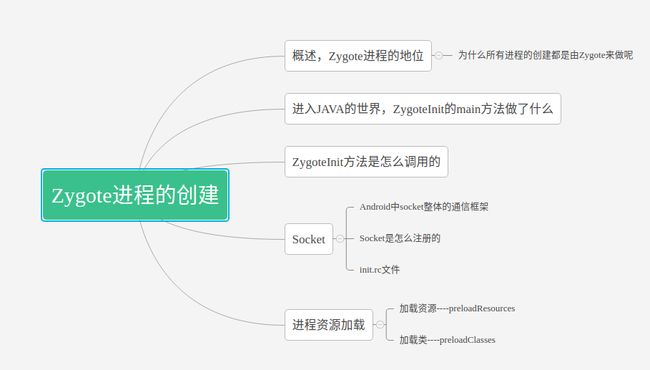
概述:
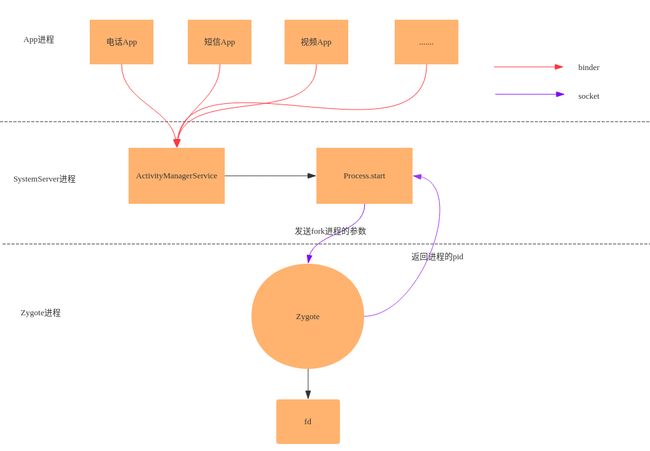
本文(基于Android O源码)主要讲解Zygote进程创建流程,线程容易创建,但进程的相关的东西都被系统很好的封装了,以至于进程的创建,很多人还是头一回。首先一张图来看看Zygote进程在系统中的地位。
Zygote进程又称受精卵进程,它由app_process启动,Zygote进程最大意义是作为一个Socket的Server端,接收着四面八方的进程创建请求,Android中所有的应用进程的创建都是一个应用进程通过Binder请求SystemServer进程,SystemServer进程发送socket消息给Zygote进程,统一由Zygote进程创建出来的。典型的C/S架构!!!。图中红色标注为Binder通信方式,蓝色标注为Socket通信方式。
话说为什么Android系统采用这种架构呢,为什么所有进程的创建都是由Zygote来做呢?原因有如下几点
Zygote进程在启动的时候会创建一个虚拟机实例,因此通过Zygote进程在父进程,创建的子进程都会继承这个虚拟机实例,App中的JAVA代码可以得到翻译执行。
进程与进程之间需要跨进程通信,由Zygote进程作为父进程还可以获得一个Binder线程池,这样进程之间就可以使用Binder进行跨进程通信了。
进程的“血液”可以理解成Message,启动四大组件靠的都是Looper消息机制,看过老罗的书,说由Zygote进程作为父进程,子进程可以获得一个消息循环。这句话我表示不理解,因为各个应用进程的Looper循环是自己在ActivityThread中创建的,SystemServer进程的消息循环也是自己创建的,那为什么说子进程可以继承Zygote进程的消息循环呢?这点我觉得不严谨,欢迎讨论。
所以这可以理解成Zygote进程作为所有应用进程的父进程的原因。
1、进入JAVA的世界,ZygoteInit的main方法
这张序列图就是Zygote进程的创建流程,结合代码看一看。
    frameworks/base/core/java/com/android/internal/os/ZygoteInit.java
    public static void main(String argv[]) {
       //1、创建ZygoteServer
        ZygoteServer zygoteServer = new ZygoteServer();
      .......
        try {
             .......
            boolean startSystemServer = false;
            String socketName = "zygote";
            String abiList = null;
            boolean enableLazyPreload = false;
           // 2、解析app_main.cpp传来的参数
            for (int i = 1; i < argv.length; i++) {
                if ("start-system-server".equals(argv[i])) {
                    startSystemServer = true;
                } else if ("--enable-lazy-preload".equals(argv[i])) {
                    enableLazyPreload = true;
                } else if (argv[i].startsWith(ABI_LIST_ARG)) {
                    abiList = argv[i].substring(ABI_LIST_ARG.length());
                } else if (argv[i].startsWith(SOCKET_NAME_ARG)) {
                    socketName = argv[i].substring(SOCKET_NAME_ARG.length());
                } else {
                    throw new RuntimeException("Unknown command line argument: " + argv[i]);
                }
            }

            if (abiList == null) {
                throw new RuntimeException("No ABI list supplied.");
            }
            //3、创建一个Server端的Socket
            zygoteServer.registerServerSocket(socketName);
            // In some configurations, we avoid preloading resources and classes eagerly.
            // In such cases, we will preload things prior to our first fork.
            if (!enableLazyPreload) {
                bootTimingsTraceLog.traceBegin("ZygotePreload");
                EventLog.writeEvent(LOG_BOOT_PROGRESS_PRELOAD_START,
                    SystemClock.uptimeMillis());
               //4、加载进程的资源和类
                preload(bootTimingsTraceLog);
                EventLog.writeEvent(LOG_BOOT_PROGRESS_PRELOAD_END,
                    SystemClock.uptimeMillis());
                bootTimingsTraceLog.traceEnd(); // ZygotePreload
            } else {
                Zygote.resetNicePriority();
            }
              ........
            if (startSystemServer) {
                //5、开启SystemServer进程,这是受精卵进程的第一次分裂
                startSystemServer(abiList, socketName, zygoteServer);
            }

            Log.i(TAG, "Accepting command socket connections");
           //6、启动一个死循环监听来自Client端的消息
            zygoteServer.runSelectLoop(abiList);
           //7、关闭SystemServer的Socket
            zygoteServer.closeServerSocket();
        } catch (Zygote.MethodAndArgsCaller caller) {
           //8、这里捕获这个异常调用MethodAndArgsCaller的run方法。
            caller.run();
        } catch (Throwable ex) {
            Log.e(TAG, "System zygote died with exception", ex);
            zygoteServer.closeServerSocket();
            throw ex;
        }
    }
ZygoteInit的main方法大概就做了上面六件事情,一,创建ZygoteServer,在Android O上把与Socket的操作都封装到了ZygoteServer类中;二,解析app_main.cpp传来的参数。三、创建一个Server端的Socket,作用是当Zygote进程将SystemServer进程启动后,就会在这个Socket上来等待ActivityManagerService请求,即请求创建我们自己APP应用程序进程;四,预加载类和资源,包括颜色啊,R文件,drawable、类等;五,启动system_server进程,这是上层framework的运行载体,ActivityManagerService就是运行在这个进程里面的;六,开启一个循环,等待着接收ActivityManagerService的请求,随时待命,当接收到创建新进程的请求时立即唤醒并执行相应工作;
我觉得这段代码的主线是,ZygoteInit进程启动后,会注册一个Socket,在runSelectLoop方法中开启一个while死循环等待ActivityManagerService创建新进程的请求,其次,ZygoteInit启动了SystemServer进程,执行SystemServer的main方法。
这种模式其实可以理解成一个模板格式的代码,不信你在看看WebViewZygoteInit中的写法和ZygoteInit的写法是不是如出一辙呢?
  frameworks/base/core/java/com/android/internal/os/WebViewZygoteInit.java
    public static void main(String argv[]) {
        sServer = new WebViewZygoteServer();

        // Zygote goes into its own process group.
        try {
            Os.setpgid(0, 0);
        } catch (ErrnoException ex) {
            throw new RuntimeException("Failed to setpgid(0,0)", ex);
        }

        try {
            sServer.registerServerSocket("webview_zygote");
            sServer.runSelectLoop(TextUtils.join(",", Build.SUPPORTED_ABIS));
            sServer.closeServerSocket();
        } catch (Zygote.MethodAndArgsCaller caller) {
            caller.run();
        } catch (RuntimeException e) {
            Log.e(TAG, "Fatal exception:", e);
        }

        System.exit(0);
    }
如果要理解的更深一点,就需要再思考几个问题了。
- 1、ZygoteInit方法是怎么调用的?
- 2、Socket是怎么注册的?Socket通信的原理是否还记得?
- 3、SystemServer进程资源如何加载?
- 4、为什么要抛出MethodAndArgsCaller这个异常?作用是什么?
好,现在解答这些问题,这些问题弄懂,Zygote进程创建流程也就OK了。
1.1、ZygoteInit方法是怎么调用的
从上面的流程图中看到ZygoteInit的main是从app_main.cpp来的。app_main是Zygote进程对应的主文件,Zygote进程被Init启动的时候,就会调用这个app_main.cpp的main函数。
/frameworks/base/cmds/app_process/app_main.cpp
192int main(int argc, char* const argv[])
193{
       ......
282    // Parse runtime arguments.  Stop at first unrecognized option.
283    bool zygote = false;
284    bool startSystemServer = false;
285    bool application = false;
286    String8 niceName;
287    String8 className;
288
289    ++i;  // Skip unused "parent dir" argument.
         //init.rc中会配置一些参数,这里进行比较设置一些变量走进不同的分支
290    while (i < argc) {
291        const char* arg = argv[i++];
292        if (strcmp(arg, "--zygote") == 0) {
               //启动的是Zygote进程
293            zygote = true;
294            niceName = ZYGOTE_NICE_NAME;
295        } else if (strcmp(arg, "--start-system-server") == 0) {
               //启动的是system-server进程
296            startSystemServer = true;
297        } else if (strcmp(arg, "--application") == 0) {
298            application = true;
299        } else if (strncmp(arg, "--nice-name=", 12) == 0) {
300            niceName.setTo(arg + 12);
301        } else if (strncmp(arg, "--", 2) != 0) {
302            className.setTo(arg);
303            break;
304        } else {
305            --i;
306            break;
307        }
308    }
309
           .......
           //设置一个“好听的名字” zygote,之前的名称是app_process
357    if (!niceName.isEmpty()) {
358        runtime.setArgv0(niceName.string(), true /* setProcName */);
359    }
360
361    if (zygote) {
             //通过runtime启动zygote
364        runtime.start("com.android.internal.os.ZygoteInit", args, zygote);
365    } else if (className) {
366        runtime.start("com.android.internal.os.RuntimeInit", args, zygote);
367    } else {
368        fprintf(stderr, "Error: no class name or --zygote supplied.\n");
369        app_usage();
370        LOG_ALWAYS_FATAL("app_process: no class name or --zygote supplied.");
371    }
372}
Zygote本身是一个Native的应用程序,刚开始的名字为“app_process”,运行过程中,通过调用setArgv0将名字改为Zygote,真正启动的地方是runtime的start方法,简单看一下runtime的start方法。
/*
987 * Start the Android runtime.  This involves starting the virtual machine
988 * and calling the "static void main(String[] args)" method in the class
989 * named by "className".
990 *
991 * Passes the main function two arguments, the class name and the specified
992 * options string.
993 */
994void AndroidRuntime::start(const char* className, const Vector& options, bool zygote)
995{
996    ALOGD(">>>>>> START %s uid %d <<<<<<\n",
997            className != NULL ? className : "(unknown)", getuid());
998
1026    /* start the virtual machine */
1027    JniInvocation jni_invocation;
1028    jni_invocation.Init(NULL);
1029    JNIEnv* env;
1030    if (startVm(&mJavaVM, &env, zygote) != 0) {
1031        return;
1032    }
1033    onVmCreated(env);
1034
1035    /*
1036     * Register android functions.
1037     */
1038    if (startReg(env) < 0) {
1039        ALOGE("Unable to register all android natives\n");
1040        return;
1041    }
1042
1043    /*
1044     * We want to call main() with a String array with arguments in it.
1045     * At present we have two arguments, the class name and an option string.
1046     * Create an array to hold them.
1047     */
1048    jclass stringClass;
1049    jobjectArray strArray;
1050    jstring classNameStr;
1051
1052    stringClass = env->FindClass("java/lang/String");
1053    assert(stringClass != NULL);
1054    strArray = env->NewObjectArray(options.size() + 1, stringClass, NULL);
1055    assert(strArray != NULL);
1056    classNameStr = env->NewStringUTF(className);
1057    assert(classNameStr != NULL);
1058    env->SetObjectArrayElement(strArray, 0, classNameStr);
1059
1060    for (size_t i = 0; i < options.size(); ++i) {
1061        jstring optionsStr = env->NewStringUTF(options.itemAt(i).string());
1062        assert(optionsStr != NULL);
1063        env->SetObjectArrayElement(strArray, i + 1, optionsStr);
1064    }
1065
1066    /*
1067     * Start VM.  This thread becomes the main thread of the VM, and will
1068     * not return until the VM exits.
1069     */
1070    char* slashClassName = toSlashClassName(className);
1071    jclass startClass = env->FindClass(slashClassName);
1072    if (startClass == NULL) {
1073        ALOGE("JavaVM unable to locate class '%s'\n", slashClassName);
1074        /* keep going */
1075    } else {
1076        jmethodID startMeth = env->GetStaticMethodID(startClass, "main",
1077            "([Ljava/lang/String;)V");
1078        if (startMeth == NULL) {
1079            ALOGE("JavaVM unable to find main() in '%s'\n", className);
1080            /* keep going */
1081        } else {
1082            env->CallStaticVoidMethod(startClass, startMeth, strArray);
1083
1084#if 0
1085            if (env->ExceptionCheck())
1086                threadExitUncaughtException(env);
1087#endif
1088        }
1089    }
1090    free(slashClassName);
1091   //这行Log比较常见,因为其他应用进程也是由zygote 进程fork 出来的,所有其他进程也包含这段代码,如果其他进程在java 层crash,那么也会走到这里
1092    ALOGD("Shutting down VM\n");
1093    if (mJavaVM->DetachCurrentThread() != JNI_OK)
1094        ALOGW("Warning: unable to detach main thread\n");
1095    if (mJavaVM->DestroyJavaVM() != 0)
1096        ALOGW("Warning: VM did not shut down cleanly\n");
1097}
1098
代码很简单,主要做了三件事情,一调用startVm开启虚拟机,二调用startReg注册JNI方法,三就是使用JNI把Zygote进程启动起来。
996    ALOGD(">>>>>> START %s uid %d <<<<<<\n",
997            className != NULL ? className : "(unknown)", getuid());
这个是进入Zygote进程的重要依据,开机的时候一般都会打印这一行Log。如
07-09 14:40:37.788 16504 16504 D AndroidRuntime: >>>>>> START com.android.internal.os.ZygoteInit uid 0 <<<<<<
如果遇到不能开机的情况,这行Log没有打开,极有可能不是上层的问题。
1.2、Socket是怎么注册的?
这个问题还用说嘛,看一下ZygoteServer类的registerServerSocket不就OK了吗,不要觉得这里很容易,其实彻底弄明白还是需要一些思考的。
    frameworks/base/core/java/com/android/internal/os/ZygoteServer.java
    private static final String ANDROID_SOCKET_PREFIX = "ANDROID_SOCKET_";

    private LocalServerSocket mServerSocket;
    /**
     * Registers a server socket for zygote command connections
     *
     * @throws RuntimeException when open fails
     */
    void registerServerSocket(String socketName) {
        //看起来是用了一个单例
        if (mServerSocket == null) {
            int fileDesc;
            final String fullSocketName = ANDROID_SOCKET_PREFIX + socketName;
            try {
                //从环境变量中获取名为ANDROID_SOCKET_zygote的fd
                String env = System.getenv(fullSocketName);
                fileDesc = Integer.parseInt(env);
            } catch (RuntimeException ex) {
                throw new RuntimeException(fullSocketName + " unset or invalid", ex);
            }

            try {
                //构建JAVA中的FD对象
                FileDescriptor fd = new FileDescriptor();
                fd.setInt$(fileDesc);
               //用上面的FD创建LocalServerSocket
                mServerSocket = new LocalServerSocket(fd);
            } catch (IOException ex) {
                throw new RuntimeException(
                        "Error binding to local socket '" + fileDesc + "'", ex);
            }
        }
    }
其中 参数 socketName = "zygote";注册的过程实际上就是生成一个mServerSocket对象,用来接收Client端的请求,这里又有两个小问题了。
- Socket FD是怎么生成的,在哪里创建?
- Android中socket整体的通信框架是怎样的。
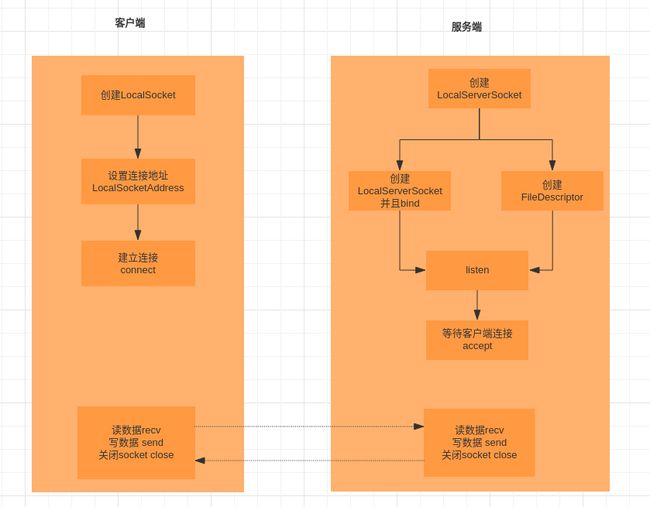
我们先看第二个问题,看看下面这张图。
LocalSocket就是作为客户端建立于服务端的连接,发送数据。LocalServerSocket作为服务端使用,建立服务端的socket监听客户端请求。典型的C/S架构!!!LocalServerSocket构造函数看到有两种方式:
第一种
frameworks/base/core/java/android/net/LocalServerSocket.java
    /**
    * Creates a new server socket listening at specified name.
    * On the Android platform, the name is created in the Linux
    * abstract namespace (instead of on the filesystem).
    *
    * @param name address for socket
    * @throws IOException
    */
   public LocalServerSocket(String name) throws IOException
   {
       //1、创建服务端socket对象
       impl = new LocalSocketImpl();

       impl.create(LocalSocket.SOCKET_STREAM);

       //2、设置地址
       localAddress = new LocalSocketAddress(name);
       //3、绑定地址
       impl.bind(localAddress);
       //4、监听
       impl.listen(LISTEN_BACKLOG);
   }
第二种
   /**
    * Create a LocalServerSocket from a file descriptor that's already
    * been created and bound. listen() will be called immediately on it.
    * Used for cases where file descriptors are passed in via environment
    * variables
    *
    * @param fd bound file descriptor
    * @throws IOException
    */
   public LocalServerSocket(FileDescriptor fd) throws IOException
   {
       impl = new LocalSocketImpl(fd);
       impl.listen(LISTEN_BACKLOG);
       localAddress = impl.getSockAddress();
   }
从上面看到在Zygote中创建服务端的socket,使用的就是第二种。对于这种C/S架构,一般性的用法是这样子的。通常服务端会有个死循环不断响应客户端发送来的请求
//创建socket并绑定监听 新创建的
LocalServerSocket server = new LocalServerSocket(SOCKET_ADDRESS);
while (true) {
  //等待建立连接
  LocalSocket receiver = server.accept();

  //接收获取数据流
  InputStream input = receiver.getInputStream();

  ……
}
然后,客户端就可以用下面代码向服务端发送请求
String message;

//创建socket
LocalSocket sender = new LocalSocket();

//建立对应地址连接
sender.connect(new LocalSocketAddress(SOCKET_ADDRESS));

//发送写入数据
sender.getOutputStream().write(message.getBytes());

//关闭socket
sender.getOutputStream().close();
在系统创建进程的时候,为了更好的管理LocalSocket的输入流和输出流对象,将这个过程的返回结果封装成了ZygoteState,都在ZygoteProcess的connect方法中。
frameworks/base/core/java/android/os/ZygoteProcess.java
        public static ZygoteState connect(String socketAddress) throws IOException {
            DataInputStream zygoteInputStream = null;
            BufferedWriter zygoteWriter = null;
            final LocalSocket zygoteSocket = new LocalSocket();

            try {
                zygoteSocket.connect(new LocalSocketAddress(socketAddress,
                        LocalSocketAddress.Namespace.RESERVED));

                zygoteInputStream = new DataInputStream(zygoteSocket.getInputStream());

                zygoteWriter = new BufferedWriter(new OutputStreamWriter(
                        zygoteSocket.getOutputStream()), 256);
            } catch (IOException ex) {
                try {
                    zygoteSocket.close();
                } catch (IOException ignore) {
                }

                throw ex;
            }

            String abiListString = getAbiList(zygoteWriter, zygoteInputStream);
            Log.i("Zygote", "Process: zygote socket " + socketAddress + " opened, supported ABIS: "
                    + abiListString);

            return new ZygoteState(zygoteSocket, zygoteInputStream, zygoteWriter,
                    Arrays.asList(abiListString.split(",")));
        }
好,上面基本就是Android中socket通信框架。主要把握LocalSocket与LocalServerSocket的用法。现在继续研究第一个问题,FD是在哪里创建的呢,为什么可以从环境变量中获取呢。Socket的监听方式为使用Linux系统调用select()函数监听Socket文件描述符,当该文件描述符上有数据时,自动触发中断,在中断处理函数中去读取文件描述符中的数据。
在关机状态下,我们可以看到dev/socket的文件有
android:/dev/socket # ls -la
total 0
drwxr-xr-x  2 root   root    160 1970-12-23 09:50 .
drwxr-xr-x 14 root   root   3440 1970-12-23 09:49 ..
srw-rw----  1 system system    0 1970-12-23 09:50 adbd
srw-rw-rw-  1 root   root      0 1970-12-23 09:49 property_service
srw-rw----  1 system system    0 1970-12-23 09:49 thermal-recv-client
srw-rw-rw-  1 system system    0 1970-12-23 09:49 thermal-recv-passive-client
srw-rw-rw-  1 system system    0 1970-12-23 09:49 thermal-send-client
srw-rw----  1 system system    0 1970-12-23 09:49 thermal-send-rule
开机状态下呢
jason:/dev/socket # ls -la
total 0
drwxr-xr-x  7 root           root       840 2018-07-09 19:24 .
drwxr-xr-x 14 root           root      3660 1970-12-23 06:29 ..
srw-rw----  1 system         system       0 2018-07-09 19:24 adbd
srw-rw-rw-  1 system         system       0 1970-12-23 06:29 audio_hw_socket
srw-rw----  1 root           mount        0 1970-12-23 06:28 cryptd
srw-rw----  1 root           inet         0 2018-07-09 16:05 dnsproxyd
srw-rw----  1 root           system       0 2018-07-09 16:05 dpmd
srw-rw----  1 root           inet         0 2018-07-09 16:05 dpmwrapper
srw-rw----  1 root           inet         0 2018-07-09 16:05 fwmarkd
srw-rw----  1 system         radio        0 2018-07-09 16:05 ims_datad
srw-rw----  1 system         radio        0 1970-12-23 06:29 ims_qmid
srw-rw----  1 radio          radio        0 2018-07-09 16:05 ipacm_log_file
srw-rw----  1 system         system       0 1970-12-23 06:29 lmkd
srw-rw-rw-  1 logd           logd         0 1970-12-23 06:28 logd
srw-rw-rw-  1 logd           logd         0 1970-12-23 06:28 logdr
s-w--w--w-  1 logd           logd         0 1970-12-23 06:28 logdw
srw-rw----  1 root           system       0 2018-07-09 16:05 mdns
srw-rw-rw-  1 gps            gps          0 2018-07-09 16:05 mlid
srw-rw----  1 root           system       0 2018-07-09 16:05 netd
drwxr-x---  2 radio          radio       60 2018-07-09 16:05 netmgr
srw-rw----  1 system         system       0 1970-12-23 06:29 pps
srw-rw-rw-  1 root           root         0 1970-12-23 06:28 property_service
drwxrws---  2 media          audio       40 1970-12-23 06:29 qmux_audio
drwxrws---  2 bluetooth      bluetooth   40 1970-12-23 06:29 qmux_bluetooth
drwxrws---  2 gps            gps         40 1970-12-23 06:29 qmux_gps
drwxrws---  2 radio          radio      120 2018-07-09 16:05 qmux_radio
srw-rw----  1 radio          system       0 2018-07-09 16:05 rild-debug2
srw-rw----  1 root           radio        0 2018-07-09 16:05 rild2
srw-rw-rw-  1 system         system       0 2018-07-09 16:05 seempdw
srw-rw----  1 root           inet         0 2018-07-09 16:05 tcm
srw-rw----  1 system         system       0 1970-12-23 06:29 thermal-recv-client
srw-rw-rw-  1 system         system       0 1970-12-23 06:29 thermal-recv-passive-client
srw-rw-rw-  1 system         system       0 1970-12-23 06:29 thermal-send-client
srw-rw----  1 system         system       0 1970-12-23 06:29 thermal-send-rule
srw-rw-rw-  1 system         system       0 2018-07-09 16:05 tombstoned_crash
srw-rw-rw-  1 system         system       0 2018-07-09 16:05 tombstoned_intercept
srw-rw-rw-  1 system         system       0 2018-07-09 16:05 tombstoned_java_trace
srw-rw----  1 root           mount        0 1970-12-23 06:28 vold
srw-rw----  1 webview_zygote system       0 2018-07-09 16:05 webview_zygote
srw-rw----  1 wifi           wifi         0 2018-07-09 16:05 wpa_wlan0
srw-rw----  1 root           system       0 1970-12-23 06:29 zygote
srw-rw----  1 root           system       0 1970-12-23 06:29 zygote_secondary
最后两行是不是多了一个zygote和zygote_secondary呢?这两个是怎么来的呢,这个就得从init.rc文件了,内核启动完成之后会去读取init.rc文件,启动开机需要启动的进程。
在Android5.0中,Zygote的启动发生了一些变化,以前直接放在init.rc中的代码块放到了单独的文件中,在init.rc中通过import的方式引入文件,如下:
import /init.${ro.zygote}.rc
所以init.rc并不是直接引入某个固定的文件,而是根据属性“ro.zygote”的内容来引入system/core/init/目录下不同的文件,这个目录下目前有Init.zygote64.rc,Init.zygote32.rc,Init.zygote32_64.rc,Init.zygot64_32.rc。与之对应的属性 ro.zygote 的值可为:zygote32、zygote64、zygote32_64、zygote64_32。
init.zygote32.rc:zygote 进程对应的执行程序是 app_process (纯 32bit 模式)
init.zygote64.rc:zygote 进程对应的执行程序是 app_process64 (纯 64bit 模式)
init.zygote32_64.rc:启动两个 zygote 进程 (名为 zygote 和 zygote_secondary),对应的执行程序分别是 app_process32 (主模式)、app_process64。
init.zygote64_32.rc:启动两个 zygote 进程 (名为 zygote 和 zygote_secondary),对应的执行程序分别是 app_process64 (主模式)、app_process32。
什么意思呢?举个例子看zygot64_32.rc。
service zygote /system/bin/app_process64 -Xzygote /system/bin --zygote --start-system-server --socket-name=zygote
    class main
    priority -20
    user root
    group root readproc
    socket zygote stream 660 root system
    onrestart write /sys/android_power/request_state wake
    onrestart write /sys/power/state on
    onrestart restart audioserver
    onrestart restart cameraserver
    onrestart restart media
    onrestart restart netd
    onrestart restart wificond
    writepid /dev/cpuset/foreground/tasks

service zygote_secondary /system/bin/app_process32 -Xzygote /system/bin --zygote --socket-name=zygote_secondary --enable-lazy-preload
    class main
    priority -20
    user root
    group root readproc
    socket zygote_secondary stream 660 root system
    onrestart restart zygote
    writepid /dev/cpuset/foreground/tasks
其中
service zygote /system/bin/app_process64 -Xzygote /system/bin --zygote --start-system-server --socket-name=zygote
这行表示zygote进程以服务的方式启动,对应的native应用程序是/system/bin/app_process64,给这个zygote进程传递了5个参数,分别是-Xzygote,/system/bin,--zygote,--start-system-server,--socket-name=zygote。可以看到zygot64_32.rc里面定义了两个Zygote服务:zygote和zygote_secondary。zygote为主,zygote_secondary为辅。
    onrestart restart cameraserver
    onrestart restart media
    onrestart restart netd
    onrestart restart wificond
onrestart后面跟的Zygote重启需要执行的命令,audioserver,cameraserver,media,netd,wificond,当Zygote进程重启了,这些进程都会重启。
socket zygote stream 660 root system
这行表示Zygote进程在启动过程中,会在dev/socket目录下创建一个Socket,权限为660,表示所有的用户都可以对他进行读写,当init 解析到这样一条语句,它将做下面两件事:
- 调用 create_socket() (system/core/init/util.c), 创建一个Socket fd, 将这个fd 与某个文件(/dev/socket/xxx, xxx 就是上面列到的名字,比如,zygote) 绑定(bind), 根据init.rc 里面定义来设定相关的用户,组和权限。最后返回这个fd。
- 将socket 名字(带‘ANDROID_SOCKET_'前缀)(比如 zygote) 和 fd 注册到init 进程的环境变量里,这样所有的其他进程(所有进程都是init的子进程)都可以通过 getenv(name)获取到这个fd.
system/core/init/descriptors.cpp

45#define ANDROID_SOCKET_ENV_PREFIX "ANDROID_SOCKET_"
46#define ANDROID_SOCKET_DIR        "/dev/socket"

50void DescriptorInfo::CreateAndPublish(const std::string& globalContext) const {
51  // Create
52  const std::string& contextStr = context_.empty() ? globalContext : context_;
53  int fd = Create(contextStr);
54  if (fd < 0) return;
55
56  // Publish
57  std::string publishedName = key() + name_;
58  std::for_each(publishedName.begin(), publishedName.end(),
59                [] (char& c) { c = isalnum(c) ? c : '_'; });
60
61  std::string val = android::base::StringPrintf("%d", fd);
     //将创建的socket 的fd 放入 环境变量:ANDROID_SOCKET_zygote 中,以便在zygote进程中,获取此socket的fd
62  add_environment(publishedName.c_str(), val.c_str());
63
64  // make sure we don't close on exec
65  fcntl(fd, F_SETFD, 0);
66}
80int SocketInfo::Create(const std::string& context) const {
81  int flags = ((type() == "stream" ? SOCK_STREAM :
82                (type() == "dgram" ? SOCK_DGRAM :
83                 SOCK_SEQPACKET)));
      //创建名为zygote 的socket
84  return create_socket(name().c_str(), flags, perm(), uid(), gid(), context.c_str());
85}
86
87const std::string SocketInfo::key() const {
88  return ANDROID_SOCKET_ENV_PREFIX;
89}
123const std::string FileInfo::key() const {
124  return ANDROID_FILE_ENV_PREFIX;
125}
现在应该明白了registerServerSocket的来龙去脉了吧,尤其是这个socket的fd是怎么来的
    frameworks/base/core/java/com/android/internal/os/ZygoteServer.java
    private static final String ANDROID_SOCKET_PREFIX = "ANDROID_SOCKET_";

    private LocalServerSocket mServerSocket;
    /**
     * Registers a server socket for zygote command connections
     *
     * @throws RuntimeException when open fails
     */
    void registerServerSocket(String socketName) {
        //看起来是用了一个单例
        if (mServerSocket == null) {
            int fileDesc;
            final String fullSocketName = ANDROID_SOCKET_PREFIX + socketName;
            try {
                //从环境变量中获取名为ANDROID_SOCKET_zygote的fd
                String env = System.getenv(fullSocketName);
                fileDesc = Integer.parseInt(env);
            } catch (RuntimeException ex) {
                throw new RuntimeException(fullSocketName + " unset or invalid", ex);
            }

            try {
                //构建JAVA中的FD对象
                FileDescriptor fd = new FileDescriptor();
                fd.setInt$(fileDesc);
               //用上面的FD创建LocalServerSocket
                mServerSocket = new LocalServerSocket(fd);
            } catch (IOException ex) {
                throw new RuntimeException(
                        "Error binding to local socket '" + fileDesc + "'", ex);
            }
        }
    }
总结:init进程中add环境变量,Zygote进程中get环境变量。
1.3、Zygote进程预加载资源
- 何为预加载?
android系统资源加载分两种方式,预加载和使用进程中加载。 预加载是指在zygote进程启动的时候就加载,这样系统只在zygote执行一次加载操作,所有APP用到该资源不需要再重新加载,减少资源加载时间,加快了应用启动速度,一般情况下,系统中App共享的资源会被列为预加载资源。
- 预加载是什么原理?
预加载的原理很简单,就是在zygote进程启动后将资源读取出来,保存到Resources一个全局静态变量中,下次读取系统资源的时候优先从静态变量中查找。主要代码在zygoteInit.java类中方法preloadResources(),主要代码如下: - 系统哪些资源被预加载了?
/frameworks/base/core/java/com/android/internal/os/ZygoteInit.java
124    static void preload(BootTimingsTraceLog bootTimingsTraceLog) {
125        Log.d(TAG, "begin preload");
126        bootTimingsTraceLog.traceBegin("BeginIcuCachePinning");
127        beginIcuCachePinning();
128        bootTimingsTraceLog.traceEnd(); // BeginIcuCachePinning
129        bootTimingsTraceLog.traceBegin("PreloadClasses");
130        preloadClasses();
131        bootTimingsTraceLog.traceEnd(); // PreloadClasses
132        bootTimingsTraceLog.traceBegin("PreloadResources");
133        preloadResources();
134        bootTimingsTraceLog.traceEnd(); // PreloadResources
135        Trace.traceBegin(Trace.TRACE_TAG_DALVIK, "PreloadOpenGL");
136        preloadOpenGL();
137        Trace.traceEnd(Trace.TRACE_TAG_DALVIK);
138        preloadSharedLibraries();
139        preloadTextResources();
140        // Ask the WebViewFactory to do any initialization that must run in the zygote process,
141        // for memory sharing purposes.
142        WebViewFactory.prepareWebViewInZygote();
143        endIcuCachePinning();
144        warmUpJcaProviders();
145        Log.d(TAG, "end preload");
146
147        sPreloadComplete = true;
148    }
系统哪些资源被预加载了?加载的有类,资源,共享库,
1.3.1 加载类----preloadClasses
preload方法中会调用会preloadClasses预加载一些类,这些类记录在[frameworks/base/preloaded-classes](http://androidxref.com/8.0.0_r4/xref/frameworks/base/preloaded-classes)文本文件里。大概有四千多个,下面列举一下。
32[Landroid.accounts.Account;
33[Landroid.animation.Animator;
34[Landroid.animation.Keyframe$FloatKeyframe;
35[Landroid.animation.Keyframe$IntKeyframe;
36[Landroid.animation.PropertyValuesHolder;
37[Landroid.app.LoaderManagerImpl;
38[Landroid.app.Notification$Action;
39[Landroid.app.NotificationChannel;
40[Landroid.app.RemoteInput;
41[Landroid.app.job.JobInfo$TriggerContentUri;
42[Landroid.bluetooth.BluetoothDevice;
43[Landroid.content.ContentProviderResult;
44[Landroid.content.ContentValues;
45[Landroid.content.Intent;
46[Landroid.content.UndoOwner;
47[Landroid.content.pm.ActivityInfo;
48[Landroid.content.pm.ConfigurationInfo;
49[Landroid.content.pm.FeatureGroupInfo;
50[Landroid.content.pm.FeatureInfo;
51[Landroid.content.pm.InstrumentationInfo;
52[Landroid.content.pm.PathPermission;
53[Landroid.content.pm.PermissionInfo;
54[Landroid.content.pm.ProviderInfo;
55[Landroid.content.pm.ServiceInfo;
56[Landroid.content.pm.Signature;
57[Landroid.content.res.Configuration;
58[Landroid.content.res.StringBlock;
59[Landroid.content.res.XmlBlock;
60[Landroid.database.CursorWindow;
61[Landroid.database.sqlite.SQLiteConnection$Operation;
62[Landroid.database.sqlite.SQLiteConnectionPool$AcquiredConnectionStatus;
63[Landroid.graphics.Bitmap$CompressFormat;
64[Landroid.graphics.Bitmap$Config;
65[Landroid.graphics.Bitmap;
66[Landroid.graphics.Canvas$EdgeType;
67[Landroid.graphics.ColorSpace$Model;
68[Landroid.graphics.ColorSpace$Named;
69[Landroid.graphics.ColorSpace;
70[Landroid.graphics.FontFamily;
71[Landroid.graphics.Interpolator$Result;
上面文件中列举的四千多个类都要通过Class.forName加载到系统中,生成字节码。
229    /**
230     * Performs Zygote process initialization. Loads and initializes
231     * commonly used classes.
232     *
233     * Most classes only cause a few hundred bytes to be allocated, but
234     * a few will allocate a dozen Kbytes (in one case, 500+K).
235     */
236    private static void preloadClasses() {
237        final VMRuntime runtime = VMRuntime.getRuntime();
238
239        InputStream is;
240        try {
241            is = new FileInputStream(PRELOADED_CLASSES);
242        } catch (FileNotFoundException e) {
243            Log.e(TAG, "Couldn't find " + PRELOADED_CLASSES + ".");
244            return;
266            droppedPriviliges = true;
267        }
               ........
274        try {
275            BufferedReader br   = new BufferedReader(new InputStreamReader(is), 256);
278            int count = 0;
279            String line;
280            while ((line = br.readLine()) != null) {
281                // Skip comments and blank lines.
282                line = line.trim();
                      //跳过文件中注释的部分
283                if (line.startsWith("#") || line.equals("")) {
284                    continue;
285                }
286
287                Trace.traceBegin(Trace.TRACE_TAG_DALVIK, line);
288                try {
289                    if (false) {
290                        Log.v(TAG, "Preloading " + line + "...");
291                    }
292                    // Load and explicitly initialize the given class. Use
293                    // Class.forName(String, boolean, ClassLoader) to avoid repeated stack lookups
294                    // (to derive the caller's class-loader). Use true to force initialization, and
295                    // null for the boot classpath class-loader (could as well cache the
296                    // class-loader of this class in a variable).
297                    Class.forName(line, true, null);
298                    count++;
299                } catch (ClassNotFoundException e) {
300                    Log.w(TAG, "Class not found for preloading: " + line);
301                } catch (UnsatisfiedLinkError e) {
302                    Log.w(TAG, "Problem preloading " + line + ": " + e);
303                } catch (Throwable t) {
304                 ........
314            }
315
316            Log.i(TAG, "...preloaded " + count + " classes in "
317                    + (SystemClock.uptimeMillis()-startTime) + "ms.");
318        } catch (IOException e) {
319            Log.e(TAG, "Error reading " + PRELOADED_CLASSES + ".", e);
320        } finally {
                  .....
339        }
340    }
1.3.2 加载资源----preloadResources
系统中有大量的资源可以直接被App所使用,比如一个颜色,一个drawble,这些都是通过preloadResources加载的。
/frameworks/base/core/java/com/android/internal/os/ZygoteInit.java
342    /**
343     * Load in commonly used resources, so they can be shared across
344     * processes.
345     *
346     * These tend to be a few Kbytes, but are frequently in the 20-40K
347     * range, and occasionally even larger.
348     */
349    private static void preloadResources() {
350        final VMRuntime runtime = VMRuntime.getRuntime();
351
352        try {
353            mResources = Resources.getSystem();
354            mResources.startPreloading();
355            if (PRELOAD_RESOURCES) {
356                Log.i(TAG, "Preloading resources...");
357
358                long startTime = SystemClock.uptimeMillis();
                     //1、加载preloaded_drawables中定义的资源,这里面定义的基本是图片
359                TypedArray ar = mResources.obtainTypedArray(
360                        com.android.internal.R.array.preloaded_drawables);
361                int N = preloadDrawables(ar);
362                ar.recycle();
363                Log.i(TAG, "...preloaded " + N + " resources in "
364                        + (SystemClock.uptimeMillis()-startTime) + "ms.");
365
366                startTime = SystemClock.uptimeMillis();
                       //2、加载preloaded_color_state_lists中定义的资源,这里面定义的基本是颜色
367                ar = mResources.obtainTypedArray(
368                        com.android.internal.R.array.preloaded_color_state_lists);
                      //如果是颜色资源,需要调用preloadColorStateLists加载,见下面的preloadColorStateLists代码的解释
369                N = preloadColorStateLists(ar);
370                ar.recycle();
371                Log.i(TAG, "...preloaded " + N + " resources in "
372                        + (SystemClock.uptimeMillis()-startTime) + "ms.");
373
                      //3、加载config_freeformWindowManagement中定义的资源,这里面定义的基本是图片
374                if (mResources.getBoolean(
375                        com.android.internal.R.bool.config_freeformWindowManagement)) {
376                    startTime = SystemClock.uptimeMillis();
377                    ar = mResources.obtainTypedArray(
378                            com.android.internal.R.array.preloaded_freeform_multi_window_drawables);
379                    N = preloadDrawables(ar);
380                    ar.recycle();
381                    Log.i(TAG, "...preloaded " + N + " resource in "
382                            + (SystemClock.uptimeMillis() - startTime) + "ms.");
383                }
384            }
385            mResources.finishPreloading();
386        } catch (RuntimeException e) {
387            Log.w(TAG, "Failure preloading resources", e);
388        }
389    }
preloaded_drawables、preloaded_color_state_lists、preloaded_freeform_multi_window_drawables都是在/frameworks/base/core/res/res/values/arrays.xml中定义的
/frameworks/base/core/res/res/values/arrays.xml
20
21
22
24
25 - @drawable/ab_share_pack_material
26 - @drawable/ab_solid_shadow_material
27 - @drawable/action_bar_item_background_material
28 - @drawable/activated_background_material
......
138 - @drawable/toast_frame
139
141
143
144 - @color/primary_text_dark
145 - @color/primary_text_dark_disable_only
146 - @color/primary_text_dark_nodisable
.......
186 - @color/search_url_text_material_light
187
189
190 - @drawable/decor_maximize_button_dark
191 - @drawable/decor_maximize_button_light
192
对于颜色资源,需要调用preloadColorStateLists来加载
/frameworks/base/core/java/com/android/internal/os/ZygoteInit.java
391    private static int preloadColorStateLists(TypedArray ar) {
392        int N = ar.length();
393        for (int i=0; i
对于preloadOpenGL、preloadSharedLibraries和preloadTextResources在此不一一分析了,原来ZygoteInit中的preload方法加载了这么多资源,这个也就是为什么开机慢而打开一个应用快的原因之一。我们能不能把加载资源的这些耗时操作放到子线程中做呢?
671    public static void main(String argv[]) {
672        ZygoteServer zygoteServer = new ZygoteServer();
673
674        // Mark zygote start. This ensures that thread creation will throw
675        // an error.
676        ZygoteHooks.startZygoteNoThreadCreation();
677
                .......
756        ZygoteHooks.stopZygoteNoThreadCreation();
757     }
看到为防止多线程带来的同步问题,google这个地方禁止开启多线程。故网上有很多说法,尝试把这些代码放到子线程中去做应该是不对的(Android O)。
下一篇将在此基础上梳理SystemServer进程的创建流程


