整理资料一 荔枝派Zero V3s(TF/SD卡启动)(主线Linux,主线u-boot)
资料来源挖坑网
荔枝派Zero V3s开发板入坑记录 (TF/SD卡启动)(主线Linux,主线u-boot) https://whycan.cn/t_561.html
1. 准备工作
1) 安装Ubuntu14.04LTS(长支持版本),如果用虚拟机请安装vmware14(别的虚拟机都不推荐,泪的教训), 然后安装 vmware tools(不是必须,但是方便文件共享)
2) 安装arm linux 硬件浮点数工具链, 因为V3s支持VFPv4 浮点单元: sudo apt-get install gcc-arm-linux-gnueabihf
3) 安装git源码管理软件: sudo apt-get install git
4) 其他支撑软件
2. u-boot
首先获取u-boot源码: git clone https://github.com/Lichee-Pi/u-boot.git -b v3s-current
如果你需要支持spi flash: git clone https://github.com/Lichee-Pi/u-boot.git -b v3s-spi-experimental
修改 include/configs/sun8i.h, 使u-boot可以直接从tf卡启动:
#define CONFIG_BOOTCOMMAND "setenv bootm_boot_mode sec; " \
"load mmc 0:1 0x41000000 zImage; " \
"load mmc 0:1 0x41800000 sun8i-v3s-licheepi-zero-dock.dtb; " \
"bootz 0x41000000 - 0x41800000;"#define CONFIG_BOOTARGS "console=ttyS0,115200 panic=5 rootwait root=/dev/mmcblk0p2 earlyprintk rw vt.global_cursor_default=0"
cd u-boot
ARCH=arm CROSS_COMPILE=arm-linux-gnueabihf- make LicheePi_Zero_800x480LCD_defconfig (群主网店5寸屏)ARCH=arm CROSS_COMPILE=arm-linux-gnueabihf- make LicheePi_Zero_480x272LCD_defconfig (通用4.3寸屏)
ARCH=arm CROSS_COMPILE=arm-linux-gnueabihf- make LicheePi_Zero_defconfig (默认)
ARCH=arm make menuconfig
执行编译:
ARCH=arm CROSS_COMPILE=arm-linux-gnueabihf- make多核编译,避免cpu其他内核打酱油, J后的参数是参与编译的cpu个数:
ARCH=arm CROSS_COMPILE=arm-linux-gnueabihf- make -j3
3. 设备树, Linux
获取Linux源码(zero-4.13.y分支对网卡支持比较好): git clone https://github.com/Lichee-Pi/linux.git -b zero-4.13.y
生成荔枝派Zero 默认配置文件: CROSS_COMPILE=arm-linux-gnueabihf- ARCH=arm make licheepi_zero_defconfig
设备树文件(默认不需要修改): arch/arm/boot/dts/sun8i-v3s-licheepi-zero.dts
编译内核: make ARCH=arm CROSS_COMPILE=arm-linux-gnueabihf- -j4
编译设备树: make ARCH=arm CROSS_COMPILE=arm-linux-gnueabihf- dtbs
4. 根文件系统
1). 下载最新的buildroot稳定版本
官方网站: https://buildroot.org/download.html
长支持版本:buildroot-2017.02.7.tar.gz
最新稳定版:buildroot-2017.08.1.tar.gz
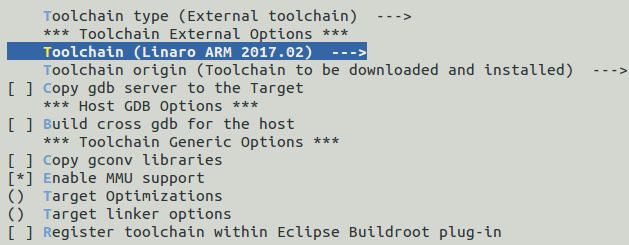
2). 配置buildroot 参数, make menuconfig; make
如果不会配置, 就下载下面这个文件,然后把 buildroot-v3s-20171122.zip解压后 拷贝到 buidroot目录成 .config 文件。
3). 执行编译, 生成文件跟文件系统。
4). 如需构建Qt应用程序, 视频地址: buildroot成功后如何编译Qt应用程序
5. 烧录TF卡启动盘: 【视频分享】制作荔枝派Zero开发板(全志V3s) TF/SD卡启动盘
https://www.kancloud.cn/lichee/lpi0/317715
1) 删除TF卡所有分区
2) 将uboot写入到sd卡8k偏移处(必须8K偏移, brom龟腚的)。
sudo dd if=u-boot-sunxi-with-spl.bin of=/dev/sdX bs=1024 seek=8
3) 建立第一个分区,大小32M(可以随意填写), 格式FAT16, 把zImage, sun8i-v3s-licheepi-zero-dock.dtb拷贝到 这个分区
4) 建立第二个分区,用尽剩余空间,格式ext4, 把buildroot产生的rootfs.tar解压到该分区根目录
tar xvf output/images/rootfs.tar -C /挂载的tf卡第二个分区目录

