基于眼镜识别和手势识别的视力检测系统(Python)
基于手势识别的视力检测系统(Python)
(自学C++和Python已经一年的时间,之前基于客户需求开发出此程序,效果还算满意,特发布自己的第一篇博客,未完待续,我先去追一下《庆余年》。。。。)
在传统的视力检测中,被测者需要摘下眼镜,并用手指示出验光师指定E图的方向,验光师需要根据被测试者的反应判断视力值。
本程序使用眼镜识别和手势识别(参考),程序随机出现E图,被测者根据图片做出反应,程序进行自动判断得到检测结果,并输出检测报告。
目录
- 基于手势识别的视力检测系统(Python)
- 项目介绍
- 眼镜识别
- 手势识别
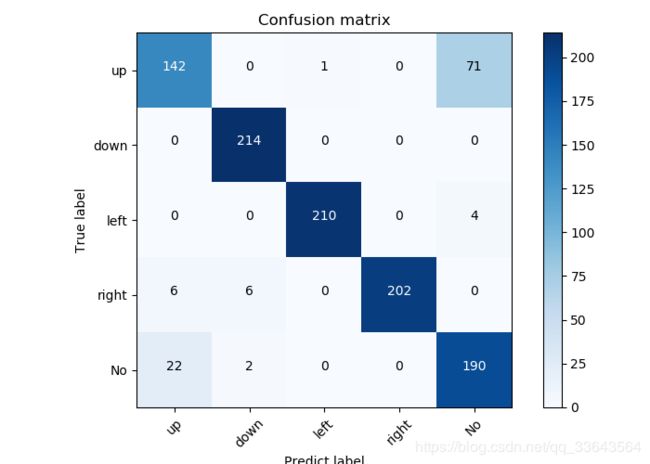
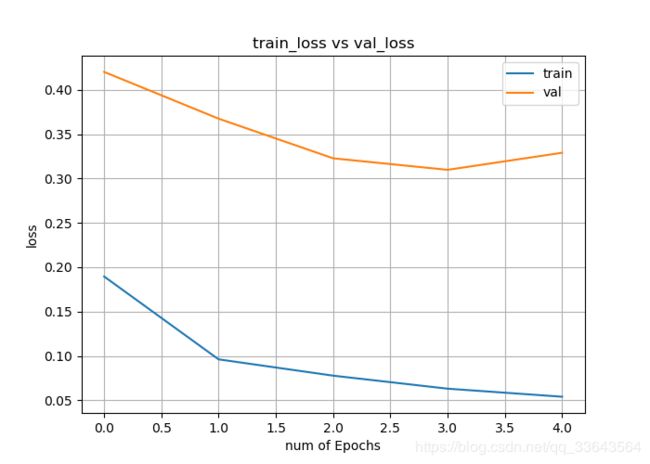
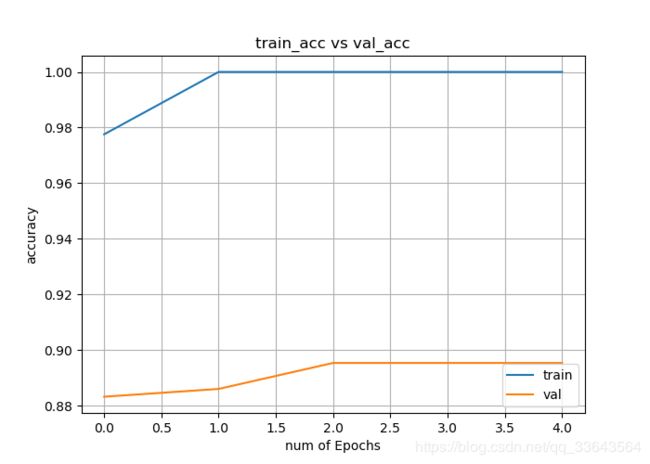
- 训练模型
- 界面制作
- 检测流程
- 生成检测报告
- 总结
- 参考文献

项目介绍
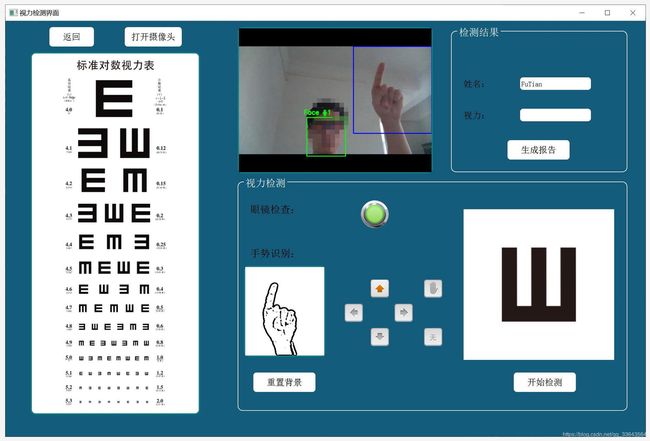
使用Opencv和Dlib库检测人脸并检测是否佩戴眼镜,只能在未佩戴眼镜的情况下(裸眼)进行视力检测:
- 人脸识别–使用Opencv和Dlib库识别人脸;
- 眼镜识别–眉心和瞳孔检测确认是否佩戴眼镜;
- 手势识别–使用背景减法运动检测获取手势二值化图像,然后使用卷积神经网络CNN进行深度学习(Tensorflow);
- 界面UI–使用PyQt5完成界面设计;
- 报告输出–使用openpyxl在做好的视力检测模板中添加图片和文字,输出PDF报告;
- 总结
眼镜识别
眉心和瞳孔检测确认是否佩戴眼镜
# ==============================================================================
    #   1.landmarks格式转换函数
    #       输入:dlib格式的landmarks
    #       输出:numpy格式的landmarks
    # ==============================================================================
    def landmarks_to_np(self,landmarks, dtype="int"):
        # 获取landmarks的数量
        num = landmarks.num_parts

        # initialize the list of (x, y)-coordinates
        coords = np.zeros((num, 2), dtype=dtype)

        # loop over the 68 facial landmarks and convert them
        # to a 2-tuple of (x, y)-coordinates
        for i in range(0, num):
            coords[i] = (landmarks.part(i).x, landmarks.part(i).y)
        # return the list of (x, y)-coordinates
        return coords

    # ==============================================================================
    #   2.绘制回归线 & 找瞳孔函数
    #       输入:图片 & numpy格式的landmarks
    #       输出:左瞳孔坐标 & 右瞳孔坐标
    # ==============================================================================
    def get_centers(self,img, landmarks):
        # 线性回归
        EYE_LEFT_OUTTER = landmarks[2]
        EYE_LEFT_INNER = landmarks[3]
        EYE_RIGHT_OUTTER = landmarks[0]
        EYE_RIGHT_INNER = landmarks[1]

        x = ((landmarks[0:4]).T)[0]
        y = ((landmarks[0:4]).T)[1]
        A = np.vstack([x, np.ones(len(x))]).T
        k, b = np.linalg.lstsq(A, y, rcond=None)[0]

        x_left = (EYE_LEFT_OUTTER[0] + EYE_LEFT_INNER[0]) / 2
        x_right = (EYE_RIGHT_OUTTER[0] + EYE_RIGHT_INNER[0]) / 2
        LEFT_EYE_CENTER = np.array([np.int32(x_left), np.int32(x_left * k + b)])
        RIGHT_EYE_CENTER = np.array([np.int32(x_right), np.int32(x_right * k + b)])

        pts = np.vstack((LEFT_EYE_CENTER, RIGHT_EYE_CENTER))
        cv2.polylines(img, [pts], False, (255, 0, 0), 1)  # 画回归线
        cv2.circle(img, (LEFT_EYE_CENTER[0], LEFT_EYE_CENTER[1]), 3, (0, 0, 255), -1)
        cv2.circle(img, (RIGHT_EYE_CENTER[0], RIGHT_EYE_CENTER[1]), 3, (0, 0, 255), -1)

        return LEFT_EYE_CENTER, RIGHT_EYE_CENTER

    # ==============================================================================
    #   3.人脸对齐函数
    #       输入:图片 & 左瞳孔坐标 & 右瞳孔坐标
    #       输出:对齐后的人脸图片
    # ==============================================================================
    def get_aligned_face(self,img, left, right):
        desired_w = 256
        desired_h = 256
        desired_dist = desired_w * 0.5

        eyescenter = ((left[0] + right[0]) * 0.5, (left[1] + right[1]) * 0.5)  # 眉心
        dx = right[0] - left[0]
        dy = right[1] - left[1]
        dist = np.sqrt(dx * dx + dy * dy)  # 瞳距
        scale = desired_dist / dist  # 缩放比例
        angle = np.degrees(np.arctan2(dy, dx))  # 旋转角度
        M = cv2.getRotationMatrix2D(eyescenter, angle, scale)  # 计算旋转矩阵

        # update the translation component of the matrix
        tX = desired_w * 0.5
        tY = desired_h * 0.5
        M[0, 2] += (tX - eyescenter[0])
        M[1, 2] += (tY - eyescenter[1])

        aligned_face = cv2.warpAffine(img, M, (desired_w, desired_h))

        return aligned_face

    # ==============================================================================
    #   4.是否戴眼镜判别函数
    #       输入:对齐后的人脸图片
    #       输出:判别值(True/False)
    # ==============================================================================
    def judge_eyeglass(self,img):
        img = cv2.GaussianBlur(img, (11, 11), 0)  # 高斯模糊

        sobel_y = cv2.Sobel(img, cv2.CV_64F, 0, 1, ksize=-1)  # y方向sobel边缘检测
        sobel_y = cv2.convertScaleAbs(sobel_y)  # 转换回uint8类型
        # cv2.imshow('sobel_y',sobel_y)

        edgeness = sobel_y  # 边缘强度矩阵

        # Otsu二值化
        retVal, thresh = cv2.threshold(edgeness, 0, 255, cv2.THRESH_BINARY + cv2.THRESH_OTSU)

        # 计算特征长度
        d = len(thresh) * 0.5
        x = np.int32(d * 6 / 7)
        y = np.int32(d * 3 / 4)
        w = np.int32(d * 2 / 7)
        h = np.int32(d * 2 / 4)

        x_2_1 = np.int32(d * 1 / 4)
        x_2_2 = np.int32(d * 5 / 4)
        w_2 = np.int32(d * 1 / 2)
        y_2 = np.int32(d * 8 / 7)
        h_2 = np.int32(d * 1 / 2)

        roi_1 = thresh[y:y + h, x:x + w]  # 提取ROI
        roi_2_1 = thresh[y_2:y_2 + h_2, x_2_1:x_2_1 + w_2]
        roi_2_2 = thresh[y_2:y_2 + h_2, x_2_2:x_2_2 + w_2]
        roi_2 = np.hstack([roi_2_1, roi_2_2])

        measure_1 = sum(sum(roi_1 / 255)) / (np.shape(roi_1)[0] * np.shape(roi_1)[1])  # 计算评价值
        measure_2 = sum(sum(roi_2 / 255)) / (np.shape(roi_2)[0] * np.shape(roi_2)[1])  # 计算评价值
        measure = measure_1 * 0.3 + measure_2 * 0.7

        # cv2.imshow('roi_1',roi_1)
        # cv2.imshow('roi_2',roi_2)
        #print(measure)

        # 根据评价值和阈值的关系确定判别值
        if measure > 0.15:  # 阈值可调,经测试在0.15左右
            self.judge = True
        else:
            self.judge = False
        #print(judge)
        return self.judge
手势识别
使用背景减法运动检测获取手势二值化图像,然后使用卷积神经网络CNN进行深度学习(Tensorflow)
import cv2
import numpy as np
from keras.models import load_model
from training import Training
import os
from keras import backend
import time
import random


class Gesture():

    def __init__(self, train_path, predict_path, gesture, train_model):
        self.blurValue = 5
        self.bgSubThreshold = 36
        self.train_path = train_path
        self.predict_path = predict_path
        self.threshold = 60
        self.gesture = gesture
        self.train_model = train_model
        self.skinkernel = cv2.getStructuringElement(cv2.MORPH_ELLIPSE, (5, 5))
        self.x1 = 380
        self.y1 = 60
        self.x2 = 640
        self.y2 = 350

    def collect_gesture(self, capture, ges, photo_num):
        photo_num = photo_num
        vedeo = False
        predict = False
        count = 0
        # 读取默认摄像头
        cap = cv2.VideoCapture(capture)
        # 设置捕捉模式
        cap.set(10, 200)
        # 背景减法创建及初始化
        bgModel = cv2.createBackgroundSubtractorMOG2(0, self.bgSubThreshold)

        while True:
            # 读取视频帧
            ret, frame = cap.read()
            # 镜像转换
            frame = cv2.flip(frame, 1)

            cv2.imshow('Original', frame)
            # 双边滤波
            frame = cv2.bilateralFilter(frame, 5, 50,100)

            # 绘制矩形,第一个为左上角坐标(x,y),第二个为右下角坐标
            # rec = cv2.rectangle(frame, (220, 50), (450, 300), (255, 0, 0), 2)
            rec = cv2.rectangle(frame, (self.x1, self.y1), (self.x2, self.y2), (255, 0, 0), 2)

            # 定义roi区域,第一个为y的取值,第2个为x的取值
            # frame = frame[50:300, 220:450]
            frame = frame[self.y1:self.y2, self.x1:self.x2]
            cv2.imshow('bilateralFilter', frame)
            # 背景减法运动检测
            bg = bgModel.apply(frame, learningRate=0)
            # 显示背景减法的窗口
            cv2.imshow('bg', bg)
            # 图像边缘处理--腐蚀
            fgmask = cv2.erode(bg, self.skinkernel, iterations=1)
            # 显示边缘处理后的图像
            cv2.imshow('erode', fgmask)
            # 将原始图像与背景减法+腐蚀处理后的蒙版做"与"操作
            bitwise_and = cv2.bitwise_and(frame, frame, mask=fgmask)
            # 显示与操作后的图像
            cv2.imshow('bitwise_and', bitwise_and)
            # 灰度处理
            gray = cv2.cvtColor(bitwise_and, cv2.COLOR_BGR2GRAY)
            # 高斯滤波
            blur = cv2.GaussianBlur(gray, (self.blurValue, self.blurValue), 2)
            cv2.imshow('GaussianBlur', blur)

            # 使用自适应阈值分割(adaptiveThreshold)
            thresh = cv2.adaptiveThreshold(blur, 255, cv2.ADAPTIVE_THRESH_GAUSSIAN_C, cv2.THRESH_BINARY, 11, 2)
            cv2.imshow('thresh', thresh)

            Ges = cv2.resize(thresh, (100, 100))
            # 图像的阈值处理(采用ostu)
            # _, thresh = cv2.threshold(blur, 0, 255, cv2.THRESH_BINARY+cv2.THRESH_OTSU)
            # cv2.imshow('threshold1', thresh)

            if predict == True:

                # img = cv2.resize(thresh, (100, 100))
                img = np.array(Ges).reshape(-1, 100, 100, 1)/255
                prediction = p_model.predict(img)
                final_prediction = [result.argmax() for result in prediction][0]
                ges_type = self.gesture[final_prediction]
                # print(ges_type)
                cv2.putText(rec, ges_type, (self.x1, self.y1), fontFace=cv2.FONT_HERSHEY_COMPLEX, fontScale=1, thickness=2, color=(0, 0, 255))
                # cv2.putText(rec, ges_type, (150, 220), fontFace=cv2.FONT_HERSHEY_COMPLEX, fontScale=1, thickness=3, color=(0, 0, 255))

            cv2.imshow('Original', rec)
            if vedeo is True and count < photo_num:
                # 录制训练集
                cv2.imencode('.jpg', Ges)[1].tofile(self.train_path + '{}_{}.jpg'.format(str(random.randrange(1000, 100000)),str(ges)))
                count += 1
                print(count)
            elif count == photo_num:
                print('{}张测试集手势录制完毕,3秒后录制此手势测试集,共{}张'.format(photo_num, int(photo_num*0.43)))
                time.sleep(3)
                count += 1
            elif vedeo is True and photo_num < count < int(photo_num*1.43):
                cv2.imencode('.jpg', Ges)[1].tofile(self.predict_path + '{}_{}.jpg'.format(str(random.randrange(1000, 100000)),str(ges)))
                count += 1
                print(count)
            elif vedeo is True and count >= int(photo_num*1.43):
                vedeo = False
                ges += 1
                if ges < len(self.gesture):
                    print('此手势录制完成,按l录制下一个手势')
                else:
                    print('手势录制结束, 按t进行训练')

            k = cv2.waitKey(10)
            if k == 27:
                break

            elif k == ord('l'):  # 录制手势
                vedeo = True
                count = 0

            elif k == ord('p'):  # 预测手势
                predict = True
                while True:
                    model_name = input('请输入模型的名字:\n')
                    if model_name == 'exit':
                        break
                    if model_name in os.listdir('./'):
                        print('正在加载{}模型'.format(model_name))
                        p_model = load_model(model_name)
                        break
                    else:
                        print('模型名字输入错误,请重新输入,或输入exit退出')

            elif k == ord('b'):
                bgModel = cv2.createBackgroundSubtractorMOG2(0, self.bgSubThreshold)
                print('背景重置完成')

            elif k == ord('t'):
                os.environ["CUDA_VISIBLE_DEVICES"] = "0"
                train = Training(batch_size=32, epochs=5, categories=len(self.gesture), train_folder=self.train_path,
                                 test_folder=self.predict_path, model_name=self.train_model, type=self.gesture)
                train.train()
                backend.clear_session()
                print(f'{self.train_model}模型训练结束')


if __name__ == '__main__':

    # 要训练的手势类型
    # Gesturetype = input('请输入训练手势(用逗号隔开):\n')
    # if Gesturetype == "none":
    #     Gesturetype = ['666', 'yech', 'stop', 'punch', 'OK']
    # else:
    #     Gesturetype = Gesturetype.split(',')

    Gesturetype = ['None','up', 'down', 'left', 'right','No']
    train_path = 'Gesture_train/'
    pridect_path = 'Gesture_predict/'

    # # 训练集路径
    # train_path = 'train_test/'
    # # 测试集路径
    # pridect_path = 'predict_test/'

    for path in [train_path, pridect_path]:
        if not os.path.exists(path):
            os.mkdir(path)
    print(f'训练手势有:{Gesturetype}')

    # 模型保存命名
    # train_model = input('请输入训练模型名:\n')

    train_model = 'Gesture.h5'
    # 初始化手势识别类
    Ges = Gesture(train_path, pridect_path, Gesturetype, train_model)
    # 单个手势要录制的数量
    num = 1000
    # 训练手势类别计数器
    x = 0
    # 调用启动函数
    Ges.collect_gesture(capture=0, ges=x, photo_num=num)
训练模型
界面制作
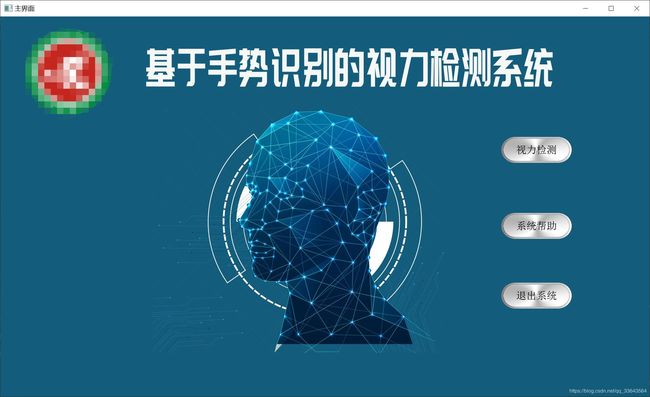
使用PyQt5制作子界面和检测界面
1.主界面
2.检测界面
图片在项目简介中有,这里就不贴了,主要的难点是将视频流和动态Button显示在界面上,这里我们使用QTimer采用多线程的处理方式。
#打开摄像头
    def camshow(self):
        if self.camstatus:
            self.timer_camera = QTimer()  # 定义定时器
            self.cap = cv2.VideoCapture(0)
            self.timer_camera.start(20)
            self.timer_camera.timeout.connect(self.openFrame)
            #摄像头已经开启
            self.camstatus = False
检测流程
将E图从大到小显示在界面上,如果手势正确则进行下一E图的检测,连续两次检测错误,则认定看不清。
 def EyeSightChk(self):

        #_,self.img_1 = self.cap.read()

        #cv2.imshow("Result", self.img_1)
        if self.judge == True:
            reply = QMessageBox.warning(self, '眼睛检查', '检测到您已佩戴眼镜,请摘下眼镜后进行检查!',
                                        QMessageBox.Yes | QMessageBox.No, QMessageBox.No)
        else:
            self.lineEdit_ES.setText("")
            self.count = 0
            self.sight_value_current = self.sight_value[self.count]
            list_dir = [0,2,3]
            self.check_E_current = random.choice(list_dir)
            E_img = QPixmap("./icon/sight/" + str(self.sight_value_current) + "_" + str(self.check_E_current) + ".png")  # 按指定路径找到图片,注意路径必须用双引号包围,不能用单引号
            self.label_face.setPixmap(E_img)  # 在label上显示图片
            self.label_face.setScaledContents(True)  # 让图片自适应label大小
            ##Report
            self.wb = load_workbook(os.getcwd() + '/report/temple.xlsx')
            self.sht = self.wb.worksheets[0]
            img = EImage("./icon/sight/" + str(self.sight_value_current) + "_" + str(self.check_E_current) + ".png")
            newsize = (130, 130)
            img.width, img.height = newsize
            self.sht.add_image(img, 'B6')
            #self.wb.save(os.getcwd() + '/report/temple2.xlsx')
            #每间隔5s更换E图
            self.timer_sight = QTimer()  # 定义定时器

            self.timer_sight.timeout.connect(self.sightcheck)
            self.startCount()
            #每隔20毫秒检查一次手势变化
            self.timer_sight_hand = QTimer()  # 定义定时器
            self.result = []
            self.timer_sight_hand.timeout.connect(self.sightcheck_hand)
            self.startCount_hand()


    def startCount(self):
        self.timer_sight.start(5000)
    def startCount_hand(self):

        self.timer_sight_hand.start(100)

    def sightcheck_hand(self):

        self.result.append(self.Gesturetype[self.final_prediction])


        #print(self.result)

    def sightcheck(self):
        #当视力达到最大时,结束检测
        if self.sight_value_current == "1.50":
            cv2.imwrite('./report/Hand_Frame/' + str(self.count+1) + ".png", self.thresh)
            self.sht.cell(self.count + 6, 4).value = "正确"
            E_img = QPixmap("./icon/sight/over.png")  # 按指定路径找到图片,注意路径必须用双引号包围,不能用单引号

            self.label_face.setPixmap(E_img)  # 在label上显示图片
            self.label_face.setScaledContents(True)  # 让图片自适应label大小
            self.timer_sight_hand.stop()
            self.timer_sight.stop()
            self.lineEdit_ES.setText(self.sight_value_current)
        else:
            maxNum_result = Counter(self.result).most_common(1)
            #print(self.result)
            #当检测到的结果一致时
            if maxNum_result[0][0] == self.Gesturetype[self.check_E_current + 1]:
                self.sht.cell(self.count+6, 4).value = "正确"
                self.count = self.count + 1
                self.result = []  # 清空3秒中内的结果
                self.sight_value_current = self.sight_value[self.count]
                print(self.sight_value_current)
                list_dir = [0, 2, 3]
                self.check_E_current = random.choice(list_dir)
                E_img = QPixmap("./icon/sight/" + str(self.sight_value_current) + "_" + str(self.check_E_current) + ".png")  # 按指定路径找到图片,注意路径必须用双引号包围,不能用单引号
                self.label_face.setPixmap(E_img)  # 在label上显示图片
                self.label_face.setScaledContents(True)  # 让图片自适应label大小

                img = EImage("./icon/sight/" + str(self.sight_value_current) + "_" + str(self.check_E_current) + ".png")
                newsize = (130, 130)
                img.width, img.height = newsize
                self.sht.add_image(img, 'B'+str(self.count+6))
                cv2.imwrite('./report/Hand_Frame/' + str(self.count) + ".png", self.thresh)
               # self.wb.save(os.getcwd() + '/report/temple2.xlsx')

                '''
                #cv2.imwrite("buffer.png", self.thresh)
                handimg = EImage("buffer.png")
                handnewsize = (130, 145)
                handimg.width, handimg.height = handnewsize
                self.sht.add_image(handimg,'C'+str(self.count+5))
                self.wb.save(os.getcwd() + '/report/temple2.xlsx')
                '''
                self.failtime = 0
            #如果检测到的结果是手掌,结束检测
            elif maxNum_result[0][0] == 'none' and self.count != 0:
                self.sht.cell(self.count + 6, 4).value = "错误"
                cv2.imwrite('./report/Hand_Frame/' + str(self.count+1) + ".png", self.thresh)
                E_img = QPixmap("./icon/sight/over.png")  # 按指定路径找到图片,注意路径必须用双引号包围,不能用单引号
                self.label_face.setPixmap(E_img)  # 在label上显示图片
                self.label_face.setScaledContents(True)  # 让图片自适应label大小
                self.timer_sight_hand.stop()
                self.timer_sight.stop()
                self.lineEdit_ES.setText(self.sight_value[self.count-1])
            #当结果不对时,再试一次,如果还是不对则结束检测
            else:
                self.result = []

                self.failtime += 1
                if self.failtime == 2:
                    self.sht.cell(self.count + 6, 4).value = "错误"
                    cv2.imwrite('./report/Hand_Frame/' + str(self.count+1) + ".png", self.thresh)
                    #self.wb.save(os.getcwd() + '/report/temple2.xlsx')
                    E_img = QPixmap("./icon/sight/over.png")  # 按指定路径找到图片,注意路径必须用双引号包围,不能用单引号
                    self.label_face.setPixmap(E_img)  # 在label上显示图片
                    self.label_face.setScaledContents(True)  # 让图片自适应label大小
                    self.timer_sight_hand.stop()
                    self.timer_sight.stop()
                    if self.count == 0:
                        self.lineEdit_ES.setText("0.15")
                    else:
                        self.lineEdit_ES.setText(self.sight_value[self.count-1])
        ''''
        print(self.count,self.result)


        if self.count == 0 :
            self.count = self.count + 1
            self.result = []  # 清空3秒中内的结果

        '''''
        #else:
            #self.timer_sight_hand.stop()
            #self.timer_sight.stop()

        #print(self.count)
生成检测报告
    def save(self):
        # 获取输入框内容并去除首位空格
        self.sight_report = self.lineEdit_ES.text()
        self.name_report = self.lineEdit_NM.text()

        # 判断检测值和姓名两项是否有其中一项为空
        if len(self.sight_report) >= 1 and len(self.sight_report) >= 1:
            self.sht.cell(2, 2).value = self.name_report
            self.sht.cell(3, 2).value = self.sight_report
            self.sht.cell(2, 4).value = time.strftime('%Y-%m-%d %H:%M:%S', time.localtime(time.time()))
            for i in range(0,self.count+1):
                img = EImage("./report/Hand_Frame/" + str(i+1) + ".png")
                newsize = (130, 130)
                img.width, img.height = newsize
                self.sht.add_image(img, 'C' + str(i+ 6))
            self.wb.save(os.getcwd() + '/report/'+self.name_report+'.xlsx')
            xlApp = client.Dispatch("Excel.Application")
            books = xlApp.Workbooks.Open(os.getcwd() + '/report/'+self.name_report+'.xlsx')
            books.ExportAsFixedFormat(0, os.getcwd() + '/report/'+self.name_report+'.pdf')
            xlApp.Quit()
            reply = QMessageBox.information(self, '报告生成成功', '检测报告生成成功!保存在report文件夹下',
                                            QMessageBox.Yes | QMessageBox.No, QMessageBox.No)
        else:
            #对话框,完整输入
            reply = QMessageBox.warning(self, '错误', '请检查姓名并完成检查!',
                                         QMessageBox.Yes | QMessageBox.No, QMessageBox.No)
总结
未完待续。。。如有疑问可私信与我联系。
眼镜检测和手势检测参考以下代码,特别感谢!

参考文献
【1】眼镜检测Github
【2】手势检测Github
