R:ggplot2(16),第8章 精雕细琢(1)
《ggplot2:数据分析与图形艺术》
第8章 精雕细琢
8.1 主题
主题系统控制者图形中的非数据元素外观,它不会影响几何对象和标度等数据元素。主题的控制包括标题、坐标轴标签、图例标签等文字调整,以及网格线、背景、轴须等颜色搭配。
8.1.1 内置主题
图形默认等theme_gray()使用淡灰色背景白色网格线,theme_bw()为传统等白色背景和深灰色网格线。
两个主题都由危机的参数base_size来控制基础字体的大小。基础字体大小指的是轴标题的大小,图形标题比它大20%,轴须标签比它小20%。
主题设置有两种方式:
- 全局性设置:theme_set(theme_grey())或theme_set(theme_bw())。theme_set()返回先前的主题,可储存以备用。
- 局部性设置:只改变单个图形的主题,qplot(…) + theme_grey()。局部设置将会覆盖默认的全局性设置。
下面展示全局设置主题和局部设置主题应用的例子:
> theme_set(theme_bw()) #设定一个白色主题
> hgram <- qplot(table, data=diamonds, binwidth=1)
> hgram #图形绘制的是白色主题
> previous_theme <- theme_set(theme_gray()) #加入一个灰色主题
> hgram #图形绘制的是灰色主题
> hgram + previous_theme #图形绘制的是白色主题,加入2种主题后,选用前一种主题色。theme_set()返回先前的主题
8.1.2 主题元素和元素函数
主题有控制图形外观的多个元素组成,见表8.1。
表8.1主题元素
| 主题元素 | 类型 | 描述 |
|---|---|---|
| axis.line | segment | 直线和坐标轴 |
| axis.text.x | text | x轴标签 |
| axis.text.y | text | y轴标签 |
| axis.ticks | segment | 轴须标签 |
| axis.title.x | text | 水平轴标题 |
| axis.title.y | text | 竖直轴标题 |
| legend.background | rect | 图例背景 |
| legend.key | rect | 图例符号 |
| legend.text | text | 图例标签 |
| legend.title | text | 图例标题 |
| panel.background | rect | 面板背景 |
| panel.border | rect | 面板边界 |
| panel.grid.major | line | 主网格线 |
| panel.grid.minor | line | 次网格线 |
| plot.background | rect | 整个图形背景 |
| plot.title | text | 图形标题 |
| strip.background | rect | 分面标签背景 |
| strip.text.x | text | 水平条状文本 |
| strip.text.y | text | 竖直条状文本 |
内置元素函数有四个基础类型:文本(text)、线条(lines)、矩形(rectangles)、空白(blank)。每个元素函数都有一系列控制外观的函数。
- element_text() 绘制标签和标题,可控制字体的family,face,colour,size,hjust,vjust,angle,lineheight。下面的代码和图展示来不同参数下图形的变化情况。角度的改变可能会轴须标签很有用,当改变角度时,需将hjust调整至0或1。
> hgram <- qplot(table, data=diamonds, binwidth=1)
> hgram <- hgram + labs(title = "This is a histogram") #加一个标题
> hgram
> hgram + theme(plot.title = element_text(size=20)) #标题文字大小
> hgram + theme(plot.title = element_text(size=20, colour="red")) #标题文字大小加入文字颜色
> hgram + theme(plot.title = element_text(size=20, hjust=0)) #hjust=0不调整标题位置
> hgram + theme(plot.title = element_text(size=20, face="bold")) #改变字体,字体加粗
> hgram + theme(plot.title = element_text(size=20, angle=180)) #字体方向,旋转180度
- element_line() 绘制线条或线段,该元素函数可控制colour,size,linetype。下图展示来相应的结果
> hgram <- qplot(table, data=diamonds, binwidth=1)
> hgram + theme(panel.grid.major = element_line(colour="red")) #主网格线为红色
> hgram + theme(panel.grid.major = element_line(size=2)) #主网格线加粗,为2倍
> hgram + theme(panel.grid.major = element_line(linetype="dotted")) #改变网格线的形式,次网格线为虚线
> hgram + theme(axis.line = element_line()) #坐标轴线变为黑色,而坐标轴线向外突出的线不改变
> hgram + theme(axis.line = element_line(colour="red")) #坐标轴线变为红色,而坐标轴线向外突出的线不改变
> hgram + theme(axis.line = element_line(size=0.5, linetype="dashed")) #坐标轴线变为黑色虚线size=0.5,而坐标轴线向外突出的线不改变
- element_rect() 绘制主要供背景使用的矩形。你可以控制填充颜色(fill)和边界的colour,size,linetype,实例如下:
> hgram <- qplot(table, data=diamonds, binwidth=1)
> hgram + theme(plot.background = element_rect(fill="grey80", colour=NA)) #图形之外加一个灰色的底
> hgram + theme(plot.background = element_rect(colour='black',size=2)) #图形之外加一个黑框
> hgram + theme(plot.background = element_rect(colour='red')) #图形之外加一个红框
> hgram + theme(plot.background = element_rect())
> hgram + theme(plot.background = element_rect(colour=NA))
> hgram + theme(plot.background = element_rect(linetype="dotted"))

- element_blank() 表示空主题,即对元素不分配相应对绘图空间。该函数可删去我们不感兴趣对绘图元素,使用之前对colour=NA,fill=NA让某些元素不可见,可达到相同的效果,但仍然占绘图空间。
> hgram <- qplot(table, data=diamonds, binwidth=1)
> hgram + theme(panel.grid.minor=element_blank()) #消除次网格线
> hgram + theme(panel.grid.major=element_blank()) #消除主网格线
> hgram + theme(panel.background=element_blank()) #消除背景
> hgram + theme(axis.title.x=element_blank(), axis.title.y=element_blank()) #消除x及y轴坐标名称
> hgram + theme(axis.line=element_line()) #坐标轴线为黑色
使用theme_get()可得到当前主题的设置。theme()可在一幅图中对某些元素进行局部性地修改,theme_update()可为后面图形对绘制进行全局性地修改。
old_theme <- theme_update(
plot.background = element_rect(fill = "#3366FF"),
panel.background = element_rect(fill = "#003DF5"),
axis.text.x = element_text(colour = "#CCFF33"),
axis.text.y = element_text(colour = "#CCFF33", hjust = 1),
axis.title.x = element_text(colour = "#CCFF33", face = "bold"),
axis.title.y = element_text(colour = "#CCFF33", face = "bold", angle = 90),
)
qplot(cut, data = diamonds, geom = "bar")
qplot(cty, hwy, data = mpg)
theme_set(old_theme)
8.2 自定义标度和几何对象
8.2.1 标度
如果需要改变默认标度的显示方法,请重新定义或者用ggplot2中已经定义的可选方法覆盖控制相应图形属性的标度函数。该函数的命名方法通常是scale_aesthetics_continuous或者scale_aestietics_diascrete,请将函数命名中的aesthetics替换成相应的图形属性,比如colour,fill,size等。
p <- qplot(mpg, wt, data = meticars, colour = factor(cyl))
p
scale_colour_diascrete <- scale_colour_brewer
p
8.2.2 几何对象和统计变换
类似update_geom_defaults()和update_stat_defaults(),我们也可以自定义几何对象和统计变换。与其他的主题设置不同,此处设置只影响设置改变后新绘制的图形,而不是所有图形。
下面例子展示了如何改变默认颜色和将默认直方图改变成密度直方图。
> update_geom_defaults("point", aes(colour = "darkblue")) #只影响设置改变后新绘制的图形,即改变下面的图形
> qplot(mpg, wt, data = mtcars) #所以默认绘图colour = “darkblue”,geom = “point”
> update_stat_defaults("bin", aes(y = ..density..)) #即改变下面的图形
> qplot(depth, data = diamonds, geom = "histogram", binwidth = 1) #默认绘图geom = “density”
表 8.2 几何对象的图形属性的默认设置
| 图形属性 | 默认值 | 几何对象 |
|---|---|---|
| colour | #3366FF | contour, density2d, quantile, smooth |
| colour | NA | area, bar, histogram, polygon, rect, tile |
| colour | black | abline, crossbar, density, errorbar, hline, line, linerange, path, pointrange, rug, segment, step, text, vline |
| colour | darkblue | jitter, point |
| colour | grey60 | boxplot, ribbon |
| fill | NA | crossbar, density, jitter, point, pointrange |
| fill | grey20 | area, bar, histogram, polygon, rect, ribbon, tile |
| linetype | 1 | abline, area, bar, contour, crossbar, density, density2d, errorbar, histogram, hline, line, linerange, path, pointrange, polygon, quantile, rect, ribbon, rug, segment, smooth, step, tile, vline |
| shape | 19 | jitter, point, pointrange |
| size | 0.5 | abline, area, bar, boxplot, contour, crossbar, density, density2d, errorbar, histogram, hline, line, linerange, path, pointrange, polygon, quantile, rect, ribbon, rug, segment, smooth, step, vline |
| size | 2 | jitter, point |
| weight | 1 | bar, boxplot, contour, density, density2d, histogram, quantile, smooth |
8.3 存储输出
基本图形输出有两种类型:矢量型或光栅型。矢量图是过程化的,意味这图形可无限缩放而没有细节的损失。光栅图以像素阵列形式存储,具有固定的最优观测大小。
优劣势分析,矢量图清晰,但渲染很慢,光栅图但高分辨率在600dpi值,但图形会很大。
ggsave()函数,用来存储图形结果。该函数有以下几个参数。
filename 图形输出文件的名称
device 图片格式"eps", “ps”, “tex”, “pdf”, “jpeg”, “tiff”, “png”, “bmp”, “svg” or “wmf"等
width, height, units 图形等宽,高,单位数
dpi 图形分辨率,默认300,高分辨率600,适合屏幕72
例如:
ggsave(”…/output.png", plot=final, device=“png”, width=8, height=5)
表8.3 不同功用的推荐图形设备
| 软件 | 推荐的图形设备 |
|---|---|
| Illustrator | svg |
| latex | ps |
| MS Office | png (600 dpi) |
| Open Office | png (600 dpi) |
| pdflatex | pdf, png (600 dpi) |
| web | png (72 dpi) |
8.4 一页多图
若想绘制一页多图,必须了解这grid(ggplot2中默认调用)的工作原理。其关键概念是视图窗口(viewport):显示设备的一个矩形子区域。默认的视图窗口占据了整个绘图区域,通过设置视图窗口,可以任意安排多幅图形的位置。一页多图最简单的方式是床技图形并将图形赋值成为变量,然后再绘制出来。之后只考虑图形的摆放则可以形成一页多图。
下面是三个事例图:
a <- qplot(date, unemploy, data=economics, geom="line")
b <- qplot(uempmed, unemploy, data=economics)+geom_smooth(se=F)
c <- qplot(uempmed, unemploy, data=economics, geom="path")
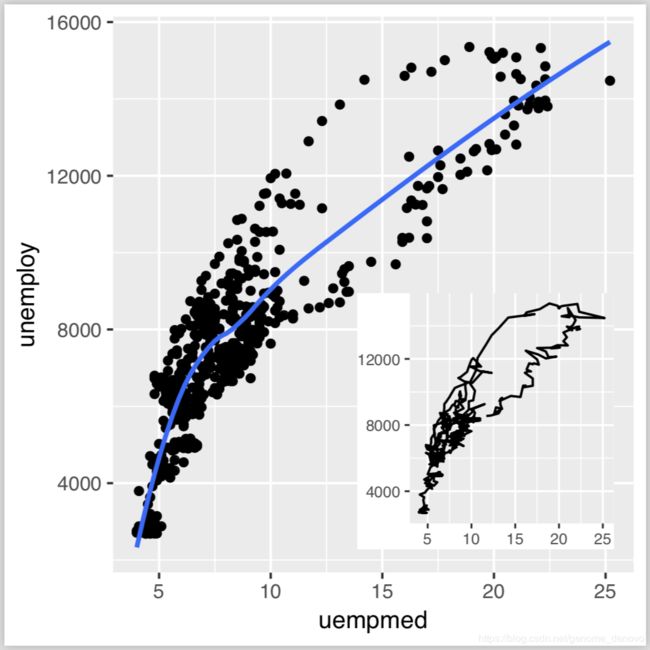
8.4.1 子图
绘制子图,首先需要绘制主图,然后在更小的视图窗口绘制子图。viewport()函数可以创建视图窗口,参数x,y,width,height控制视图窗口的大小和位置。默认的测量单位是“npc”,范围从0到1。(0,0)代表的位置是左下角,(1,1)代表右上角,(0.5, 0.5)代表视图窗口的中心。如果这些单位不符合你的需求,可使用如unit(2, “cm”)或unit(1, “inch”)这样的绝对单位。
library(grid)
vp1 <- viewport(width=1, height=1, x=0.5, y=0.5) #一个占据整个图形设备的视图窗口
vp2 <- viewport(width=0.5, height=0.5, x=0.5, y=0.5) #定位在图形的中间位置
vp3 <- viewport(width=unit(2, "cm"), height=unit(3, "cm")) #一个2cm X 3cm的视图窗口,定位在图形设备中心
默认地,x和y参数控制这视图窗口的中心位置,若想调整图形位置,可通过just参数来控制将图形放置在哪个边角。
为了能在新的视图窗口中画图,还需要使用print()中的vp参数。通常在命令行上解析某些代码时会自动调用print(),但因为我们想自定义视图窗口,因此需要我们手动调用。
例如:
> pdf("/Users/XXX/Desktop/zitu1.pdf", width=4, height=4)
> subvp <- viewport(width=0.4, height=0.4, x=0.75, y=0.35)
> b
#geom_smooth() using method = ‘loess’ and formula ‘y ~ x’
> print(c, vp=subvp)
> dev.off()
null device
····1
#png格式的图片,像素很低,图片模糊,需要设定标准的像素输出

如果想对图形进行进一步的微调:文本应更小些,移除标签,缩减图形的边界。
> csmall <- c + theme_gray(9) + labs(x=NULL, y=NULL) + theme(plot.margin=unit(rep(0, 4), "lines"))
> pdf("/Users/XXX/Desktop/zitu2.pdf", width=4, height=4)
> b
#geom_smooth() using method = ‘loess’ and formula ‘y ~ x’
> print(csmall, vp=subvp)
> dev.off()
null device
····1

注意需要使用pdf()或png()将图形存储到磁盘中,因为ggsave()只能存储一幅图。
8.4.2 矩形网格
设置一个任意高和宽的视图窗口网格,可用grid.layout()函数,虽然可一个个创建视图窗口,但不用设置视图窗口的位置和大小,只需设置布局(layout)的行数和列数即可。
其工作原理为,首先创建一个布局,如2 X 2网格,随后将它分配到一个视图窗口中,在视图窗口上构建绘图设备,然后在网格预期的位置上绘图。可按照行向量将图形在多个单元格中展开。
例如:
> a <- qplot(date, unemploy, data=economics, geom="line")
> b <- qplot(uempmed, unemploy, data=economics)+geom_smooth(se=F)
> c <- qplot(uempmed, unemploy, data=economics, geom="path")
> pdf("/Users/XXX/Desktop/wangge.pdf", width=8, height=6)
> grid.newpage()
> pushViewport(viewport(layout = grid.layout(2, 2)))
> vplayout <- function(x, y) viewport(layout.pos.row = x, layout.pos.col = y)
> print(a, vp=vplayout(1, 1:2))
> print(b, vp=vplayout(2, 1))
#geom_smooth() using method = ‘loess’ and formula ‘y ~ x’
> print(c, vp=vplayout(2, 2))
> dev.off()
null device
1

在默认的grid.layout()中,每个单元格的大小都相同,可设置widths和heights参数设定不同的大小
> ?grid.layout()
#查看详细使用方法和参数