小武与YOLOv3 ---- 优图代码
---- YOLOv3文章:
https://blog.csdn.net/qq_34037046/article/details/87393498
----YOLOv3 — Backbone学习:
两个主要的改进,第一个是用了残差网络,第二个是用了FPN。
---- 残差网络
1.网络本身通过卷积层来减少尺寸的大小,没有用maxpooling层,一般目前都是用卷积层来处理,然后maxpooling层来降低维度,但是这里没有,其实我也觉得为何要用pooling 层来呢?感觉pooling,特别是maxpooling也别的果断。
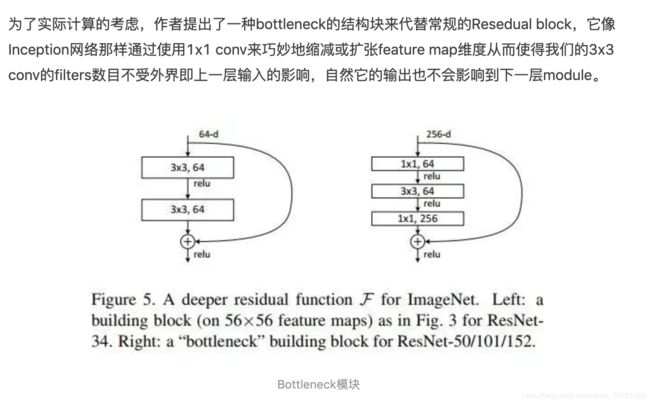
2.残差模块,并没有和其他非残差模块有啥区别,也是之前的数值和残差直接相加,可能有区别就是我们之前做POI的resnet50是用了下面左边的形式,这种的话计算量比较大,优图的话就用了右边的格式,这种的话计算量比较小。
class StageBlock(nn.Module):
    custom_layers = ()
    def __init__(self, nchannels):
        super().__init__()
        self.features = nn.Sequential(
                    vn_layer.Conv2dBatchLeaky(nchannels, int(nchannels/2), 1, 1),
                    vn_layer.Conv2dBatchLeaky(int(nchannels/2), nchannels, 3, 1)
                )

    def forward(self, data):
        return data + self.features(data)


class Stage(nn.Module):
    custom_layers = (StageBlock, StageBlock.custom_layers)
    def __init__(self, nchannels, nblocks, stride=2):
        super().__init__()
        blocks = []
        blocks.append(vn_layer.Conv2dBatchLeaky(nchannels, 2*nchannels, 3, stride))
        for ii in range(nblocks - 1):
            blocks.append(StageBlock(2*nchannels))
        self.features = nn.Sequential(*blocks)

    def forward(self, data):
        return self.features(data)
通过卷积来减少特征图的尺寸大小:上面的stride = 2 通过这个计算我们可以每次到新的stage前都会减少1/2大小的featuremap。同时深度也在不断的加深,符合YOLOV3的模型。
---- FPN
FPN网络的学习:
https://www.cnblogs.com/majiale/p/9296449.html
https://www.tensorinfinity.com/paper_137.html
作者在自己的网络中加了类似残差网络的同时 也加了FPN网络,这样的做法可以丰富每一层出来的信息,越层次的语义信息加上低层次的空间信息,完美的找到小物体的位置。稍后我们会研究优图下的yolov3看看优图是如何做这方面的。
其实读到FPN个人还是挺兴奋的,首先自下而上,我们不断卷积处理然后featuremap在不断减少,其实这样的featuremap已经很能表达图片的语义信息了,所以FPN 直接取了最后一层,进行上采样,得到的放大版本的语义信息的featuremap,然后通过和一开始的同样大小的那几层的信息进行联合,具体的联合的方式还要看代码来,但是这样的做法一来语义信息增强,而且空间信息都还在。那么拿这样的层来作目标检测,是可以很好看的看到小物体的,因为小物体我们在不断卷积的过程中,空间信息是不断丢失可能是最后没有的。但是写到这里又让我好奇那么语义信息就不会丢失吗?
个人觉得YOLOv3的核心其实就是实验了FPN,其他的并有很大的改变。从这里看到了细粒度的特征融合的一种方法FPN就是了,可以反思下自己的文字特征和全局特征的融合。
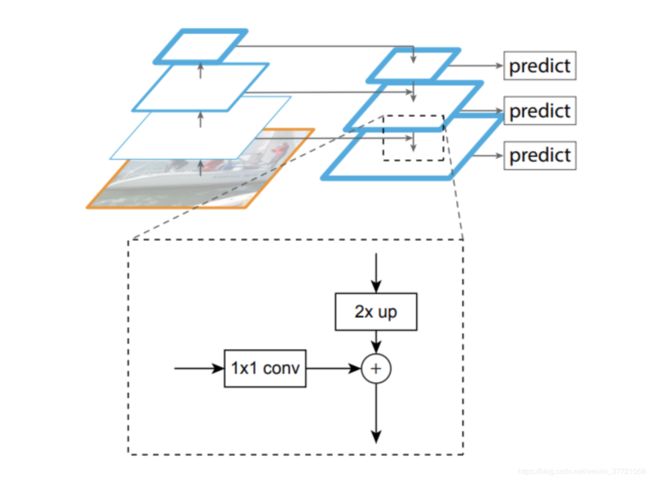
FPN与YOLOv3:
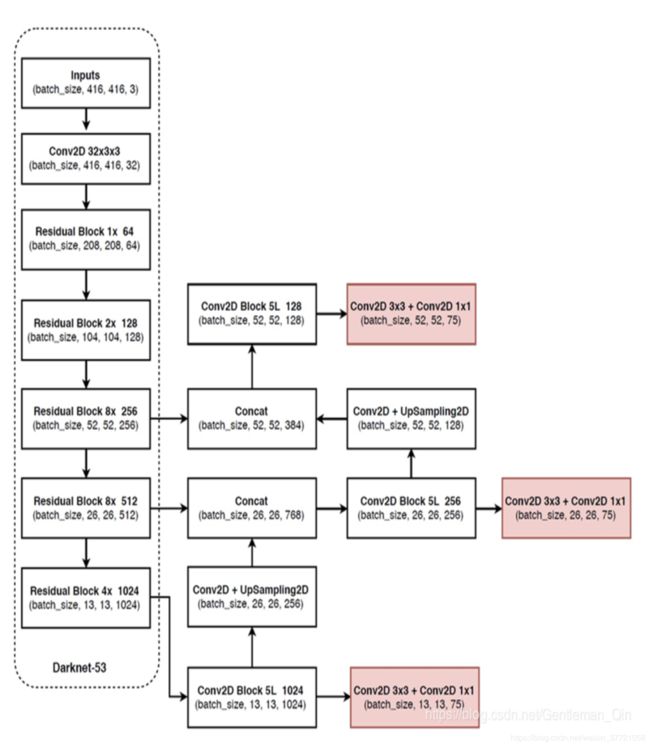
先是基本的darknet53在这里面就已经完成了FPN的部分该上采样的上采样,该concat 的进行concat。
class Darknet53(nn.Module):
    custom_layers = (bdkn.Stage, bdkn.HeadBody, bdkn.Transition,
                    bdkn.Stage.custom_layers, bdkn.HeadBody.custom_layers, bdkn.Transition.custom_layers)
    def __init__(self):
        super().__init__()

        input_channels = 32
        stage_cfg = {'stage_2': 2, 'stage_3': 3, 'stage_4': 9, 'stage_5': 9, 'stage_6': 5}

        # Network
        layer_list = [
        # layer 0
        # first scale, smallest
        OrderedDict([
            ('stage_1', vn_layer.Conv2dBatchLeaky(3, input_channels, 3, 1, 1)),
            ('stage_2', bdkn.Stage(input_channels, stage_cfg['stage_2'])),
            ('stage_3', bdkn.Stage(input_channels*(2**1), stage_cfg['stage_3'])),
            ('stage_4', bdkn.Stage(input_channels*(2**2), stage_cfg['stage_4'])),
        ]),

        # layer 1
        # second scale
        OrderedDict([
            ('stage_5', bdkn.Stage(input_channels*(2**3), stage_cfg['stage_5'])),
        ]),

        # layer 2
        # third scale, largest
        OrderedDict([
            ('stage_6', bdkn.Stage(input_channels*(2**4), stage_cfg['stage_6'])),
        ]),

        # the following is extra
        # layer 3
        # output third scale, largest
        OrderedDict([
            ('head_body_1', bdkn.HeadBody(input_channels*(2**5), first_head=True)),
        ]),

        # layer 4
        OrderedDict([
            ('trans_1', bdkn.Transition(input_channels*(2**4))),
        ]),

        # layer 5
        # output second scale
        OrderedDict([
            ('head_body_2', bdkn.HeadBody(input_channels*(2**4+2**3))),
        ]),

        # layer 6
        OrderedDict([
            ('trans_2', bdkn.Transition(input_channels*(2**3))),
        ]),

        # layer 7
        # output first scale, smallest
        OrderedDict([
            ('head_body_3', bdkn.HeadBody(input_channels*(2**3+2**2))),
        ]),
    ]

    self.layers = nn.ModuleList([nn.Sequential(layer_dict) for layer_dict in layer_list])

def forward(self, x):
    features = []
    outputs = []

    stage_4 = self.layers[0](x)
    stage_5 = self.layers[1](stage_4)
    stage_6 = self.layers[2](stage_5) #这里出来的深度是1024
    head_body_1 =  self.layers[3](stage_6) #这里出来是1024 #输出可以拿去做目标检测了
    trans_1 = self.layers[4](head_body_1) #upsample #这里进行降低维度和上采样

    concat_2 = torch.cat([trans_1, stage_5], 1) 进行concat和stage5 stage5是512 所以变成了768
    head_body_2 =  self.layers[5](concat_2) concat在进行一次卷积处理,输出可以拿去做目标检测了
    trans_2 = self.layers[6](head_body_2) #upsample 继续上采样和降低维度

    concat_3 = torch.cat([trans_2, stage_4], 1) 和stage4
    head_body_3 =  self.layers[7](concat_3) #upsample后

    # stage 6, stage 5, stage 4
    features = [head_body_1, head_body_2, head_body_3]

    return features
1024出来后继续处理的1024
class HeadBody(nn.Module):
    custom_layers = ()
    def __init__(self, nchannels, first_head=False):
        super().__init__()
        if first_head:
            half_nchannels = int(nchannels/2)
        else:
            half_nchannels = int(nchannels/3)
        in_nchannels = 2 * half_nchannels
        layers = [
                vn_layer.Conv2dBatchLeaky(nchannels, half_nchannels, 1, 1),
                vn_layer.Conv2dBatchLeaky(half_nchannels, in_nchannels, 3, 1),
                vn_layer.Conv2dBatchLeaky(in_nchannels, half_nchannels, 1, 1),
                vn_layer.Conv2dBatchLeaky(half_nchannels, in_nchannels, 3, 1),
                vn_layer.Conv2dBatchLeaky(in_nchannels, half_nchannels, 1, 1)
                ]
        self.feature = nn.Sequential(*layers)

    def forward(self, data):
        x = self.feature(data)
        return x
上采样模块
class Transition(nn.Module):
    custom_layers = ()
    def __init__(self, nchannels):
        super().__init__()
        half_nchannels = int(nchannels/2)
        layers = [
                vn_layer.Conv2dBatchLeaky(nchannels, half_nchannels, 1, 1),
                nn.Upsample(scale_factor=2)
                ]

        self.features = nn.Sequential(*layers)

    def forward(self, data):
        x = self.features(data)
        return x
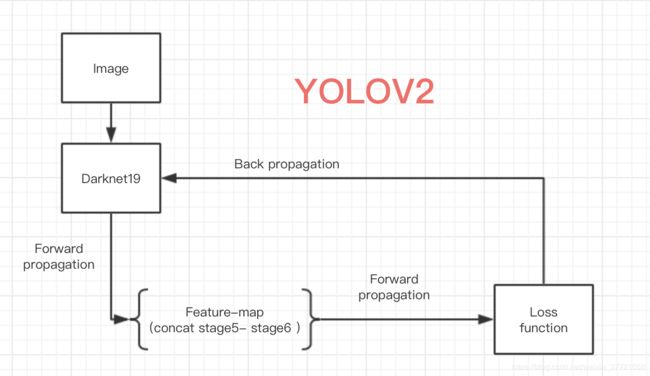
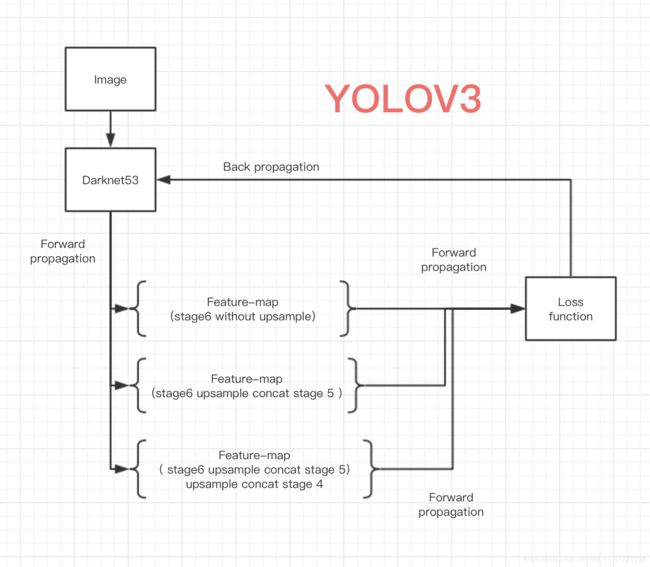
最终的话就会输出三部分分别对应三部分不同的处理,用来检测不同粒度的大小。然后输出的三层featuremap都会进行各自的卷积处理,然后就可以拿来做loss function 的检测了。损失函数的话就是平行的进入,所以预测框可能从这三种不同的里面找到最好的,这就是FPN的作用,我们结合不同的层,然后通过这些层来检测到不同的大小。损失函数和YOLOv2是一样的也没啥区别了。相同于之前输出1313N,现在就是31313*N这样来做的了。3倍,又多了又多了。而且之前YOLOv2虽然用了但是只是concat进去并没有单独来做。
