Apollo 3.5 Cyber - Scheduler 模塊
Apollo 3.5 Cyber - Scheduler 模塊
- 背景知識
- Scheduler的工作是
- Scheduler中的主要Task有甚麼
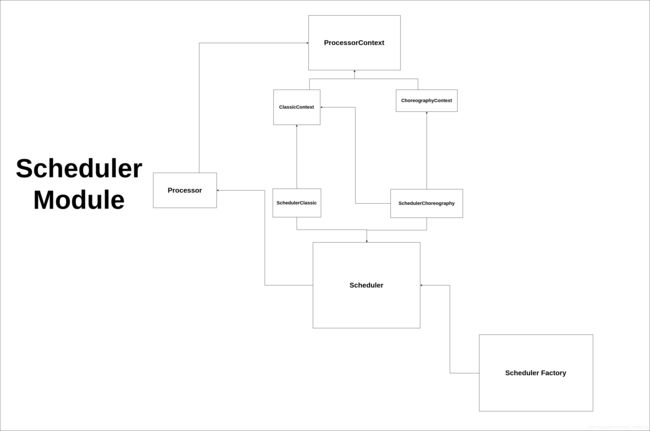
- Scheduler的內部架構
- Task的實現:CRoutine模塊
- 兩種Scheduler的區別
- SchedulerClassic
- SchedulerChoreography
- Scheduler工作流程
背景知識
cpuset 是甚麼
https://blog.csdn.net/u013592097/article/details/52639643
CPU_ZERO, CPU_SET 等把線程綁定cpu的介紹
https://www.cnblogs.com/vanishfan/archive/2012/11/16/2773325.html
context switch 的原理
https://tboox.org/cn/2016/10/28/coroutine-context/
Scheduler的工作是
Scheduler自然是把一堆Task做調度,然後順調度結果執行,就跟一般os的scheduling一樣
以下為一般對scheduling的定義
Process Scheduling. Definition.
The process scheduling is the activity of the process manager that handles the
removal of the running process from the CPU and the selection of
another process on the basis of a particular strategy. Process
scheduling is an essential part of a Multiprogramming operating
systems.
Scheduler中的主要Task有甚麼
那這些Task是甚麼呢(小心,Scheduler並不是負責管理Cyber中所有內部模塊的執行,有很多內部模塊有自己的thread,它們的調度是由os去做的,而不是Scheduler。Scheduler只管以下幾種Task)
主要有兩種Task
第一種就是Component自身處理數據的task,即是Component中Proc()的部份
它會從DataVisitor拿數據,再調用bool Component,最後調用Proc()
這種task的task name就是在dag檔案中定義的Component名字,比如control
template <typename M0>
bool Component<M0, NullType, NullType, NullType>::Initialize(
    const ComponentConfig& config) {
 ...
 auto dv = std::make_shared<data::DataVisitor<M0>>(conf);
  croutine::RoutineFactory factory =
      croutine::CreateRoutineFactory<M0>(func, dv);
  auto sched = scheduler::Instance();
  return sched->CreateTask(factory, node_->Name());
}
第二種task,就是Node::Reader不停從DataVisitor拿數據,然後Enqueue到自身的Blocker容器,最後調用回調。
注意,Component一般是不會從中的reader拿數據來用的,除非是在is_reality_mode是False時,才會不生成第一種task,改為靠Reader去拿數據處理。
這種Task的使用比較靈活,因為你可以在自己的Componet中用this->node_->CreateReader去直接生成第二種Task
而這種Task的名字為Component Name + '_' + Channel Name,比如"control_/apollo/planning"
template <typename MessageT>
bool Reader<MessageT>::Init() {
  ...
  auto sched = scheduler::Instance();
  croutine_name_ = role_attr_.node_name() + "_" + role_attr_.channel_name();
  ...
}
而這些Task是會用以下function去再包一層,主要是把數據接起來跟為了用CRoutine::Yield去確保當前的Task在跑完一次之後,把控制權交還給Processor
template <typename M0, typename F>
RoutineFactory CreateRoutineFactory(
    F&& f, const std::shared_ptr<data::DataVisitor<M0>>& dv) {
  RoutineFactory factory;
  factory.SetDataVisitor(dv);
  factory.create_routine = [=]() {
    return [=]() {
      std::shared_ptr<M0> msg;
      for (;;) {
        CRoutine::GetCurrentRoutine()->set_state(RoutineState::DATA_WAIT);
        if (dv->TryFetch(msg)) {
          f(msg);
          CRoutine::Yield(RoutineState::READY);
        } else {
          CRoutine::Yield();
        }
      }
    };
  };
  return factory;
}
Scheduler的內部架構
Processor 1 Processor等於一個Thread,內部會設定cpu親和度,用cpuset去把Processor的內部線程綁定到特定cpu
SchedulerFactory 外部接口,生成跟取得Scheduler實體
Scheduler 放Task到ProcessorContext的地方
SchedulerClassic Scheduler的Classic模式實現
SchedulerChoreography Scheduler的Choreography模式實現
ProcessorContext Processor拿Task的地方
ClassicContext ProcessorContext的Classic模式實現
ChoreographyContext ProcessorContext的Choreography模式實現
Task的實現:CRoutine模塊
要解釋甚麼是Routine比較麻煩,所以我簡單說一說就算了。基本是把一個function打包,並給予狀態機跟context switch的支持,容許其他人按照其狀態做對應處理
context switch的實現是cyber/croutine/detail/swap.S
context switch基本就是python的yield
即是當你的function運行到一半,然後context switch了,那就會直接返回了。那下一次再執行同一個function時,會由上一次退出的位置繼續執行
因為我對asm也不太了解,也不太能說出其context switch原理
兩種Scheduler的區別
Scheduler 模塊提供了兩種Scheduler,用那個Scheduler是由config決定的
SchedulerClassic
Choreography Classic就是根據用家給的scheduler conf去給每個task priority,然後就按conf中預先設定的priority去做。還支持把Processor做分組,某不同range的Processor負責不同的種類的任務。
SchedulerClassic中的ClassicContext是用static變量去放CRoutine的,CRoutine不能保證自己被該組中的那一個Processor執行。而每個ClassicContext都有一個group_name_,那Processor在拿Task時只會拿到該group的Task。
SchedulerChoreography
SchedulerChoreography跟SchedulerClassic沒有差很大,它是在支持SchedulerClassic的前題下(但不支持Processor分組),把一部份的processor留出來,容許你指定每個task用當中那一個processor。所以被特別留出來的processor,各有一個自己的context,不跟其他processor共用,確保該processor只會處理指定的Task
Scheduler工作流程
cyber/component/component.h,cyber/croutine/routine_factory.h先把一個Task生成出來
template <typename M0>
bool Component<M0, NullType, NullType, NullType>::Initialize(
    const ComponentConfig& config) {
 ...
 auto dv = std::make_shared<data::DataVisitor<M0>>(conf);
  croutine::RoutineFactory factory =
      croutine::CreateRoutineFactory<M0>(func, dv);
  auto sched = scheduler::Instance();
  return sched->CreateTask(factory, node_->Name());
}

template <typename M0, typename F>
RoutineFactory CreateRoutineFactory(
    F&& f, const std::shared_ptr<data::DataVisitor<M0>>& dv) {
  RoutineFactory factory;
  factory.SetDataVisitor(dv);
  factory.create_routine = [=]() {
    return [=]() {
      std::shared_ptr<M0> msg;
      for (;;) {
        CRoutine::GetCurrentRoutine()->set_state(RoutineState::DATA_WAIT);
        if (dv->TryFetch(msg)) {
          f(msg);
          CRoutine::Yield(RoutineState::READY);
        } else {
          CRoutine::Yield();
        }
      }
    };
  };
  return factory;
}
cyber/scheduler/scheduler_factory.cc
在生成Task時會去拿Scheduler的Instance,如果還未生成Instance,就按config生成
Scheduler* Instance() {
  Scheduler* obj = instance.load(std::memory_order_acquire);
  if (obj == nullptr) {
    std::lock_guard<std::mutex> lock(mutex);
    obj = instance.load(std::memory_order_relaxed);
    if (obj == nullptr) {
      std::string policy("classic");
      std::string conf("conf/");
      conf.append(GlobalData::Instance()->ProcessGroup()).append(".conf");
      auto cfg_file = GetAbsolutePath(WorkRoot(), conf);
      apollo::cyber::proto::CyberConfig cfg;
      if (PathExists(cfg_file) && GetProtoFromFile(cfg_file, &cfg)) {
        policy = cfg.scheduler_conf().policy();
      } else {
        AWARN << "Pls make sure schedconf exist and which format is correct.\n";
      }
      if (!policy.compare("classic")) {
        obj = new SchedulerClassic();
      } else if (!policy.compare("choreography")) {
        obj = new SchedulerChoreography();
      } else {
        AWARN << "Invalid scheduler policy: " << policy;
        obj = new SchedulerClassic();
      }
      instance.store(obj, std::memory_order_release);
    }
  }
  return obj;
}
cyber/scheduler/scheduler.cc在CreateTask時,會把CRoutine生成出來。而CRoutine生成時,會先把這個Task跑一次CRoutineEntry,如果數據還未到。讓其進入DATA_WAIT的狀態,否則進入READY狀態,然後把控制權返回。(代碼看1)。如果跑一次就直接完成了,那會到FINISHED的狀態
void CRoutineEntry(void *arg) {
  CRoutine *r = static_cast<CRoutine *>(arg);
  r->Run();
  CRoutine::Yield(RoutineState::FINISHED);
}
}

CRoutine::CRoutine(const std::function<void()> &func) : func_(func) {
  std::call_once(pool_init_flag, [&]() {
    auto routine_num = 100;
    auto &global_conf = common::GlobalData::Instance()->Config();
    if (global_conf.has_scheduler_conf() &&
        global_conf.scheduler_conf().has_routine_num()) {
      routine_num = global_conf.scheduler_conf().routine_num();
    }
    context_pool.reset(new base::CCObjectPool<RoutineContext>(routine_num));
  });

  context_ = context_pool->GetObject();
  if (context_ == nullptr) {
    AWARN << "Maximum routine context number exceeded! Please check "
             "[routine_num] in config file.";
    context_.reset(new RoutineContext());
  }

  MakeContext(CRoutineEntry, this, context_.get());
  state_ = RoutineState::READY;
  updated_.test_and_set(std::memory_order_release);
}
- 然彼Scheduler把Task中關於processor的屬性設好,再放到
ProcessorContext。 以下以SchedulerClassic為例子
bool Scheduler::CreateTask(const RoutineFactory& factory,
                           const std::string& name) {
  return CreateTask(factory.create_routine(), name, factory.GetDataVisitor());
}

bool Scheduler::CreateTask(std::function<void()>&& func,
                           const std::string& name,
                           std::shared_ptr<DataVisitorBase> visitor) {
  if (unlikely(stop_.load())) {
    ADEBUG << "scheduler is stoped, cannot create task!";
    return false;
  }

  auto task_id = GlobalData::RegisterTaskName(name);

  auto cr = std::make_shared<CRoutine>(func);
  cr->set_id(task_id);
  cr->set_name(name);

  if (!DispatchTask(cr)) {
    return false;
  }

  if (visitor != nullptr) {
    visitor->RegisterNotifyCallback([this, task_id, name]() {
      if (unlikely(stop_.load())) {
        return;
      }
      this->NotifyProcessor(task_id);
    });
  }
  return true;
}

bool SchedulerClassic::DispatchTask(const std::shared_ptr<CRoutine>& cr) {
  // we use multi-key mutex to prevent race condition
  // when del && add cr with same crid
  if (likely(id_cr_wl_.find(cr->id()) == id_cr_wl_.end())) {
    {
      std::lock_guard<std::mutex> wl_lg(cr_wl_mtx_);
      if (id_cr_wl_.find(cr->id()) == id_cr_wl_.end()) {
        id_cr_wl_[cr->id()];
      }
    }
  }
  std::lock_guard<std::mutex> lg(id_cr_wl_[cr->id()]);

  {
    WriteLockGuard<AtomicRWLock> lk(id_cr_lock_);
    if (id_cr_.find(cr->id()) != id_cr_.end()) {
      return false;
    }
    id_cr_[cr->id()] = cr;
  }

  if (cr_confs_.find(cr->name()) != cr_confs_.end()) {
    ClassicTask task = cr_confs_[cr->name()];
    cr->set_priority(task.prio());
    cr->set_group_name(task.group_name());
  } else {
    // croutine that not exist in conf
    cr->set_group_name(classic_conf_.groups(0).name());
  }

  // Check if task prio is reasonable.
  if (cr->priority() >= MAX_PRIO) {
    AWARN << cr->name() << " prio is greater than MAX_PRIO[ << " << MAX_PRIO
          << "].";
    cr->set_priority(MAX_PRIO - 1);
  }

  // Enqueue task.
  {
    WriteLockGuard<AtomicRWLock> lk(
        ClassicContext::rq_locks_[cr->group_name()].at(cr->priority()));
    ClassicContext::cr_group_[cr->group_name()].at(cr->priority())
        .emplace_back(cr);
  }

  PerfEventCache::Instance()->AddSchedEvent(SchedPerf::RT_CREATE, cr->id(),
                                            cr->processor_id());
  ClassicContext::Notify(cr->group_name());
  return true;
}
cyber/scheduler/processor.cc在scheduler的constructor 中會按config生成多個Processor instance,並啟動Processor內部的thread,不停在ProcessorContext中拿下一個任務來跑。在上一步中加到ProcessorContext的Task會被執行,沒有Task就等。而ProcessorContext中的NextRoutine()就提供了按優先度拿Task的功能(不同的scheduler模式下,其context也有各自獨特的功能)
void Processor::Run() {
  tid_.store(static_cast<int>(syscall(SYS_gettid)));

  while (likely(running_)) {
    if (likely(context_ != nullptr)) {
      auto croutine = context_->NextRoutine();
      if (croutine) {
        croutine->Resume();
        croutine->Release();
      } else {
        context_->Wait();
      }
    } else {
      std::unique_lock<std::mutex> lk(mtx_ctx_);
      cv_ctx_.wait_for(lk, std::chrono::milliseconds(10));
    }
  }
}
cyber/scheduler/policy/classic_context.cc在ProcessorContext中可見,只有狀態為READY的Task會被返回。
std::shared_ptr<CRoutine> ClassicContext::NextRoutine() {
  if (unlikely(stop_)) {
    return nullptr;
  }

  for (int i = MAX_PRIO - 1; i >= 0; --i) {
    ReadLockGuard<AtomicRWLock> lk(rq_locks_[group_name_].at(i));
    for (auto& cr : cr_group_[group_name_].at(i)) {
      if (!cr->Acquire()) {
        continue;
      }

      if (cr->UpdateState() == RoutineState::READY) {
        PerfEventCache::Instance()->AddSchedEvent(SchedPerf::NEXT_RT, cr->id(),
                                                  cr->processor_id());
        return cr;
      }

      if (unlikely(cr->state() == RoutineState::SLEEP)) {
        if (!need_sleep_ || wake_time_ > cr->wake_time()) {
          need_sleep_ = true;
          wake_time_ = cr->wake_time();
        }
      }

      cr->Release();
    }
  }

  return nullptr;
}
- 那些在等數據的Task,datavisitor在等到數據後會由調
NotifyProcessor,那就會把原本在DATA_WAIT的Task的一個updateflag設值,那在ProcessorContext::NextRoutine()中叫到cr->UpdateState()時,就會去更新它的狀態,那就會變成READY的狀態。那就可以被執行了
bool Scheduler::CreateTask(std::function<void()>&& func,
                           const std::string& name,
                           std::shared_ptr<DataVisitorBase> visitor) {
   ...
  if (visitor != nullptr) {
    visitor->RegisterNotifyCallback([this, task_id, name]() {
      if (unlikely(stop_.load())) {
        return;
      }
      this->NotifyProcessor(task_id);
    });
  }
  ...
}

bool SchedulerChoreography::NotifyProcessor(uint64_t crid) {
...
 std::shared_ptr<CRoutine> cr;
  // find cr from id_cr && Update cr Flag
  // policies will handle ready-state CRoutines
  {
    ReadLockGuard<AtomicRWLock> lk(id_cr_lock_);
    auto it = id_cr_.find(crid);
    if (it != id_cr_.end()) {
      cr = it->second;
      if (cr->state() == RoutineState::DATA_WAIT) {
        cr->SetUpdateFlag();
      }
    } else {
      return false;
    }
  }
...
}
