实现属于自己的TensorFlow(一) - 计算图与前向传播
前言
前段时间因为课题需要使用了一段时间TensorFlow,感觉这种框架很有意思,除了可以搭建复杂的神经网络,也可以优化其他自己需要的计算模型,所以一直想自己学习一下写一个类似的图计算框架。前几天组会开完决定着手实现一个模仿TensorFlow接口的简陋版本图计算框架以学习计算图程序的编写以及前向传播和反向传播的实现。目前实现了前向传播和反向传播以及梯度下降优化器,并写了个优化线性模型的例子。
代码放在了GitHub上,取名SimpleFlow, 仓库链接:
https://github.com/PytLab/simpleflow
虽然前向传播反向传播这些原理了解起来并不是很复杂,但是真正着手写起来才发现,里面还是有很多细节需要学习和处理才能对实际的模型进行优化(例如Loss函数对每个计算节点矩阵求导的处理)。其中SimpleFlow的代码并没有考虑太多的东西比如dtype和张量size的检查等,因为只是为了实现主要图计算功能并没有考虑任何的优化, 内部张量运算使用的Numpy的接口(毕竟是学习和练手的目的嘛)。
好久时间没更新博客了,在接下来的几篇里面我将把实现的过程的细节总结一下,希望可以给后面学习的童鞋做个参考。
正文
本文主要介绍计算图以及前向传播的实现, 主要涉及图的构建以及通过对构建好的图进行后序遍历然后进行前向传播计算得到具体节点上的输出值。
先贴上一个简单的实现效果吧:
     import simpleflow as sf


     # Create a graph


     with sf.Graph().as_default():


         a = sf.constant(1.0, name='a')


         b = sf.constant(2.0, name='b')


         result = sf.add(a, b, name='result')


         # Create a session to compute


         with tf.Session() as sess:


             print(sess.run(result))
计算图(Computational Graph)
计算图是计算代数中的一个基础处理方法,我们可以通过一个有向图来表示一个给定的数学表达式,并可以根据图的特点快速方便对表达式中的变量进行求导。而神经网络的本质就是一个多层复合函数, 因此也可以通过一个图来表示其表达式。
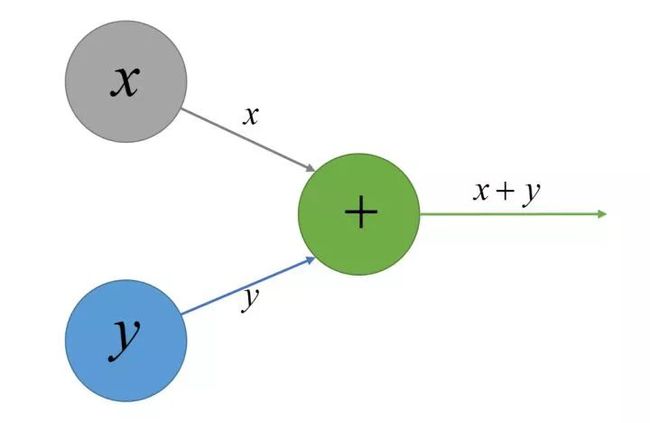
本部分主要总结计算图的实现,在计算图这个有向图中,每个节点代表着一种特定的运算例如求和,乘积,向量乘积,平方等等… 例如求和表达式 f(x, y)=x+y 使用有向图表示为:
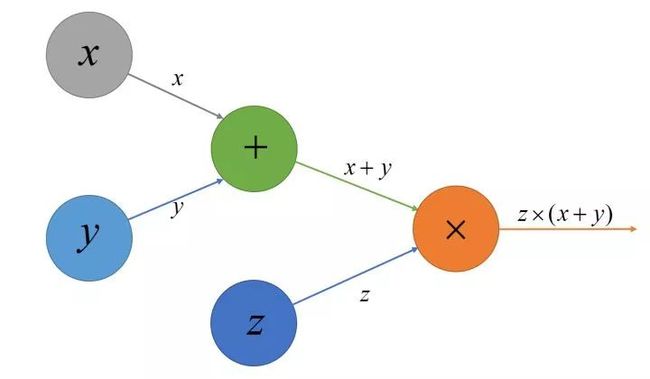
表达式 f(x,y,z)=z(x+y) 使用有向图表示为:
与TensorFlow的实现不同,为了简化,在SimpleFlow中我并没有定义Tensor类来表示计算图中节点之间的数据流动,而是直接定义节点的类型,其中主要定义了四种类型来表示图中的节点:
1、Operation: 操作节点主要接受一个或者两个输入节点然后进行简单的操作运算,例如上图中的加法操作和乘法操作等。
2、Variable: 没有输入节点的节点,此节点包含的数据在运算过程中是可以变化的。
3、Constant: 类似Variable节点,也没有输入节点,此节点中的数据在图的运算过程中不会发生变化
4、Placeholder: 同样没有输入节点,此节点的数据是通过图建立好以后通过用户传入的
其实图中的所有节点都可以看成是某种操作,其中Variable, Constant, Placeholder都是一种特殊的操作,只是相对于普通的Operation而言,他们没有输入,但是都会有输出(像上图中的xx, yy节点,他们本身输出自身的值到++节点中去),通常会输出到Operation节点,进行进一步的计算。
下面我们主要介绍如何实现计算图的基本组件: 节点和边。
Operation节点
节点表示操作,边代表节点接收和输出的数据,操作节点需要含有以下属性:
1、input_nodes: 输入节点,里面存放与当前节点相连接的输入节点的引用
2、output_nodes: 输出节点, 存放以当前节点作为输入的节点,也就是当前节点的去向
3、outputvalue: 存储当前节点的数值, 如果是Add节点,此变量就存储两个输入节点outputvalue的和
4、name: 当前节点的名称
5、graph: 此节点所属的图 下面我们定义了Operation基类用于表示图中的操作节点(详见https://github.com/PytLab/simpleflow/blob/master/simpleflow/operations.py):
     class Operation(object):


         ''' Base class for all operations in simpleflow.


         An operation is a node in computational graph receiving zero or more nodes


         as input and produce zero or more nodes as output. Vertices could be an


         operation, variable or placeholder.


         '''


         def __init__(self, *input_nodes, name=None):


             ''' Operation constructor.


             :param input_nodes: Input nodes for the operation node.


             :type input_nodes: Objects of `Operation`, `Variable` or `Placeholder`.


             :param name: The operation name.


             :type name: str.


             '''


             # Nodes received by this operation.


             self.input_nodes = input_nodes


             # Nodes that receive this operation node as input.


             self.output_nodes = []


             # Output value of this operation in session execution.


             self.output_value = None


             # Operation name.


             self.name = name


             # Graph the operation belongs to.


             self.graph = DEFAULT_GRAPH


             # Add this operation node to destination lists in its input nodes.


             for node in input_nodes:


                 node.output_nodes.append(self)


             # Add this operation to default graph.


             self.graph.operations.append(self)


         def compute_output(self):


             ''' Compute and return the output value of the operation.


             '''


             raise NotImplementedError


         def compute_gradient(self, grad=None):


             ''' Compute and return the gradient of the operation wrt inputs.


             '''


             raise NotImplementedError
在初始化方法中除了定义上面提到的属性外,还需要进行两个操作:
1、将当前节点的引用添加到他输入节点的output_nodes这样可以在输入节点中找到当前节点。
2、将当前节点的引用添加到图中,方便后面对图中的资源进行回收等操作
另外,每个操作节点还有两个必须的方法: computoutput和computegradient. 他们分别负责根据输入节点的值计算当前节点的输出值和根据操作属性和当前节点的值计算梯度。关于梯度的计算将在后续的文章中详细介绍,本文只对节点输出值的计算进行介绍。
下面我以求和操作为例来说明具体操作节点的实现:
     class Add(Operation):


         ''' An addition operation.


         '''


         def __init__(self, x, y, name=None):


             ''' Addition constructor.


             :param x: The first input node.


             :type x: Object of `Operation`, `Variable` or `Placeholder`.


             :param y: The second input node.


             :type y: Object of `Operation`, `Variable` or `Placeholder`.


             :param name: The operation name.


             :type name: str.


             '''


             super(self.__class__, self).__init__(x, y, name=name)


         def compute_output(self):


             ''' Compute and return the value of addition operation.


             '''


             x, y = self.input_nodes


             self.output_value = np.add(x.output_value, y.output_value)


             return self.output_value
可见,计算当前节点output_value的值的前提条件就是他的输入节点的值在此之前已经计算得到了。
Variable节点
与Operation节点类似,Variable节点也需要outputvalue, outputnodes等属性,但是它没有输入节点,也就没有inputnodes属性了,而是需要在创建的时候确定一个初始值initialvalue:
     class Variable(object):


         ''' Variable node in computational graph.


         '''


         def __init__(self, initial_value=None, name=None, trainable=True):


             ''' Variable constructor.


             :param initial_value: The initial value of the variable.


             :type initial_value: number or a ndarray.


             :param name: Name of the variable.


             :type name: str.


             '''


             # Variable initial value.


             self.initial_value = initial_value


             # Output value of this operation in session execution.


             self.output_value = None


             # Nodes that receive this variable node as input.


             self.output_nodes = []


             # Variable name.


             self.name = name


             # Graph the variable belongs to.


             self.graph = DEFAULT_GRAPH


             # Add to the currently active default graph.


             self.graph.variables.append(self)


             if trainable:


                 self.graph.trainable_variables.append(self)


         def compute_output(self):


             ''' Compute and return the variable value.


             '''


             if self.output_value is None:


                 self.output_value = self.initial_value


             return self.output_value
Constant节点和Placeholder节点
Constant和Placeholder节点与Variable节点类似,具体实现详见:
https://github.com/PytLab/simpleflow/blob/master/simpleflow/operations.py
计算图对象
在定义了图中的节点后我们需要将定义好的节点放入到一个图中统一保管,因此就需要定义一个Graph类来存放创建的节点,方便统一操作图中节点的资源。
     class Graph(object):


         ''' Graph containing all computing nodes.


         '''


         def __init__(self):


             ''' Graph constructor.


             '''


             self.operations, self.constants, self.placeholders = [], [], []


             self.variables, self.trainable_variables = [], []
为了提供一个默认的图,在导入simpleflow模块的时候创建一个全局变量来引用默认的图:
     from .graph import Graph


     # Create a default graph.


     import builtins


     DEFAULT_GRAPH = builtins.DEFAULT_GRAPH = Graph()
为了模仿TensorFlow的接口,我们给Graph添加上下文管理器协议方法使其成为一个上下文管理器, 同时也添加一个as_default方法:
     class Graph(object):


         #...


         def __enter__(self):


             ''' Reset default graph.


             '''


             global DEFAULT_GRAPH


             self.old_graph = DEFAULT_GRAPH


             DEFAULT_GRAPH = self


             return self


         def __exit__(self, exc_type, exc_value, exc_tb):


             ''' Recover default graph.


             '''


             global DEFAULT_GRAPH


             DEFAULT_GRAPH = self.old_graph


         def as_default(self):


             ''' Set this graph as global default graph.


             '''


             return self
这样在进入with代码块之前先保存旧的默认图对象然后将当前图赋值给全局图对象,这样with代码块中的节点默认会添加到当前的图中。最后退出with代码块时再对图进行恢复即可。这样我们可以按照TensorFlow的方式来在某个图中创建节点.
Ok,根据上面的实现我们已经可以创建一个计算图了:
     import simpleflow as sf


     with sf.Graph().as_default():


         a = sf.constant([1.0, 2.0], name='a')


         b = sf.constant(2.0, name='b')


         c = a * b
前向传播(Feedforward)
实现了计算图和图中的节点,我们需要对计算图进行计算, 本部分对计算图的前向传播的实现进行总结。
会话
首先,我们需要实现一个Session来对一个已经创建好的计算图进行计算,因为当我们创建我们之前定义的节点的时候其实只是创建了一个空节点,节点中并没有数值可以用来计算,也就是output_value是空的。为了模仿TensorFlow的接口,我们在这里也把session定义成一个上下文管理器:
     class Session(object):


         ''' A session to compute a particular graph.


         '''


         def __init__(self):


             ''' Session constructor.


             '''


             # Graph the session computes for.


             self.graph = DEFAULT_GRAPH


         def __enter__(self):


             ''' Context management protocal method called before `with-block`.


             '''


             return self


         def __exit__(self, exc_type, exc_value, exc_tb):


             ''' Context management protocal method called after `with-block`.


             '''


             self.close()


         def close(self):


             ''' Free all output values in nodes.


             '''


             all_nodes = (self.graph.constants + self.graph.variables +


                          self.graph.placeholders + self.graph.operations +


                          self.graph.trainable_variables)


             for node in all_nodes:


                 node.output_value = None


         def run(self, operation, feed_dict=None):


             ''' Compute the output of an operation.'''


             # ...
计算某个节点的输出值
上面我们已经可以构建出一个计算图了,计算图中的每个节点与其相邻的节点有方向的联系起来,现在我们需要根据图中节点的关系来推算出某个节点的值。那么如何计算呢? 还是以我们刚才 f(x,y,z)=z(x+y) 的计算图为例,
若我们需要计算橙色 X 运算节点的输出值,我们需要计算与它相连的两个输入节点的输出值,进而需要计算绿色 + 的输入节点的输出值。我们可以通过后序遍历来获取计算一个节点所需的所有节点的输出值。为了方便实现,后序遍历我直接使用了递归的方式来实现:
     def _get_prerequisite(operation):


         ''' Perform a post-order traversal to get a list of nodes to be computed in order.


         '''


         postorder_nodes = []


         # Collection nodes recursively.


         def postorder_traverse(operation):


             if isinstance(operation, Operation):


                 for input_node in operation.input_nodes:


                     postorder_traverse(input_node)


             postorder_nodes.append(operation)


         postorder_traverse(operation)


         return postorder_nodes
通过此函数我们可以获取计算一个节点值所需要所有节点列表,再依次计算列表中节点的输出值,最后便可以轻易的计算出当前节点的输出值了。
     class Session(object):


         # ...


         def run(self, operation, feed_dict=None):


             ''' Compute the output of an operation.


             :param operation: A specific operation to be computed.


             :type operation: object of `Operation`, `Variable` or `Placeholder`.


             :param feed_dict: A mapping between placeholder and its actual value for the session.


             :type feed_dict: dict.


             '''


             # Get all prerequisite nodes using postorder traversal.


             postorder_nodes = _get_prerequisite(operation)


             for node in postorder_nodes:


                 if type(node) is Placeholder:


                     node.output_value = feed_dict[node]


                 else:  # Operation and variable


                     node.compute_output()


             return operation.output_value
例子
上面我们实现了计算图以及前向传播,我们就可以创建计算图计算表达式的值了, 如下:
     import simpleflow as sf


     # Create a graph


     with sf.Graph().as_default():


         w = sf.constant([[1, 2, 3], [3, 4, 5]], name='w')


         x = sf.constant([[9, 8], [7, 6], [10, 11]], name='x')


         b = sf.constant(1.0, 'b')


         result = sf.matmul(w, x) + b


         # Create a session to compute


         with sf.Session() as sess:


             print(sess.run(result))
输出值:
     array([[  54.,   54.],


            [ 106.,  104.]])
总结
本文使用Python实现了计算图以及计算图的前向传播,并模仿TensorFlow的接口创建了Session以及Graph对象。下篇中将继续总结计算图节点计算梯度的方法以及反向传播和梯度下降优化器的实现。
最后再附上simpleflow项目的链接, 欢迎相互学习和交流:
https://github.com/PytLab/simpleflow
参考
     Deep Learning From Scratch


     https://en.wikipedia.org/wiki/Tree_traversal#Post-order


     https://zhuanlan.zhihu.com/p/25496760


     http://blog.csdn.net/magic_anthony/article/details/77531552
赞赏作者
本文作者
❈
PytLab,Python 中文社区专栏作者。主要从事科学计算与高性能计算领域的应用,主要语言为Python,C,C++。熟悉数值算法(最优化方法,蒙特卡洛算法等)与并行化 算法(MPI,OpenMP等多线程以及多进程并行化)以及python优化方法,经常使用C++给python写扩展。
知乎专栏:化学狗码砖的日常
blog:http://pytlab.org
github:https://github.com/PytLab
❈![]()
![]()
点击阅读原文,加入CodingGo编程社区,更多阅读请点击:


