创建你的第一个JavaFX应用程序
创建你的第一个JavaFX应用程序
----学习翻译......
转老紫竹
原文:http://www.javafx.com/docs/gettingstarted/javafx/create-first-javafx-app.jspThis section guides application developers in creating their first JavaFX application by using the NetBeans IDE 6.5 for JavaFX 1.0technology. For web designers who want to get started using the JavaFX1.0 Production Suite, see the Getting Started With JavaFX 1.0 Production Suite article.
这一章指导应用开发人员使用NetBeans IDE 6.5 for JavaFC 1.0 技术来创建第一个 Java FX 应用.对于想使用JavaFX 1.0 Production Suite 的 Web 设计人员,看这个文章 Getting Started With JavaFX 1.0 Production Suite 。
In this section, you create a simple sphere with text that changes color and performs a scaling transformation within a specified timeperiod, as shown next:
这一章,你要创建一个简单的球体。包含可以改变颜色和执行一个指定时间周期的平滑变化的文字,如下所示:
JAVA世纪网 http://www.java2000.net
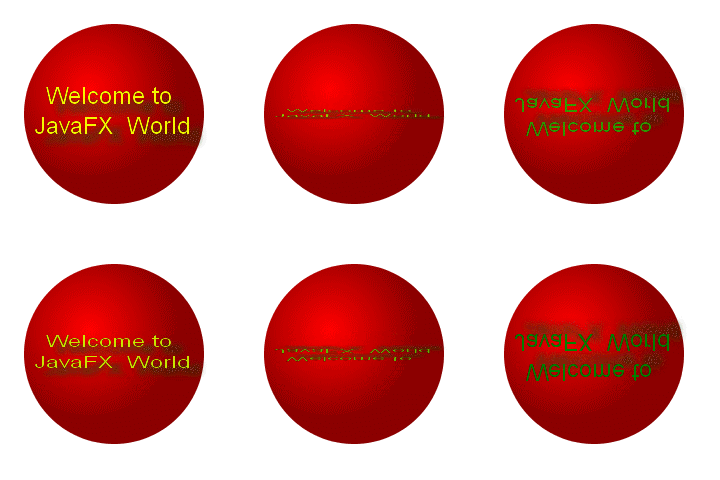
Figure 1: Finished JavaFX Sphere
完成的JavaF 球体
1. Ensure that you have the NetBeans IDE 6.5 for JavaFX 1.0 software already installed on your system. If necessary, revisit the What to Download page.
确信你已经安装了NetBeans IDE 6.5 for JavaFX 1.0 软件。
2. Start the NetBeans IDE.
启动 NetBeans IDE
a. For Windows. Choose Start > All Programs > NetBeans > NetBeans IDE 6.5
在Windwos 平台,选择 Start > All Programs > NetBeans > NetBeans IDE 6.5
b. For Mac OS X. Select Applications > NetBeans > NetBeans 6.5
在 MAC OS上,选择 Applications > NetBeans > NetBeans 6.5
3. Create a JavaFX Script Application project.
创建 JavaFC Script 应用项目
a. Choose File > New Project (Ctrl-Shift-N).
选择 File > New Project (Ctrl-Shift-N).
b. Inthe New Project wizard, select JavaFX in the Categories pane and JavaFXScript Application in the Projects pane. Click Next.
在新建项目向导里,在分类面板里面选择 JavaFX,在 项目面板里选择 JavaFXScript 应用,点击[Next]
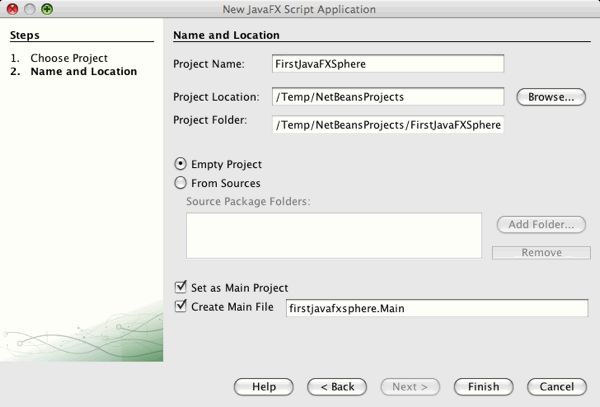
c. On the Name and Location page, type FirstJavaFXSpherefor the Project Name, specify your desired location for the project's files in the Project Location text field, and leave all other default values unchanged, as shown in Figure 2.
在名字和位置页面,输入[FirstJavaFXSphere]作为项目的名字,指定项目文件的路径,其它的保持默认值不要改变,如图2所示:
Figure 2: New Project Wizard With Project Name and Location Specified.
图2,新建项目向导,项目名称和指定位置 JAVA世纪网 http://www.java2000.net
d. Click Finish.
点击[Finish]
The FirstJavaFXSphere project opens in both the Projects window and the Files window, and the Main.fx file opens in the source editor, as shown in Figure 3.
项目同时在项目窗口和文件窗口打开,Main.fx 被源代码编辑器打开,如图3所示:
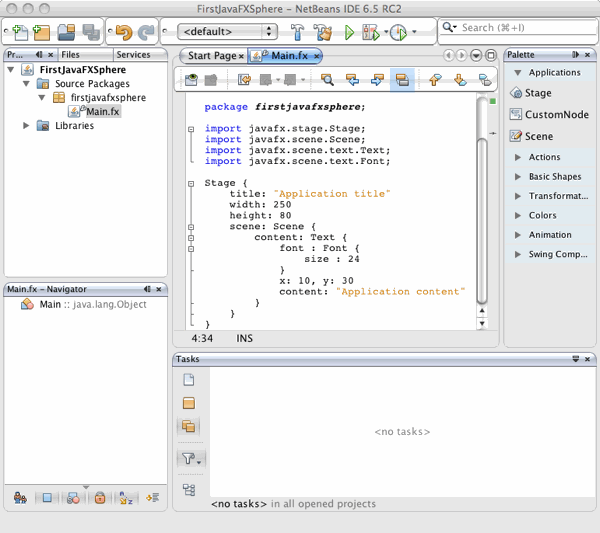
Figure 3: FirstJavaFXSphere Project Opened in Projects Window and Main.fx File in the Source Editor.
Notice that JavaFX Script code is included within the Main.fx file by default. This code includes several import statements and object literals (like Stage). These Object literals represent key concepts within a JavaFX application, and are described in the table below.
注意:JavaFX的脚本代码是默认包含在Main.fx 文件里的。代码包含了一些import语句和对象文字。这些对象表示JavaFX里买你的关键概念,将在下面的表格里描述 JAVA世纪网 http://www.java2000.net
Table 1: Object Literals Created by Default
| Object Literal | Description |
| Stage | The top level container window required to display any visible JavaFX objects. The default instance variables title, width and height define the the text that appears on the window's top border and its height and width. The scene variable defines an instance of the Sceneobject literal, which sets the area in which you can place the JavaFXobjects. 最顶部的窗口容器,用来显示所有可见的JavaFX对象。默认的实例变量 title,width和height分别定义了出现在窗口顶部边框里的的文字(标题)和窗口的高度和宽度。 |
| Scene | This is similar to a drawing surface for the graphical content of your application. The scene instance variable has a content variable that is used to hold JavaFX graphical elements and defines the graphical content of your application. For more information about theScene class, see Presenting UI Objects in a Graphical Scene, a lesson in Building GUI Applications With JavaFX 这个类似于你应用程序的图形内容的画布。场景实例变量包含一个内容变量,拥有了JavaFX图形元素,并定义了你应用程序的图形内容。 |
| Text | Defines the graphical element that displays text in the scene. 定义了场景里显示的文字图形元素 |
| Font | Defines the font used to display the text in the scene. 定义场景里用来显示文字的字体 |
4. Modify the Stage object, as shown next, so that the window has the title, window size,and text that we want to appear in the application we are building. You also need to add the import statement for the TextAlignment class.
如后面所示,修改场景对象,来让窗口有便同意,窗口尺寸和我们想创建应用要显示的文字。你同样需要增加import语句给TextAlignment 类。
a.Modify the Stage object literal as shown below. You may copy the lines in bold and paste them in the editor.
修改Stage 对象Source Code
源代码
引用:
Stage {
title: "My First JavaFX Sphere"
width: 250
height: 250
scene: Scene {
content: [
Text {
font: Font { size: 24 }
x: 20, y: 90
textAlignment: TextAlignment.CENTER
content:"Welcome to /nJavaFX World"
} //Text
] // content
} // Scene
} // Stage
b. To fix the highlighted error due to a missing import statement for the TextAlignment class used, right-click in any white space in the editor and select Fix Imports (Ctrl+Shift+I).
为了修正高亮的缺少 import 语句的 TextAlignment 类的错误信息,你可以在编辑器的任何空白地方右键,选择 Fix Imports (Ctrl+Shift+I)
The following import statement is added to the top of the Main.fx file.Source Code
import 语句被叫如到Main.fx源代码的最顶部 JAVA世纪网 http://www.java2000.net
引用:
import javafx.scene.text.TextAlignment;
5. Define the basic Circle object from which you create the sphere by expanding the Basic Shapes section in the Palette window and dragging the Circle code snippet in the line above the Text code block, as shown next.
从Pallette 窗口拖动 Circle 代码片段来创建球星的基础。
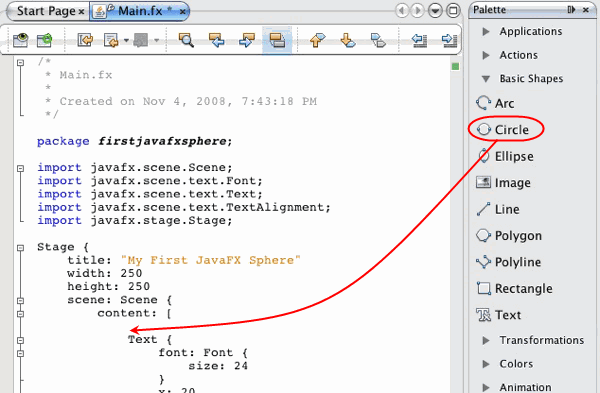
Figure 4: Drag the Circle Code Snippet From the Palette Window.
6. Modify the circle's instance variables so that it has the correct size to contain the text. Also, add a new RadialGradient setting, which makes the circle have a little depth and look more like a sphere.Modifythe source file with the following source code in bold. You can copy the lines in bold, including the closing square and curly braces forthe fill variable, and paste them to the source editor.
修改圆的实例属性到正确的尺寸和文字。同时增加一个 RadialGradient 配置,来让圆看上去有一些深度,更像一个球。如下的粗体部分修改源代码。 JAVA世纪网 http://www.java2000.net
Source Code
引用:
Stage {
title: "My First JavaFX Sphere"
width: 250
height: 250
scene: Scene {
content: [
Circle {
centerX: 100,
centerY: 100
radius: 90
fill: RadialGradient {
centerX: 75
centerY: 75
radius: 90
proportional: false
stops: [
Stop {
offset: 0.0
color: Color.RED},
Stop {
offset: 1.0
color: Color.DARKRED}
] // stops
} // RadialGradient
} // Circle
Text {
font: Font {
size: 24
}
x: 20, y: 90
textAlignment: TextAlignment.CENTER
content: "Welcome to /nJavaFX World"
} //Text
] // content
} // Scene
} // Stage
b. To fix the errorsthat are highlighted because of the missing import statements forseveral classes introduced in the previous step, right-click in anywhite space in the editor and select Fix Imports (Ctrl+Shift+I).
为了修正高亮的缺少 import 语句的 一些类的错误信息,你可以在编辑器的任何空白地方右键,选择 Fix Imports (Ctrl+Shift+I) JAVA世纪网 http://www.java2000.net
The following import statements are added to the top of the Main.fx file.
如下的import 语句被加入到Main.fx文件的顶部
Source Code
引用:
import javafx.scene.paint.RadialGradient;
import javafx.scene.paint.Stop;
7. Turn on the Preview feature by clicking the Enable Preview button on the editor toolbar.
点击编辑按扭栏的【 Enable Preview 】按钮来打开预览特性
A new Design Preview window displays the circle you just modified to look more like a sphere, as shown next. The preview feature enables you to view the current state of the GUI design you are creating. As you modify the source code and if no errors are encountered, the design preview window displays the current status of the GUI you are building.
一个设计预览窗口打开,显示你刚才修改的圆看上去更像一个球。预览特性让你可以查看当前GUI设计的状态。当你修改了源代码且没有代码错误,设计预览窗口将显示你当前建立的GUI状态。

Figure 5: Sphere in Designer Preview Window.
8. Use the following steps to change the color of the text to yellow and to add a drop shadow effect.
使用下面的步骤来修改文字颜色为黄色,同时增加一个阴影效果。
a.Add the variables color and scale with their initial default values set.
增加颜色和比例变量以及初始值。
These variables will be used in the timeline animation you will create in later steps.
这些只用与后面步骤的时间线的动画
Source Code
引用:
var scale = 1.0;
var color = Color. YELLOW;
Stage {
title: "My First JavaFX Sphere"
width: 250
height: 250
b.Modify the Text object so that the lines defining the fill, effect, and transforms variable instances are added, as shown in bold below. You may copy the lines in bold below and paste it to the source editor.
修改文本对象来定义填充效果和增加转换变量实例。 JAVA世纪网 http://www.java2000.net
Source Code
引用:
Text {
font: Font {
size: 24
}
x: 20,
y: 90
textAlignment: TextAlignment.CENTER
content: "Welcome to /nJavaFX World"
fill: bind color
effect: DropShadow {
offsetX: 10
offsetY:10
color: Color.color(0.1, 0.3, 0.1)
}; // DropShadow
transforms: Scale{
x: 1
y: bind scale
pivotX: 100,
pivotY: 100
} // Scale
} // Text
The fill variable instance binds the Text's color to the variable color. A drop shadow effect is added and the scaling transformation is defined. The transforms variable defines the value of the Scale object returned from the call to the Scale function. The Scale object represents a scaling transformation defined by the specified variables, x, y, pivotX, and pivotY. The x and y variables define the factor by which coordinates are scaled along the x and y axis directions. The pivotX and pivotY variables define the X and Y coordinates about which point the scale occurs.
填充变量实例绑定了文本的颜色为变量的颜色。增加影响效果和定义缩放变换。变换变量定义了缩放的对象调用缩放功能返回的对象。缩放对象通过缩放的变换变量 x,y,provotX和 provotY定义。 x和y变量定义了沿着x和y坐标缩放的比例参数。 privotX和privotY变量定义了发生缩放的点的X和Y坐标。
To correct the highlighted errors due to the missing import statements forthe two classes introduced, right-click in any white space in theeditor and select Fix Imports (Ctrl+Shift+I).
为了修正高亮的缺少 import 语句的2个类的错误信息,你可以在编辑器的任何空白地方右键,选择 Fix Imports (Ctrl+Shift+I)
Select the javafx.scene.effect.DropShadow in the first dialog, as shown in Figure 6, and press Enter. In the next pop-up dialog, select the javafx.scene.transform.Scale and press Enter.
在第一个对话框里选择 javafx.scene.effect.DropShadow,按回车,在下一个弹出对话框里选择 javafx.scene.transform.Scale然后回车。 JAVA世纪网 http://www.java2000.net
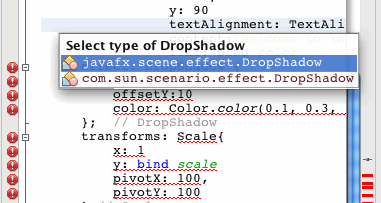
Figure 6: Fix Imports pop-up dialog.
The following import statement is added to the top of the Main.fx file.
下面的import语句被加入到Main.fx文件的顶部
Source Code
引用:
import javafx.scene.effect.DropShadow;
import javafx.scene.transform.Scale;
Notice in the Design Preview window that the text's color has changed to yellow and the drop shadow effect now appears, as shown next.
注意设计预览窗口的文字颜色已经变成黄色,阴影效果也出现了。

Figure 7: Sphere Updated in the Designer Preview Window.
9. Add animation by having the text change from yellow to green and have it rotate.
增加文字从黄色到绿色的动画效果,然后循环
a. Expand the Animation section in the Palette window, select Timeline, and drag the Timeline code snippet to the line just above the Stage code block, as shown next.
打开 Pallette 窗口的 Animation 区,选择 Timeline(时间线),拖动Timeline 代码片段到刚好在Stage代码块的上面。
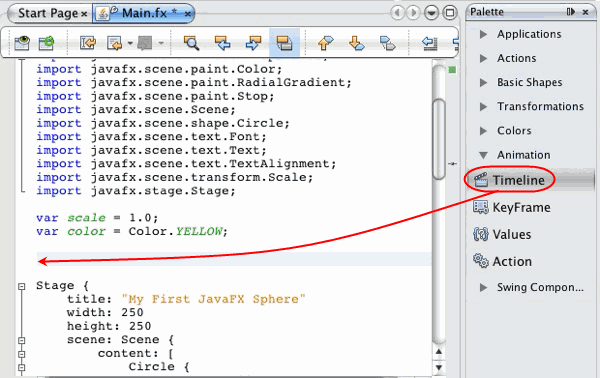
Figure 8: Drag Timeline Code Snippet from the Palette to the Source Editor.
Animation occurs along a timeline, represented by a javafx.animation.Timeline object. Each timeline contains one or more key frames, represented by javafx.animation.KeyFrame objects.For more information about animation, see Creating Animated Objects, a lesson in Building GUI Applications With JavaFX.
动画沿着时间线发生,通过 javafx.animation.Timeline对象实现。每个时间线包含一个或多个关键帧,通过 javafx.animation.KeyFrame 对象表示。
b. Change the value of the time instance variable from 1s to 5s so that now the Timeline object literal is as shown below.
修改时间实例的值,从1s 到 5s, 如下所示 JAVA世纪网 http://www.java2000.net
Source Code
引用:
Timeline {
repeatCount: Timeline. INDEFINITE
keyFrames : [
KeyFrame {
time : 5s
canSkip: true
} // KeyFrame
] // keyFrames
} // Timeline
This timeline repeats indefinitely on a five second interval. The value of the time instance variable, 5 seconds, defines the elapsed time at which the values within the key frame will be set in a single cycle of the Timeline object. The next couple of steps of this tutorial define those values to be set.
时间线每5秒无限重复。 实例的 time 变量为5秒,表示Timeline 对象在一个循环里关键帧里要消耗的时间。这个向导的后面的步骤定义了这些变量。
c. Drag the Animation > Values code snippet from the Palette to the line just after time variable.
拖动 Animation > Values 代码片段从 Pallette 到 time 变量的后面
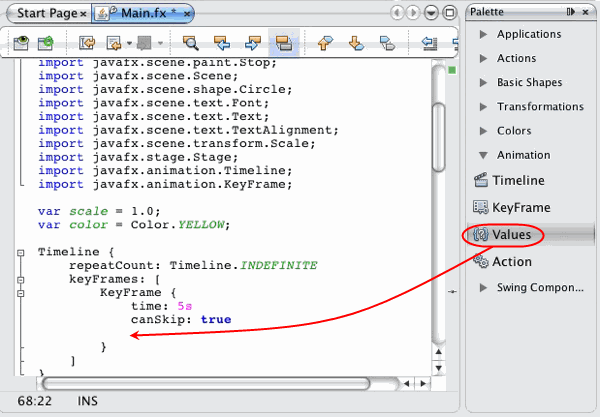
Figure 9: Drag Values Code Snippet from the Palette to the Source Editor.
Values define the list of target variables and the desired values they should interpolate at the specified time of the KeyFrame.
变量Values定义了一系列目标变量和KeyFrame希望插入使用的变量。
d. Copy the lines shown in bold below and paste it to the source editor to modify the values instance. The added code changes the text's color from yellow to green as it eases.
复制后面的粗体部分代码,粘贴到你的代码里面。 JAVA世纪网 http://www.java2000.net
Source Code
引用:
values : [
scale => -1.0 tween Interpolator.EASEBOTH
[b]color => Color.GREEN
] // values[/b]
The desired values of the scale and color variables are defined within the 5 seconds interval of the keyframe. The =>operator provides a literal constructor (a special notation) that makesit easier to express the list of key interpolated values or object properties.
要使用的缩放和颜色变量被定义在关键帧的5秒周期内。 => 操作符提供了一个结构,来简单的描述一系列的关键插入值和对象属性。
In this case, we use the tween operator to construct the interpolated values for the scale between 1.0 and -1.0 to create the illusion of rotation. The Interpolator.EASEBOTH is the built-in interpolator instance that provides for ease in and out behavior. Also, over the same 5 second period, the color of the text will change from yellow to green.
在这个情况下,我们使用 tween 操作符来构建一个内插的数值,从1.0到 -1.0 来创建一个旋转的现象。Interpolator.EASEBOTH 是内建的内插实例,来提供擦除内部和外部的功能。同样,在5秒的周期内,文本的颜色将从黄色变成绿色。 JAVA世纪网 http://www.java2000.net
Right-click in any white space in the editor and select Format (Alt+Shift+F) to properly align the newly added lines of code.Add .play(); to the end of the Timeline object declaration, as shown below in bold.
在任何编辑的空白地方点右键,选择 Format (Alt+Shift+F) 来让新增加的代码行正确对齐。在Timeline对象的末尾增加 .play()
The play() method plays the timeline as defined. The completed Timeline object should be as shown next.
play方法运行定义的时间线。完整的Timeline对象如下
Source Code
引用:
Timeline {
repeatCount: Timeline. INDEFINITE
keyFrames: [
KeyFrame {
time: 5s
canSkip: true
values : [
scale => -1.0 tween Interpolator. EASEBOTH
color => Color. GREEN
] // values
} // KeyFrame
] // keyFrames
} .play();
Notice in the Design Preview window that the text's color is now continuously changing from yellow to green as it appears to rotate. Ifyou are not seeing this, click the Reset Preview button.
注意,设计预览窗口里,文字颜色将布点的从黄色变到绿色,并且循环。如果你没有看到这个,那么点一下Reset Preview 按钮。
10. Run the project.
运行项目
Close the Design Preview window.In the Projects window, right-click the FirstJavaFXSphere project node and select Run Project.
关闭设计预览窗口,在项目窗口,右键点击 FirstJavaFXSphere 项目节点,选择 Run Project.
The IDE compiles the project and prepares the files necessary to run the application using the Desktop execution model. When the project is compiled successfully, an animated sphere similar to what is shown in Figure 1 is displayed. The color of the text should change from yellow to green as it appears to rotate.
IDE编译项目,准备桌面运行模式运行需要的文件。当项目编译成功后,一个模拟的球形动画将显示如图一所示。文本的颜色将从黄色变到绿色,并循环显示。 JAVA世纪网 http://www.java2000.net
Congratulations! You've just created your first JavaFX application.
祝贺你,你已经创建了你第一个 JavaFX 应用程序。