Spring源码解析(一)
终于下定决心,啃spring源码,主要是通过源码了解spring底层机制,以及学习一下编码技巧,其中肯定会有错误,希望大家指正,一起学习。好了,开始进入正题。
我们的源码学习就是从下面这行代码开始:
BeanFactory bf=new XmlBeanFactory(new ClassPathResource("beanFactoryTest.xml"));首先通过ClassPathResource的构造函数来构造Resource资源文件的实例对象,有了Resource就可以进行XmlBeanFactory的初始化了。ClassPathResource的最终父类接口是Resource,Resource继承InputStreamSource接口。
InputStreamSource中只有一个方法:
![]()
InputStreamSource封装任何能返回InputStream的类,比如File、Classpath下的资源和Byte Array等.
Resource接口是spring自己封装的抽象结构来封装底层资源,即把不同来源的资源封装为Resource进行统一处理,每个来源的资源只要实现自己的getInputStream()方法即可以得到相应的inputStream。
Resource接口定义的方法:
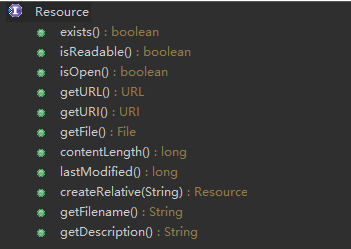
Spring中内置的Resource的实现类:UrlResource、FileSystemResource、ByteArrayResource、ClasspathResource等。
顺便提及一下ResourceLoader 接口,这个接口是用来加载Resource对象的。
好啦,下面开始我们的配置文件的封装。
【ClassPathResource】
成员属性:
	private final String path;
	private ClassLoader classLoader;
	private Class clazz;
构造方法:
public ClassPathResource(String path, ClassLoader classLoader){}
public ClassPathResource(String path, Class clazz) {}public InputStream getInputStream() throws IOException {
InputStream is;
if (this.clazz != null) {
is = this.clazz.getResourceAsStream(this.path);
}
else if (this.classLoader != null) {
is = this.classLoader.getResourceAsStream(this.path);
}
else {
is = ClassLoader.getSystemResourceAsStream(this.path);
}
if (is == null) {
throw new FileNotFoundException(getDescription() + " cannot be opened because it does not exist");
}
return is;
}通过上面的源码可以得知ClasspathResource获取资源的方式有两种,通过class【Class#getResourceAsStream方法】或者classLoader【ClassLoader#getSystemResourceAsStream方法】得到InputStream。
public ClassPathResource(String path, ClassLoader classLoader) {
		Assert.notNull(path, "Path must not be null");
		String pathToUse = StringUtils.cleanPath(path);
		if (pathToUse.startsWith("/")) {
			pathToUse = pathToUse.substring(1);
		}
		this.path = pathToUse;
		this.classLoader = (classLoader != null ? classLoader : ClassUtils.getDefaultClassLoader());
	}
上面构造方法中ClassUtils.getDefaultClassLoader(),获取classLoader的方法(1)Thread.currentThread().getContextClassLoader()
(2)ClassLoader.getSystemClassLoader()
(3)ClassUtils.class.getClassLoader()
执行完构造函数,以上,xml文件已经被封装好。
接着开始执行加载bean。
【XmlBeanFactory】
我们开始的第一行代码时就调用了XmlBeanFactory的构造方法
public XmlBeanFactory(Resource resource, BeanFactory parentBeanFactory) throws BeansException {
		super(parentBeanFactory);
		this.reader.loadBeanDefinitions(resource);
	}
进入loadBeanDefinitions(resource)方法:
public int loadBeanDefinitions(Resource resource) throws BeanDefinitionStoreException {
		return loadBeanDefinitions(new EncodedResource(resource));
	}
资源封装:EncodedResource(resource) ,EncodedResource主要用于对文件的编码进行处理。
继续进入loadBeanDefinitions(new EncodedResource(resource))【下面我只挑选了部分代码】:
public int loadBeanDefinitions(EncodedResource encodedResource) throws BeanDefinitionStoreException {
		Assert.notNull(encodedResource, "EncodedResource must not be null");
	    //通过属性来记录已经加载的资源
		Set currentResources = this.resourcesCurrentlyBeingLoaded.get();
		if (currentResources == null) {
			currentResources = new HashSet(4);
			this.resourcesCurrentlyBeingLoaded.set(currentResources);
		}
		if (!currentResources.add(encodedResource)) {
			throw new BeanDefinitionStoreException(
					"Detected cyclic loading of " + encodedResource + " - check your import definitions!");
		}
		//从encodedResource对象中获取resource对象,并从resource对象中获取inputStream
		InputStream inputStream = encodedResource.getResource().getInputStream();
               //把inputStream封装为inputSource
	        InputSource inputSource = new InputSource(inputStream);
		//真正的加载逻辑部分
		return doLoadBeanDefinitions(inputSource, encodedResource.getResource());
		//资源的关闭
		inputStream.close();
	}
以上先总结一波:我们拿到封装成Resource的资源以后,(1)首先通过EncodedResource(resource)进行资源编码处理(2)获取resource的inputStream,并把inputStream封装为SAX读取xml文件的对象inputSource(3)把准备好的额数据传递给doLoadBeanDefinitions方法,这是真正的核心处理部分。
下面的代码我只是挑选了核心代码,异常处理之类的可以自行查看源码~
protected int doLoadBeanDefinitions(InputSource inputSource, Resource resource)
			throws BeanDefinitionStoreException {

			Document doc = doLoadDocument(inputSource, resource);
			return registerBeanDefinitions(doc, resource);

	}
没错,你没有看错,只有两行,但是这两行其实做了3件事,其中两件事都融合在一个方法里面,没错就是doLoadDoucument方法。(1)获取对xml文件的验证模式(2)加载xml文件,并得到对应的Document(3)根据返回的Document注册bean信息。
首先看doLoadDocument()方法:
protected Document doLoadDocument(InputSource inputSource, Resource resource) throws Exception {
		return this.documentLoader.loadDocument(inputSource, getEntityResolver(), this.errorHandler,
				getValidationModeForResource(resource), isNamespaceAware());
	}
看里面的参数,第四个参数getValidationModeForResource(resource),这个就是我说的第一件事,验证模式的读取,即配置文件是dtd还是xsd。话不多说,上代码
protected int getValidationModeForResource(Resource resource) {
		int validationModeToUse = getValidationMode();
		if (validationModeToUse != VALIDATION_AUTO) {
			return validationModeToUse;
		}
		int detectedMode = detectValidationMode(resource);
		if (detectedMode != VALIDATION_AUTO) {
			return detectedMode;
		}
		return VALIDATION_XSD;
	}
对上段代码的解释,首先判断是自动验证还是手动验证,若是手动验证则直接返回,若是自动验证则继续执行下面的方法detectValidationMode(resource),代码如下:

进入detectValidationMode(inputStream)方法:
public int detectValidationMode(InputStream inputStream) throws IOException {
		BufferedReader reader = new BufferedReader(new InputStreamReader(inputStream));
		try {
			boolean isDtdValidated = false;
			String content;
			while ((content = reader.readLine()) != null) {
				content = consumeCommentTokens(content);
				if (this.inComment || !StringUtils.hasText(content)) {
					continue;
				}
				if (hasDoctype(content)) {
					isDtdValidated = true;
					break;
				}
				if (hasOpeningTag(content)) {
					// End of meaningful data...
					break;
				}
			}
			return (isDtdValidated ? VALIDATION_DTD : VALIDATION_XSD);
		}
	}
上面代码的意思就是判断有没有DOCTYPE关键字,如果包含则为dtd,返回VALIDATION_DTD(常量值为2),否则返回VALIDATION_XSD(常量值为3),上面代码的一个异常我没有粘贴过来,如果出现异常,即每办法判断是dtd还是xsd,则返回1.因此若为自动检测而且返回的是1,则我们就假定他是xsd的,返回VALIDATION_XSD。
接着进行第二件事,获取Document,即常规方法,通过SAX解析Xml,首先创建DocumentBuilderFactory,然后创建DocumentBuilder,进而进行解析inputSource来返回Document对象。
得到document以后,就可以进行我们的第三件事解析注册bean,通过方法registerBeanDefinitions(doc, resource)。代码如下:
public int registerBeanDefinitions(Document doc, Resource resource) throws BeanDefinitionStoreException {
		BeanDefinitionDocumentReader documentReader = createBeanDefinitionDocumentReader();
		int countBefore = getRegistry().getBeanDefinitionCount();
		documentReader.registerBeanDefinitions(doc, createReaderContext(resource));
		return getRegistry().getBeanDefinitionCount() - countBefore;
	}
上面代码返回的是本次注册的bean的数目。
注册的主要逻辑在registerBeanDefinitions(doc, createReaderContext(resource))中的doRegisterBeanDefinitions(root)方法中。这个方法中,首先处理profile,进行解析,然后再进行xml文件的读取【parseBeanDefinitions(Element root, BeanDefinitionParserDelegate delegate)】