Caffe经典模型——图像分类LeNet-5
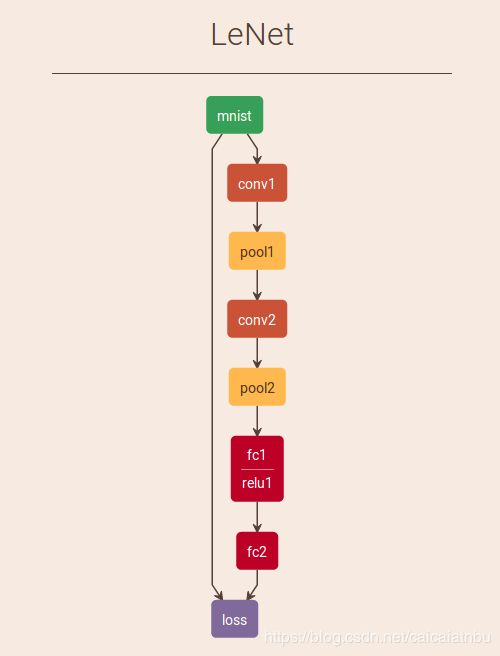
- LeNet网络框架如下图:
LeNet-5 包括输入层一共8层,每一层都包含多个参数(权重和偏置).
第一层: 输入层大小32*32,但是Caffe中MNIST数据集中的图片大小都是28*28,这样设计是为了让潜在的明显特征(笔画断续,角点)能够出现在最高层特征检测子感受野的中心.
第二层: 卷积层,卷积核大小 5 * 5, 步长为1, 卷积模板数 6, 对输入层进行卷积操作后,得到的特征图大小为 (32 - 5 + 1) * (32 - 5 + 1) = 28 * 28, 通过C1层的卷积操作,使得原始信号特征增强,并降低了噪声,而且不同的卷积核能够提取图像中不同的特征;
第三层: 池化层, 滑动窗口大小 2 * 2, 滑动步长 2, 对C1层进行最大化池化操作后,得到的特征图带下为 28 / 2 * 28 / 2 = 14 * 14,
第四层:卷积层, 卷积核大小 5 * 5, 步长为1, 卷积模板数 16, 对S2层进行卷积操作后,得到的特征图大小为 (14 - 5 + 1) * (14 - 5 + 1) = 10 * 10,
第五层: 池化层, 滑动窗口 2 * 2 , 滑动步长 2, 对 C3 层进行最大化池化操作后,得到的特征图大小为 10 / 2 * 10 / 2 = 5 * 5,
第六层: 卷积层, 卷积核大小 5 * 5, 步长为1, 模板数为120, 对 S4 层进行卷积操作后,得到的特征图大小为 (5 - 5 + 1) * (5 - 5 + 1) = 1 * 1,
第七层: 全连接层, F6层一共有 84 个神经元, 每个神经元与C5层全连接, F6层计算输入向量和权重向量的之间的点积以及与偏置的和,之后进过Sigmoid函数.
第八层: 输出层, 一共有10各神经元,采用径向基函数(RBF)的网络连接方式,其输出的计算方式:
RBF的值由i的比特图编码确定,越接近-,则越接近i的比特图编码.
- 模型描述文件 LeNet_train_val.prototxt
name: "LeNet"				// 网络(Net)的名称为LeNet
layer {					// 定义一个层(Layer)
  name: "mnist"				// 层的名称为mnist
  type: "Data"			// 层的类型为数据层
  top: "data"			// 层的输出blob有两个:data和label
  top: "label"
  include {
    phase: TRAIN				// 该层参数只对训练阶段有效
  }
  transform_param {
    scale: 0.00390625			// 输入图片像素归一化到[0,1] 1/256. = 0.00390625
  }
  data_param {				// 数据层参数
    source: "examples/mnist/mnist_train_lmdb"	// LMDB的路径
    batch_size: 64			// 批量数目,一次读取64张图
    backend: LMDB				// 数据格式为LMDB
  }
}
layer {	// 一个新数据层,名字也叫mnist,输出blob也是data和label,但是这里定义的参数只有在分类阶段有效
  name: "mnist"
  type: "Data"
  top: "data"
  top: "label"
  include {
    phase: TEST
  }
  transform_param {
    scale: 0.00390625
  }
  data_param {
    source: "examples/mnist/mnist_test_lmdb"
    batch_size: 100
    backend: LMDB
  }
}
layer {	// 定义一个新的卷积层conv1,输入blob为data,输出blob为conv1
  name: "conv1"
  type: "Convolution"
  bottom: "data"
  top: "conv1"
  param {
    lr_mult: 1		// 权值学习速率倍乘因子,1倍表示保持与全局参数一致
  }
  param {
    lr_mult: 2		// bias学习速率倍乘因子,是全局参数的2倍
  }
  convolution_param {		// 卷积计算参数
    num_output: 20		// 输出feature map数目=20
    kernel_size: 5			// 卷积核尺寸,5 x 5
    stride: 1				// 卷积输出跳跃间隔,1表示连续输出,无跳跃
    weight_filler {			// 允许用随机值初始化权重和偏置
      type: "xavier"              // 使用Xavier算法自动缺东基于输入-输出神经元数量的初始规模
    }
    bias_filler {			// bias使用常数填充器,默认为0
      type: "constant"
    }
  }
}
layer {	// 定义新下采样层pool1,输入blob为conv1,输出blob为pool1
  name: "pool1"
  type: "Pooling"
  bottom: "conv1"
  top: "pool1"
  pooling_param {		// 下采样参数
    pool: MAX		// 使用最大值下采样方法
    kernel_size: 2		// 下采样窗口尺寸 2 x 2
    stride: 2			// 下采样输出跳跃间隔 2 x 2
  }
}
layer {	// 新的卷积层,和conv1类似
  name: "conv2"
  type: "Convolution"
  bottom: "pool1"
  top: "conv2"
  param {
    lr_mult: 1
  }
  param {
    lr_mult: 2
  }
  convolution_param {
    num_output: 50
    kernel_size: 5
    stride: 1
    weight_filler {
      type: "xavier"
    }
    bias_filler {
      type: "constant"
    }
  }
}
layer { // 新的下采样层,和pool1类似
  name: "pool2"
  type: "Pooling"
  bottom: "conv2"
  top: "pool2"
  pooling_param {
    pool: MAX
    kernel_size: 2
    stride: 2
  }
}
layer {	// 新的全连接层,输入blob为pool2,输出blob为ip1
  name: "fc1"
  type: "InnerProduct"
  bottom: "pool2"
  top: "ip1"
  param {
    lr_mult: 1
  }
  param {
    lr_mult: 2
  }
  inner_product_param {	// 全连接层参数
    num_output: 500		// 该层输出元素个数为500
    weight_filler {
      type: "xavier"
    }
    bias_filler {
      type: "constant"
    }
  }
}
layer {	// 新的非线性层,用ReLU方法
  name: "relu1"
  type: "ReLU"
  bottom: "ip1"
  top: "ip1"
}
layer {
  name: "fc2"
  type: "InnerProduct"
  bottom: "ip1"
  top: "ip2"
  param {
    lr_mult: 1
  }
  param {
    lr_mult: 2
  }
  inner_product_param {
    num_output: 10
    weight_filler {
      type: "xavier"
    }
    bias_filler {
      type: "constant"
    }
  }
}
layer {	// 分类准确率层,只在Testing阶段有效,输入blob为ip2和label,输出blob为accuracy,该层用于计算分类准确率
  name: "accuracy"
  type: "Accuracy"
  bottom: "ip2"
  bottom: "label"
  top: "accuracy"
  include {
    phase: TEST
  }
}
layer {	// 损失层,损失函数采用SoftmaxLoss,输入blob为ip2和label,输出blob为loss
  name: "loss"
  type: "SoftmaxWithLoss" // softmaxLoss层实现softmax 和 多项Logistic 损失
  bottom: "ip2"
  bottom: "label"
  top: "loss"
}
LeNet模型可视化结果,如果下图所示:
- 训练网络
运行 ./example/mnist/train_lenet.sh, 其里面的内容如下:
#!/usr/bin/env sh
set -e

./build/tools/caffe train --solver=examples/mnist/lenet_solver.prototxt $@
执行该脚本,实际运行的是 lennet_solver.prototxt, 其内容如下:
# The train/test net protocol buffer definition
net: "examples/mnist/lenet_train_test.prototxt" // 网络具体定义
# test_iter specifies how many forward passes the test should carry out.
# In the case of MNIST, we have test batch size 100 and 100 test iterations,
# covering the full 10,000 testing images.
test_iter: 100 //test 迭代次数
# Carry out testing every 500 training iterations.
test_interval: 500 // 训练迭代500次,测试一次
# The base learning rate, momentum and the weight decay of the network.
base_lr: 0.01 // 网络参数:学习率,动量.权重衰减
momentum: 0.9
weight_decay: 0.0005
# The learning rate policy // 学习策略: 有固定学习率和每步递减学习率
lr_policy: "inv" //当前递减学习率
gamma: 0.0001
power: 0.75
# Display every 100 iterations
display: 100  // 每迭代100次显示一次
# The maximum number of iterations
max_iter: 10000   //最大迭代次数
# snapshot intermediate results
snapshot: 5000  // 每5000次迭代存储一次数据
snapshot_prefix: "examples/mnist/lenet"
# solver mode: CPU or GPU
solver_mode: GPU //GPU训练
- 测试网络:
运行 ./example/mnist/test_lenet.sh 脚本, 其里面的内容如下:
#!/usr/bin/env sh
set -e

./build/tools/caffe test -model=examples/mnist/lenet_train_test.prototxt -weights=examples/mnist/lenet_iter_10000.caffemodel -gpu=0


