pytorch 实现Faster R-cnn从头开始(一)
前言
从本章开始就要进入学习faster rcnn的复现了,深入了解目标检测的核心,只有知道等多的细节才能有机会创造和改进,代码很多,所以我也是分章节更新。每次学会一个知识点就可以了。我写的有retinanet网络,代码阅读和复现难度较低,建议先去学习。后再来学习faster rcnn。
候选框的生成
目标检测的第一步,就是你要先生成框的位置信息,再去画出来,它是如何产生框的坐标点。以及如何按照一定大小的比例生成,都是需要掌握的知识。

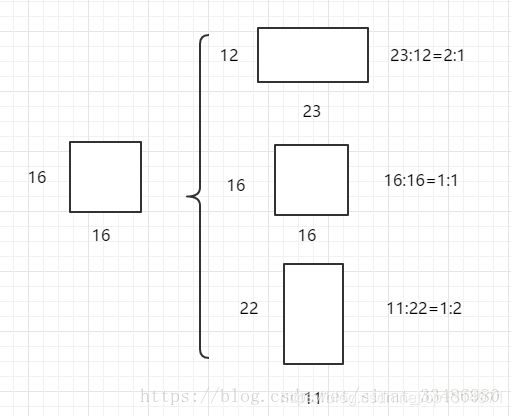
它是由一个原始16X16大小的框去通过计算变成长宽比为2,1,0.5的框,之后又经过面积大小成比例的变化,如下图

代码实现
现将生成写成一个函数
def generate_anchors(base_size=16, ratios=[0.5, 1, 2],scales=2 ** np.arange(3, 6)):

    base_anchor = np.array([1, 1, base_size, base_size]) - 1
    ratio_anchors = _ratio_enum(base_anchor, ratios)
    anchors = np.vstack([_scale_enum(ratio_anchors[i, :], scales)
                         for i in range(ratio_anchors.shape[0])])
    return anchors
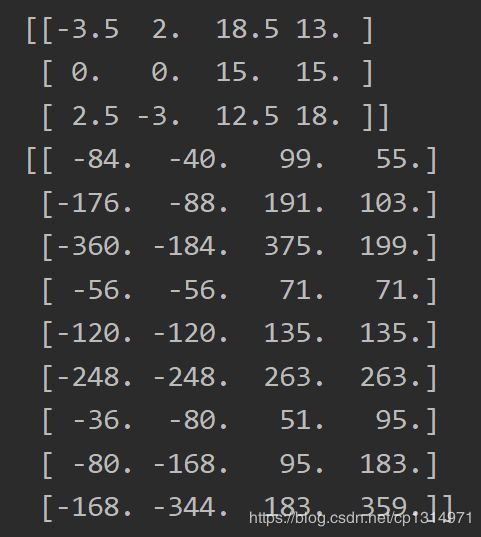
base_anchor是最开始的点,(0,0,15,15)坐标点左上角和右下角,,注意这里的形式,计算过程都是np的形式。ratios=[0.5, 1, 2]是需要变换的长宽比,scales=2 ** np.arange(3, 6))就是面积的比。 ratio_anchors = _ratio_enum(base_anchor, ratios)这一步是生成进过长宽比变化后的三种框的坐标信息,最后一步anchors 的生成是 按照面积大小在次变化。下图就是变化,由最初的一个坐标信息生成了9个坐标信息。整体流程就是先生成长宽比变化后的左上角,右下角的坐标点,三个,在变化面积大小,每个比例都有三个,所以就成了9个框了。

_ratio_enum()和_scale_enum()是二个函数
def _ratio_enum(anchor, ratios):
    w,h,x_ctr,y_ctr = _whctrs(anchor)
    size = w * h
    size_ratios = size / ratios
    ws = np.round(np.sqrt(size_ratios))
    hs = np.round(ws * ratios)
    anchors = _mkanchors(ws, hs, x_ctr, y_ctr)
    return anchors
def _scale_enum(anchor, scales):
    w, h, x_ctr, y_ctr = _whctrs(anchor)
    ws = w * scales
    hs = h * scales
    anchors = _mkanchors(ws, hs, x_ctr, y_ctr)
    return anchors
因为坐标信息的 坐标点,这种计算面积不方便,所以写了转化形式,_whctrs()是给定anchor左上点和右下点坐标求出anchor的中心点和宽高。x_ctr,y_ctr中心点坐标。仔细看ws和hs的生成,ws:[23 16 11],hs:[12 16 22]正好生成比列2:1,1:1,1:2的长宽比,算出的面积还是256左右,np.round()去掉小数点,_mkanchors()是给定anchor的中心点和宽高求出anchor的左上点和右下点坐标。
def _whctrs(anchor):

    w = anchor[2] - anchor[0] + 1
    h = anchor[3] - anchor[1] + 1
    x_ctr = anchor[0] + 0.5 * (w - 1)
    y_ctr = anchor[1] + 0.5 * (h - 1)
    return w, h, x_ctr, y_ctr
def _mkanchors(ws, hs, x_ctr, y_ctr):
    ws = ws[:, np.newaxis]
    hs = hs[:, np.newaxis]
    anchors = np.hstack((x_ctr - 0.5 * (ws - 1),
                         y_ctr - 0.5 * (hs - 1),
                         x_ctr + 0.5 * (ws - 1),
                         y_ctr + 0.5 * (hs - 1)))
    return anchors
np.hstack():在水平方向上平铺,ws = ws[:, np.newaxis]这一步将[23,16,11]变成了[[23],[16],[11]]多产生了一个维度,x_ctr - 0.5 * (ws - 1),这都是以3x1的矩阵计算的
到这里已经很好理解全部代码了
    w, h, x_ctr, y_ctr = _whctrs(anchor)
    ws = w * scales
    hs = h * scales
    anchors = _mkanchors(ws, hs, x_ctr, y_ctr)
ws = w * scales将按照面积成比例的先扩大,之后再利用 _mkanchors函数转化出扩大后左上角,右下角的形式。
全部代码
import numpy as np

def generate_anchors(base_size=16, ratios=[0.5, 1, 2],scales=2 ** np.arange(3, 6)):

    base_anchor = np.array([1, 1, base_size, base_size]) - 1
    ratio_anchors = _ratio_enum(base_anchor, ratios)
    anchors = np.vstack([_scale_enum(ratio_anchors[i, :], scales)
                         for i in range(ratio_anchors.shape[0])])
    return anchors
def _ratio_enum(anchor, ratios):
    w,h,x_ctr,y_ctr = _whctrs(anchor)
    size = w * h
    size_ratios = size / ratios
    ws = np.round(np.sqrt(size_ratios))
    hs = np.round(ws * ratios)
    anchors = _mkanchors(ws, hs, x_ctr, y_ctr)
    return anchors
def _whctrs(anchor):
    w = anchor[2] - anchor[0] + 1
    h = anchor[3] - anchor[1] + 1
    x_ctr = anchor[0] + 0.5 * (w - 1)
    y_ctr = anchor[1] + 0.5 * (h - 1)
    return w, h, x_ctr, y_ctr
def _scale_enum(anchor, scales):
    w, h, x_ctr, y_ctr = _whctrs(anchor)
    ws = w * scales
    hs = h * scales
    anchors = _mkanchors(ws, hs, x_ctr, y_ctr)
    return anchors
def _mkanchors(ws, hs, x_ctr, y_ctr):
    ws = ws[:, np.newaxis]
    hs = hs[:, np.newaxis]
    anchors = np.hstack((x_ctr - 0.5 * (ws - 1),
                         y_ctr - 0.5 * (hs - 1),
                         x_ctr + 0.5 * (ws - 1),
                         y_ctr + 0.5 * (hs - 1)))
    return anchors


if __name__ == '__main__':
    a = generate_anchors()
    print(a)
这一步细节比较多,可以去print每行代码的过程才能更好的理解