学习faster-rcnn遇到的问题
1.参数scales问题
更改py-faster-rcnn/lib/rpn/generate_anchors.py中函数generate_anchors,其中参数scales出现的问题
Check failed: outer_num_ * inner_num_ == bottom[1]->count() (21546 vs. 35910) Number of labels must match number of predictions; e.g., if softmax axis == 1 and prediction shape is (N, C, H, W), label count (number of labels) must be N*H*W, with integer values in {0, 1, ..., C-1}.修改过程参考http://www.bubuko.com/infodetail-2306438.html
https://github.com/rbgirshick/py-faster-rcnn/issues/161
修改示例:
①修改generate_anchors.py,修改为scales=(2,4,8,16,32);
②修改anchor_target_layer.py,修改为anchor_scales = layer_params.get('scales', (2, 4, 8, 16, 32));
③修改proposal_layer.py,修改为anchor_scales = layer_params.get('scales', (2, 4, 8, 16, 32));
④修改faster_rcnn_alt_opt/faster_rcnn_end2end(用哪一个训练,修改哪一个即可)中,rpn_cls_score层的num_output改为30 # 2(bg/fg) * 15(anchors),其中anchors数量为scales(5个)与ratios(3个)的数量相乘,rpn_bbox_pred层的num_output改为60 # 4 * 15(anchors)
⑤修改faster_rcnn_alt_opt/faster_rcnn_end2end(用哪一个训练,修改哪一个即可)中,rpn_cls_prob_reshape层的第2个dim,即shape { dim: 0 dim: 18 dim: -1 dim: 0 }中18改为:30 #2*15(anchors)
2.学习率base_lr的理解
参考https://stackoverflow.com/questions/30033096/what-is-lr-policy-in-caffe
示例:lr_policy: "step":
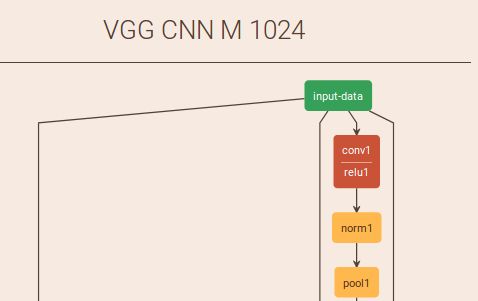
3.深度学习网络可视化工具(caffe)
参考http://ethereon.github.io/netscope/#/editor
示例展示:
4.mAP下降
修改各类参数(base_lr,weight_decay,base_size,scales,……),训练结果中mAP一直不提升,反而下降,考虑数据集中是否存在错误
参考https://github.com/rbgirshick/py-faster-rcnn/issues/9,其中讨论到数据集Annotations中没有groundtruth,会影响到训练结果,因此,检查自己数据集,发现有xmax与ymax为0的情况,直接去掉这部分数据(删除py-faster-rcnn/data/VOCdevkit2007/VOC2007/ImageSets/Main中文件里面出现对应问题的序号)
效果比对(VGG16):
①删除前:mAP=0.31;(最大迭代次数为80000,60000,80000,60000)
②删除后:mAP=0.3339;(最大迭代次数为80000,60000,80000,60000)
③删除后:mAP=0.3334;(最大迭代次数为200000,120000,200000,120000)
所以,数据集的正确性对于faster-rcnn训练过程起到了一定的作用,80000次的最大迭代次数已经满足了VGG16的训练迭代要求。
5.大图中小目标检测
参考网站与论文:
https://github.com/rbgirshick/py-faster-rcnn/issues/86
https://github.com/rbgirshick/py-faster-rcnn/issues/433
https://www.merl.com/publications/docs/TR2016-144.pdf
①修改config.py中的RPN_MIN_SIZE,对于小目标检测,改小一点就行(由于我的数据集中有特别小的对象,直接将16改为了8),用SqueezeNet(https://blog.csdn.net/u011956147/article/details/53714616)训练测试,mAP从0.2354提升至0.2552(这是在第4步的基础上)
6.训练过程中问题bbox_loss = nan的情况
报错:
RuntimeWarning: invalid value encountered in greater_equal
  keep = np.where((ws >= min_size) & (hs >= min_size))[0]
参考网站:https://github.com/chainer/chainercv/issues/326
①cpu模式下出现的问题,具体查看参考网站;
②主要是自己制作的数据集存在一定问题。比如,我的数据集中存在对象面积为0的情况,去掉对应xml文件即可正常运行
③VOC数据集从1开始计算像素,而自己的数据集很有可能存在从0开始标注对象(object)的情况,将x1 = float(bbox.find('xmin').text) #原始多一个-1
y1 = float(bbox.find('ymin').text) #原始多一个-1
x2 = float(bbox.find('xmax').text) #原始多一个-1
y2 = float(bbox.find('ymax').text) #原始多一个-1
(主要参考方式②)
这个只是一种处理方式,但最好自己调试,查看报错原因!!!
比如:我的数据集中的标注文件中xmin存在0的情况,这里-1之后,会出现65535的结果,所以也可以把65535统一改为0。
7.缓存文件
IndexError: list index out of rangepy-faster-rcnn/data/cache/下的缓存文件未删除的原因,直接删除即可。
8.eval时出现问题
line 126, in voc_eval
    R = [obj for obj in recs[imagename] if obj['name'] == classname]
参考网站:https://www.cnblogs.com/xthrough/p/6386651.html
文件夹/py-faster-rcnn/data/VOCdevkit2007/annotations_cache/下面的文件没有被删除,直接删除即可。
9.faster-rcnn中RPN实现的三步骤
参考网站:https://www.quora.com/How-does-the-region-proposal-network-RPN-in-Faster-R-CNN-work
step1: the input image goes through a convolution network which will output a set of convlutional feature maps on the last convolutional layer.
{卷积特征提取层:input-data → conv1_1|relu1_1(channel:64,kernel:3,pad:1) → conv1_2|relu1_2(64,3,1) → pool1(kernel:2,stride:2) → conv2_1|relu2_1(128,3,1) → conv2_2|relu2_2(128,3,1) → pool2(2,2) → conv3_1|relu3_1(256,3,1) → conv3_2|relu3_2(256,3,1) → pool3(2,2) → conv4_1|relu4_1(512,3,1) → conv4_2|relu4_2(512,3,1) → conv4_3|relu4_3(512,3,1) → pool4(2,2)→ conv5_1|relu5_1(512,3,1) → conv5_2|relu5_2(512,3,1) → conv5_3|relu5_3(512,3,1)}
step2:Then a sliding window is run spatially on these feature maps.
{→ rpn_conv/3×3|rpn_relu/3×3(512,3,1)→![]() →}
→}
step3:classification (cls) and regression (reg)
10.各层作用
卷积层(前五层,包括relu,pool)--提取图片特征
全连接层--针对分类的特征提取
如:对于人脸性别识别来说,一个CNN模型前面的卷积层所学习到的特征就类似于学习人脸共性特征,然后全连接层所学习的特征就是针对性别分类的特征了。
参考网站:http://lib.csdn.net/article/deeplearning/43032
11.caffe版faster-rcnn多gpu配置
基本要求:ubuntu16.04已经安装好cuda、opencv3之类的,
若没有安装好,可先参照:https://www.cnblogs.com/go-better/p/7161006.html配置完成。
参考网站:https://github.com/bharatsingh430/py-R-FCN-multiGPU
配置步骤:
1)安装nccl,以我的电脑(ubuntu16.04,双Titan)为例具体步骤可参考:https://github.com/NVIDIA/nccl
下载nccl文件后,具体执行步骤如下:
cd nccl
sudo make CUDA_HOME=/usr/local/cuda-8.0/ test #我的cuda目录是/usr/local/cuda-8.0/
sudo make install
sudo ldconfig
2)编译多gpu版faster-rcnn的caffe
①下载py-R-FCN-multiGPU代码库
②在py-R-FCN-multiGPU/caffe/目录下修改Makefile.config(没有就直接复制Makefile.config.example,并命名为Makefile.config),修改以下几项:
step1:去掉注释----#WITH_PYTHON_LAYER := 1 #USE_NCCL := 1 #OPENCV_VERSION := 3 用到opencv3才去掉)
step2:将:
INCLUDE_DIRS := $(PYTHON_INCLUDE) /usr/local/include
LIBRARY_DIRS := $(PYTHON_LIB) /usr/local/lib /usr/lib
改为:
INCLUDE_DIRS := $(PYTHON_INCLUDE) /usr/local/include /usr/include/hdf5/serial
LIBRARY_DIRS := $(PYTHON_LIB) /usr/local/lib /usr/lib /usr/lib/x86_64-linux-gnu /usr/lib/x86_64-linux-gnu/hdf5/serial
step3:去掉CUDA_ARCH中包含20的项
CUDA_ARCH := -gencode arch=compute_30,code=sm_30 \
		-gencode arch=compute_35,code=sm_35 \
		-gencode arch=compute_50,code=sm_50 \
		-gencode arch=compute_50,code=compute_50
③修改Makefile文件
将
NVCCFLAGS +=-ccbin=$(CXX) -Xcompiler-fPIC $(COMMON_FLAGS)改为:
NVCCFLAGS += -D_FORCE_INLINES -ccbin=$(CXX) -Xcompiler -fPIC $(COMMON_FLAGS)④编译caffe:make all -j8 && make pycaffe #(若是之前编译过,则make clean以下)
3)参考https://blog.csdn.net/sinat_30071459/article/details/51332084就可以直接跑了
运行过程中遇到的问题:
ImportError: No module named cython_bbox解决方案参考:https://github.com/rbgirshick/fast-rcnn/issues/125
12.安装了cudnn5之后仍报错
ImportError: libcudnn.so.5: cannot open shared object file: No such file or directory可能原因:环境配置没有更新,因此需要在终端执行一下:$sudo ldconfig
13.修改anchor与scales之后的错误
参考网站:https://github.com/rbgirshick/py-faster-rcnn/issues/27
File "/py-faster-rcnn/tools/../lib/rpn/anchor_target_layer.py", line 137, in forward
    gt_argmax_overlaps = overlaps.argmax(axis=0)
ValueError: attempt to get argmax of an empty sequence
原因:我改scales添加了几个(16, 32, 64, 128, 256, 512),改了之后就报这个错误,原因是图像中的width和height经过anchor机制之后,框太大或者太小。
解决方法:我是直接把scales改成了(4,8,16, 32, 64, 128),即可正常使用。
至于修改scales和ratios,是为了训练学习到更多、更丰富的对象(大的,小的)。修改方法可参考网站:https://blog.csdn.net/cainiaohudi/article/details/80995799
14.多层特征(feature map)融合
想法1:直接改train_val.prototxt中网络的连接情况,但会涉及到各层的size,channel等不同,以融合第3,4,5层卷积层为例,则需要对第3层进行池化,对第5层进行反卷积(caffe中有反卷积层,可以直接用),再把三层的feature map融合(这个融合怎么处理?通过添加一个融合层-参考:https://blog.csdn.net/wanggao_1990/article/details/78863669)。
15.pip错误
Command "python setup.py egg_info" failed with error code 1 in /tmp/pip-install-gl9WXX/matplotlib/这种错误一般是安装的包和python版本不兼容问题。如果环境下是python2,一般就需要安装python对应的包。即使用pip安装时带上版本号:pip install package==2.**
16. scale、anchor分析
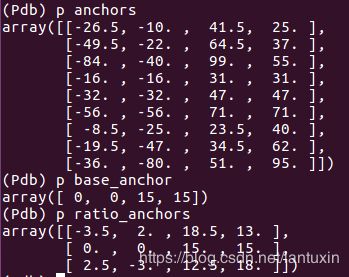
设定:base_size=16,ratios=[0.5, 1, 2],scales=(3,5,8)
得到的其中一组anchor结果:
base_anchor=[0, 0, 15, 15]
ratio_anchors=[[-3.5, 2, 18.5, 13], 中心点(7.5, 7.5) 长×宽=22*11
[0, 0, 15, 15], 中心点(7.5, 7.5) 长×宽=15*15
[2.5, -3, 12.5,18]] 中心点(7.5, 7.5) 长×宽=10*21
anchors=[[-26.5, -10. , 41.5, 25. ], 中心点(7.5, 7.5) 长×宽=68*35
[-49.5, -22. , 64.5, 37. ], 中心点(7.5, 7.5) 长×宽=114*60
[-84. , -40. , 99. , 55. ], 中心点(7.5, 7.5) 长×宽=183*95
[-16. , -16. , 31. , 31. ],
[-32. , -32. , 47. , 47. ],
[-56. , -56. , 71. , 71. ],
[ -8.5, -25. , 23.5, 40. ],
[-19.5, -47. , 34.5, 62. ],
[-36. , -80. , 51. , 95. ]]
17.imdb存储错误
"……tools/../lib/datasets/imdb.py", line 130, in append_flipped_images
    assert (boxes[:, 2] >= boxes[:, 0]).all()
AssertionError
问题分析:这个错误一般是由于数据集中存在不合理的
可选解决方案:筛选并修改存储于imdb中的值,若
代码修改(imdb.py中加入如下代码):
    @property
    def roidb(self):
        # A roidb is a list of dictionaries, each with the following keys:
        #   boxes
        #   gt_overlaps
        #   gt_classes
        #   flipped
        if self._roidb is not None:
            return self._roidb
        self._roidb = self.roidb_handler()

        ''' start(detect wrong annotations)'''
        num_images = self.num_images
        widths = self._get_widths()
        # the width of images
        for i in xrange(num_images):
            boxes = self._roidb[i]['boxes'].copy()
            oldx1 = boxes[:, 0].copy()
            oldx2 = boxes[:, 2].copy()
            oldx1 = np.array([oldx1[or_index] if oldx1[or_index]<=widths[i] else 0 for or_index in range(len(oldx1))],dtype=np.uint16)
            oldx2 = np.array([oldx2[or_index] if oldx2[or_index]<=widths[i] else oldx1[or_index] for or_index in range(len(oldx2))],dtype=np.uint16)
            self._roidb[i]['boxes'][:, 0] = oldx1
            self._roidb[i]['boxes'][:, 2] = oldx2
        ''' end(detect wrong annotations)'''
        # import pdb;pdb.set_trace()
        return self._roidb
18. 索引类型错误
TypeError: slice indices must be integers or None or have an __index__ method错误原因分析:一个list、tuple的索引都必须是int类型,dict可以是字符串的索引,所以py-faster-rcnn代码中此类问题,多是由于索引type为float或者float32等;
可选解决方案:将对应位置的索引强行转换为int类型,有的索引可能需要转换为uint16、uint32等类型(用到numpy包时)
19.*.caffemodel卷积层分析
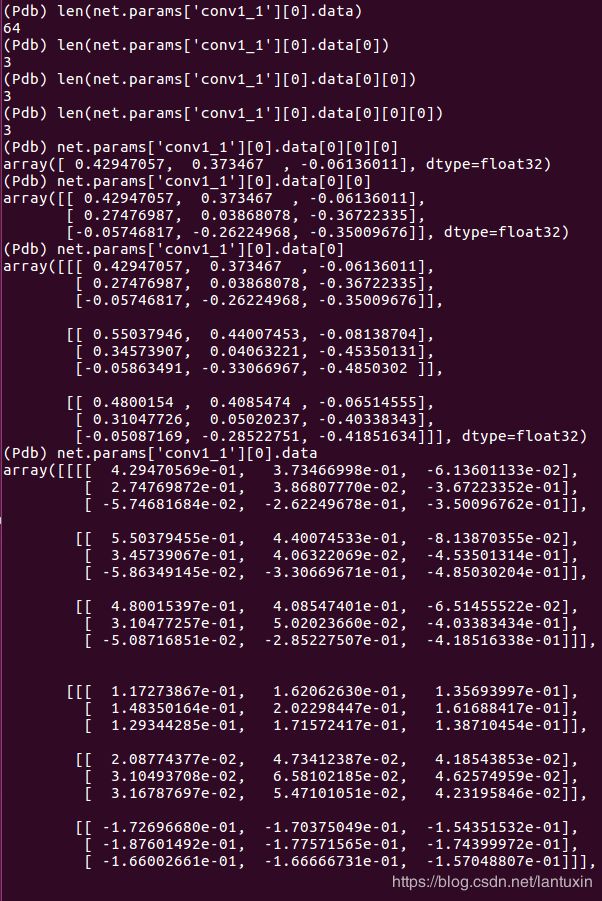
64个num_ouput,即64个卷积核,每个卷积核是3通道,3*3的卷积核大小。
卷积核64 = len(net.params['conv1_1'][0].data)
通道数3 = len(net.params['conv1_1'][0].data[0])
尺寸3*3 = len(net.params['conv1_1'][0].data[0][0]) * len(net.params['conv1_1'][0].data[0][0][0])
神经元个数1728 = net.params['conv1_1'][0].count = 64*3*3*3


