SpringBoot整合ElasticSearch及源码
一 Springboot 与检索


二 搭建环境
整合Elasticsearch,选中该模块,如下图:
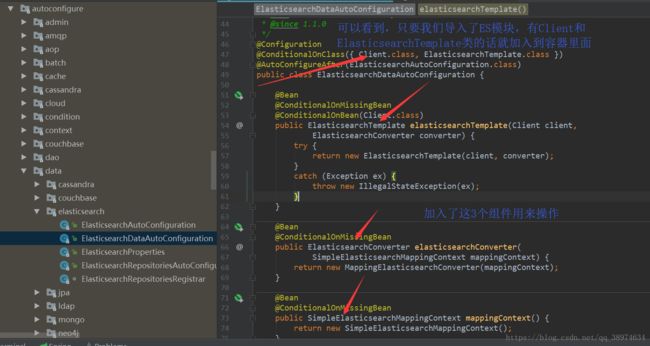
先来看看自动配置文件,看下为我们做了哪些自动配置:
接下来使用docker来创建elasticSearch容器,可以参考之前的博客 Docker轻松入门(详解) 或 Docker轻松入门(详解)
这个时候就可以使用IP地址:9301 进行访问了,如下:
出现以下信息就说明已经连接上了。
三 插入数据
注意: 需要更多的了解ElasticSearch的的知识,请参考官方文档:
https://www.elastic.co/guide/cn/elasticsearch/guide/current/intro.html
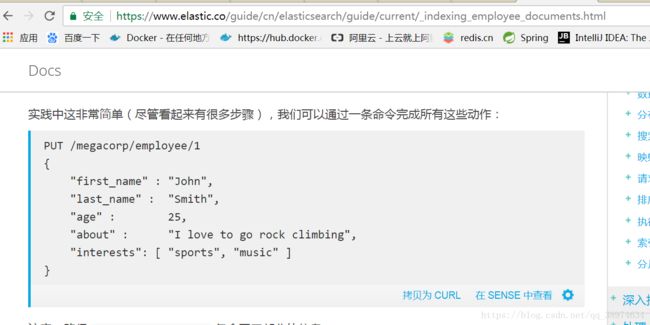
首先参考官方文档,插入一些数据:
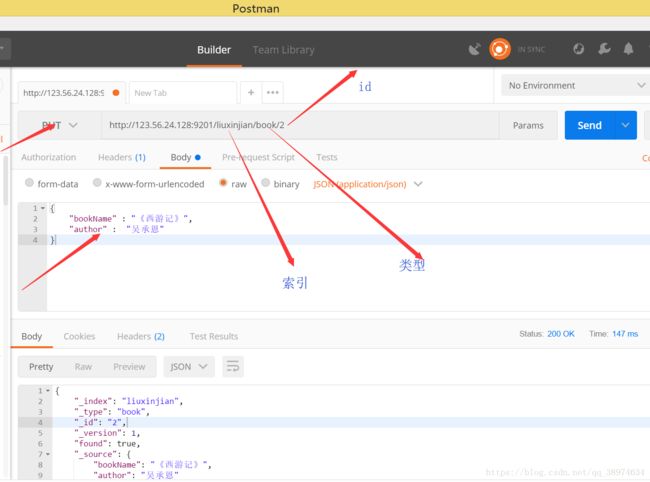
在Postman中模拟put请求插入数据
我插入了以下数据供查询: http://123.56.24.128:9201/liuxinjian/book/_search _search 代表查询所有类型下的数据
{
    "took": 2,
    "timed_out": false,
    "_shards": {
        "total": 5,
        "successful": 5,
        "failed": 0
    },
    "hits": {
        "total": 4,
        "max_score": 1,
        "hits": [
            {
                "_index": "liuxinjian",
                "_type": "book",
                "_id": "2",
                "_score": 1,
                "_source": {
                    "id": 2,
                    "bookName": "《水浒传》",
                    "author": "施耐庵"
                }
            },
            {
                "_index": "liuxinjian",
                "_type": "book",
                "_id": "4",
                "_score": 1,
                "_source": {
                    "id": 4,
                    "bookName": "《三国演义》",
                    "author": "罗贯中"
                }
            },
            {
                "_index": "liuxinjian",
                "_type": "book",
                "_id": "1",
                "_score": 1,
                "_source": {
                    "id": 1,
                    "bookName": "《红楼梦》",
                    "author": "曹雪芹"
                }
            },
            {
                "_index": "liuxinjian",
                "_type": "book",
                "_id": "3",
                "_score": 1,
                "_source": {
                    "id": 3,
                    "bookName": "《西游记》",
                    "author": "吴承恩"
                }
            }
        ]
    }
}
四 测试
1. 使用ElasticsearchTemplate进行操作
book.java
package com.lxj.elasticsearch.bean;

import org.springframework.data.annotation.Id;
import org.springframework.data.elasticsearch.annotations.Document;

@Document(indexName = "liuxinjian",type = "book") //indexName 索引  type 类型
public class Book {
    @Id
    private  Integer id;
    private  String bookName;
    private  String author;
    public Integer getId() {
        return id;
    }
    @Override
    public String toString() {
        return "Book{" +
                "id=" + id +
                ", bookName='" + bookName + '\'' +
                ", author='" + author + '\'' +
                '}';
    }

    public void setId(Integer id) {
        this.id = id;
    }

    public String getBookName() {
        return bookName;
    }

    public void setBookName(String bookName) {
        this.bookName = bookName;
    }

    public String getAuthor() {
        return author;
    }

    public void setAuthor(String author) {
        this.author = author;
    }
}
测试代码:
package com.lxj.elasticsearch;
import com.lxj.elasticsearch.bean.Book;
import org.elasticsearch.client.AdminClient;
import org.elasticsearch.client.Client;
import org.elasticsearch.common.xcontent.ToXContent;
import org.elasticsearch.common.xcontent.XContentBuilder;
import org.elasticsearch.index.query.QueryBuilder;
import org.elasticsearch.index.search.MatchQuery;
import org.junit.Test;
import org.junit.runner.RunWith;
import org.springframework.beans.factory.annotation.Autowired;
import org.springframework.boot.test.context.SpringBootTest;
import org.springframework.data.elasticsearch.core.ElasticsearchTemplate;
import org.springframework.data.elasticsearch.core.convert.ElasticsearchConverter;
import org.springframework.data.elasticsearch.core.query.NativeSearchQuery;
import org.springframework.data.elasticsearch.core.query.NativeSearchQueryBuilder;
import org.springframework.data.elasticsearch.core.query.SearchQuery;
import org.springframework.test.context.junit4.SpringRunner;

import java.io.IOException;
import java.util.List;

@RunWith(SpringRunner.class)
@SpringBootTest
public class SpringbootElasticsearchApplicationTests {

	@Autowired
	ElasticsearchTemplate elasticsearchTemplate;  //自动为我们导入的组件,前面看过源码,类似于jdbcTemplate

	@Test
	public void queryForList() {
		SearchQuery searchQuery = new NativeSearchQueryBuilder().build();
		List books = elasticsearchTemplate.queryForList(searchQuery, Book.class);
		for(Book book : books) {
			System.out.println(book);
		}
	}

} 
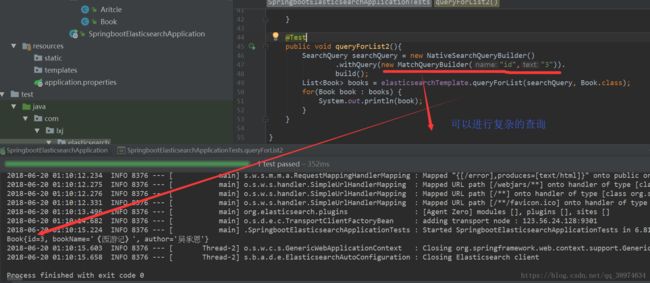
下面看看有哪些查询的方法:
这些都是进行查询匹配的,我就不举例子了。
2 Spring Data Elasticsearch配合使用
参考官方文档:https://docs.spring.io/spring-data/elasticsearch/docs/3.0.8.RELEASE/reference/html/#repositories
BookRepository.java
public interface BookRepository extends ElasticsearchRepository{
    public List findByBookNameLike(String bookName);
}
Test.java
	@Autowired
	BookRepository bookRepository;
	@Test
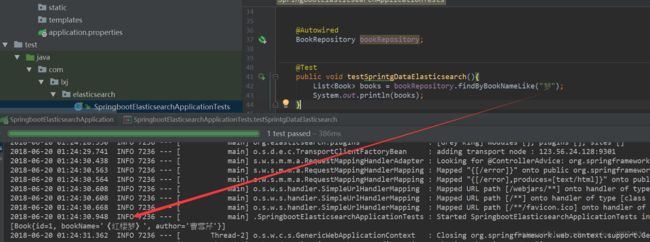
	public void testSprintgDataElasticsearch(){
		List books = bookRepository.findByBookNameLike("梦");
		System.out.println(books);
} 
3. 使用JestCilent进行操作
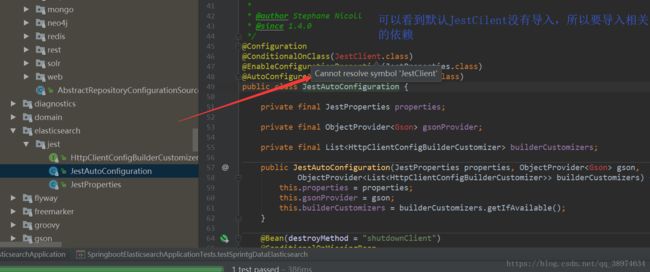
要使用JestCilent首先要导入依赖:
			io.searchbox
			jest
			5.3.3
当然我们可以看看源码包就知道原因了:
/**
 * Configuration properties for Jest.
 *
 * @author Stephane Nicoll
 * @since 1.4.0
 */
@ConfigurationProperties(prefix = "spring.elasticsearch.jest")
public class JestProperties {

	/**
	 * Comma-separated list of the Elasticsearch instances to use.
	 */
	private List uris = new ArrayList(
			Collections.singletonList("http://localhost:9200"));

	/**
	 * Login user.
	 */
	private String username;

	/**
从JestProperties的配置文件可以看到默认是本地9200端口,需要我们进行配置:
application.propeties文件配置如下:
spring.elasticsearch.jest.uris=http://123.56.24.128:9201
/**
 * {@link EnableAutoConfiguration Auto-Configuration} for Jest.
 *
 * @author Stephane Nicoll
 * @since 1.4.0
 */
@Configuration
@ConditionalOnClass(JestClient.class)
@EnableConfigurationProperties(JestProperties.class)
@AutoConfigureAfter(GsonAutoConfiguration.class)
public class JestAutoConfiguration {

	private final JestProperties properties;

	private final ObjectProvider gsonProvider;

	private final List builderCustomizers;

	public JestAutoConfiguration(JestProperties properties, ObjectProvider gson,
			ObjectProvider> builderCustomizers) {
		this.properties = properties;
		this.gsonProvider = gson;
		this.builderCustomizers = builderCustomizers.getIfAvailable();
	}

	@Bean(destroyMethod = "shutdownClient")
	@ConditionalOnMissingBean
	public JestClient jestClient() {
		JestClientFactory factory = new JestClientFactory();
		factory.setHttpClientConfig(createHttpClientConfig());
		return factory.getObject();
	}
自动配置类为我们导入了JestClient组件,下面开始测试:
        @Autowired
	JestClient jestClient;
	@Test //插入数据
	public void testJestCilent(){
		//1.给ES中索引(保存)一个文档。
		Book book = new Book();
		book.setId(5);
		book.setBookName("《计算机网络》");
		book.setAuthor("吴功谊");
		//构建一个索引功能
		Index build = new Index.Builder(book).index("liuxinjian").type("book").build();
		try {
			//执行
			jestClient.execute(build);
		} catch (IOException e) {
			e.printStackTrace();
		}
	}
	//测试搜索
	@Test
	public void search(){
		//查询表达式,可参照官方文档
		String json = "{\n" +
				"    \"query\" : {\n" +
				"        \"match\" : {\n" +
				"            \"bookName\" : \"《计算机网络》\"\n" +
				"        }\n" +
				"    }\n" +
				"}";
		//构造搜索功能
		Search search = new Search.Builder(json).addIndex("liuxinjian").addType("book").build();
		//执行
		try {
			SearchResult searchResult = jestClient.execute(search);
			System.out.println(searchResult.getJsonString());
		} catch (IOException e) {
			e.printStackTrace();
		}
	}
查询结果如下:
{"took":38,"timed_out":false,"_shards":{"total":5,"successful":5,"failed":0},"hits":{"total":1,"max_score":0.30018792,"hits":[{"_index":"liuxinjian","_type":"book","_id":"AWQZIecwNyuayaACXT7k","_score":0.30018792,"_source":{"id":5,"bookName":"《计算机网络》","author":"吴功谊"}}]}}
五 总结
关于SpringBoot整合ElasticSearch就到这里,如果需要深入学习的话,请参照官方文档,对这篇博客有什么问题请留言,后续还会继续更新相关知识,也可以关注博主的慕课手记,谢谢大家!!!


