Unity3d 周分享(17期 2019.5.18 )
选自过去1~2周 自己所看到外文内容:https://twitter.com/unity3d 和各种其他博客来源吧
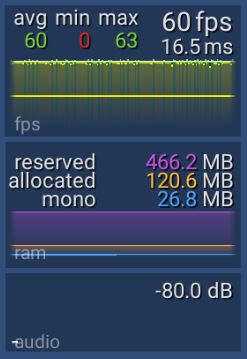
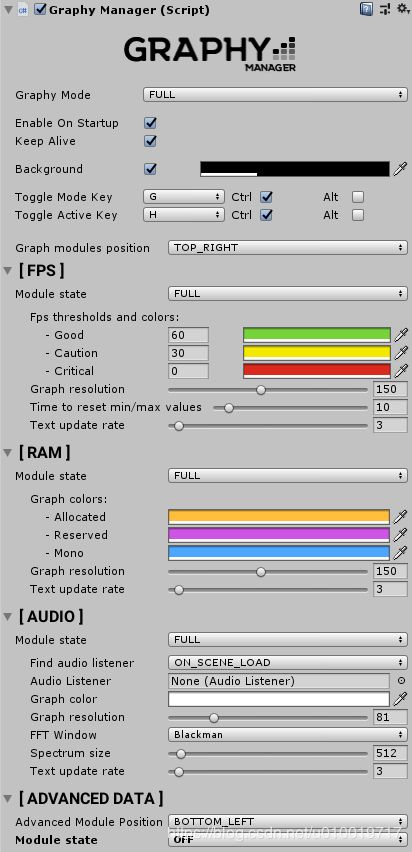
1、 [Unity]介绍可以在游戏画面上显示FPS,内存,音频,设备信息的“Graphy”
https://github.com/Tayx94/graphy
2、 [Unity]编辑器扩展,可以轻松选择重叠的uGUI对象
当有很多UI, 特别是UI重叠的时候, 点选特别麻烦!
在“Scene”视图中单击鼠标右键,
从上下文菜单中选择鼠标光标位置上存在的所有uGUI对象
using System.Collections.Generic;
using System.Linq;
using UnityEditor;
using UnityEngine;
using UnityEngine.SceneManagement;

[InitializeOnLoad]
public static class SceneViewContextMenu
{
    private static Vector3[] corners = new Vector3[ 4 ];

    static SceneViewContextMenu()
    {
        SceneView.onSceneGUIDelegate += OnSceneGUI;
    }

    private static void OnSceneGUI( SceneView sceneView )
    {
        var e = Event.current;

        if ( e == null ) return;
        if ( e.type != EventType.MouseUp ) return;
        if ( e.button != 1 ) return;

        e.Use();

        ShowSpriteSelectionMenu( e.mousePosition );
    }

    private static void ShowSpriteSelectionMenu( Vector2 screenPos )
    {
        var groups = SceneViewRaycast( screenPos )
            .GroupBy( c => c.gameObject.scene.name )
            .ToArray()
        ;

        var isOneScene = GetAllScenes().Count( c => c.isLoaded ) <= 1;

        var menu = new GenericMenu();

        var nameTable = new Dictionary();

        foreach ( var group in groups )
        {
            foreach ( var n in group )
            {
                var name = n.name;
                var sceneName = n.gameObject.scene.name;
                var nameWithSceneName = sceneName + "/" + name;
                var isSameName = nameTable.ContainsKey( nameWithSceneName );
                var text = isOneScene ? name : nameWithSceneName;
                if ( isSameName )
                {
                    var count = nameTable[ nameWithSceneName ]++;
                    text += " [" + count.ToString() + "]";
                }
                var content = new GUIContent( text );
                menu.AddItem( content, false, () => OnSelect( n ) );
                if ( !isSameName )
                {
                    nameTable.Add( nameWithSceneName, 1 );
                }
            }
        }
        menu.ShowAsContext();
    }

    private static void OnSelect( RectTransform rectTransform )
    {
        Selection.activeTransform = rectTransform;
        EditorGUIUtility.PingObject( rectTransform );
    }

    private static IEnumerable SceneViewRaycast( Vector2 mousePos )
    {
        return GetAllScenes()
            .Where( c => c.isLoaded )
            .SelectMany( c => c.GetRootGameObjects() )
            .Where( c => c.activeInHierarchy )
            .SelectMany( c => c.GetComponentsInChildren() )
            .Where( c =>
            {
                c.GetWorldCorners( corners );
                return NGUIEditorTools.SceneViewDistanceToRectangle( corners, mousePos ) == 0;
            } )
        ;
    }

    private static IEnumerable GetAllScenes()
    {
        for ( int i = 0; i < SceneManager.sceneCount; i++ )
        {
            yield return SceneManager.GetSceneAt( i );
        }
    }
}
https://qiita.com/kyubuns/items/f10ae5c0de29d715a23b
3、 通过向Unity项目引入“unity-toolbar-extender”
,您可以在Unity编辑器顶部的播放按钮的两侧放置按钮。
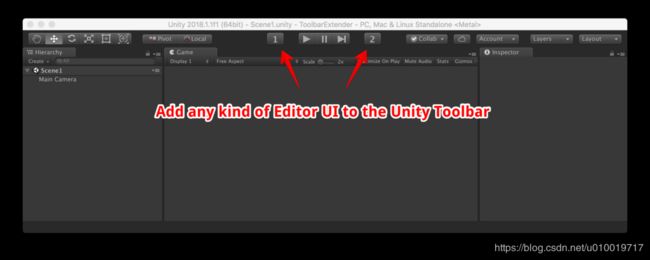
https://github.com/marijnz/unity-toolbar-extender
using ToolbarExtender;
using UnityEditor;
using UnityEngine;

[InitializeOnLoad]
public class LeftButtonToolbarWindow : ExtendedToolbarWindow
{
    static LeftButtonToolbarWindow()
    {
        RegisterToolbarWindow( -90, 35 );
    }

    protected override void OnGUI()
    {
        base.OnGUI();

        var rect = new Rect( 0, 0, position.width, position.height );
        rect.y = 4;

        if ( GUI.Button( rect, "1", Styles.commandButtonStyle ) )
        {
            // ...
        }
    }
}

[InitializeOnLoad]
public class RightButtonToolbarWindow : ExtendedToolbarWindow
{
    static RightButtonToolbarWindow()
    {
        RegisterToolbarWindow( 90, 35 );
    }

    protected override void OnGUI()
    {
        base.OnGUI();

        var rect = new Rect( 0, 0, position.width, position.height );
        rect.y = 4;

        if ( GUI.Button( rect, "2", Styles.commandButtonStyle ) )
        {
            // ...
        }
    }
}


	[InitializeOnLoad]
	public class SceneSwitchLeftButton
	{
		static SceneSwitchLeftButton()
		{
			ToolbarExtender.LeftToolbarGUI.Add(OnToolbarGUI);
		}

		static void OnToolbarGUI()
		{
			GUILayout.FlexibleSpace();

			if(GUILayout.Button(new GUIContent("1", "Start Scene 1"), ToolbarStyles.commandButtonStyle))
			{
				SceneHelper.StartScene("Assets/ToolbarExtender/Example/Scenes/Scene1.unity");
			}

			if(GUILayout.Button(new GUIContent("2", "Start Scene 2"), ToolbarStyles.commandButtonStyle))
			{
				SceneHelper.StartScene("Assets/ToolbarExtender/Example/Scenes/Scene2.unity");
			}
		}
	}
添加buttons,添加sliders,toggles等。请注意,由于代码依赖于反射来访问Unity的内部代码,所以这很麻烦。 使用新的Unity更新可能无法再使用它。
当前的解决方案由https://github.com/OndrejPetrzilka完成,并使用Unity的新UIElements代码和反射来连接工具栏的OnGUI回调。
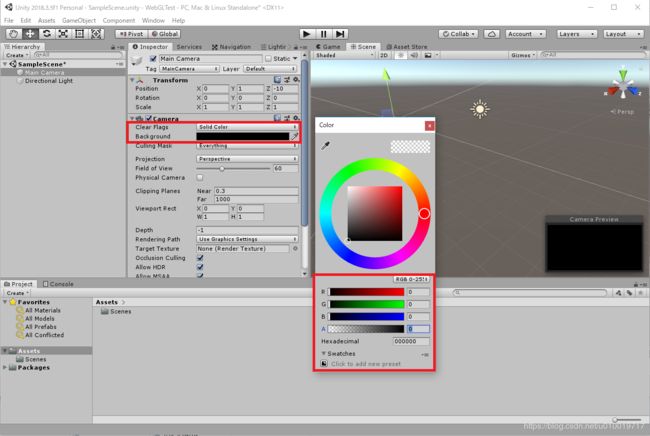
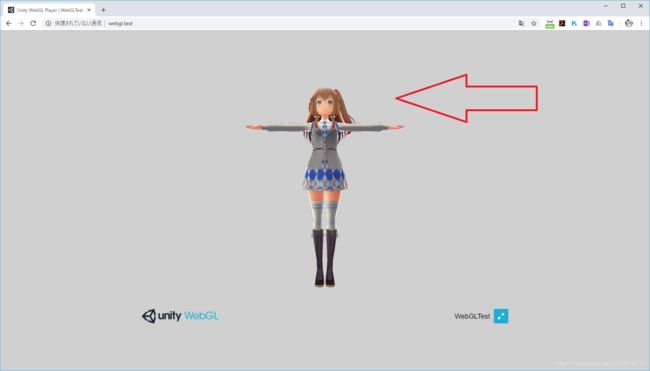
4、 Unity WebGL透明(显示HTML背景)
https://qiita.com/kumatta_ss/items/b89b03d7b4892ec3c93f
参考站点等
- Twitter文章
- Unity论坛文章
- Unity支持文章
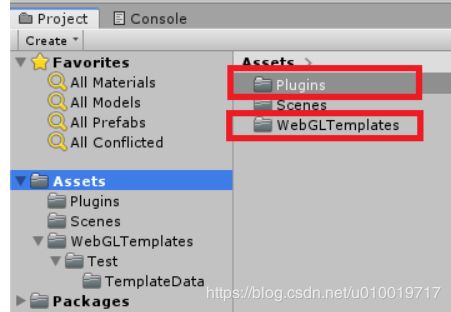
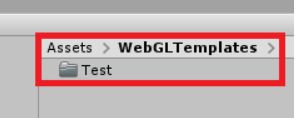
为WebGL输出创建模板
复制模板
将以下目录中的「Default」拷贝到项目中 更改为「Test」
※默认值应安装在“C:\ Program Files”下
Unity\Hub\Editor\2018.3.5f1\Editor\Data\PlaybackEngines\WebGLSupport\BuildTools\WebGLTemplates
编辑“index.html”以显示确认
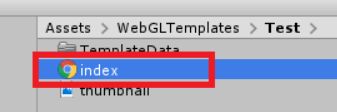
将以下内容添加到“index.html”

覆盖Unity的alpha缓冲区处理
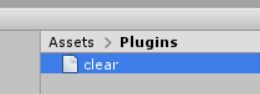
在“Plugins”中创建名为“clear.jslib”的文件
var LibraryGLClear = {
glClear: function(mask)
{
if (mask == 0x00004000)
{
var v = GLctx.getParameter(GLctx.COLOR_WRITEMASK);
if (!v[0] && !v[1] && !v[2] && v[3])
// We are trying to clear alpha only -- skip.
return;
}
GLctx.clear(mask);
}
};
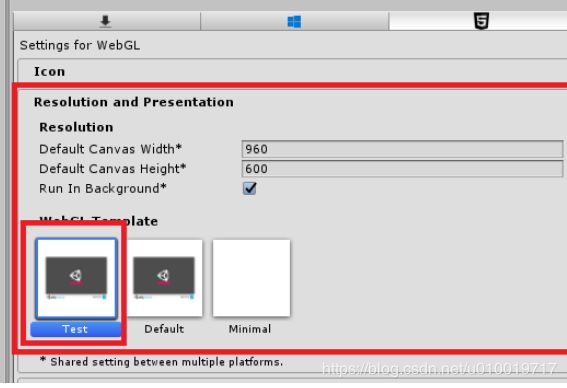
mergeInto(LibraryManager.library, LibraryGLClear); 更改构建模板
在“Player Settings ”中
在“Inspector”选项卡的“Respect and Presentation-> WebGL Template”中,选择上面创建的模板“Test”
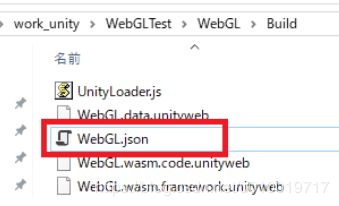
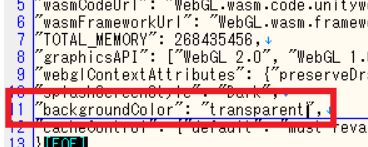
构建完成之后查看:
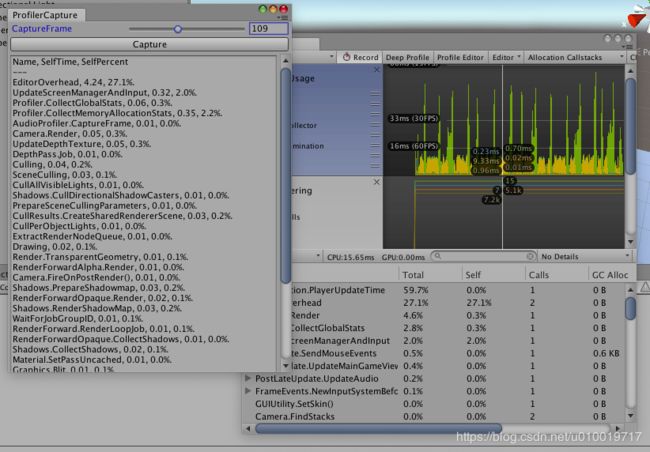
5、通过脚本获取Unity的Profiler窗口的信息
https://github.com/KTA552/UnityProfilerCapture
如果您已经知道要获取的内容,我认为通常使用Unity的Profiler.Recorder会更容易。 但是现在要说的不会使用这个
Unity-Scripting API:Recorder
https://docs.unity3d.com/ScriptReference/Profiling.Recorder.html
- 获取Profiler持有的ProfilerProperty根
- 从获取的ProfilerProperty获取必要的数据。
- 重复,直到ProfilerProperty中没有更多子项。
获取ProfilerProperty:
var property = new ProfilerProperty();
property.SetRoot(_captureIndex - 1, ProfilerColumn.SelfTime, ProfilerViewType.Hierarchy);   // 参数1是帧索引,可以获取当前帧和偏离1的帧,  参数2 指定要获取的排序顺序,可以是TotalTime, Selfpercent 等,  参数3指定要从ProfilerWindow 获取的类别。
从ProfilerProperty获取信息:
通过执行property.Next,移动到当前属性层次结构的下一个层次结构。
while (property.Next(true))
{
    var value = property.GetColumnAsSingle(ProfilerColumn.SelfTime);
    if (value > 0.01)
    {
        _logText += String.Format("{0}, {1}, {2}. \n",
                        property.GetColumn(ProfilerColumn.FunctionName),
                        property.GetColumn(ProfilerColumn.SelfTime),
                        property.GetColumn(ProfilerColumn.SelfPercent));
    }
}
参考
- UnityCsReference / ProfilerWindow.cs
https://github.com/Unity-Technologies/UnityCsReference/blob/57f723ec72ca50427e5d17cad0ec123be2372f67/Modules/ProfilerEditor/ProfilerWindow/ProfilerWindow.cs
- ProfilerProperty.Next,UnityEditorInternal C#(CSharp)方法代码示例 - HotExamples
https://csharp.hotexamples.com/examples/UnityEditorInternal/ProfilerProperty/Next/php-profilerproperty-next-method-examples.html
- 第6章EditorGUI(EdirotGUILayout) - 编辑扩展的简介
https://anchan828.github.io/editor-manual/web/part1-editorgui
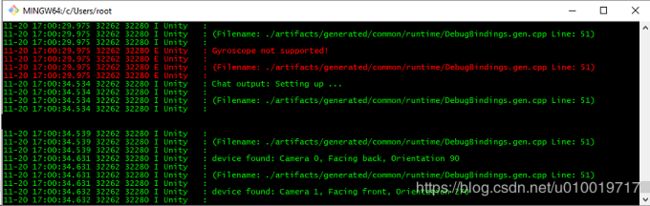
6、 让adb logcat 输出有颜色
你可以轻松启用输出颜色!
只需添加-v颜色参数:
adb logcat -s Unity ActivityManager PackageManager dalvikvm DEBUG -v颜色
注意:默认的Windows命令提示符不支持颜色,
需要使用其他一些控制台(我使用的是GitBash,它与SourceTree一起提供)
之前:(很难看出哪一行是错误)
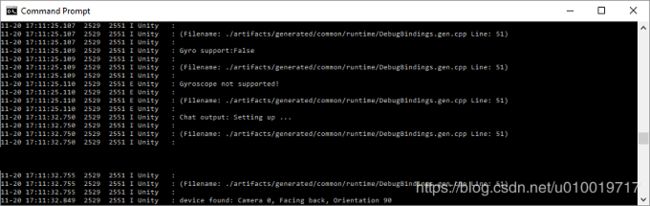
之后:(红色文本来自Debug.LogError)
参考资料
- https://developer.android.com/studio/command-line/logcat
7、 Unity如何仅使uGUI忽略多个触摸输入
Input.multiTouchEnabled 如果我试图设置为 false,他会禁用所有的, 不仅仅是UGUI
怎么做
- 创建一个派生自要禁用多点触控输入的组件的类。例如public MyButton : UnitySystem.UI.Button。
- 覆盖从1中创建的类接收的方法 ,其中主要是参数UnityEngine.EventSystems.PointerEventData,eventData.pointerId如果不是0则立即返回。如果0调用基类处理,base.OnPointerDown(eventData); 如。
- 使用在2中创建的脚本不是Button。如果您已经粘贴了一个Button,则可以通过将Inspector从Normal切换到Debug来直接替换Script,因此如果更改它,则可以在不删除已设置的属性的情况下进行迁移。
SingleTouchButton.cs
using UnityEngine.EventSystems;
public class SingleTouchButton : UnityEngine.UI.Button
{
    public override void OnPointerDown(PointerEventData eventData)
    {
        if (eventData.pointerId != 0)
        {
            return;
        }
        base.OnPointerDown(eventData);
    }
    public override void OnPointerClick(PointerEventData eventData)
    {
        if (eventData.pointerId != 0)
        {
            return;
        }
        base.OnPointerClick(eventData);
    }
    public override void OnPointerEnter(PointerEventData eventData)
    {
        if (eventData.pointerId != 0)
        {
            return;
        }
        base.OnPointerEnter(eventData);
    }
    public override void OnPointerExit(PointerEventData eventData)
    {
        if (eventData.pointerId != 0)
        {
            return;
        }
        base.OnPointerExit(eventData);
    }
    public override void OnPointerUp(PointerEventData eventData)
    {
        if (eventData.pointerId != 0)
        {
            return;
        }
        base.OnPointerUp(eventData);
    }
}
我想也许我可以修改EventSystem本身并配置单个触摸环境而不修改uGUI组件,但我认为到目前为止重写它们是不现实的其他想法
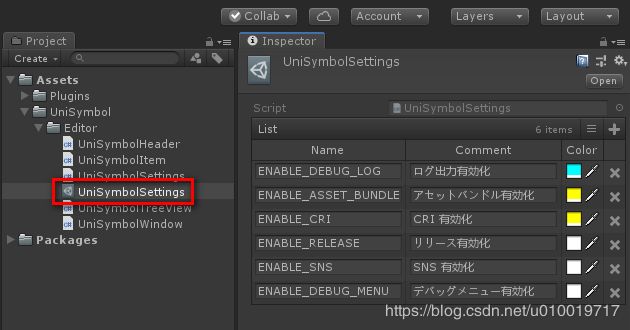
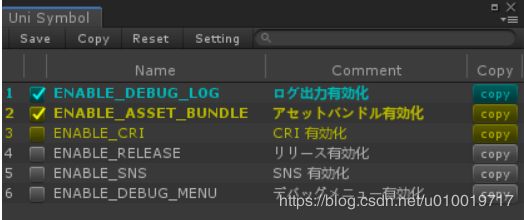
8、 这个工具还是蛮有用的: 编辑器扩展可以轻松定义符号
https://github.com/baba-s/uni-symbol
项目中会定义很多宏定义。 Unity提供的宏定义编辑很不方便。 一行显示的内容更是不好编辑。
他的实现方式好像依赖插件:
“Odin”
https://assetstore.unity.com/packages/tools/utilities/odin-inspector-and-serializer-89041
9、 推荐幻灯片和项目
https://github.com/meleap/HadoObjectPool
使用UniRx完全托管的ObjectPool库
ppt: https://www.slideshare.net/YasuyukiKado/hadounirxobjectpool
10、 【Unity】如何打开多个EditorWindow
var win = GetWindow
通常,当您想要使用编辑器扩展打开一个窗口时,请使用EditorWindow.GetWindow,但是使用此描述您无法打开多个EditorWindow。
var win = CreateInstance();
win.titleContent = new GUIContent( TITLE );
win.Show();
如果要打开多个EditorWindow,请编写上面的代码
https://answers.unity.com/questions/980577/multiple-menuitems-multiple-editor-windows.html
11、 有个Shader 优化策略 能在顶点着色器中处理就不要在片元着色器中处理

// 不应该在 在片段着色器中进行颜色计算
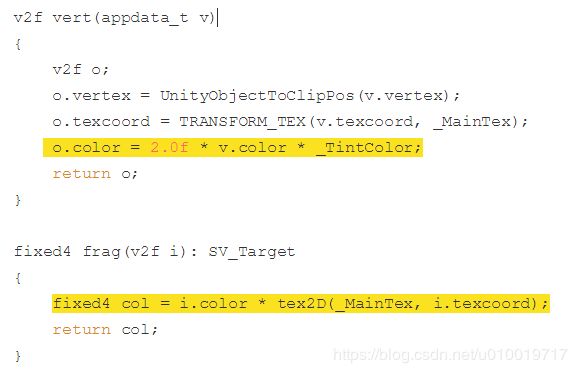
最好事先在顶点着色器中执行颜色计算
12、 [Unity] 可在Android应用程序开发中使用的分析器的官方文档
https://unity3d.com/jp/learn/tutorials/topics/best-practices/android-profiling-tools
这么多工具:
| Tool |
Target Devices |
GPU |
CPU |
System |
Description |
OS |
API |
| Systrace |
Any chipset |
Yes |
Yes |
Systrace is not a sampling profiler. The tracing tool captures system-wide traces, and Android Studio embeds it in 3.0. |
Android |
||
| Adreno Profiler |
Adreno GPU |
Yes |
Replaced by Snapdragon Profiler Requires old mono framework 2.10.5 and xquartz 2.7.11 |
Android |
DirectX OpenGL ES OpenCL |
||
| Snapdragon Profiler |
Snapdragon Chipset |
Yes |
Yes |
Yes |
Requires latest mono framework and Android 6.0+ (frame capture) |
Android |
OpenGL ES OpenCL Vulkan |
| Mali Graphics Debugger |
Mali GPU |
Yes |
Additional .so file added (via Plugin in Unity) otherwise requires source changes or a rooted device. |
Android Linux |
OpenGL ES OpenCL |
||
| Simpleperf |
Any chipset |
Command Line only, but Android Studio integrates it in 3.0. |
Android |
||||
| Android Studio GPU Debugger |
Any chipset |
Yes |
Create Android Studio Project and build/run. |
Android |
OpenGL ES |
||
| DS-5 Streamline |
ARM Chipset (Cortex-M, Cortex-A) |
Yes |
Yes |
Streamline requires a custom kernel and a rooted device. |
Linux, Android |
||
| Tegra System Profiler |
Tegra K1, X1 |
Yes |
Yes |
A system trace and multi-core CPU call stack sampling profiler. |
Android Linux |
||
| Tegra Graphics Debugger |
Tegra K1, X1 |
Yes |
A tool for debugging and profiling applications. |
Android Linux |
OpenGL ES OpenGL |
||
| Intel VTune Amplifier Performance Analyzer |
Intel x86 Desktop |
Yes |
Yes |
Yes |
A tool for analysing and profiling processor performance. |
Windows Android Linux |
DirectX OpenGL ES OpenGL |
| Intel System Analyzer |
Intel x86, ARM |
Yes |
Yes |
A tool for analysing CPU live traces. |
Windows Android Linux |
DirectX OpenGL ES OpenGL |
|
| Intel Graphics Frame Analyzer |
Intel x86 |
Yes |
A tool for single-frame analysis and optimization. |
Windows Android Linux |
DirectX OpenGL ES OpenGL |
||
| Intel Graphics Trace Analyzer |
Intel x86 |
Yes |
Yes |
A trace tool for analyzing workload performance across the CPU and GPU. |
Windows Android Linux |
DirectX OpenGL ES OpenGL |
|
| PVRTrace |
Any chipset |
Yes |
Used for older GPUs and imgtecis not producing new GPUs right now. |
Android Linux |
OpenGL ES OpenGL |
||
| gapid |
Any chipset |
Yes |
You need to build it manually, but Google also offers pre-built executables. |
Android Windows Linux |
OpenGL ES Vulcan |
||
| vkTrace |
Any chipset |
Yes |
Command Line only. |
Linux Windows |
Vulcan |
For other platforms, similar tools are available. It’s good practice to verify and compare results on different platforms, especially when they share similar
13、Editor 扩展方法。 判断Object 是不是Prefab或者Prefab实例。
using UnityEditor;

public static class UnityObjectExt
{
    public static bool IsNotPrefab( this UnityEngine.Object self )
    {
        var type = PrefabUtility.GetPrefabAssetType( self );
        return type == PrefabAssetType.NotAPrefab;
    }
}
using UnityEditor;

public static class UnityObjectExt
{
    public static bool IsPrefab( this UnityEngine.Object self )
    {
        var type = PrefabUtility.GetPrefabAssetType( self );
        return type != PrefabAssetType.NotAPrefab;
    }
}
Debug.Log( gameObject.IsNotPrefab() );
Debug.Log( gameObject.IsPrefab() );
14、 https://bitbucket.org/Daerst/gpu-ray-tracing-in-unity/src
https://bitbucket.org/Daerst/gpu-ray-tracing-in-unity/src/Tutorial_Pt1/
https://bitbucket.org/Daerst/gpu-ray-tracing-in-unity/src/Tutorial_Pt2/
https://bitbucket.org/Daerst/gpu-ray-tracing-in-unity/src/Tutorial_Pt3/
Unity中的GPU光线跟踪
在Unity中从头开始编写GPU光线跟踪器!访问blog.three-eyed-games.com
Unity中的GPU路径跟踪 - 第3部分 http://blog.three-eyed-games.com/2019/03/18/gpu-path-tracing-in-unity-part-3/
2019年3月18日 | 3评论 | 教程
“算术!代数!几何!宏伟的三位一体!发光的三角形!谁不认识你就没有意义!“ - ComtedeLautréamont今天,我们将会有一个很大的飞跃。我们将超越纯粹的球形结构和我们迄今为止追踪的无限平面,并引入三角形 - 现代计算机图形的本质,[...]
1)定义平面上的直线和三角形的交点? www.iquilezles.org/www/articles/noacos/noacos.htm
2)(三维)空间中线和三角形的交点的定义? paulbourke.net/geometry/polygonmesh
Unity中的GPU路径跟踪 - 第2部分 http://blog.three-eyed-games.com/2018/05/12/gpu-path-tracing-in-unity-part-2/
2018年5月12日 | 24评论 | 教程
“没有比模糊概念的清晰图像更糟糕了。” - 安塞尔·亚当斯在本系列的第一部分中,我们创建了一个能够追踪完美反射和硬阴影的Whitted光线追踪器。缺少的是模糊效果:漫反射互反射,光泽反射和柔和阴影。以我们已有的代码为基础,[...]
Unity中的GPU光线跟踪 - 第1部分 http://blog.three-eyed-games.com/2018/05/03/gpu-ray-tracing-in-unity-part-1/
2018年5月3日 | 23评论 | 教程
这些是光线追踪的真正令人兴奋的时刻。最新进展如人工智能加速去噪,微软宣布DirectX 12中的原生支持。。。。。
15、 在 Windows 上查看 ios 的log : iOSLogInfo
https://www.blackberry.com/blackberrytraining/web/KB_Resources/KB36986_iOSLogInfo_4.3.4.zip
https://www.xuanyusong.com/archives/4541
http://www.sohu.com/a/220125355_216613
https://www.utest.com/articles/how-to-capture-ios-console-logs-on-windows-pc
16、 [Unity]编辑器扩展,关闭所有场景的全局照明
using System.Linq;
using UnityEditor;
using UnityEditor.SceneManagement;

///
/// 编辑器扩展以关闭所有场景的全局照明
///
public static class GlobalIlluminationDisabler
{
    [MenuItem( "Tools/Global Illumination/Disable In All Scenes" )]
    private static void Execute()
    {
        var list = AssetDatabase
                   .FindAssets( "t:scene" )
                   .Select( AssetDatabase.GUIDToAssetPath )
            ;

        var setup = EditorSceneManager.GetSceneManagerSetup();
        var mode  = Lightmapping.GIWorkflowMode.OnDemand;

        foreach ( var n in list )
        {
            var scene          = EditorSceneManager.OpenScene( n );
            var isAutoGenerate = Lightmapping.giWorkflowMode != mode;

            if ( !Lightmapping.realtimeGI && !Lightmapping.bakedGI && !isAutoGenerate )
            {
                continue;
            }

            Lightmapping.realtimeGI     = false;
            Lightmapping.bakedGI        = false;
            Lightmapping.giWorkflowMode = mode;

            EditorSceneManager.SaveScene( scene );
        }

        EditorSceneManager.RestoreSceneManagerSetup( setup );
    }
}
【Unity】编辑器扩展,关闭“照明”窗口中的“自动生成”
using UnityEditor;

public static class Example
{
    [MenuItem( "Tools/Hoge" )]
    private static void Hoge()
    {
        Lightmapping.giWorkflowMode = Lightmapping.GIWorkflowMode.OnDemand;
    }
}
17、 经常看日文, 看到VRM 这个词, 今天突然好奇起来, 基本上搜搜不到类似相关的内容。
中文教程: https://steamcdn-a.akamaihd.net/steam/apps/870820/manuals/VRM_sc.pdf?t=1534018849
https://home.gamer.com.tw/creationDetail.php?sn=4075972
官方:
https://dwango.github.io/
参考资料:
https://qiita.com/miyumiyu/items/192e1beb95d6e3507533
https://uuki.org/article/how-to-make-vrm
VRM是日本近年在VR,Vtuber领域大力推荐的3D模型格式,2018年3月左右公开,还非常新 颖。
因为人形3D模型格式多种多样的不统一,坐标系不同,尺度不同,初始姿势不同,表情不同 ,骨骼导入程序的方法也不同。对于VR开发者来说模型的处理非常麻烦,虽然FBX可以被大 多数3D软件输出与读取,但是缺乏许多对于VR应用以及游戏应用的必要资讯,VRM转档程式 会自动补足这些缺少的部分,使人形3D模型的应用更加简单。
架构: VRM基于3D标准格式glTF2.0,这是包含处理人形模型的规范和扩展的格式。 实际上~.vrm直接更改副档名为.glb可以被win10读取,支援glTF2.0的软体应该也可以,不过 一些拓展的资讯可能不会被读取。
主要搭载的模型资讯有
纹理Texture
材质Material
着色器Shaders
网格Mesh (Vertex array、index array) 变形,
表情 Blend shapes
蒙皮Skinning (4weight)
骨头结构 Node 、bones、rig
第一人称资讯 First-person setting
碰撞与弹簧物理骨骼Secondary (Spring bone、Collision detection)
授权与作者情报 Metadata
VRM目前官方只提供Unity的SDK用于读取和写入制作VRM,但VRM本身与平台无关。可以在 其他系统引擎和环境中处理。已有第三方的UE4 SDK正在开发中 官方
Unity SDK https://github.com/dwango/UniVRM/releases
UE4 SDK https://github.com/uetokyo/UnrealVRM
今天看到的文章: 试图在Unity中晃动VRM模型的胸部
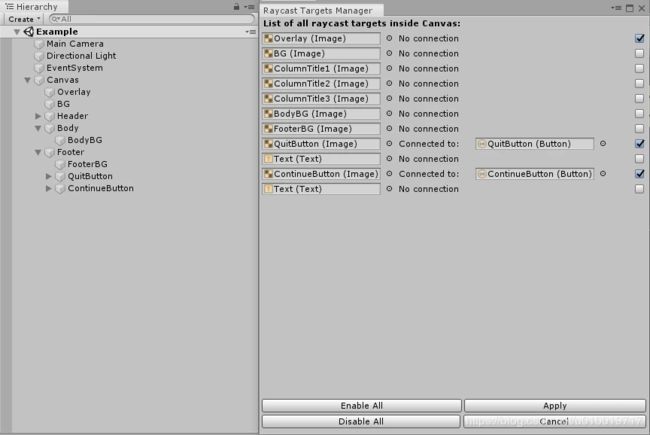
18、 一个编辑器扩展: RaycastTargetsManager
UGUI (包括TextMeshPro)系统的一个优化点就是 减少 Raycast Target 的勾选。
下面这个编辑器 很容易管理, 设置。
https://connect.unity.com/p/unity-workflow-optimization-pt-1
https://github.com/olegpshenin/RaycastTargetsManager
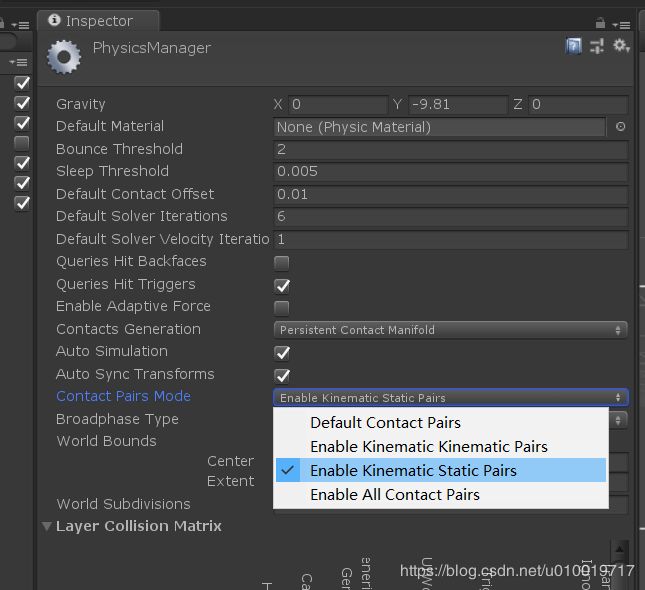
19、 请记住,它只是被激活的碰撞事件,它们实际上并不碰撞!Unity有一个选项,即使在运动和静态物体上也可以发送碰撞事件!
https://twitter.com/wayward_st/status/1120612020297056257?ref_src=twsrc%5Etfw%7Ctwcamp%5Etweetembed%7Ctwterm%5E1120612020297056257&ref_url=https%3A%2F%2Fdevdog.io%2Fblog%2F8-best-unity-tips-for-game-developers-88%2F
20、
从#unity 2019.1开始,我们可以通过全局和特定工具让自己更轻松。您只需从EditorTools继承并使用EditorTool属性。

官方文档: https://docs.unity3d.com/2019.1/Documentation/ScriptReference/EditorTools.EditorTool.html
21、 想让ameobject/sprite始终相对于相机旋转吗?
只需设置相同的值。 如:
![]()
transform.ratotion = Camera.main.transform.rotation ; // 广告牌
https://twitter.com/MattGambell/status/1121141595317915649?ref_src=twsrc%5Etfw%7Ctwcamp%5Etweetembed%7Ctwterm%5E1121141595317915649&ref_url=https%3A%2F%2Fdevdog.io%2Fblog%2F8-best-unity-tips-for-game-developers-88%2F
注意要写到 LateUpdate, 而不是 Update中~
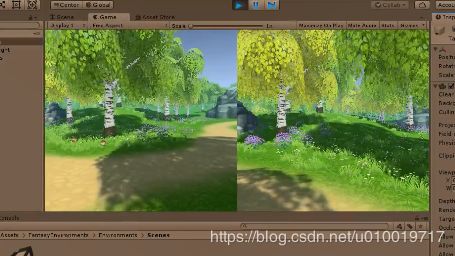
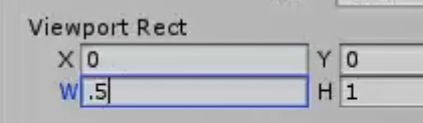
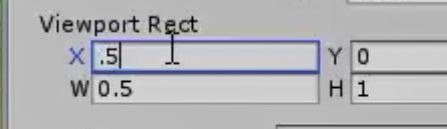
22、 一个游戏内分屏的实现方式 : 你需要的只是两个摄像头,并且改变了一些值!
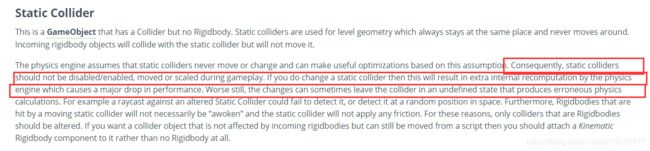
23、 请记住:避免移动静态碰撞器!这会导致性能下降并产生强烈的物理计算。
上午2:06 - 2019年4月30日
https://twitter.com/tntcproject/status/1123151617593892864?ref_src=twsrc%5Etfw%7Ctwcamp%5Etweetembed%7Ctwterm%5E1123151617593892864&ref_url=https%3A%2F%2Fdevdog.io%2Fblog%2F13-best-unity-tips-for-game-developers-89%2F
我想要说这个观点是过时的!!!!!!!
哪些Unity中 过时的观点。 Unity早期版本会有一些问题,但是很多在后续版本新版中都被解决优化掉了。
1、 foreach 性能问题
2、Static Collider.Move warning 问题,
官方的最佳实践中依然这样写着
https://unity3d.com/cn/learn/tutorials/topics/physics/physics-best-practices
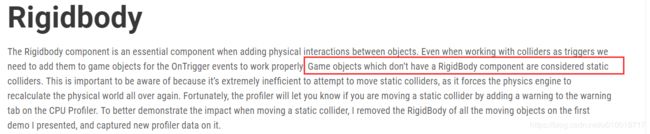
问题在Unity5.0 开始就被修复了。
https://answers.unity.com/questions/1422129/static-collidermove-warning-is-still-in-place-shou.html
https://blogs.unity3d.com/kr/2014/07/08/high-performance-physics-in-unity-5/
最新的官方文档也没有更新:
https://docs.unity3d.com/Manual/CollidersOverview.html
包括有人测试得到相反的结论:

24、关于如何将光标捕捉到Unity中的网格的简短提示。
https://translate.google.cn/#view=home&op=translate&sl=ja&tl=zh-CN&text=Just%20a%20short%20tip%20on%20how%20to%20snap%20the%20cursor%20to%20the%20grid%20in%20Unity.%20%23madewithunity%20%23unitytips%20%23gamedev
Unity Scene视图中的网络 就是一米的单位, 也是一个Cube的大小。 摄像机正交投影模式。
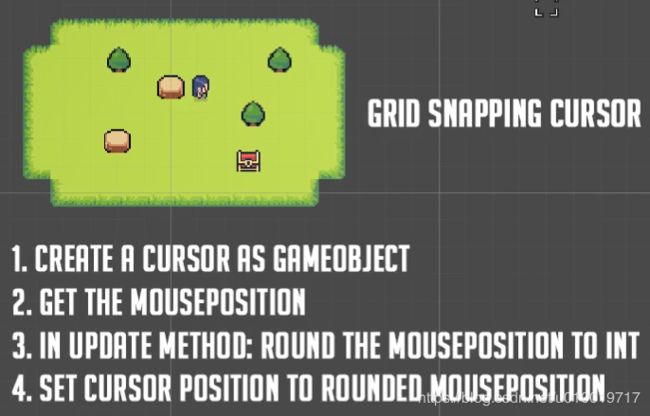
private void Update()
{
if (Input.GetMouseButtonDown(0))
{
var mousePos = Input.mousePosition;
var mouseScreenPos = Camera.main.ScreenToWorldPoint(mousePos);
this.transform.position = new Vector2(Mathf.RoundToInt(mouseScreenPos.x), Mathf.RoundToInt(mouseScreenPos.y));
}
}
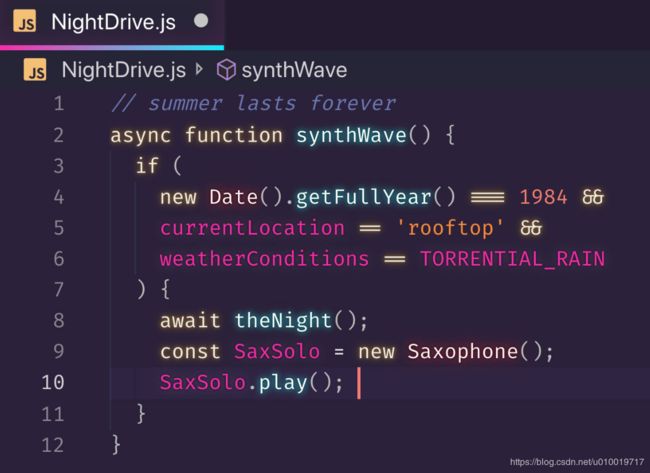
看到网上有人分享的一个 VS Code 的 theme : SynthWave '84 - VS Code theme
https://marketplace.visualstudio.com/items?itemName=RobbOwen.synthwave-vscode
25、 看到官方文档上的建议:
一帧内顶点数不要超过10万。

还有一个提示:
请注意,图形硬件必须处理的实际顶点数通常与3D应用程序报告的数量不同。建模应用程序通常显示构成模型的不同角点的数量(称为几何顶点数)。但是,对于图形卡,为了渲染目的,需要将一些几何顶点分割成两个或更多个逻辑顶点。如果顶点有多个法线,UV坐标或顶点颜色,则必须将其拆分。因此,Unity中的顶点计数通常高于3D应用程序给出的计数。

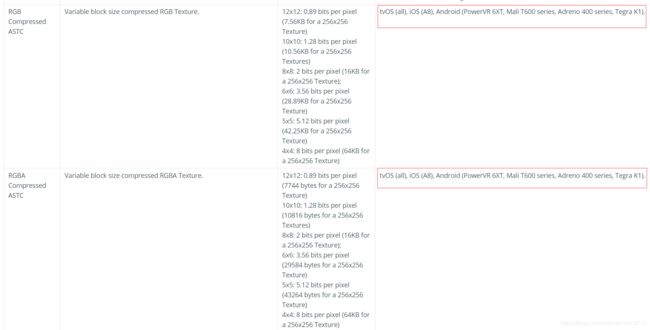
用于特定于平台的overrides的纹理压缩格式https://docs.unity3d.com/Manual/class-TextureImporterOverride.html
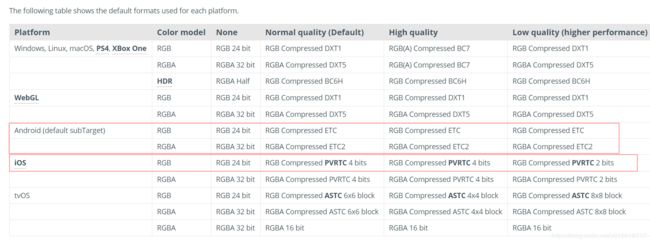
Unity考虑的更全, 所以默认设置要覆盖的支持更广。
现在比较关心 ASTC的支持程度。 ASTC的速度和压缩质量效果更好~ 现在IOS 中大部分都使用ASTC了。 安卓因为碎片问题严重,还是没办法直接使用。
Notes on Android
Unless you’re targeting specific hardware (such as Tegra), ETC2 compression is the most efficient option for Android, offering the best balance of quality and file size (with associated memory size requirements). If you need an alpha channel, you could store it externally and still benefit from a lower Texture file size.
除非您针对特定硬件(例如Tegra),否则ETC2压缩是Android的最有效选项,可提供最佳的质量和文件大小平衡(以及相关的内存大小要求)。


- 动态批处理:对于足够小的网格 (不超过300个顶点),它会在CPU上转换它们的顶点,将许多相似的顶点组合在一起,并一次性绘制它们。
- 静态批处理:将静态(不移动)GameObjects组合成大网格,并以更快的方式呈现它们。
与手动合并GameObjects相比,内置批处理有几个好处; 最值得注意的是,GameObjects仍然可以单独剔除。但是,它也有一些缺点; 静态批处理会产生内存和存储开销,动态批处理会产生一些CPU开销。

在移动平台上获得相当好的质量,大约有30个骨头。理想情况下,移动设备的数量应保持在30以下,桌面游戏的数量不要超过30。

对于移动设备,每个网格300到1500个多边形的位置将产生良好的结果
对于每个角色,您应该只使用一个 skinned Mesh Renderer 。
26、 Unity官方有一个 How to 系列文章。 但是官方并没有给出一个总的目录来浏览所有的文章。 可以用搜索引擎这搜索:
这样搜索更多: site:https://unity3d.com/how-to/
在创作者角落 或开发者角落查看更多内容
注册以获得技术提示和技术诀窍
- Unity不断发展的架构的最佳实践https://unity3d.com/how-to/unity-best-practices-for-engine-performance?_ga=2.62430764.1017019482.1557380061-1366382285.1535636176
- 使用Scriptable Objects构建游戏的三种很酷的方法https://unity3d.com/how-to/architect-with-Scriptable-Objects?_ga=2.62430764.1017019482.1557380061-1366382285.1535636176 https://github.com/roboryantron/Unite2017 https://www.youtube.com/watch?v=raQ3iHhE_Kk https://www.youtube.com/watch?v=6vmRwLYWNRo https://bitbucket.org/richardfine/scriptableobjectdemo/src/default/
- 一个场景,为控制台开发人员提供10个图形优化https://unity3d.com/how-to/optimize-high-end-graphics?_ga=2.62430764.1017019482.1557380061-1366382285.1535636176 https://www.slideshare.net/unity3d/unite-berlin-2018-book-of-the-dead-optimizing-performance-for-high-end-consoles
- Tips for big games on low-end mobile - Unityhttps://unity3d.com/how-to/big-games-on-low-end-mobile
- 保持冷静:AR的三个快速优化技巧 https://unity3d.com/how-to/fast-optimizations-for-AR
- Progressive Lightmapper的优化技巧 https://unity3d.com/how-to/progressive-lightmapper-optimization-tips
- Olly为移动VR优化的七个阶段 https://unity3d.com/how-to/optimize-mobile-VR-games
- XR图形:最佳实践和解决方法 https://unity3d.com/how-to/XR-graphics-development-tips
- Unity UI的一些最佳优化技巧 https://unity3d.com/how-to/unity-ui-optimization-tips
- 如何在Unity中设置视频(包括360和VR):这比你想象的要容易 https://unity3d.com/how-to/native-video-in-Unity
- 粒子系统:10个关键更新+5个性能提示 https://unity3d.com/how-to/particle-systems-performance-tips
- 将角色变成玩家的12个步骤 https://unity3d.com/how-to/turn-character-into-player
- 使用C#数据结构和Unity API进行最佳工作 https://unity3d.com/how-to/work-optimally-with-unity-apis
- 在移动设备上使用光烤预制件 https://unity3d.com/how-to/light-baked-prefabs-on-mobile
- Asa的着色器分析和优化技巧 https://unity3d.com/how-to/shader-profiling-and-optimization-tips
- 在VR中保持舒适的五种方法 https://unity3d.com/how-to/design-and-develop-vr-game
- 粒子系统的新功能:提高灵活性和性能 https://unity3d.com/how-to/flexible-and-performant-Particle-Systems
- 第三维中的顶点着色和绘画 https://unity3d.com/how-to/novel-lighting-workflow-in-Unity
- 不要在Unity中做什么:最常见的错误要避免 https://unity3d.com/how-to/unity-common-mistakes-to-avoid
- 使用Unity Tilemap提高2D游戏的性能 https://unity3d.com/how-to/boost-2D-game-performance-with-Tilemap
- 独立工作室的AAA最佳实践,以保持健康的构建 https://unity3d.com/how-to/set-up-a-stable-build-pipeline
- 灯光,相机,动作!使用Cinemachine设置相机 https://unity3d.com/how-to/set-up-your-cameras-with-cinemachine
- 在Unity中创建AR应用程序:最新的提示和资源 https://unity3d.com/how-to/create-AR-games-in-Unity-efficiently
- 在Unity中快速移动 (中国官方翻译过!) https://unity3d.com/how-to/move-fast-and-save-time-in-Unity
- 如何让你的游戏成功?在发布之前,期间和之后了解您的玩家 (他这个热图有点意思)https://unity3d.com/how-to/live-ops-analytics-tools-for-player-insights
- 解决问题和理解架构的工具 https://unity3d.com/how-to/better-scripting-experience
27、 Unity 如何区分低端机、中端机、高端机 ?
问答: https://answer.uwa4d.com/question/594c7f3c57e8aaf745b4d584
http://www.luzexi.com/2018/07/30/Unity3D%E9%AB%98%E7%BA%A7%E7%BC%96%E7%A8%8B%E4%B9%8B%E8%BF%9B%E9%98%B6%E4%B8%BB%E7%A8%8B-UI10.html
《Unity3D高级编程之进阶主程》第四章,UI(七) - UI优化(四)
那么怎么用程序区分机子是高低端呢?
区分机子是高低端的几个方法介绍下:
1, Apple,毕竟IOS的型号是有限的,我们可以把其中一些型号的机子归类为高端,其中一些型号的机子归类为中端,另一些型号的机子归类为低端。Unity3D中的API有可以用的接口,例如 UnityEngine.iOS.Device.generation == UnityEngine.iOS.DeviceGeneration.iPhone6,等以此类推就能实现区分Apple机子高低端的情况。
2, Android 等其他机型,由于机子型号太多,我们可以用内存大小,系统版本号,屏幕分辨率大小,平均帧率等因素判断是高端机还是低端机。
比如,3G内存或以上为高端机,1G或以下肯定是低端,其他为中端。
又比如,Android 7.0以上为高端,Android 5.0以下都是低端,其他为中端。
如上描述通过一些简单的规则将高低端机型区分开来。
3, 我们也可以通过平均帧率来判定高低端机型。
在游戏中加入统计平均帧率的程序,将机型型号和平均帧率发送给服务器,由服务器记录各机型型号的平均帧率,再统计出来一份报表给客户端,客户端根据这份统计报表决定,哪些机型型号是高端设备,哪些是低端设备。
最后再通过高低端设备画质不同的方法,来优化高低端设备的游戏流畅度。
区分高低端的方法,我们可以三种一起用,因为Android中有一些机子是有固定名称或者编号的,我们可以确定他的高低端类型,有些是不确定型号的,就需要通过设备的硬件设置来确定高低端,哪些完全不能确定高低端的机子,就只能在统计中得到答案了。