如何使用Python plt像MATLAB一样绘图
1、 Python plt绘图
使用Python的绘图,制作训练的迭代次数与准确率、损失函数值的图像:
- 使用说明
- 代码
使用说明
Introduction 简介:
我们在用MATLAB绘图时感觉很轻巧,那么在Python中,怎么使用plot呢?下面是一个简单的例子,使用linspace定义自变量的取值范围,文档中其说明为:
np.linspace(start, stop, num, endpoint, retstep, dtype),
我们只需要了解前面3个,小标开始的数字、结束的数字、数字数字个数。好,直接showcode
代码块
代码,例如:
import numpy as np
import matplotlib.pyplot as plt
from pylab import *
mpl.rcParams['font.sans-serif']=['SimHei']
tra_accuracy=[0.12,0.23,0.31,0.34,0.43,0.51,0.55,0.66,0.68,0.74,0.8,0.9]
test_acc = [0.4,0.5,0.6,0.7,0.8,0.9]

a=np.linspace(0,100,2)
print(a)
#正确率绘图
fig1=plt.figure('fig1')
plt.plot(np.linspace(0, 11, len(tra_accuracy)),tra_accuracy,'b-',label='训练的正确率')
plt.plot(np.linspace(0, 10, len(test_acc)),test_acc,'k-.',label='测试的正确率')
plt.title('训练、测试的正确率')
plt.xlabel('迭代次数')
plt.ylabel('准确率')
plt.legend(loc='lower right')


>>> plt.show(fig1)
2、绘制柱状图
# _*_coding:utf-8_*_
__author__ = 'Alex_XT'
import numpy as np
import matplotlib.pyplot as plt

x=[0,1,2,3,4,5,6,7,8,9]
y=[12,23,4,10,22,33,44,23,35,7]
plt.bar(x,y,align='center',alpha=0.5)
plt.xticks(x,x)
plt.ylabel('count')
plt.title('Distribution')
plt.show()
3、画准确率图
# _*_coding:utf-8_*_
__author__ = 'Alex_XT'
from pylab import *
mpl.rcParams['font.sans-serif']=['SimHei']#导入中文
import numpy as np
import matplotlib.pyplot as plt

y=[1.0,0.982,0.97,0.95,0.92,0.620]
y2=[0.989,0.967,0.43,0.44,0.48,0.3]
plt.plot(np.linspace(40,50,6),y,'r-*',label='Swish')
plt.plot(np.linspace(40,50,6),y2,'b-d',label='ReLu')
plt.legend(loc='lower left')
plt.ylabel('准确率')
plt.xlabel('网络层数')
plt.title('MNIST数据集中不同网络层数测试')
plt.show()
4、等比数列的图,但xlabel却是等间距的
# _*_coding:utf-8_*_
__author__ = 'Alex_XT'
from pylab import *
mpl.rcParams['font.sans-serif']=['SimHei']#导入中文
import numpy as np
import matplotlib.pyplot as plt

x=np.linspace(1,5,5)
xt=np.logspace(0,4,5,base=2)*128#等比
print(xt)

y=[92.4,92.22,92.2091,91.8,91.45]
y2=[92.0,91.90,92.01,91.402,91.302]
plt.plot(x,y,'r-*',label='Swish')
plt.plot(x,y2,'b-d',label='ReLu')
plt.legend(loc='upper right')
plt.xticks(x,xt)
plt.ylabel('准确率')
plt.xlabel('Batch Size')
plt.title('MNIST数据集中不同BatchSize大小测试')
plt.show()
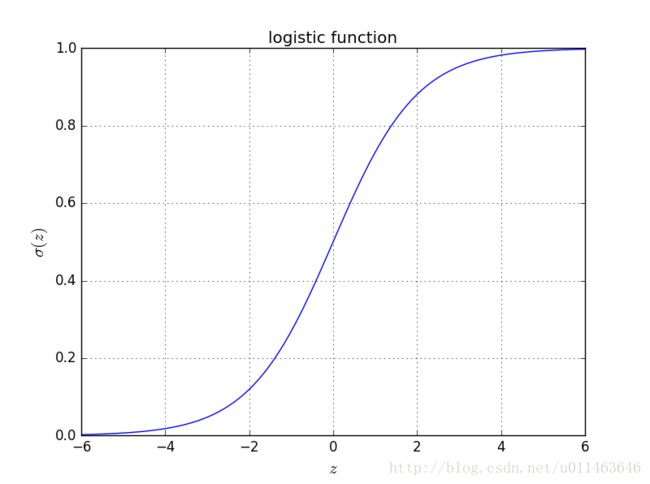
5、画Logistic的Sigmoid函数图
# _*_coding:utf-8_*_
__author__ = 'Alex_XT'
# Python imports
import numpy as np # Matrix and vector computation package
import matplotlib.pyplot as plt  # Plotting library

# Define the logistic function
def logistic(z):
    return 1 / (1 + np.exp(-z))

# Plot the logistic function
z = np.linspace(-6,6,100)
plt.plot(z, logistic(z), 'b-')
plt.xlabel('$z$', fontsize=15)
plt.ylabel('$\sigma(z)$', fontsize=15)
plt.title('logistic function')
plt.grid()
plt.show()# _*_coding:utf-8_*_
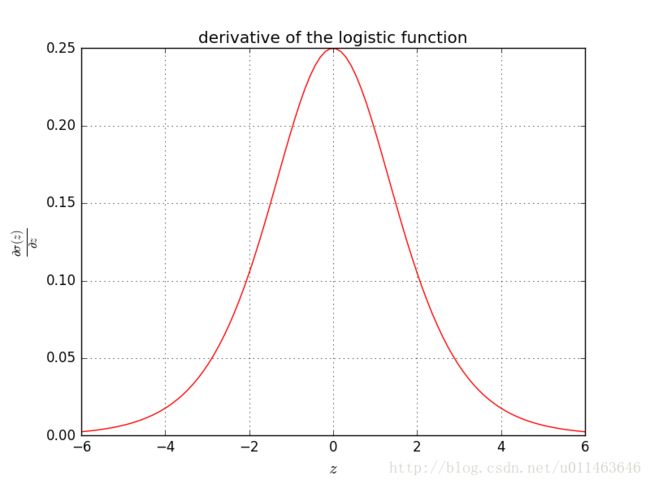
__author__ = 'Alex_XT'
# Python imports
import numpy as np # Matrix and vector computation package
import matplotlib.pyplot as plt # Plotting library
# Define the logistic function
def logistic(z):
return 1 / (1 + np.exp(-z))
# Define the logistic derivative function
def logistic_derivative(z):
return logistic(z) * (1 - logistic(z))
# Plot the derivative of the logistic function
z = np.linspace(-6,6,100)
plt.plot(z, logistic_derivative(z), 'r-')
plt.xlabel('$z$', fontsize=15)
plt.ylabel('$\\frac{\\partial \\sigma(z)}{\\partial z}$', fontsize=15)
plt.title('derivative of the logistic function')
plt.grid()
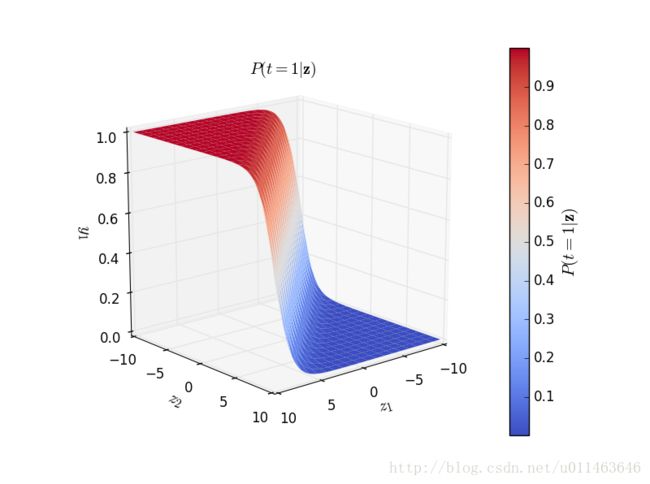
plt.show()6、画Softmax三维图
# _*_coding:utf-8_*_
__author__ = 'Alex_XT'
import numpy as np # Matrix and vector computation package
import matplotlib.pyplot as plt  # Plotting library
from matplotlib.colors import colorConverter, ListedColormap # some plotting functions
from mpl_toolkits.mplot3d import Axes3D  # 3D plots
from matplotlib import cm # Colormaps
# Allow matplotlib to plot inside this notebook
# Define the softmax function
def softmax(z):
    return np.exp(z) / np.sum(np.exp(z))

# Plot the softmax output for 2 dimensions for both classes
# Plot the output in function of the weights
# Define a vector of weights for which we want to plot the ooutput
nb_of_zs = 200
zs = np.linspace(-10, 10, num=nb_of_zs) # input
zs_1, zs_2 = np.meshgrid(zs, zs) # generate grid
y = np.zeros((nb_of_zs, nb_of_zs, 2)) # initialize output
# Fill the output matrix for each combination of input z's
for i in range(nb_of_zs):
    for j in range(nb_of_zs):
        y[i,j,:] = softmax(np.asarray([zs_1[i,j], zs_2[i,j]]))
# Plot the cost function surfaces for both classes
fig = plt.figure()
# Plot the cost function surface for t=1
ax = fig.gca(projection='3d')
surf = ax.plot_surface(zs_1, zs_2, y[:,:,0], linewidth=0, cmap=cm.coolwarm)
ax.view_init(elev=30, azim=70)
cbar = fig.colorbar(surf)
ax.set_xlabel('$z_1$', fontsize=15)
ax.set_ylabel('$z_2$', fontsize=15)
ax.set_zlabel('$y_1$', fontsize=15)
ax.set_title ('$P(t=1|\mathbf{z})$')
cbar.ax.set_ylabel('$P(t=1|\mathbf{z})$', fontsize=15)
plt.grid()
plt.show()
7、画ELU激活函数
# _*_coding:utf-8_*_
__author__ = 'Alex_XT'
# Python imports
import numpy as np  # Matrix and vector computation package
import matplotlib.pyplot as plt  # Plotting library


# Define the ELU function
def ELU(z):
    new_z = []
    for i in z:
        if i > 0:
            new_z.append(i)
        else:
            new_z.append(np.exp(i) - 1)
    return new_z


# Plot the ELU function
z = np.linspace(-10, 15, 100)
plt.plot(z, ELU(z), 'r-')
plt.xlabel('$x$', fontsize=15)
plt.ylabel('$f(x)$', fontsize=15)
plt.title('ELU')
plt.grid()
plt.show()


