pyinstaller安装方法
前提:确保计算机安装了Python语言环境,并且正确配置了环境变量。
方法一:联网在线自动安装
选择一 Windows OS下进入cmd(命令行窗口) 输入:pip install pyinstaller
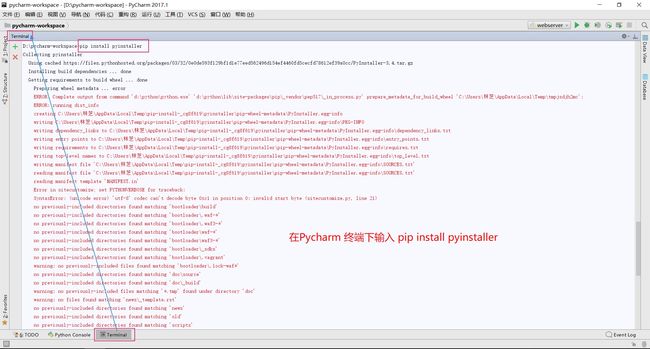
选择二 在Pycharm IDE 终端下 输入:pip install pyinstaller
我在Pycharm 终端下安装pyinstaller时,遇到这样的安装错误:
D:\pycharm-workspace>pip install pyinstaller
Collecting pyinstaller
Using cached https://files.pythonhosted.org/packages/03/32/0e0de593f129bf1d1e77eed562496d154ef4460fd5cecfd78612ef39a0cc/PyInstaller-3.4.tar.gz
Installing build dependencies ... done
Getting requirements to build wheel ... done
Preparing wheel metadata ... error
ERROR: Complete output from command 'd:\python\python.exe' 'd:\python\lib\site-packages\pip\_vendor\pep517\_in_process.py' prepare_metadata_for_build_wheel 'C:\Users\林芝\AppData\Local\Temp\tmpjsdjh2mc':
ERROR: running dist_info
creating C:\Users\林芝\AppData\Local\Temp\pip-install-_cg8f619\pyinstaller\pip-wheel-metadata\PyInstaller.egg-info
writing C:\Users\林芝\AppData\Local\Temp\pip-install-_cg8f619\pyinstaller\pip-wheel-metadata\PyInstaller.egg-info\PKG-INFO
writing dependency_links to C:\Users\林芝\AppData\Local\Temp\pip-install-_cg8f619\pyinstaller\pip-wheel-metadata\PyInstaller.egg-info\dependency_links.txt
writing entry points to C:\Users\林芝\AppData\Local\Temp\pip-install-_cg8f619\pyinstaller\pip-wheel-metadata\PyInstaller.egg-info\entry_points.txt
writing requirements to C:\Users\林芝\AppData\Local\Temp\pip-install-_cg8f619\pyinstaller\pip-wheel-metadata\PyInstaller.egg-info\requires.txt
writing top-level names to C:\Users\林芝\AppData\Local\Temp\pip-install-_cg8f619\pyinstaller\pip-wheel-metadata\PyInstaller.egg-info\top_level.txt
writing manifest file 'C:\Users\林芝\AppData\Local\Temp\pip-install-_cg8f619\pyinstaller\pip-wheel-metadata\PyInstaller.egg-info\SOURCES.txt'
reading manifest file 'C:\Users\林芝\AppData\Local\Temp\pip-install-_cg8f619\pyinstaller\pip-wheel-metadata\PyInstaller.egg-info\SOURCES.txt'
reading manifest template 'MANIFEST.in'
Error in sitecustomize; set PYTHONVERBOSE for traceback:
SyntaxError: (unicode error) 'utf-8' codec can't decode byte 0xc1 in position 0: invalid start byte (sitecustomize.py, line 21)
no previously-included directories found matching 'bootloader\build'
no previously-included directories found matching 'bootloader\.waf-*'
no previously-included directories found matching 'bootloader\.waf3-*'
no previously-included directories found matching 'bootloader\waf-*'
no previously-included directories found matching 'bootloader\waf3-*'
no previously-included directories found matching 'bootloader\_sdks'
no previously-included directories found matching 'bootloader\.vagrant'
warning: no previously-included files found matching 'bootloader\.lock-waf*'
no previously-included directories found matching 'doc\source'
no previously-included directories found matching 'doc\_build'
warning: no previously-included files matching '*.tmp' found under directory 'doc'
warning: no files found matching 'news\_template.rst'
no previously-included directories found matching 'news'
no previously-included directories found matching 'old'
no previously-included directories found matching 'scripts'
no previously-included directories found matching 'tests\scripts'
no previously-included directories found matching '.github'
warning: no previously-included files found matching '.*'
warning: no previously-included files found matching '*.yml'
warning: no previously-included files found matching '*~'
warning: no previously-included files found matching '.directory'
writing manifest file 'C:\Users\林芝\AppData\Local\Temp\pip-install-_cg8f619\pyinstaller\pip-wheel-metadata\PyInstaller.egg-info\SOURCES.txt'
creating 'C:\Users\林芝\AppData\Local\Temp\pip-install-_cg8f619\pyinstaller\pip-wheel-metadata\PyInstaller.dist-info'
error: invalid command 'bdist_wheel'
----------------------------------------
ERROR: Command "'d:\python\python.exe' 'd:\python\lib\site-packages\pip\_vendor\pep517\_in_process.py' prepare_metadata_for_build_wheel 'C:\Users\林芝\AppData\Local\Temp\tmpjsdjh2mc'" failed with error code 1 in C:\Users\林芝\
AppData\Local\Temp\pip-install-_cg8f619\pyinstaller
######################## 终端提示我 命令执行失败,错误代码1 我也不知道这种方法安装失败的原因, 欢迎大家交流讨论#######################
方法二:自主下载pyinstaller包,进行手动安装
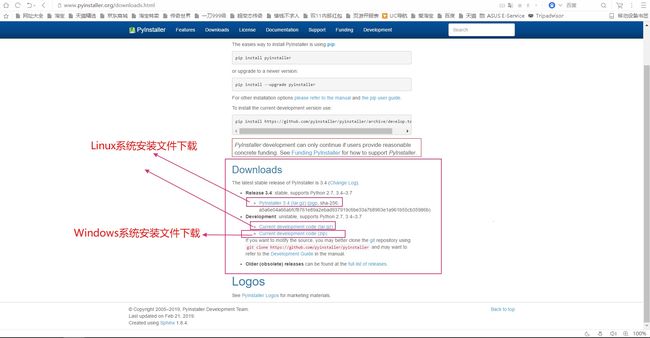
pyinstaller 的下载地址:http://www.pyinstaller.org/downloads.html
下载文件后,解压文件。
我的解压路径是: D:\python\pyinstaller-pyinstaller-d740524
windows OS cmd(命令行窗口)进入 解压文件所在的目录。
cd D:\python\pyinstaller-pyinstaller-d740524
D:\
输入: python setup.py install
等待一段时间,pyinstaller就会安装成功
安装成功后,查看一下pyinstaller的版本信息
pyinstaller --version
出现结果如下,证明安装成功!
Python项目生成可执行程序的步骤
选择一:Windows OS下进入cmd(命令行窗口) 输入:pyinstaller -F xx.py xxx.py ......
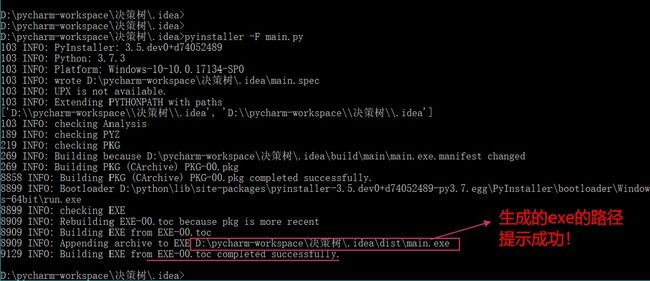
选择二:在Pycharm IDE 终端下 输入:pyinstaller -F xx.py xxx.py ......
xx.py 和 xxx.py 是要打包的文件名
-F参数的含义是,将多个.py脚本文件打包成为一个可执行程序。


