SpringBoot整合Elastic-Job实战(分片处理数据)
前言
笔者上篇文章 一文搞懂Elastic-Job(内附源码解析)是简单的介绍了Elastic-Job的使用,可以说是一个基础版,demo的写法在我们生产可不能直接拿过来用哦。我们知道Elastic-Job强大之处在于分片机制 ,如果用了Elastic-Job,而不用他分片的能力可以说杀鸡用牛刀,本文结合Elastic-Job强大的分片能力做一个简单的实战,利用分片高效处理数据,并且本文Demo的结构可以直接用于生产。
正文
目录
前言
正文
环境
前置准备工作
环境
介绍一下本次使用所有框架和中间件的版本
| 框架 |
版本 |
|---|---|
| Spring Boot |
2.1.5.RELEASE |
| mybatis | 1.3.2 |
| mysql |
5.7.x |
| JDK |
1.8.0_144-b01 |
| elastic-job-lite | 2.1.5 |
| Zookeeper | 3.4.14 |
前置准备工作
- 本机启动Zookeeper,一切配置按默认。
- 连接一个mysql,执行一下sql创建数据库和一个表,以及初始化表数据。
SET NAMES utf8mb4;
SET FOREIGN_KEY_CHECKS = 0;

-- ----------------------------
--  Table structure for `job`
-- ----------------------------
DROP TABLE IF EXISTS `job`;
CREATE TABLE `job` (
  `id` int(11) NOT NULL AUTO_INCREMENT,
  `state` int(11) DEFAULT '0',
  PRIMARY KEY (`id`)
) ENGINE=InnoDB AUTO_INCREMENT=12 DEFAULT CHARSET=utf8mb4;

-- ----------------------------
--  Records of `job`
-- ----------------------------
BEGIN;
INSERT INTO `job` VALUES ('1', '0'), ('2', '0'), ('3', '0'), ('4', '0'), ('5', '0'), ('6', '0'), ('7', '0'), ('8', '0'), ('9', '0'), ('10', '0'), ('11', '0');
COMMIT;

SET FOREIGN_KEY_CHECKS = 1;
准备工作结束后我们创建一个maven 工程,
工程pom依赖如下
        org.springframework.boot
        spring-boot-starter-parent
        2.1.5.RELEASE


            org.springframework.boot
            spring-boot-starter-web


            mysql
            mysql-connector-java
            runtime


            org.mybatis.spring.boot
            mybatis-spring-boot-starter
            1.3.2


            org.springframework.boot
            spring-boot-starter-jdbc


            com.dangdang
            elastic-job-lite-core
            2.1.5


            com.dangdang
            elastic-job-lite-spring
            2.1.5
properties文件
spring.datasource.driver-class-name=com.mysql.jdbc.Driver
spring.datasource.url=jdbc:mysql://10.8.18.73:3306/job
spring.datasource.username=root
spring.datasource.password=123456

regCenter.serverList=127.0.0.1:2181
regCenter.namespace=new-elastic-job-demo

simpleJob.cron=0/20 * * * * ?
simpleJob.shardingTotalCount=2
配置zookeeper
@Configuration
public class ElasticRegCenterConfig {
    /**
     * 配置zookeeper
     *
     * @param serverList
     * @param namespace
     * @return
     */
    @Bean(initMethod = "init")
    public ZookeeperRegistryCenter regCenter(
            @Value("${regCenter.serverList}") final String serverList,
            @Value("${regCenter.namespace}") final String namespace) {
        return new ZookeeperRegistryCenter(new ZookeeperConfiguration(serverList, namespace));
    }
}
SimpleJob配置
@Configuration
public class SimpleJobConfig {
    @Resource
    private ZookeeperRegistryCenter regCenter;

    @Bean
    public JavaSimpleJob simpleJob() {
        return new JavaSimpleJob();
    }


    @Bean(initMethod = "init")
    public JobScheduler simpleJobScheduler(final JavaSimpleJob simpleJob, @Value("${simpleJob.cron}") final String cron,
                                           @Value("${simpleJob.shardingTotalCount}") final int shardingTotalCount) {

        return new SpringJobScheduler(simpleJob, regCenter, getSimpleAJobConfiguration(simpleJob.getClass(), cron, shardingTotalCount));
    }

    /**
     * 简单定时任务A
     *
     * @param jobClass
     * @param cron
     * @param shardingTotalCount
     * @return
     */
    private LiteJobConfiguration getSimpleAJobConfiguration(final Class jobClass, final String cron, final int shardingTotalCount) {
        return LiteJobConfiguration.newBuilder(new SimpleJobConfiguration(JobCoreConfiguration.newBuilder(
                jobClass.getName(), cron, shardingTotalCount).build(), jobClass.getCanonicalName())).overwrite(true).build();
    }

}
SimpleJob定时业务
这里说一下实现类的execute方法中不能使用spring注入的对象,前言中的Demo存在该问题,该篇实战文章已解决,请放心使用。
@Service
public class JavaSimpleJob implements SimpleJob {
@Autowired
SimpleJobA simpleJobA;
@Override
public void execute(ShardingContext shardingContext) {
List idS = simpleJobA.selectId(shardingContext.getShardingTotalCount(), shardingContext.getShardingItem());
String ids = Arrays.toString(idS.toArray());
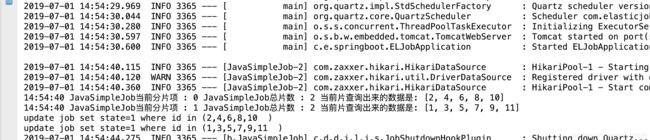
System.out.println(new SimpleDateFormat("HH:mm:ss").format(new Date())
+ " JavaSimpleJob当前分片项 : " + shardingContext.getShardingItem()
+ " JavaSimpleJob总片数 : " + shardingContext.getShardingTotalCount() + " 当前片查询出来的数据是: " + ids);
simpleJobA.updateState(idS);
}
}
以下Code是与配置无关,均是业务代码,放在一个代码块贴出,类用分隔符分开。
public interface SimpleJobA {
    void updateState(List id);

    List selectId(Integer count, Integer item);
}

----------------------------------
@Service
public class SimpleJobAImpl implements SimpleJobA {
    @Autowired
    JobAMapper jobAMapper;

    @Override
    public void updateState(List id) {
         jobAMapper.updateState(id);
    }

    @Override
    public List selectId(Integer count, Integer item) {

        return jobAMapper.selectId(count, item);
    }
}

----------------------------------
@Mapper
public interface JobAMapper {
    //查询当前片下对数据
    @Select("SELECT id FROM job WHERE mod(id,#{shardingTotalCount})=#{shardingItem} and state=0")
    List selectId(@Param("shardingTotalCount") Integer count, @Param("shardingItem") Integer item);

    //修改当前片的数据
    @SelectProvider(type = SqlProvider.class, method = "updateStateList")
    void updateState(@Param("idList") List id);
}

----------------------------------

public class SqlProvider {
    public String updateStateList(Map> para) {
        StringBuffer sb = new StringBuffer();
        List idList = para.get("idList");
        sb.append("update job set state=1 ");
        if (idList != null && !idList.isEmpty()) {
            sb.append("where id in (");
            for (int i = 0; i < idList.size(); i++) {
                sb.append(idList.get(i));
                if (i < idList.size() - 1) {
                    sb.append(",");
                }
            }
            sb.append("  )");
        }
        System.out.println(sb.toString());
        return sb.toString();
    }
}

-----------------------------------
@SpringBootApplication
public class ELJobApplication {
    public static void main(String[] args) {

        SpringApplication.run(ELJobApplication.class, args);
    }
}
简述一下业务:用当前片数、总片数和id取模作为当前片下应该处理的数据,然后修改数据。文章代码简单易懂,很好理解。
启动项目,重要的节点处已经打上输出,可观察,按照分片处理数据,数据库截图略
第一次任务执行时间不是项目启动后开始计算,而是从注册到zk的时间开始计算,因此早于项目启动后的时间,如果多台服务器部署,一定要注意各个服务器的时间差。
然后要注意一点的是,这个分片识别是根据ip的,也就是说同一台电脑,跑两个程序没用,两个程序都会全部执行,还是会重复。
单台机器分2片以上,而且没有处理分片的数据,任务执行次数是分片的个数,造成重复。
分片还保证分布式中处理数据不重复,分片也会转移,即一个服务挂了之后,分片参数和item会自动转移到剩下服务中,如:2台机器,分2片,挂了一台,zk会感知存活节点,Elastic-Job让所有节点重新调整。也可以根据failover、misfire参数调整。建议默认。
了解更多的Elastic-Job工作机制就需要掌握源码,以及各个对象和参数的含义。
推荐 微信公众号Elastic-Job源码解析地址:https://mp.weixin.qq.com/s/m1VRIzeFfa_6Ly_gEDNK-w
项目github地址:https://github.com/362460453/springboot-elastic-job-actual-combat